Legal notice and privacy policy
Содержание:
Best practices and tips for maintaining Zentyal Server
It is good to have the knowledge to install and make the initial configuration of Zentyal Server, but it is also essential to know how to maintain the server. This chapter brings together the information regarding the services that help in Zentyal Server maintenance in the Commercial Editions, such as alerts, reports and Kernel management. It also covers the most important logs and commands that get you started with troubleshooting and resolving any incidents on your Zentyal Server. See the whole chapter…
Besides these featured chapters, additional documentation has been included in the Configuration Backup chapter (), Domain Controller and File Sharing chapter ( and ) and Filesharing chapter (). The full official documentation for the latest version of the Zentyal Linux Server is available in English and in Spanish at https://doc.zentyal.org/
The Official Zentyal Book for the latest major Zentyal Server version is available for purchase as an eBook and paperback through Lulu, starting from 29.90€: http://www.lulu.com/spotlight/zentyal . The book covers all relevant aspects of configuring and managing Zentyal Servers in business environments, best practices for safe and effective network maintenance and a large number of practical exercises.
remoteservices
- Save HAProxy module when adding/removing CA for SSL validation
- Allow subscription when firewall has been enabled a second time but changes has not been saved
- Give support to set monitoring servers on rs_monitoring_servers conf key
- Set up QA repository only to commercial versions
- Clarified doc about qa_updates_always_automatic confkey
- Fixed JS regressions on subscribe action
- Disable QA updates until next commercial edition
- EBox::RemoteServices::Subscription::Check::check recovers for any error raised on users checking
- DisasterRecoveryDomains can notify other models
- Fix remove conf backup after PSGI migration
- Fix overwrite action on remote conf backup
- Added and used checkMailNotInUse method
- Added _delVDomainAbort to LdapVDomain base to give the opportunity to abort vdomain removals
- Use service instead of deprecated invoke-rc.d for init.d scripts
- Added and used checkMailNotInUse method
- Don’t add mail which already exists when adding group alias
- Better integration with openchange account addon
- Remove openchange account when removing mail account
- Postfix max mail size is increased by 36% because of base64 encoding
- Better integration of group alias addon
- Added openchange outgoing mail rewriting
- Added sieve_dir plugin parameter
- Nopass dovecot policy enabled only when Openchange provisioned
- Adapt alias management to constraints by mailboxRelatedObject
- Changed amavis submision service to avoid rewriting rules
- Reorganized mail configuration
- Don’t try to check openchange accounts on removing system users
- Fixed bug triggered when adding external aliases
- Adapted to OpenLDAP removal
- Postfix handles Zentyal distribution groups virtual alias
- Adapted MailQueue.pm to TryCatch::Lite
- Restart usercorner on installation / upgrade time so the new code is available there too
- Fixed external mail retrieval configuration form from user corner
- Fixed some errors on user mail account edition
- Better integration between mail addon and mail field
- Avoid error when trying to show a no longer existent mail in queue
- Fixed bug in LDAP synchronization of mail virtual domains
- Removed free access to dovecot from localhost, now we have a master password
- Avoid unsaved changes after running initialSetup
- Setup mail account on enable for users that already have mail attribute
Installation
The Zentyal Server Installation-page is logically the most popular part of our documentation, as it is where all the users should start from. On this page you can find information on the two different options you have to install Zentyal: using the Zentyal installer or on top of an existing Ubuntu Server Edition installation. The documentation walks you through the installation steps when using Zentyal installer in the default mode. It also walks you through the initial configuration with the configuration wizard and provides basic guidelines for selecting the hardware for your Zentyal server.
If you would prefer to see a video, we recommend you to check out these complementary video resources:
- Basic install & overview on Zentyal 6.0 on VirtualBox
- How-to: Create a Zentyal Server VM for macOS with VirtualBox
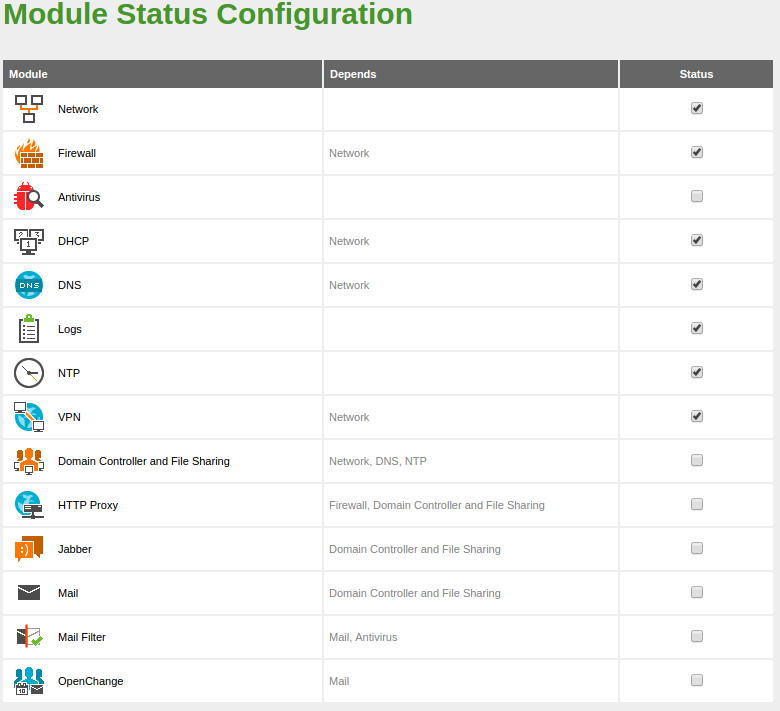
Configuration of the module status
Zentyal uses a modular design in which each component manages a different
service. To configure each of these services you must enable the
corresponding module from Module Status. All those
functions that have been selected during the installation will be
enabled automatically.
 Configuration of the module status
Each module may have dependencies on other modules in order to work. For
instance, DHCP module needs to have the network module enabled so
that it can serve IP addresses through the configured network
interfaces. The dependencies are shown in the Depends
column and until these are enabled, you can’t enable the
module.
It’s important to remember that a module will not work until it is activated. Similarly,
you can do several changes in a module configuration and they will not apply until you
click on Save Changes. This behaviour is expected and allows you to carefully double check
all the configurations before applying them.
The first time you enable a module, you are asked to accept the
set of actions that will be carried out and the configuration files
that will be overwritten. After you have accepted all the
actions and listed files, you must save changes in order to apply the
configuration.
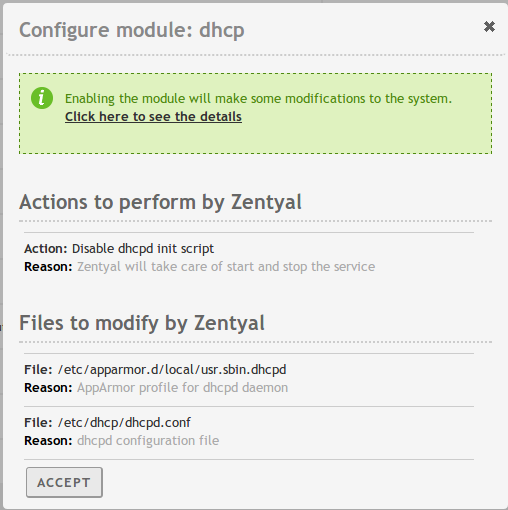 Confirmation to enable a module
If you manually modify any of the files controlled by a module, for example
/etc/dhcp/dhcp.conf for the DHCP module, it will be overwritten the next time you click
on Save Changes. If you want to modify how this file
is generated, check the .
samba
- Setup roaming profiles for each user only when the setting changes in the UI
- Remove duplicate entries from the custom shell list
- Hide krbtgt user in external AD mode
- EBox::Samba::DNS::Zone always return lowercase zone name
- Fix members of ‘Domain Admins’ group not able to delete items from recycle bin
- Grant rwx rights to Domain guest and Everybody on guest shares
- Added new domainControllers() method
- Override daemons when migrating from previous versions
- Remove the use of method canonicalName for greater performance, use object DNs instead the end of the work loop
- Show Administrator account in the UI so it can be handled from Zentyal
- Merge zentyal-users and zentyal-samba in a single package
- Added EBox::Samba::User::hasValue to check if a certain value is present
- Do not duplicate cloud ops when REST call fails
- Use samba instead of slapd * heimdal
- Create a container CN=Groups when provisioning as DC
- Set gidNumber for new users to Domain Users to have NSS * PAM working
- Set gidNumber based on RID for new groups
- Set gidNumber to Domain Users and Domain Admin for NSS * PAM
- Change default group container to cn=Users as Windows does
- Include PAM * NSS services with SSSd to authenticate LDB users in the system
- New EBox::Module::LDAP replacing EBox::LdapModule and using EBox::Module::Service as base class, schemas are now loaded in _regenConfig instead of manually in enableActions
- Display message when creating a user which username has more than 20 characters
- Fixed error when editing user email address when mail module is not installed
- Fix domain controllers shown on the computers OU in Manage model
- Using paged serch in EBox::Samba::users() method
- Added EBox::LDAPBase::pagedSearch method
- Added support for addon components when user is in a non-standard OU
- Better control for edit user quota
- Sent zentyal-usercorner trigger on install / upgrade to restart it if it’s installed
- Avoid apparmor errors in trusty
- Fixed bug when altering mail address through the edit user form
- Better integration between mail addon and mail field
- Remove method canonicalName and use object DNs for greater performance
- Migrate previous configuration from 3.3 when upgrading
Upgrades
Upgrades between major releases. New major releases usually introduce large changes in the code base and therefore in-place upgrades have the tendency of causing issues. For this reason, in-place upgrades between major Zentyal Commercial versions are not automatic and Zentyal strongly recommends evaluating fresh installation when upgrading from one major version to another. However, Zentyal makes reasonable efforts to provide an upgrade path when in-place upgrade is required by the customer.
Upgrades from Development Edition to Commercial Edition. Due to the different code bases of the Zentyal Community Edition and Commercial Zentyal Edition, it is not possible to upgrade directly from the Zentyal Development Edition to a Commercial Zentyal Edition. Users of the Zentyal Development Edition wishing to use a Commercial Zentyal Edition are required to reinstall the server, though they can maintain their existing configuration through the configuration backup.
network
- Import current DHCP addresses in first setup and when enabling module
- Don’t allow domain names as target of failover tests, usability changes in failover rules
- Removed DNS resolution failover test
- Save module config after initialSetup
- Added flag to notify when an ifup is set
- Wait a bit in multigwRoutes to give time to dhcp/pppoe to register addresses
- Implement replicationExcludeKeys() to avoid replication of ifaces in HA
- Migrated to use Plack / PSGI API instead of the CGI one
- When adding a new IP (viface or static iface) it is checked to avoid collision with the current HA floating IPs
- Use service instead of deprecated invoke-rc.d for init.d scripts
- Added bonding support (contribution by Vsevolod Kukol)
- Specifiy local address in failover tests to avoid vlan interface problems
- Fix Dynamic DNS with Zentyal Remote as provider when the registration wizard is done
- Fixed bad behaviour in interfaces method wizard
- Wait a bit in multigwRoutes to give time to dhcp/pppoe to register addresses
- Don’t generate resolvconf file until all interfaces are up
- nameservers() method always return 127.0.0.1 if DNS module is installed and enabled
- Fixed dhclient configuration
- Fixed some issues with showing of DHCP nameservers and removed related dead code
- Don’t use owner module in external-ip.pl script
- Changed failover firewall rules to not use owner module
- Fixed regression in VLANs interface (contribution by Chris Pitchford)
- Fixed bug which made impossible to edit pppoe gateways
- Fix regresion in the installer wizard that made options for static interfaces be always shown
Настройка сети и выход в интернет
Теперь нам необходимо настроить сеть и подключить к интернету новоиспеченный сервер. В нашем тестовом сервере установлено 2 сетевых платы и zentyal мы будем использовать как программный маршрутизатор, с каждым обзором добавляя дополнительный функционал. Идем в раздел Сеть\Интерфейсы
Здесь мы видим обе наши сетевых карты (закладки eth0 и eth1). Сначала настроит eth0 для подключения к локальной сети — зададим IP-адрес, маску, нажмем на кнопку «Изменить».
После этого перейдем на закладку eth1. Здесь прежде всего отметим галку WAN, у нас эта сетевуха будет подключена к провайдеру, затем выберем метод подключения и выполним все остальные необходимы действия.
Когда вы вносите изменения в конфигурацию, в правом верхнем углу кнопка «Сохранить изменения» становится красной, а зеленеет она только после нажатия на неё. Сохраняйтесь чаще!
Если у вас на интернет-интерфейсе IP-адрес задан статически, то следующим этапом нужно прописать шлюз, выданный провайдером. Для этого идем в раздел Сеть\Шлюзы и добавляем (кнопка Add New).
При добавлении нужно будет указать какое-нибудь название для шлюза, IP-адрес, выбрать интернет-интерфейс (в нашем случае eth2). Weight оставляем как есть — 1, Ставим галку Default, т.к. это у нас будет шлюз по умолчанию.
Затем нажимаем кнопку «Добавить» и «Сохранить изменения» в правом-верхнем углу. Если же в настройках eth2 в качестве метода подключения вы указывали PPPoE или DHCP, то шлюз добавится автоматически и нам ничего делать не нужно.
Завершающий шаг — добавление DNS серверов провайдера. Идем в раздел Сеть\DNS, нажимаем кнопку Add New и добавляем IP-адрес DNS-сервера. Если провайдер дал несколько адресов, то все эти сервера добавляем туда по очереди.
После этих манипуляций наш сервер должен без проблем выходить в интернет.
Чтобы продолжить дальше не лишним будет обновить всю систему до актуального состояния. Идем в раздел «Управление программным обеспечением\Системные обновления», там нажимаем кнопку «Список обновлений», затем нам покажут сам список того чего можно обновить, а мы все это дело отметим галками и нажмем кнопку «Обновить».
Теперь нам надо установить DHCP-сервис, чтобы компьютеры нашей локальной сети могли получать IP-адреса автоматически. Идем в раздел «Управление программным обеспечением\Компоненты Zentyal», там находим в списке DHCP service, отмечаем его галкой и внизу нажимаем кнопку «Установка».
По завершению инсталляции идем в раздел DHCP, здесь главное указать, что DHCP-сервис будет работать на интерфейсе локальной сети (eth0), остальные настройки можно оставить по умолчанию как на скриншоте ниже.
Затем добавим хотя бы один диапазон, из которого будут раздаваться IP-адреса. Нажимаем кнопку Add New и вводим понятное нам название диапазона, начальный и конечный IP-адреса:
Последним шагом включаем DHCP-сервис в разделе «Статус модуля», установив напротив него галку.
При этом на экране появится всплывающее окно, в котором нужно будет нажать кнопку Применить. Теперь все компьютеры локальной сети смогут получить IP-адрес и беспрепятственно выйти в интернет через zentyal.
Как видите, настраивается всё довольно просто, даже не смотря на немного кривой перевод русского в web-интерфейсе. В следующих обзорах мы продолжим рассказ про другие возможности Zentyal. Следите за новостями!
Applying the configuration changes
An important feature to consider when working with Zentyal is the way
configuration changes are applied. First,
changes must be accepted in the module forms. Then, to make these
changes effective and apply them permanently you must click on the
Save Changes button in the top menu. This button will only appear
if there are any unsaved changes. By clicking on this button, you will see
a confirmation dialogue where you can also discard unsaved changes. An exception to
this rule is the users and groups
management: here the changes are applied directly to the LDAP database.
Save Changes
If you change the network interface configurations, firewall or
administrative interface port, you might loose the connection.
If this is the case you should change the URL in the browser or
reconfigure through the local GUI.
squid
- Give support to multiple addresses for a domain in Transparent Proxy Exemptions
- Save modules configurations after initialSetup
- Added all subdomains in cache exemptions
- Deny cache explicitly from cache exemption domains
- Give support to optional ABORTED flag in denied requests when the HTTP client aborts the request
- Adapt configuration for squid 3.3.8
- Use service instead of deprecated invoke-rc.d for init.d scripts
- Forced 644 permission on Dansguardian files to avoid zombie processes
- Remove canonical_dn call for compatibility with MS LDAP servers in external AD mode
- Synchronise AD groups every 30 min if using external AD and any filter profile includes an AD group
- Manage errors when AD failed on fulfill our requests in external AD mode
- Give support to groups with more than 1500 members and more than 1000 groups in external AD mode
- Fixed regression in authenticationMode method
- Added validation of the domains added to the transparent proxy exceptions
Network diagnosis
To check that the network has been configured correctly, you can use the
tools available in Network ‣ Tools.
Ping is a tool that uses the ICMP network diagnosis protocol to observe
whether a particular remote host is reachable by means of a simple «echo
request».
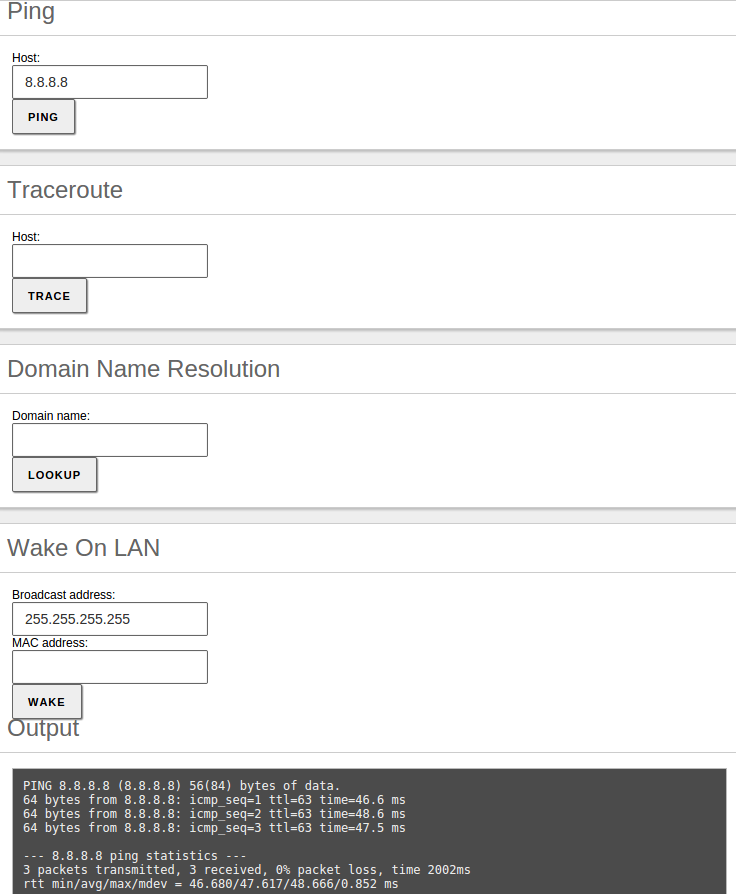 Network diagnosis tools, ping
You can also use the traceroute tool that is used to determine the route taken by
packages across different networks until they reach a given remote host.
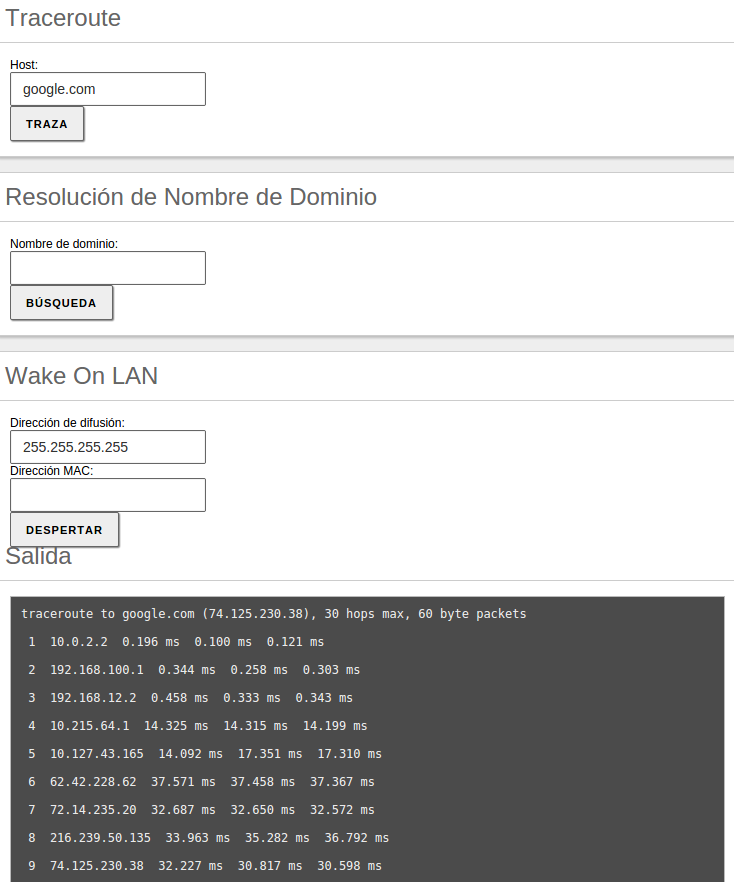 Tool traceroute
Also, you can use the domain name resolution tool, which is used to verify
the correct functioning of the name service.
 Domain name resolution
The last tool is Wake On Lan, which allows you to activate a host using its MAC address, if this feature is enabled in the target.
Previous | Index | Next
Applying the configuration changes
An important feature to consider when working with Zentyal is the way
configuration changes are applied. First,
changes must be accepted in the module forms. Then, to make these
changes effective and apply them permanently you must click on the
Save Changes button in the top menu. This button will only appear
if there are any unsaved changes. By clicking on this button, you will see
a confirmation dialogue where you can also discard unsaved changes. An exception to
this rule is the users and groups
management: here the changes are applied directly to the LDAP database.
Save Changes
If you change the network interface configurations, firewall or
administrative interface port, you might loose the connection.
If this is the case you should change the URL in the browser or
reconfigure through the local GUI.
remoteservices
- Save HAProxy module when adding/removing CA for SSL validation
- Allow subscription when firewall has been enabled a second time but changes has not been saved
- Give support to set monitoring servers on rs_monitoring_servers conf key
- Set up QA repository only to commercial versions
- Clarified doc about qa_updates_always_automatic confkey
- Fixed JS regressions on subscribe action
- Disable QA updates until next commercial edition
- EBox::RemoteServices::Subscription::Check::check recovers for any error raised on users checking
- DisasterRecoveryDomains can notify other models
- Fix remove conf backup after PSGI migration
- Fix overwrite action on remote conf backup
samba
- Moved to use Net::LDAP::Control::Relax object to relax LDAP restrictions and forced the critical flag to 0 so Samba accepts it
- Added EBox::Samba::LdbObject::isCritical method to simplify all checks of the isCriticalSystemObject attribute
- EBox::Samba::LdbObject::setCritical cannot use lazy flag to work correctly
- Split openchange configuration into its own config file and set correct permissions on it
- Remove printers from dependencies list if the module is not installed
- Updated EBox::Samba::Users::setCredentials to stop using the lazy flag and added a note about why it cannot be used in the method documentation
- Write openchange options to use mysql as backend
- Use new addModuleToPostSave Global interface in Provision class
- Depend on new samba packaging instead of old samba4 one
- Use service instead of deprecated invoke-rc.d for init.d scripts
- ad-migrate: Detect offline role owner and seize roles
- Fixed setting of printers permissions
- s4sync: Check samba daemon is running
- Ignored and logged as errors the users, contacts and groups in OpenLDAP that are not linked with Samba objects
- Fix edit Group Policy Link after UI changes
- Fix GPO models UI
- Fix revert resolvconf configuration after joining domain
- Fix delete GPLink: use gPLink attribute name as our checkers are case sensitive
- Set allow_non_scanned_files = True on samba.conf by default to avoid issues with antivirus when editing files
- EBox::Samba::LdbObject::setCritical cannot use lazy flag to work correctly
- Fix NT_STATUS_ACCESS_DENIED opening files quering the DOS attributes and passing them to open function
- Set OpenChange as not provisioned when Samba is reprovisioned
- Added a way to check whether we are managing the AD schema or not
- Samba provision failures when IPs are not set no longer talk wrongly about internal interfaces
- Create directories in _setConf to avoid invalid group __USERS__ error
- Clean up openchange section in stub smb.conf file
- Fixed bug in EBox::LDB::users which made the method to not return users inside Organization Units
- Fix typo in SambaLdapUser that fixes error in change email
- Change user modification hook from _modifyUser to _preModifyUser
- Throw DataExists exception if the user try to rename a user on a container and already exists
- Check for duplicated DN on user creation and show a proper error, not an internal exception
- Fixed s4sync’s breakage when tries to sync serviceprincipals to OpenLDAP. Those users are ignored on EBox::LDB::users method
- Remove group share on group deletion
- Set the setShareRightsReset flag on SambaSharesPermissions row deletion
- Samba log helper is now aware of utf8
- EBox::Samba::LdbObject::deleteObject – Delete all childs before self deletion
- User profiles are only created if the OpenLDAP sync exists, otherwise, defer it until s4sync does the synchronization
- Typo fix in netbios validation
- Check if objects are system critical before deletion
Configuration of a VPN server for interconnecting networks
In this scenario two offices in different networks need to
be connected via private network. To do this, you will use Zentyal as a
gateway in both networks. One will act as a VPN client and the other as
a server. The following image clarifies the scenario:

Office interconnection with Zentyal through VPN tunnel
The goal is to connect multiple offices, their Zentyal servers and their internal networks so that one, single network infrastructure can be created in a secure way and through Internet. To do this you need to configure a VPN server similarly as explained previously.
However, you need to make two small changes. First, enable the
Allow Zentyal-to-Zentyal tunnels to exchange routes between
Zentyal servers. And then, introduce a Password for Zentyal-to-Zentyal tunnels to establish the connection between the two offices in a
safer environment. Take into account that you need to advertise the LAN networks in Advertised Networks.
Another important difference is the routing information exchange, in the roadwarrior to server scenario
described previously, the server pushes network routes to the client. In the server to server scenario,
routes are exchanged in both directions, and propagated to other clients using the RIP protocol. Therefore,
you can, as a client, configure the Advertised Networks that will be propagated to the other nodes.

Zentyal as VPN client
You can configure Zentyal as a VPN client at
VPN ‣ Clients. You must give a name to
the client and enable the service. You can configure the
client manually or automatically by using the bundle provided by the
VPN server. If you do not use the
bundle, you must introduce the IP address and
protocol-port for the server accepting requests. The
tunnel password and certificates used by the
client will also be required. These certificates must have been
created by the same certification authority the server uses.

Automatic client configuration using VPN bundle
When you Save changes in the Dashboard, you can see
a new OpenVPN daemon running as a client and the objective
connection directed towards another Zentyal server configured as a server.
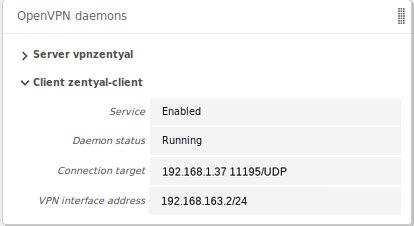
Dashboard of a Zentyal server configured as a VPN client
Warning
The propagation of routes can take a few minutes.
| http://www.ietf.org/rfc/rfc1058 |
Dashboard
The Dashboard is the «home» interface. It contains a series of
widgets that can be configured. You can reorganize the widgets at
any time by clicking on their titles and dragging them.
By clicking on Configure Widgets a new menu appears,
allowing you to remove and add new widgets. To add a new widget,
you need to search for it using the top menu and drag it to the central
section. To remove a widget, click on the X in the upper right corner
of the window.
 Dashboard configuration
One of the most important widgets in the Dashboard displays the status
of all modules installed on Zentyal.
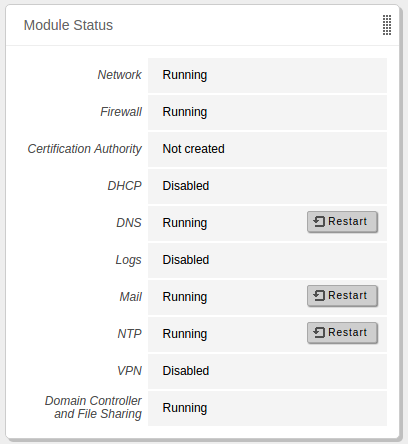 Widget showing status of the modules
The image shows the status of a service and the action you can carry
out for this service. The different statuses are:
Running:The service is running and listening to client connections.
You can restart a service using Restart.
Running unmanaged:If you haven’t enabled the module yet, it will be running
with the default configuration set by the distribution.
Stopped:The service is stopped either because the administrator has stopped it
or because a problem has occurred. You can restart the service by
clicking on Restart.
Disabled:The module has been explicitly disabled by the administrator.
Directory
Directory services allow sysadmins to manage all the user-related information across the organization, centralizing and abstracting the authorization and permission management for all the other services. Thanks to the integration of Samba and Kerberos technologies, it is possible to turn Zentyal Server into a native drop-in replacement for Windows Server. Most of the people choose Zentyal because of the easy-to-use domain & directory server it provides so it is not a surprise that the Domain & Directory-page is the second most visited documentation page.
This documentation starts from the basics: how to configure the Zentyal Domain Server, how to configure Zentyal as a standalone domain server with Windows clients and how to join Windows clients to the domain. It then continues by describing how to enable roaming profiles and folder redirection, what is the Kerberos authentication system and how it works on Zentyal, how the users can change their passwords or how Group Policy Objects (GPOs) can be managed. As Zentyal is many times deployed in mixed environments (Zentyal and Windows servers), the documentation also covers joining Zentyal to an existing domain, total migration of the FSMO roles and importing and exporting of users and groups. Last, but not the least you are provided important information regarding known Zentyal/Samba limitations and issues.
If you would prefer to see a video, we recommend you to check out these complementary video resources:
- Zentyal as a stand-alone domain controller
- Zentyal as an Additional Domain Controller of a Windows Domain
- Total migration from Windows Server to Zentyal – Transfer of FSMO roles
- Load openchange plugin if openchange enabled
- Added Zentyal.MailUserAddon.editFormWillRemoveAccount JS method
- Prepopulate installation wizard by default with the Samba domain
- Encrypt external accounts passwords stored in LDAP
- Fixed periodical removal of Trash and Spam mails
- Fixed bug in initialSetup which triggered migration on fresh install
- Increased mail_max_userip_connections to 20 for IMAP protocol
- Fixed values in fetchmail widget status
- Fixed some labels which referenced deprecated user corner
- Do not allow both keep and fetch all options in external accounts
- Fixed group mail accounts and their aliases
- Do not move mailbox to .bak if directory already exist
- Migrate mboxes path to Maildir when upgrading from 3.4
- Fixed bug when removing virtual domain
- Adding a virtual domain now can update old unmanaged accounts
- Fixed errors related with users which has account on a umanaged domain
- Added migration code to handle new Dovecot certs
- Fixed group mail alias creation
- Fixed problems with checking mail address duplicates
- Added fetchmail again
- Fix _accountExists ldap search filter
- Removed spurious warnings on mail services widget
- Disabled deprecated autocreate dovecot plugin, using mailbox and namespaces instead
- Workaround in members table against losing of directory parameter/attribute
Installation Guide
Zentyal Installer ISO
The preferred way to install Zentyal on a new machine from scratch is using our tailored CD installer. This CD contains Zentyal and all its dependencies. The 6.2 version is based on Ubuntu Server 18.04 64bit and is available at:
Note: If you want to define the partition layout manually or you need to specify a proxy to get Internet access, make sure you install using the «expert mode».
Once the installation process is done, you can access the web interface using a web browser (usually from another machine in the same network):
https://<zentyal-ip-address>:8443/
To log in, a user name and password is asked, this data is asked during the first stage of the installation. But any other user belonging to the «sudo» group could be used to log in as well.
Note: The installers are generated from time to time, so maybe some packages contained on them are outdated. If you have Internet connection during the installation, the latest version of the packages will be installed from our repositories.
Zentyal Installer script
If you already have a server with Ubuntu 18.04, to install Zentyal automagically you just need to run the following command and follow the instructions:
curl -s download.zentyal.com/install | sudo sh
Or alternatively, if you prefer to do a manual installation, just skip to next section.
Zentyal 6.2 packages
You can also install Zentyal as a «package set» to an already installed version of Ubuntu. This was developed and tested with Ubuntu version 18.04.
For Ubuntu 18.04 (Bionic). You should install the server edition of Ubuntu for 64-bit architectures.
Add to your /etc/apt/sources.list:
deb http://packages.zentyal.org/zentyal 6.2 main extra
In order to authenticate the packages in the Zentyal repository you can import its public key with the following command:
wget -q http://keys.zentyal.org/zentyal-6.2-packages.asc -O- | sudo apt-key add -
Read the Zentyal_6.2_Announcement for more info.
Installing packages
Zentyal has a modular design that allows you to install or remove modules depending on your needs.
After editing your sources.list, make sure that your package database is up to date by running the following command:
sudo apt-get update
After that, you just need to run:
sudo apt-get install zentyal
And then point your browser to the Zentyal IP address and follow the instructions on screen:
https://<zentyal-ip-address>/
If you want to install the full graphical environment you can install zenbuntu-desktop instead of just zentyal:
sudo apt-get install zenbuntu-desktop
After installing zenbuntu-desktop your Ubuntu will be in almost the same state as if you were used the the official Zentyal Installer, you just need to reboot your server (simulating the finish of the first stage of the installation) and on the next boot the Zentyal core packages will be installed and you will be able to continue the installation from the desktop environment.
You can also use the command line to install the packages.
Example:
sudo apt-get install zentyal-mail
You can also install all the Zentyal packages:
sudo apt-get install zentyal-all


