Как создать и удалить пользователя на debian 9
Содержание:
sudo -i
Using is virtually the same as the command. Users can gain root by “sudo” and not by switching to the root user. Much like , the flag allows a user to get a root environment without having to know the root account password. is also very similar to using in that it’ll read all of the environmental files (.profile, etc.) and set the environment inside the shell with it.
Where it differs from “sudo su” is that is a much cleaner way of gaining root and a root environment without directly interacting with the root user. How? With you’re using more than one root commands. This fact makes it much more challenging to figure out what environmental variables will be kept and which ones will be changed (when swamping to the root environment). This is not true with , and it is because of this most people view it as the preferred method to gain root without logging in directly.
Обоснование
Sudo — это альтернатива su для выполнения команд с правами суперпользователя (root). В отличие от su, который запускает оболочку с правами root и даёт всем дальнейшим командам root права, sudo предоставляет временное повышение привилегий для одной команды. Предоставляя привилегии root только при необходимости, использование sudo снижает вероятность того, что опечатка или ошибка в выполняемой команде произведут в системе разрушительные действия.
Sudo может также использоваться для выполнения команд от имени других пользователей; кроме того, sudo логирует все команды и неудачные попытки доступа для аудита безопасности.
Miscellaneous Information
There are a few more pieces of information that may be useful when dealing with .
If you specified a user or group to “run as” in the configuration file, you can execute commands as those users by using the and flags, respectively:
For convenience, by default, will save your authentication details for a certain amount of time in one terminal. This means you won’t have to type your password in again until that timer runs out.
For security purposes, if you wish to clear this timer when you are done running administrative commands, you can run:
If, on the other hand, you want to “prime” the command so that you won’t be prompted later, or to renew your lease, you can always type:
You will be prompted for your password, which will be cached for later uses until the time frame expires.
If you are simply wondering what kind of privileges are defined for your username, you can type:
This will list all of the rules in the file that apply to your user. This gives you a good idea of what you will or will not be allowed to do with as any user.
There are many times when you will execute a command and it will fail because you forgot to preface it with . To avoid having to re-type the command, you can take advantage of a bash functionality that means “repeat last command”:
The double exclamation point will repeat the last command. We preceded it with to quickly change the unprivileged command to a privileged command.
For some fun, you can add the following line to your file with :
/etc/sudoers
This will cause to return a silly insult when a user types in an incorrect password for . We can use to clear the previous cached password to try it out:
Тонкая настройка
Таким образом, обычный пользователь может запускать команды с правами учетной записи root не зная ее пароль. Это очень удобно, но может быть небезопасно — есть ли возможность ограничить круг команд, которые можно исполнять посредством sudo? Да, и поможет нам в этом тот же самый конфигурационный файл. Снова запускаем visudo и разбираемся дальше. Нас интересуют параметры, указанные после имени пользователя:
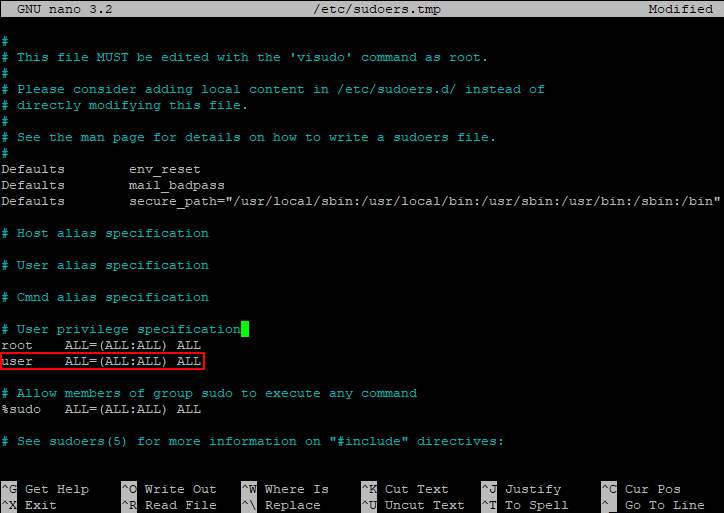
Разберем их подробнее:
- ALL=(ALL:ALL) ALL — первый параметр определяет к какому хосту применяется конфигурация. При использовании выделенного сервера параметр можно оставить без изменений;
- ALL=(ALLALL) ALL — параметры в скобках определяют с полномочиями какого пользователя (первый параметр) и/или группы (второй параметр) будет выполняться команда. По умолчанию sudo выполняет команду от имени root, однако при запуске с ключом –u можно указать другую учетную запись, а с ключом –g другую группу, чьи полномочия будут использованы при запуске;
- ALL=(ALL:ALL) ALL — третий параметр определяет к каким файлам и командам относятся данные настройки.
Исходя из вышесказанного, при необходимости определить перечень разрешенных команд заменяем последний параметр ALL тем, что нам требуется, перечисляя команды через запятую. Например, строка:
дает право пользователю user с помощью sudo осуществлять перезагрузку сервера командой sudo /sbin/shutdown –r и просматривать файлы с помощью sudo /bin/cat. Другие команды через sudo выполняться не будут. Например, при попытке выключить сервер командой sudo /sbin/shutdown –h, получим ответ:
Добавляем ограничения
Sudo позволяет добавлять пользователям ограничения на выполнение определенных команд.
Предположим, имеется группа по имени dataex, в которую входят пользователи
«alpha», «bravo» и «charlie». Эта группа может с помощью sudo выполнять команду
/usr/local/bin/mis_ext *, в которой звездочка обозначает передаваемые в сценарий параметры.
Однако пользователю
«charlie» не разрешается выполнять этот сценарий с параметром import.
Подобные ограничения можно задавать с помощью ‘!’ — оператора логического НЕ.
Вот что можно указать в файле sudoers:
 %dataex rs6000 = (dbmis) NOPASSWD: /usr/local/bin/mis_ext *
 charlie rs6000 = (dbmis) NOPASSWD: !/usr/local/bin/mis_ext import
Обратите внимание, что записи с логическим оператором НЕ указываются после обычных записей.
Можно указывать несколько подобных записей на одной строке, разделяя их запятыми:
charlie rs6000 = (dbmis) NOPASSWD: /usr/local/bin/aut_pmp *

charlie rs6000 = (dbmis) NOPASSWD: !/usr/local/bin/aut_pmp create,
!/usr/local/bin/aut_pmp delete, !/usr/local/bin/aut_pmp amend
При работе в
visudo помните, что если вы просто сохраняете запись и остаетесь работать в visudo, сделанные изменения не вступают в силу.
Чтобы изменения начали действовать, вы должны выйти из visudo.
Options
| -V | The -V (version) option causes sudo to print the version number and exit. If the invoking user is already root, the -V option will print out a list of the defaults sudo was compiled with as well as the machine’s local network addresses. |
| -l | The -l (list) option will print out the commands allowed (and forbidden) the user on the current host. |
| -L | The -L (list defaults) option will list out the parameters that may be set in a Defaults line along with a short description for each. This option is useful in conjunction with grep. |
| -h | The -h (help) option causes sudo to print a usage message and exit. |
| -v | If given the -v (validate) option, sudo will update the user’s timestamp, prompting for the user’s password if necessary. This extends the sudo timeout for another 5 minutes (or whatever the timeout is set to in sudoers) but does not run a command. |
| -k | The -k (kill) option to sudo invalidates the user’s timestamp by setting the time on it to the epoch. The next time sudo is run a password will be required. This option does not require a password and was added to allow a user to revoke sudo permissions from a .logout file. |
| -K | The -K (sure kill) option to sudo removes the user’s timestamp entirely. Likewise, this option does not require a password. |
| -b | The -b (background) option tells sudo to run the given command in the background. Note that if you use the -b option you cannot use shell job control to manipulate the process. |
| -p | The -p (prompt) option allows you to override the default password prompt and use a custom one. The following percent (‘%‘) escapes are supported:%u is expanded to the invoking user’s login name;%U is expanded to the login name of the user the command will be run as (which defaults to root);%h is expanded to the local hostname without the domain name;%H is expanded to the local hostname including the domain name (only if the machine’s hostname is fully qualified or the «fqdn» sudoers option is set);%% (two consecutive % characters) are collapsed into a single % character. |
| -c | The -c (class) option causes sudo to run the specified command with resources limited by the specified login class. The class argument can be either a class name as defined in /etc/login.conf, or a single ‘—‘ character. Specifying a class of — indicates that the command should be run restricted by the default login capabilities for the user running the command. If the class argument specifies an existing user class, the command must be run as root, or the sudo command must be run from a shell that is already root. This option is only available on systems with BSD login classes where sudo has been configured with the —with-logincap option. |
| -a | The -a (authentication type) option causes sudo to use the specified authentication type when validating the user, as allowed by /etc/login.conf. The system administrator may specify a list of sudo-specific authentication methods by adding an «auth-sudo» entry in /etc/login.conf. This option is only available on systems that support BSD authentication where sudo has been configured with the —with-bsdauth option. |
| -u | The -u (user) option causes sudo to run the specified command as a user other than root. To specify a uid instead of a username, use #uid. |
| -s | The -s (shell) option runs the shell specified by the SHELL environment variable if it is set or the shell as specified in the file passwd. |
| -H | The -H (HOME) option sets the HOME environment variable to the home directory of the target user (root by default) as specified in passwd. By default, sudo does not modify HOME. |
| -P | The -P (preserve group vector) option causes sudo to preserve the user’s group vector unaltered. By default, sudo will initialize the group vector to the list of groups of the target user. The real and effective group IDs, however, are still set to match the target user. |
| -r | The -r (role) option causes the new (SELinux) security context to have the role specified by ROLE. |
| -t | The -t (type) option causes the new (SELinux) security context to have the have the type (domain) specified by TYPE. If no type is specified, the default type is derived from the specified role. |
| -S | The -S (stdin) option causes sudo to read the password from standard input instead of the terminal device. |
| — | The — flag indicates that sudo should stop processing command line arguments. It is most useful in conjunction with the -s flag. |
How To Obtain Root Privileges
There are three basic ways to obtain root privileges, which vary in their level of sophistication.
Log In As Root
The simplest and most straightforward method of obtaining root privileges is to directly log into your server as the root user.
If you are logging into a local machine (or using an out-of-band console feature on a virtual server), enter as your username at the login prompt and enter the root password when asked.
If you are logging in through SSH, specify the root user prior to the IP address or domain name in your SSH connection string:
If you have not set up SSH keys for the root user, enter the root password when prompted.
Use to Become Root
Logging in directly as root is usually not recommended, because it is easy to begin using the system for non-administrative tasks, which is dangerous.
The next way to gain super-user privileges allows you to become the root user at any time, as you need it.
We can do this by invoking the command, which stands for “substitute user”. To gain root privileges, type:
You will be prompted for the root user’s password, after which, you will be dropped into a root shell session.
When you have finished the tasks which require root privileges, return to your normal shell by typing:
Use to Execute Commands as Root
The final, way of obtaining root privileges that we will discuss is with the command.
The command allows you to execute one-off commands with root privileges, without the need to spawn a new shell. It is executed like this:
Unlike , the command will request the password of the current user, not the root password.
Because of its security implications, access is not granted to users by default, and must be set up before it functions correctly. Check out our How To Create a New Sudo-enabled User quickstart tutorials for Ubuntu and CentOS to learn how to set up a -enabled user.
In the following section, we will discuss how to modify the configuration in greater detail.
Environment Variables
sudo uses the following environment variables:
| PATH | Set to a sane value if SECURE_PATH is set |
| SHELL | Used to determine shell to run with -s option |
| USER | Set to the target user (root unless the -u option is specified) |
| HOME | In -s or -H mode (or if sudo was configured with the —enable-shell-sets-home option), set to home directory of the target user. |
| SUDO_PROMPT | Used as the default password prompt |
| SUDO_COMMAND | Set to the command run by sudo |
| SUDO_USER | Set to the login of the user who invoked sudo |
| SUDO_UID | Set to the uid of the user who invoked sudo |
| SUDO_GID | Set to the gid of the user who invoked sudo |
| SUDO_PS1 | If set, PS1 will be set to its value |
Other special characters and reserved words
The pound sign (‘’) is used
to indicate a comment (unless it is part of a #include directive or unless
it occurs in the context of a user name and is followed by one or more
digits, in which case it is treated as a uid). Both the comment character
and any text after it, up to the end of the line, are ignored.
The reserved word ALL is a built-in
alias that always causes a match to succeed. It can be
used wherever one might otherwise use a ,
, , or
. You should not try to define your own
alias called ALL as the built-in alias
will be used in preference to your own. Please note that using
ALL can be dangerous since in a command context, it allows
the user to run any command on the system.
An exclamation point (‘’)
can be used as a logical not operator in a list or
alias as well as in front of a
. This allows one to exclude certain values. For
the ‘’ operator to be effective,
there must be something for it to exclude. For example, to match all users
except for root one would use:
ALL,!root
If the ALL, is omitted, as in:
!root
it would explicitly deny root but not match any other users. This
is different from a true “negation” operator.
Note, however, that using a
‘’ in conjunction with the built-in
ALL alias to allow a user to run “all but a
few” commands rarely works as intended (see
below).
Long lines can be continued with a backslash
(‘’) as the last character on the
line.
White space between elements in a list as well as special
syntactic characters in a User Specification
(‘’,
‘’,
‘’,
‘’) is optional.
Синтаксис
В синтаксисе данной команды нет ничего сложного.
Утилита дает возможность выполнить практически любую команду в ОС Linux. Сложностей не возникнет даже у нового пользователя.
Утилита «по умолчанию» запустит именно ту команду, которая была указана вами. Стоит отметить, что она будет запущена от имени «суперпользователя» root. Если вам требуется соблюдение определённых параметров, потребуется ввести настройки. Для этих целей в команде обязательно прописывается опция или еще ее называют аргумент.
Основные параметры:
- «-A» (—askpass). В ОС «Линукс» согласно первоначальным настройкам запрашивается пароль от терминала. Если воспользоваться данной опцией, утилита предложит графическое введение параметров.
- «-b» (—background). В этом случае будет запущена требуемая программа в фоновом режиме.
- «-C» (—close-from). Здесь потребуется передать опции численное значение, которое будет более трех. С помощью такого функционала задаются файловые дескрипторы, которые распространяются на программу. Исключена вероятность классического вывода и ввода информации.
- «-E» (—preserve-env). Эта функция передает переменное окружение, которое имеется у текущего пользователя, запускаемой программе. Опции дополнительно можно передавать определённый перечень переменных, которым разрешается доступ.
- «-e» (—edit). С использованием опции появляется возможность редактирования обрабатываемого файла вместо запуска определённой команды. Этот файл помещается в созданный временно каталог, где корректируется через специальную программу. Стоит отметить, она установлена в ОС «по умолчанию». Если вы внесли изменения в файл, он будет сохранен с теми же правами.
- «-g». В этом случае отображается указываемая вами группа вместо группы, присущей иному владельцу.
- «-h». Опция даёт возможность запустить команду от иного имени, чаще всего, от имени иного хоста.
- «-H» (—set-home). Появляется возможность создать свой каталог.
- «-i» (—login). Такая опция дает возможность пройти авторизацию в определенной консоли от имени стороннего пользователя. Здесь определяется адрес домашней папки, загружается весь перечень переменных из окружения пользователя.
- «-k». После введения опции sudo не сохраняет данные пароля. Спустя определенный промежуток времени повторно можно пользоваться утилитой, но обязательно нужно вводить пароль.
- «-l» (—list). дает возможность посмотреть список команд, которые распространяются на удаленных пользователей.
- «-n» (—non-interactive). Здесь запускается неинтеррактивный режим. При необходимости введения пароля на экране монитора появится ошибка.
- «-p» (—prompt). позволяет использовать свои приглашения при вводе пароля.
- «-r» (—role). Программа выполняется с контекстом SE Линукс. У него уже прописана первоначальная роль.
- «-S». Опция дает возможность применить стандартный поток ошибок. Это осуществляется при запросе данных пароля.
- «-s» (—shell). Есть возможность включить командный интерпретатор.
- «-U» (—User). Такая команда применяется совместно с функцией «-l», дает возможность изучить имеющие привилегии у пользователя.
- «-T» (—timeout). У пользователя появляется возможность настроить время осуществления определённой команды. Если оно закончится до того, как команда завершится, она закроется в принудительном порядке.
- «-u». Такая опция дает возможность прописать имя пользователя.
- «—». Эта функция исключит вероятность обработки последующих опций.
Представленный выше список функций является ориентировочным. На самом деле опций огромное количество, остальные используются весьма редко.
Примеры
Стоит рассмотреть наиболее популярные примеры применения команды.
Весьма часто пользователям требуется запустить определённую программу с правами root. Для этих целей потребуется прописать «sudo». К примеру, поменяем пароль для пользователя «user».
Запуск программы от имени другого пользователя. В данном случае потребуется использовать опцию «-u».
Авторизация от имени иного «суперпользователя». В такой ситуации нужно применить опцию «-i».
Авторизация от имени стороннего пользователя. Здесь потребуется обязательно казать его имя. Пример – $ sudo -i -u sergiy программа.
Редактирование системных файлов. Для осуществления поставленной перед пользователем задачи необходимо применить опцию «-е». Она откроет редактор, который установлен в системе согласно изначальным настройкам.
Запуск программы в фоне. Для этого нужна опция «-b», которая позволит выполнить задачу.
Выше описаны только общие примеры, которые чаще всего требуются пользователям операционной системы «Линукс».
Command environment
Since environment variables can influence program behavior,
sudoers provides a means to restrict which variables from
the user’s environment are inherited by the command to be run. There are two
distinct ways sudoers can deal with environment
variables.
By default, the env_reset option is enabled.
This causes commands to be executed with a new, minimal environment. On AIX
(and Linux systems without PAM), the environment is initialized with the
contents of the /etc/environment file. On BSD
systems, if the use_loginclass option is enabled, the
environment is initialized based on the path and
setenv settings in
/etc/login.conf. The new environment contains the
, ,
, ,
, ,
, and
variables in addition to variables from the
invoking process permitted by the env_check and
env_keep options. This is effectively a whitelist for
environment variables. Environment variables with a value beginning with
are removed unless both the name and value parts
are matched by env_keep or env_check, as
they will be interpreted as functions by older versions of the
bash shell. Prior to version 1.8.11, such variables were
always removed.
If, however, the env_reset option is disabled,
any variables not explicitly denied by the env_check and
env_delete options are inherited from the invoking
process. In this case, env_check and
env_delete behave like a blacklist. Environment variables
with a value beginning with are always removed,
even if they do not match one of the blacklists. Since it is not possible to
blacklist all potentially dangerous environment variables, use of the
default env_reset behavior is encouraged.
By default, environment variables are matched by name. However, if
the pattern includes an equal sign
(‘’), both the variables name and
value must match. For example, an old-style (pre-shellshock)
bash shell function could be matched as follows:
env_keep += "my_func=()*"
Without the “” suffix,
this would not match, as old-style bash shell functions
are not preserved by default.
The complete list of environment variables that
allows or denies is contained in the output of
“” when run as root. Please
note that this list varies based on the operating system
is running on.
On systems that support PAM where the
module is
enabled for , variables in the PAM environment
may be merged in to the environment. If a variable in the PAM environment is
already present in the user’s environment, the value will only be overridden
if the variable was not preserved by . When
env_reset is enabled, variables preserved from the
invoking user’s environment by the env_keep list take
precedence over those in the PAM environment. When
env_reset is disabled, variables present the invoking
user’s environment take precedence over those in the PAM environment unless
they match a pattern in the env_delete list.
Note that the dynamic linker on most operating systems will remove
variables that can control dynamic linking from the environment of setuid
executables, including . Depending on the
operating system this may include ,
, ,
, ,
, and others. These type of variables are
removed from the environment before even begins
execution and, as such, it is not possible for
to preserve them.
As a special case, if ‘s
option (initial login) is specified,
sudoers will initialize the environment regardless of the
value of env_reset. The ,
and variables
remain unchanged; ,
, ,
, and are set
based on the target user. On AIX (and Linux systems without PAM), the
contents of /etc/environment are also included. On
BSD systems, if the use_loginclass flag is enabled, the
path and setenv variables in
/etc/login.conf are also applied. All other
environment variables are removed.


