Инструкция по установке и настройке python 3
Содержание:
- Events Emitted by this Class
- Class API
- Events Emitted by this Class
- What is wxPython Phoenix?
- TextCtrl Styles
- Static Methods
- Events Emitted by this Class
- Possible Locale Mismatch on Windows
- GNU/Linux — Building from the source
- Installing wxPython-Phoenix using pip
- PyQt
- Unicode and Auto-Converting Strings
- Hello World, Part 2
- wx.DataObject and derived classes
- Различные реализации
- wxPython
- Methods Summary
- GUI-приложения
- wx.PyEvent and wx.PyCommandEvent
Events Emitted by this Class
Handlers bound for the following event types will receive a parameter.
-
EVT_TREE_BEGIN_DRAG: Begin dragging with the left mouse button. If you want to enable left-dragging you need to intercept this event and explicitly call , as it’s vetoed by default. Processes a event type.
-
EVT_TREE_BEGIN_RDRAG: Begin dragging with the right mouse button. If you want to enable right-dragging you need to intercept this event and explicitly call , as it’s vetoed by default. Processes a event type.
-
EVT_TREE_END_DRAG: End dragging with the left or right mouse button. Processes a event type.
-
EVT_TREE_BEGIN_LABEL_EDIT: Begin editing a label. This can be prevented by calling Veto(). Processes a event type.
-
EVT_TREE_END_LABEL_EDIT: Finish editing a label. This can be prevented by calling Veto(). Processes a event type.
-
EVT_TREE_DELETE_ITEM: An item was deleted. Processes a event type.
-
EVT_TREE_GET_INFO: Request information from the application. Processes a event type.
-
EVT_TREE_SET_INFO: Information is being supplied. Processes a event type.
-
EVT_TREE_ITEM_ACTIVATED: The item has been activated, i.e. chosen by double clicking it with mouse or from keyboard. Processes a event type.
-
EVT_TREE_ITEM_COLLAPSED: The item has been collapsed. Processes a event type.
-
EVT_TREE_ITEM_COLLAPSING: The item is being collapsed. This can be prevented by calling Veto(). Processes a event type.
-
EVT_TREE_ITEM_EXPANDED: The item has been expanded. Processes a event type.
-
EVT_TREE_ITEM_EXPANDING: The item is being expanded. This can be prevented by calling Veto(). Processes a event type.
-
EVT_TREE_ITEM_RIGHT_CLICK: The user has clicked the item with the right mouse button. Processes a event type.
-
EVT_TREE_ITEM_MIDDLE_CLICK: The user has clicked the item with the middle mouse button. This is only supported by the generic control. Processes a event type.
-
EVT_TREE_SEL_CHANGED: Selection has changed. Processes a event type.
-
EVT_TREE_SEL_CHANGING: Selection is changing. This can be prevented by calling Veto(). Processes a event type.
-
EVT_TREE_KEY_DOWN: A key has been pressed. Processes a event type.
-
EVT_TREE_ITEM_GETTOOLTIP: The opportunity to set the item tooltip is being given to the application (call ). Windows only. Processes a event type.
-
EVT_TREE_ITEM_MENU: The context menu for the selected item has been requested, either by a right click or by using the menu key. Notice that these events always carry a valid tree item and so are not generated when (right) clicking outside of the items area. If you need to handle such events, consider using instead. Processes a event type.
-
EVT_TREE_STATE_IMAGE_CLICK: The state image has been clicked. Processes a event type.
See also
Win32 notes:
class uses the standard common treeview control under Win32 implemented in the system library comctl32.dll. Some versions of this library are known to have bugs with handling the tree control colours: the usual symptom is that the expanded items leave black (or otherwise incorrectly coloured) background behind them, especially for the controls using non-default background colour. The recommended solution is to upgrade the comctl32.dll to a newer version: see http://www.microsoft.com/downloads/details.aspx?familyid=cb2cf3a2-8025-4e8f-8511-9b476a8d35d2
See also
, , TreeItemData , , , ,
Class API
- class (Window)
-
Possible constructors:
Panel()

Panel(parent, id=ID_ANY, pos=DefaultPosition, size=DefaultSize,
      style=TAB_TRAVERSAL, name=PanelNameStr)
A panel is a window on which controls are placed.
Methods
- (self, *args, **kw)
-
Overloaded Implementations:
__init__ (self)
Default constructor.
__init__ (self, parent, id=ID_ANY, pos=DefaultPosition, size=DefaultSize, style=TAB_TRAVERSAL, name=PanelNameStr)
Constructor.
- Parameters
-
-
parent () – The parent window.
-
id (wx.WindowID) – An identifier for the panel. is taken to mean a default.
-
pos () – The panel position. The value indicates a default position, chosen by either the windowing system or wxWidgets, depending on platform.
-
size () – The panel size. The value indicates a default size, chosen by either the windowing system or wxWidgets, depending on platform.
-
style (long) – The window style. See .
-
name (string) – Window name.
-
See also
- (self)
-
This method is overridden from and returns only if there is no child window in the panel which can accept the focus.
This is reevaluated each time a child window is added or removed from the panel.
- Return type
-
bool
- (self, parent, id=ID_ANY, pos=DefaultPosition, size=DefaultSize, style=TAB_TRAVERSAL, name=PanelNameStr)
-
Used for two-step panel construction.
See for details.
- Parameters
-
-
parent () –
-
id (wx.WindowID) –
-
pos () –
-
size () –
-
style (long) –
-
name (string) –
-
- Return type
-
bool
- static (variant=WINDOW_VARIANT_NORMAL)
-
- Parameters
-
variant (WindowVariant) –
- Return type
- (self)
-
Sends a , which in turn transfers data to the dialog via validators.
See also
- (self)
-
See : when auto layout is on, this function gets called automatically when the window is resized.
- Return type
-
bool
- (self)
-
Overrides .
This method uses the (undocumented) mix-in class ControlContainer which manages the focus and logic for controls which usually have child controls.
In practice, if you call this method and the control has at least one child window, the focus will be given to the child window.
See also
,
- (self)
-
In contrast to (see above) this will set the focus to the panel even if there are child windows in the panel.
This is only rarely needed.
Events Emitted by this Class
Handlers bound for the following event types will receive a parameter.
EVT_NAVIGATION_KEY: Process a navigation key event.
Note
By default, a panel has the same colouring as a dialog.
Note
Tab traversal is implemented through an otherwise undocumented intermediate ControlContainer class from which any class can derive in addition to the normal base class. Please see /containr.h and /panel.h to find out how this is achieved.
Note
if not all characters are being intercepted by your OnKeyDown or OnChar handler, it may be because you are using the style, which grabs some keypresses for use by child controls.
See also
What is wxPython Phoenix?
wxPython’s Project Phoenix is a new from-the-ground-up implementation of
wxPython, created with the intent of making wxPython
«better, stronger, faster than he was before.» In other words, this new
implementation is focused on improving speed, maintainability and
extensibility of wxPython, as well as removing most of the cruft that had
accumulated over the long life of Classic wxPython.
The project has been in development off and on, mostly behind the scenes,
for many years. For the past few years automated snapshot builds have been
available for those adventurous enough to try it, and many people
eventually started using the snapshots in their projects, even for
production releases. While there are still some things on the periphery
that need to be completed, the core of the new wxPython extension modules
which wrap the wxWidgets code has been stable for a long time now.
Due to some things being cleaned up, reorganized, simplified and
dehackified wxPython Phoenix is not completely backwards compatible with
wxPython Classic. This is intended, on purpose, by design. In general,
however, the API differences tend to be minor and some applications can use
Phoenix with slight, or even with no modifications. In some other cases
the correct way to do things was also available in Classic and it’s only
the wrong way that has been removed from Phoenix. For more information
there is a Migration Guide document available at:
https://docs.wxpython.org/MigrationGuide.html.
The new wxPython API reference documentation, including all Python-specific
additions and customizations, and also docs for the wx.lib package, is
located at: https://docs.wxpython.org/.
TextCtrl Styles
Multi-line text controls support styling, i.e. provide a possibility to set colours and font for individual characters in it (note that under Windows style is required for style support). To use the styles you can either call before inserting the text or call later to change the style of the text already in the control (the first solution is much more efficient). In either case, if the style doesn’t specify some of the attributes (for example you only want to set the text colour but without changing the font nor the text background), the values of the default style will be used for them. If there is no default style, the attributes of the text control itself are used. So the following code correctly describes what it does: the second call to doesn’t change the text foreground colour (which stays red) while the last one doesn’t change the background colour (which stays grey):
Static Methods
In the distant past when SWIG was generating wrapper code for C++ static
methods it would create a standalone function named
for it. When Python added support for static methods then SWIG was able to use
that to make a real named , but it still
generated the standalone function named with the underscore, for
compatibility. That underscore version of the static methods is now gone, and
you will get an in existing code that is using them. To fix
the problem simply change the underscore to a dot, for example you should
change this:
c = wx.SystemSettings_GetColour(wx.SYS_COLOUR_MENUTEXT)
to this:
c = wx.SystemSettings.GetColour(wx.SYS_COLOUR_MENUTEXT)
Events Emitted by this Class
Handlers bound for the following event types will receive one of the parameters.
-
EVT_TEXT: Respond to a event, generated when the text changes. Notice that this event will be sent when the text controls contents changes – is called); see for a function which does not send this event. This event is however not sent during the control creation.
-
EVT_TEXT_ENTER: Respond to a event, generated when enter is pressed in a text control which must have style for this event to be generated.
-
EVT_TEXT_URL: A mouse event occurred over an URL in the text control.
-
EVT_TEXT_MAXLEN: This event is generated when the user tries to enter more text into the control than the limit set by , see its description.
See also
,
Possible Locale Mismatch on Windows
On the Windows platform, prior to Python 3.8, it appears that Python did not do
any initialization of the process locale settings, at least for the “en_US”
based locales. For example, in Python 3.7:
>>> import locale
>>> locale.getdefaultlocale()
('en_US', 'cp1252')
>>> locale.getlocale()
(None, None)
And in Python 3.8:
>>> import locale
>>> locale.getdefaultlocale()
('en_US', 'cp1252')
>>> locale.getlocale()
('English_United States', '1252')
Now, when you add in the wxWidgets class wxLocale, then it can get even more
confusing on Windows. It seems that this boils down to wxWidgets setting the
locale using a Windows-specific name like “en-US” (with a hyphen instead of an
underscore). Since Python’s locale module does not recognize this as a
legitimate locale alias, then calling locale.getlocale() after a
has been created will result in a ValueError exception.
So wxPython has added code in the class to try and set up the locale so
both Python and wxWidgets are set to equivalent settings. This is still somewhat
experimental however, and the implementation in wxPython 4.1.0 is still
problematic in some cases. If you have problems with it then you can disable or
change this code by overriding the method in a derived
class. It can either just do nothing, or you can implement some alternative
locale setup code there.
GNU/Linux — Building from the source
You might also want to build wxPython from the source. You have to do this in three steps:
Installing wxGTK from source
wxGTK is the GTK version of wxWidgets. GTK (Gimp ToolKit) is a graphic library used by Gnome, so it is probably already installed on your Linux box. All you have to do is download the wxGTK source from the wxGTK ftp server. Or the wxWidgets website
- Untar wxGTK by type the command:
tar -xvzf wxGTK-2.2.5.tar.gz
- Go into the directory:
cd wxGTK-2.2.5
- Run the configure script:
./configure --with-gtk
You might get some errors here if GTK is not installed or if the include files for GTK are not installed (in a Mandrake distribution, gtk+-devel-1.2.8-6mdk.i586.rpm is the rpm that you want to install)
- Run the make file:
make
You might get some errors here if yacc or lex are not installed. (in a Mandrake distribution, the right rpms are byacc-1.9-7mdk.i586.rpm and flex-2.5.4a-13mdk.i586.rpm)
You should now have a compiled version of wxGTK. We want to install it and link it into the system.
Become superuser: su
Your root password is required here.
- Install wxGTK:
make install
- Link the library:
ldconfig
- Exit from superuser mode:
exit
Normally, wxGTK is installed but there might be a problem with wxPython:
it is possible that the library is not installed where wxPython is looking for it. ( In a mandrake 7.2 distribution, you want wxGTK to be installed in /usr/lib whereas it is automatically installed in /usr/local/lib) The solution is to create a symbolic link of the library where you want it to be:
- Go in to the directory where you want the library to be installed:
cd /usr/lib
- Create a symbolic link to the library:
ln -s /usr/local/lib/libwx_gtk.so
Installing wxPython from source
Download the source code of the last wxPython release:
- Untar the tarball:
tar -xvzf wxPython-2.2.5.tar.gz
- go into the directory:
cd wxPython-2.2.5
- Edit the setup.py to choose what you want to install. I suggest that you don’t install OGL and GL_CANVAS. by selecting:
BUILD_GLCANVAS = 0 # If true, build the contrib/glcanvas extension module BUILD_OGL = 0 # If true, build the contrib/ogl extension module BUILD_STC = 1 # If true, build the contrib/stc extension module CORE_ONLY = 0 # if true, don't build any of the above GL_ONLY = 0 # Only used when making the -gl RPM. See the "b" script # for the ugly details USE_SWIG = 0 # Should we actually execute SWIG, or just use the # files already in the distribution? IN_CVS_TREE = 0 # Set to true if building in a full wxWidgets CVS # tree, otherwise will assume all needed files are # available in the wxPython source distribution - Build the python module:
python setup.py build
- Become root:
su
Your root password is required here.
- Install the module:
python setup.py install
- Exit root mode:
exit
- Check if the module works:
 $ python
Python 1.5.2 (#1, Sep 30 2000, 18:08:36)   on linux-i386
Copyright 1991-1995 Stichting Mathematisch Centrum, Amsterdam
>>> import wx
>>>
wxPython is fully installed!
Installing wxPython-Phoenix using pip
Please note that the most up to date information about installing the new wxPython4 wheels is usually located on the main wxPython website at: https://wxpython.org/pages/downloads/.
Make sure you have recent versions of pip and setuptools installed.
-
Installing wxPython4 (Phoenix) on Linux Since wxPython is not able to be built to the manylinux1 standard we’re not able to put binaries on PyPI. Instead binary wheels are made available for a few popular linux distributions, and you can install them using pip once you locate the proper folder to tell pip to download from. Look around in https://extras.wxpython.org/wxPython4/extras/linux for a folder matching your distro and gtk preference. You can then install with a command like the following command. If you are not installing into a Python virtual environment then you will probably need to insert sudo at the beginning of the command:
pip install -U \
-f https://extras.wxpython.org/wxPython4/extras/linux/gtk3/ubuntu-16.04 \
wxPython -
Installing wxPython4 (Phoenix) on Windows and OSX Binary wheels for these platforms are available on PyPI so you can install with this simpler command if build are available for your target Python:
pip install -U wxPython
- Verify installation
python2
>>> import wx
>>> wx.VERSION_STRING
‘4.0.1’
>>> wx.version()
‘4.0.1 osx-cocoa (phoenix)’
PyQt
Пакет (несколько различных модулей) PyQt являются интерфейсом из Python к графической системе Qt4.
Для использования PyQt потребуется установить дополнительные модули Python.
Для Python 2:
$ aptitude search python-qt
p   ipython-qtconsole           - enhanced interactive Python shell - Qt console
p   python-qt4               - Python bindings for Qt4
p   python-qt4-dbg           - Python bindings for Qt4 (debug extensions)
p   python-qt4-dbus          - D-Bus Support for PyQt4
p   python-qt4-dbus-dbg      - D-Bus Support for PyQt4 (debug extensions)
p   python-qt4-dev           - Development files for PyQt4
p   python-qt4-doc           - документация и примеры для PyQt4
p   python-qt4-gl            - Python bindings for Qt4's OpenGL module
p   python-qt4-gl-dbg        - Python bindings for Qt4's OpenGL module (debug extension)
p   python-qt4-phonon        - Python bindings for Phonon
p   python-qt4-phonon-dbg    - Python bindings for Phonon (debug extensions)
p   python-qt4-sql           - интерфейс Python к модулю Qt4 SQL
p   python-qt4-sql-dbg       - Python bindings for PyQt4's SQL module (debug extension)

$ sudo apt-get install python-qt4 python-qt4-dev python-qt4-doc
...
Для Python 3:
$ aptitude search  python3-pyqt*
p   python3-pyqt4              - Python3 bindings for Qt4
p   python3-pyqt4-dbg          - Python3 bindings for Qt4 (debug extensions)
p   python3-pyqt4.phonon       - Python3 bindings for Phonon
p   python3-pyqt4.phonon-dbg   - Python3 bindings for Phonon (debug extensions)
p   python3-pyqt4.qsci         - Python 3 bindings for QScintilla 2
p   python3-pyqt4.qtopengl     - Python 3 bindings for Qt4's OpenGL module
p   python3-pyqt4.qtopengl-dbg - Python 3 bindings for Qt4's OpenGL module (debug...
p   python3-pyqt4.qtsq         - Python3 bindings for PyQt4's SQL module
p   python3-pyqt4.qtsql-dbg    - Python3 bindings for PyQt4's SQL module (debug...

# apt-get install python3-pyqt4
...
Далее будут использоваться простые примеры, которых, тем не менее, вполне достаточно для понимания
логики приложения и начала работы с этими инструментами. Ниже в листинге 2 показано простейшее приложение,
написанное с использованием PyQt (файл hw3pyqt.py в архиве python_gui.tgz ).
Листинг 2. Пример PyQt-приложения
#!/usr/bin/python3
# -*- coding: utf-8 -*-

import sys
from PyQt4.QtGui import *

# Каждое приложение должно создать объект QApplication
# sys.argv - список аргументов командной строки
application = QApplication(sys.argv)

# QWidget - базовый класс для всех объектов интерфейса пользователя;
# если использовать для виджета конструктор без родителя, такой виджет станет окном
widget = QWidget()

widget.resize(320, 240)                 # изменить размеры виджета
widget.setWindowTitle("Hello, World!")  # установить заголовок
widget.show()                           # отобразить окно на экране

sys.exit(application.exec_())           # запуск основного цикла приложения
В этом примере присутствуют все показанные ранее признаки и структура событийно- управляемого
приложения, а главное отличие между листингами 1 и 2 исключительно внешнее и заключается в именах
вызовов API, но сама логика построения приложения остаётся неизменной.
На рисунке 2 показан результат запуска этого приложения:
Проект PyQt имеет параллельно развивающееся ответвление PySide, которое некоторые разработчики
считают более удобным, чем оригинальный PyQt.
Unicode and Auto-Converting Strings
Starting with the wxPython 2.9 release series, there are no longer separate
ansi/Unicode builds of wxPython. All wxPython builds are now essentially the
same as the old Unicode builds. This means that all string objects (in Python
2.7) or bytes objects (Python 3+) passed to wx API functions or methods are
converted to Unicode before calling the C++ function or method. By default
Classic wxPython would use the encoding specified by the locale that was
current at the time of the import of the wx module.
However using the default locale could sometimes cause issues because
it meant that slightly different encodings could be used on different
platforms, even in the same locale, or the program could end up using
an encoding in a different locale that the developer has not tested
their code with.
Project Phoenix takes this Unicode simplification one step further by
stipulating that only the utf-8 encoding will be used for
auto-converting string/bytes objects to the Unicode objects that will be
passed on to the wx APIs. If you need to deal with text using a
different encoding then you will need to convert it to Unicode
yourself before passing the text to the wx API. For the most part this
should not be much of a problem for well written programs that support
Unicode because they will typically only convert to/from Unicode when
reading/writing text to a file or database, and will use Unicode objects
throughout the rest of the code. The common exception to this is that
string-literals are often used in the code for specifying labels,
etc. for UI elements. If your text for the string literals in your
code are all ascii or utf-8 then you should not need to make any
changes at all. If you have literals with some other encoding then
you’ll need to deal with them one way or another, either change the
encoding of your source file to utf-8, or convert the literals from
your encoding to Unicode before passing the text to the wx API.
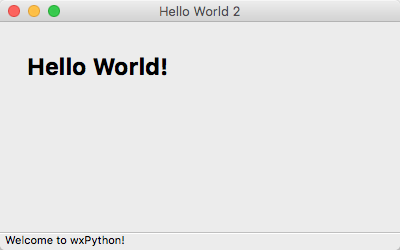
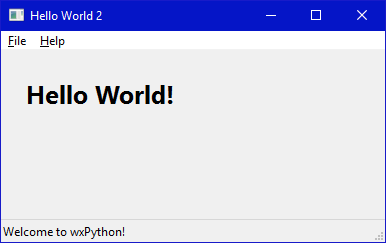
Hello World, Part 2
Okay, now let’s put a little more flesh on the bones of that Hello World
sample to give a little better idea of what creating a wxPython application
is all about. The finished application looks like these screenshots when run:
And here is the source code. The docstrings and the comments in the code
will help you understand what it is doing.
helloworld2.py (Source)
#!/usr/bin/env python
"""
Hello World, but with more meat.
"""

import wx

class HelloFrame(wx.Frame):
    """
    A Frame that says Hello World
    """

    def __init__(self, *args, **kw):
        # ensure the parent's __init__ is called
        super(HelloFrame, self).__init__(*args, **kw)

        # create a panel in the frame
        pnl = wx.Panel(self)

        # put some text with a larger bold font on it
        st = wx.StaticText(pnl, label="Hello World!")
        font = st.GetFont()
        font.PointSize += 10
        font = font.Bold()
        st.SetFont(font)

        # and create a sizer to manage the layout of child widgets
        sizer = wx.BoxSizer(wx.VERTICAL)
        sizer.Add(st, wx.SizerFlags().Border(wx.TOP|wx.LEFT, 25))
        pnl.SetSizer(sizer)

        # create a menu bar
        self.makeMenuBar()

        # and a status bar
        self.CreateStatusBar()
        self.SetStatusText("Welcome to wxPython!")


    def makeMenuBar(self):
        """
        A menu bar is composed of menus, which are composed of menu items.
        This method builds a set of menus and binds handlers to be called
        when the menu item is selected.
        """

        # Make a file menu with Hello and Exit items
        fileMenu = wx.Menu()
        # The "\t..." syntax defines an accelerator key that also triggers
        # the same event
        helloItem = fileMenu.Append(-1, "&Hello...\tCtrl-H",
                "Help string shown in status bar for this menu item")
        fileMenu.AppendSeparator()
        # When using a stock ID we don't need to specify the menu item's
        # label
        exitItem = fileMenu.Append(wx.ID_EXIT)

        # Now a help menu for the about item
        helpMenu = wx.Menu()
        aboutItem = helpMenu.Append(wx.ID_ABOUT)

        # Make the menu bar and add the two menus to it. The '&' defines
        # that the next letter is the "mnemonic" for the menu item. On the
        # platforms that support it those letters are underlined and can be
        # triggered from the keyboard.
        menuBar = wx.MenuBar()
        menuBar.Append(fileMenu, "&File")
        menuBar.Append(helpMenu, "&Help")

        # Give the menu bar to the frame
        self.SetMenuBar(menuBar)

        # Finally, associate a handler function with the EVT_MENU event for
        # each of the menu items. That means that when that menu item is
        # activated then the associated handler function will be called.
        self.Bind(wx.EVT_MENU, self.OnHello, helloItem)
        self.Bind(wx.EVT_MENU, self.OnExit,  exitItem)
        self.Bind(wx.EVT_MENU, self.OnAbout, aboutItem)


    def OnExit(self, event):
        """Close the frame, terminating the application."""
        self.Close(True)


    def OnHello(self, event):
        """Say hello to the user."""
        wx.MessageBox("Hello again from wxPython")


    def OnAbout(self, event):
        """Display an About Dialog"""
        wx.MessageBox("This is a wxPython Hello World sample",
                      "About Hello World 2",
                      wx.OK|wx.ICON_INFORMATION)


if __name__ == '__main__'
    # When this module is run (not imported) then create the app, the
    # frame, show it, and start the event loop.
    app = wx.App()
    frm = HelloFrame(None, title='Hello World 2')
    frm.Show()
    app.MainLoop()
wx.DataObject and derived classes
The and classes can now be
subclassed in Python. will let you provide complex
multi-format data objects that do not need to copy the data until one of the
formats is requested from the clipboard or a DnD operation.
is a simplification that only deals with one data
format, (although multiple objects can still be provided with
.)
Python buffer objects are used for transferring data to/from the clipboard or
DnD partner. Anything that supports the buffer protocol can be used for
setting or providing data, and a object is created for the APIs
where the data object should fetch from or copy to a specific memory location.
Различные реализации
Язык программирования обычно состоит из двух частей: собственно языка и
программного обеспечения. Язык – это то, как мы что-либо пишем, а
программное обеспечение – это то, что запускает наши программы.
До сих пор для выполнения наших программ мы использовали CPython. Он
называется “CPython”, потому что написан на языке C и является Классическим
интерпретатором Python.
Но существует и другое программное обеспечение, способное выполнять программы
на Python:
-
Реализация Python, работающая на платформе Java. Это означает, что можно
использовать библиотеки и классы Java в программе на Python и наоборот. -
Реализация Python, работающая на платформе .NET, что означает возможность
использования библиотек и классов .NET в программах на Python и наоборот. -
Реализация Python, написанная на Python! Это исследовательский проект,
существующий для ускорения и облегчения разработки интерпретатора, поскольку
сам интерпретатор написан на динамическом языке (в отличие от статических
языков, как C, Java и C# в вышеупомянутых реализациях) -
Реализация Python, специализирующаяся на высокой производительности
многопоточных программ.
Существуют и другие реализации, такие как CLPython – написанная на Common Lisp и IronMonkey – порт IronPython на JavaScript, что даёт
возможность писать браузерные приложения (“Ajax”) на Python вместо JavaScript.
wxPython
Проект wxPython происходит от известного проекта wxWidgets. В основе wxWidgets лежит GUI-библиотека,
реализованная на языке C++, также проект содержит набор классов C++ с богатыми возможностями
(высокоуровневые структуры данных и др.). А wxPython в свою очередь предлагает «обертки»
для классов wxWidgets связанных с GUI.
Примечание. Графическая система wxWidgets декларирует только мульти-платформенный API верхнего уровня,
а для непосредственного отображения используется низкоуровневый (native) API для конкретной
платформы. Основная задача библиотеки — это обеспечить работоспособность приложений, написанных
с её помощью, на различных операционных системах. Поэтому параллельно существуют несколько
различных реализаций wxWidgets: wxGTK, wxMSW, wxMac и т.д. WxWidgets — это более
высокоуровневая абстракция, чем графические базисы, над которыми она надстраивается.
Библиотека wxWidgets не настолько популярна в Linux, как GTK+ или Ot, потому всё необходимое для
использования wxPython потребуется установить отдельно:
$ aptitude search python-wx
p   python-wxglade      - GUI designer written in Python with wxPython
p   python-wxgtk2.8     - wxWidgets Cross-platform C++ GUI toolkit (wxPython binding)
p   python-wxgtk2.8-dbg - wxWidgets Cross-platform C++ GUI toolkit (wxPython binding...
p   python-wxmpl        - Painless matplotlib embedding in wxPython
p   python-wxtools      - wxWidgets Cross-platform C++ GUI toolkit (wxPython common...
p   python-wxversion    - wxWidgets Cross-platform C++ GUI toolkit (wxPython version...
Достаточно будет установить пакет , и все
остальные пакеты он инсталлирует самостоятельно:
$ sudo apt-get install python-wxgtk2.8
...
В листинге 1 показано простое приложение, использующее wxPython (файл bare.py из архива
python_gui.tgz в разделе «Материалы для скачивания»):
Листинг 1. Пример wxPython-приложения
import wx

class App( wx.App ):

    def OnInit(self):
        frame = wx.Frame( parent=None, title='Bare' )
        frame.Show()
        return True

app = App()
app.MainLoop()
В этом примере создаётся пустое окно GUI-приложения, которое под контролем оконного менеджера Linux
может перемещаться, менять размер, сворачиваться и разворачиваться во весь экран:
В листинге 2 показано ещё одно wxPython-приложение, использующее возможности API wxPython в
терминологии классов Python. Это приложение позволяет из Python-кода перенаправить потоки
и
в созданное окно (примеры для wxPython можно найти в соответствующем учебнике в разделе «Ресурсы»):
Листинг 2. Перенаправление потоков вывода (файл sysout.py)
import wx
import sys

class Frame(wx.Frame):

    def __init__(self, parent, id, title):
        print "Frame __init__"
        wx.Frame.__init__(self, parent, id, title)

class App(wx.App):

    def __init__(self, redirect=True, filename=None):
        print "App __init__"
        wx.App.__init__(self, redirect, filename)

    def OnInit(self):
        print "OnInit"                         # вывод в поток stdout
        # создание окна
        self.frame = Frame(parent=None, id=-1, title='Startup')
        self.frame.Show()
        self.SetTopWindow(self.frame)
        print >> sys.stderr, "A pretend error message"  # вывод в поток stderr
        return True

    def OnExit(self):
        print "OnExit"

if __name__ == '__main__':
    app = App(redirect=True) # здесь происходит перенаправление вывода
    print "before MainLoop"  # здесь запускается основной цикл обработки событий
    app.MainLoop()
    print "after MainLoop"
Запустим приложение и посмотрим, какие сообщения
будут отправлены в окно приложения, а какие — в терминал запуска:
$ python sysout.py
App __init__
after MainLoop
На рисунке 2 представлен пример работы приложения:
Примечание. Все примеры, показанные в этой статье и в руководстве для wxPython,
используют синтаксис Python 2. Это объясняется тем, что только в середине 2012 года создатель wxPython Робин
Данн (Robin Dunn) в своём блоге сообщал об экспериментах по сборке wxPython для Python 3.
На сайте проекта в августе 2013 г, в качестве последних стабильных версий указывались реализации для
Python 2.7.
Высказываются мнения, что реализация wxPython могла бы стать стандартной GUI-библиотекой для Python,
если бы эта позиция уже не была занята Tkinter. Тем не менее WxPython используется во многих открытых
проектах.
Methods Summary
|
Default constructor. |
|
|
Creates the choice for two-step construction. |
|
|
Finds an item whose label matches the given string. |
|
|
Gets the number of columns in this choice item. |
|
|
Returns the number of items in the control. |
|
|
Unlike which only returns the accepted selection value (the selection in the control once the user closes the dropdown list), this function returns the current selection. |
|
|
Returns the index of the selected item or if no item is selected. |
|
|
Returns the label of the item with the given index. |
|
|
Sets the number of columns in this choice item. |
|
|
Sets the selection to the given item n or removes the selection entirely if n == . |
|
|
Sets the label for the given item. |
GUI-приложения
Основной целью данной статьи будет поверхностный обзор различных вариантов,
доступных при выборе инструментария для разработки GUI-приложений. Так программист сможет определить,
какой инструмент наиболее подходит для решения конкретной задачи. Подобная постановка задачи связана
ещё и с тем, что для всех многочисленных инструментов для разработки GUI-приложений существуют (более или
менее удачные и полные) руководства. Но практически отсутствуют материалы, в которых бы выполнялся
сравнительный анализ разных подходов.
При всём разнообразии, громоздкости и кажущейся сложности различных инструментальных средств
создания графических приложений, их общая схема однообразна и проста:
-
создаётся бесконечный цикл опроса (ожидания) событий (главный цикл), порождаемых
действиями пользователя (ввод с клавиатуры, перемещение указателя или нажатие кнопки мыши и т.д.); -
для каждого потенциально возможного (обрабатываемого) события назначается функция
обратного вызова (callback функция), которая будет вызываться при наступлении этого события
(обработчик события); - при возникновении событий, для которых не были назначены обработчики, они будут игнорироваться;
-
на каждом «витке» главного цикла приложения анализируются наступившие (со времени предыдущего «витка»)
события, и для каждого такого события вызывается его обработчик, если ожидающих событий несколько, то они
обрабатываются в порядке очереди; -
всякий GUI-инструмент имеет некоторый набор графических компонентов (виджетов — widget) и средства для
компоновки таких виджетов в окне приложения, а каждый из компонентов имеет свой специфический набор
событий, которые он может генерировать;
Такой подход называется событийно управляемым программированием (event driven
programming). Все GUI приложения, независимо от используемой графической технологии, будут
использовать этот общий шаблон.
Исходя из подобной сжатой формулировки, в дальнейшем нас будут интересовать только вопросы
применимости, выбора, установки и начала работы с инструментом. Но иногда мы будем обращаться и к
специфическим требованиям для определённых инструментов по оформлению функций обработчиков событий.
Вопросы компоновки виджетов в конкретных средах рассматриваться не будут.
Примечание. Внешний вид одного и того же GUI-приложения может отличаться при запуске
в разных средах (операционных системах, менеджерах рабочего стола, оконных менеджерах). Это обусловлено
тем, что фактическую прорисовку виджетов обеспечивают не графические библиотеки, а оконный менеджер
графической системы.
wx.PyEvent and wx.PyCommandEvent
Unlike most other classes these two still exist in Phoenix, and are
still the base classes that you should use when creating your own custom event
classes. For the most part they work just like they did in Classic, and they
take care of ensuring that any Python attributes that you assign to instances
of the class will still be there when the event is delivered to an event
handler. There is one main difference from Classic however, and that is that
those attributes are now stored in a dictionary object owned by the C++
instance, instead of being stored directly in the Python instance’s
dictionary. In most cases this won’t matter to you at all, but if your derived
class has a method (or , or )
then you will need to get the attributes from that other dictionary instead.
You can get a reference to that dictionary using . For
example:


