Уязвимость mikrotik позволяет получать список всех пользователей через winbox
Содержание:
Connecting to Router
WebFig can be launched from the routers home page which is accessible by entering routers IP address in the browser. When home page is successfully loaded, choose webfig from the list of available icons as illustrated in screenshot.
After clicking on webfig icon, login prompt will ask you to enter username and password. Enter login information and click connect.
Now you should be able to see webfig in action.
IPv6 Connectivity
RouterOS http service now listens on ipv6 address, too. To connect to IPv6, in your browser enter ipv6 address in square brackets, for example . If it is required to connect to link local address, don’t forget to specify interface name or interface id on windows, for example .
Enabling HTTPS
For HTTPS to work properly, you need to specify a valid certificate that Webfig can use. You can use a certificate that is issued by a trusted Certificate Authority (CA) or you can create your own root CA and generate self-signed certificates.
Note: Webfig supports wildcard certificates. You can generate such a certificate by specifying a wildcard in the common-name property, for example
To generate your own certificates and enable HTTPS access, you must first login to the router by using Webfig (HTTP version or you can use Winbox, SSH or Telnet), open a new terminal and input the following commands:
Create your own root CA on your router
/certificate
add name=LocalCA common-name=LocalCA key-usage=key-cert-sign,crl-sign
Sign the newly created CA certificate
/certificate
sign LocalCA
Note: In case you already have set up your own CA or you are using a service that signs certificates for you, then you create and sign the certificate remotely and import the certificate on the router later. In case you are importing a certificate, then make sure you mark the certificate as trusted.
Create a new certificate for Webfig (non-root certificate)
/certificate
add name=Webfig common-name=192.168.88.1
Note: Most browsers will throw out an invalid certificate error if the common name for the certificate does not match the address you are visiting, for this reason you can specify the router’s IP address as the common name since you will be using the IP address to open up Webfig. If you have a valid DNS name for your device’s IP address, then you can use it as the common name.
Sign the newly created certificate for Webfig
/certificate
sign Webfig ca=LocalCA
Note: It is not required to set the certificate as trusted if you created your own root CA on the same router since by default RouterOS will trust its own generated root CA and therefore will trust all certificates signed by it, including the newly created certificate for Webfig.
Enable www-ssl and specify to use the newly created certificate for Webfig
/ip service
set www-ssl certificate=Webfig disabled=no
Note: By default browsers will not trust self-signed certificates, you will need to add the certificate as trusted on the first time you visit the page in your browser. Another approach is to export the root CA certificate and import it as a trusted root certificate on your computer, this way all certificates signed by this router will be considered as valid and will make it easier to manage certificates in your network.
Note: Most Internet browsers have their own certificate trust chain and works independently from the operating system’s certificate trust chain, this means that you may have to add your own root CA’s certificate as a trusted certificate in your browser settings since trusting the certificate in your operating system’s settings might not have any effect when using your Internet browser.
Interface Overview
Winbox interface has been designed to be intuitive for most of the users.
Interface consists of:
- Main toolbar at the top where users ca add various info fields, like CPU and memory usage.
- Menu bar on the left — list of all available menus and sub-menus. This list changes depending on what packages are installed. For example if IPv6 package is disabled, then IPv6 menu and all it’s sub-menus will not be displayed.
- Work area — area where all menu windows are opened.
Title bar shows information to identify with which router Winbox session is opened. Information is displayed in following format:
@ ( ) - Winbox on ()
From screenshot above we can see that user admin is logged into router with IP address 10.1.101.18. Router’s ID is MikroTik, currently installed RouterOS version is v5.0beta1, RouterBoard is RB800 and platform is PowerPC.
On the Main toolbar’s left side is located undo and redo buttons to quickly undo any changes made to configuration. On the right side is located:
- winbox traffic indicator displayed as a green bar,
- indicator that shows whether winbox session uses TLS encryption
- checkbox Hide password. This checkbox replaces all sensitive information (for example, ppp secret passwords) with ‘*’ asterisk symbols.
Summary
WebFig is a web based RouterOS utility which allows you to monitor, configure and troubleshoot the router. It is designed as an alternative of WinBox, both have similar layouts and both have access to almost any feature of RouterOS.
WebFig is accessible directly from the router which means that there is no need to install additional software (except web browser with JavaScript support, of course).
As Webfig is platform independent, it can be used to configure router directly from various mobile devices without need of a software developed for specific platform.
Some of the tasks that you can perform with WebFig:
- Configuration — view and edit current configuration;
- Monitoring — display the current status of the router, routing information, interface stats, logs and many more;
- Troubleshooting — RouterOS has built in many troubleshooting tools (like ping, traceroute, packet sniffers, traffic generators and many other) and all of them can be used with WebFig.
Logging on and Passwords
- What is the username and password when logging on to the router for the first time?
- Username is ‘admin’, and there is no password (hit the ‘Enter’ key). You can change the password using the ‘/password’ command.
- How can I recover a lost password?
- If you have forgotten the password, there is no recovery for it. You have to reinstall the router.
- After power failure the MikroTik router is not starting up again
- If you haven’t shut the router down, the file system has not been unmounted properly. When starting up, the RouterOS will perform a file system check. Depending on the HDD size, it may take several minutes to complete. Do not interrupt the file system check! It would make your installation unusable.
- How can I access the router if the LAN interface has been disabled?
- You can access the router either locally (using monitor and keyboard) or through the serial console.
Настройка Bridge и VLAN на центральном маршрутизаторе
Зайдите в настройки центрального маршрутизатора MikroTik RB2011UAS-2HnD-IN, откройте меню Bridge, нажмите красный плюсик и создайте новый бридж интерфейс с именем bridge_main.
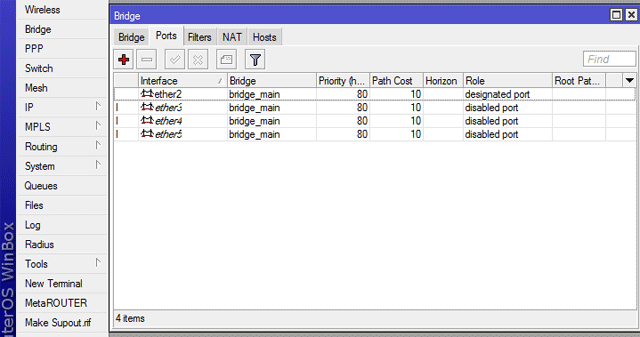
Перейдите на вкладку Ports, нажмите красный плюсик и добавьте в бридж bridge_main сетевой порт ether2.
Добавьте по аналогии в бридж сетевые порты ether3, ether3 и ether5. Также можете добавить оставшиеся сетевые порты. После добавления портов в бридж устройство можно использовать как коммутатор.
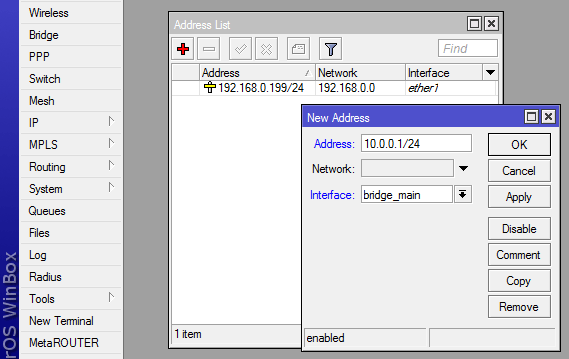
Чтобы роутер мог общаться с другими устройствами внутренней сети, интерфейсу bridge_main присвоим IP-адрес:
- Откройте меню IP — Addresses и нажмите красный плюсик.
- В появившемся окне в поле Address укажите адрес 10.0.0.1/24.
- В списке Interface выберите название интерфейса bridge_main.
- Нажмите кнопку OK.
К центральному маршрутизатору могут подключаться по кабелю несколько беспроводных базовых станций. Они будут создавать широковещательный трафик, который уменьшает пропускную способность и создает лишнюю нагрузку на оборудование. Поэтому нужно изолировать трафик каждой базовой станции путем создания виртуальных интерфейсов VLAN для каждой базы:
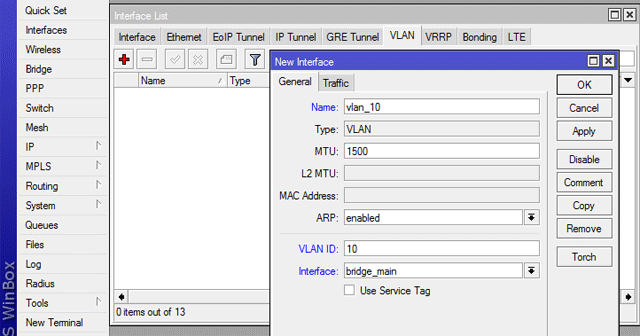
- Откройте меню Interfaces и перейдите на вкладку VLAN.
- Нажмите красный плюсик для добавления нового интерфейса влан.
- В поле Name указываем имя интерфейса, например vlan_10.
- В поле VLAN ID укажите номер влана 10. Сетевое оборудование не оперирует именами VLAN, а использует цифры от 1 до 4094. VLAN ID — это, по сути, имя виртуального интерфейса, которое будет использоваться оборудованием между собой. Единицу в качестве идентификатора использовать не рекомендуется, поскольку некоторые производители используют VLAN ID 1 в качестве значения по умолчанию. В устройствах, которые будут передавать данные через данный влан, нужно также будет указать VLAN ID номер 10.
- В списке Interface выбираем интерфейс bridge_main, на котором снимается влан. Наши сетевые порты 2-5 объединены в бридж, поэтому влан с номером 10 будет доступен на каждом из них. Если указать влан на конкретном интерфейсе, например ether2, то он не будет работать, потому что этот интерфейс объединен в бридж.
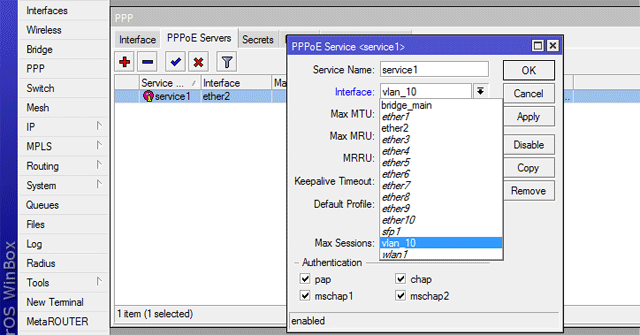
Переведем PPPoE сервер с интерфейса ether2 на vlan_10:
- Откройте меню PPP и перейдите на вкладку PPPoE Servers.
- Откройте нужный сервис и в поле Interface выберите интерфейс vlan_10.
- Нажмите кнопку OK.
Automatic upgrade
The automatic upgrade feature connects to the MikroTik download servers, and checks if there is a new RouterOS version for your device. If yes, a changelog is displayed, and Upgrade button is shown. Clicking the upgrade button, software packages are automatically downloaded, and device will be rebooted. Even if you have a custom set of packages installed, only the correct packages will be downloaded.
Note: If you are running v5.25 or older, the system will only auto-upgrade to the most recent version of the v5 major version release and not up to v6.20. Manual upgrade is needed in this case.
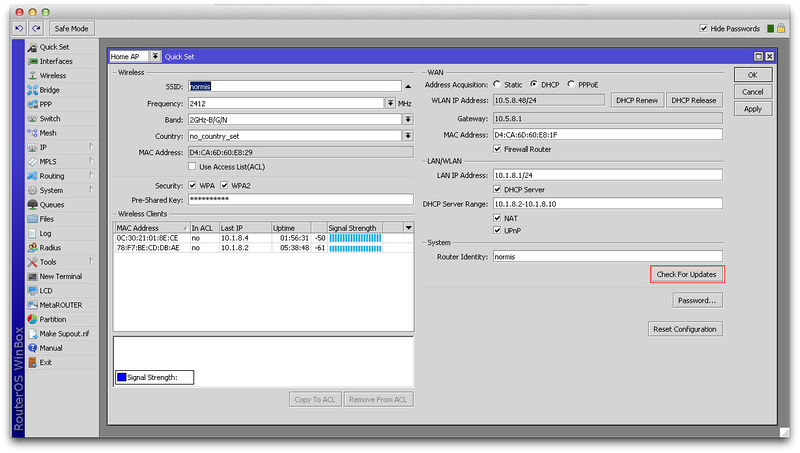
Upgrade button in QuickSet:
Upgrade button in the Packages menu:

After clicking the Upgrade button, Changelog is shown:
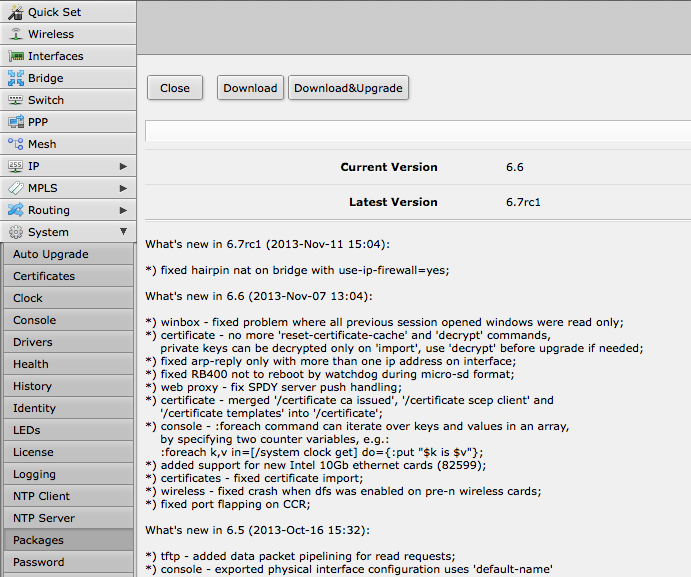
By clicking «Download & Upgrade», downloads will start, and router will reboot. After the reboot, your router will be running the latest RouterOS version. You can then click the Upgrade button again, to confirm that your router is running the latest RouterOS.
Распаковка и сброс настроек
И так, к нам в руки попал один из роутеров, первым делом нам нужно установить на компьютер утилиту для настройки – mikrotik winbox. Через нее конфигурируются все роутеры данной фирмы, только коммутаторы используют для этих целей web-интерфейс (и то не все).
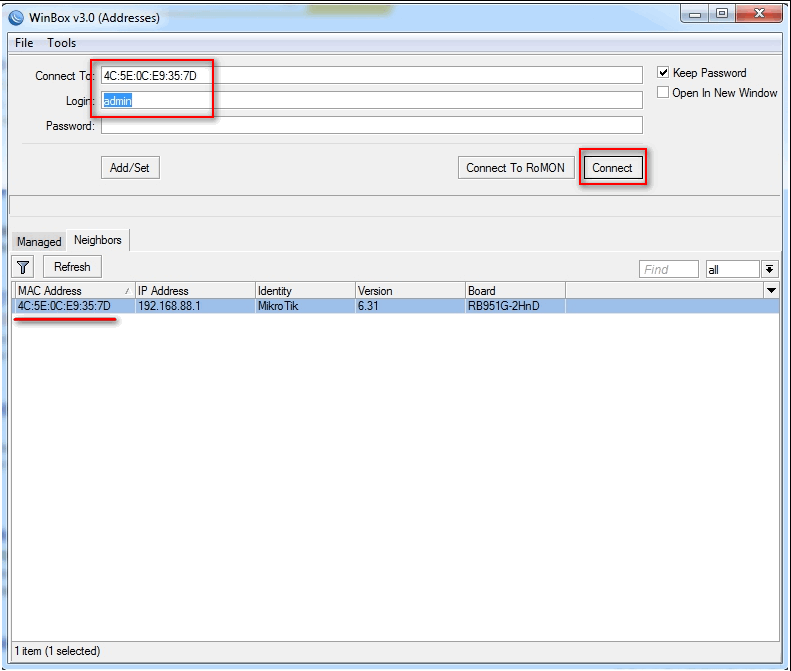
Подключаем наше устройства к сети «в любой порт кроме первого, так как на нем присутствует настройка по умолчанию, и он выделен под интернет» и запускает winbox. Теперь переходим на вкладку Neighbors (обнаружение) и подождем немного должно появится наше устройство. Нажимаем на mac адрес вводим логин по умолчанию «admin» и подключаемся.
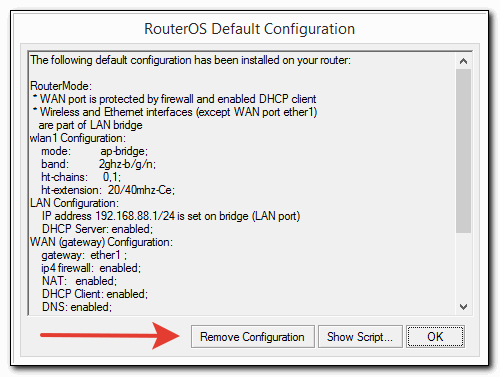
После входа выводится окно «RouterOS Default Configuration» со стандартными настройками от производителя. Их стоит оставить только в том случае если вы дальше ничего настраивать не будете. Так как для новичка разобраться в них будет сложно, поэтому сбрасываем MikroTik нажав на кнопку «Remove Configuration».
CLI
Command Line Interface (CLI) allows configuration of the router’s settings using text commands. Since there is a lot of available commands, they are split into groups organized in a way of hierarchical menu levels. Follow console manual for CLI syntax and commands.
There are several ways how to access CLI:
- Winbox terminal menu
- Telnet
- SSH
- serial cable etc.
Serial Cable
If your device has a Serial port, you can use a console cable (or Null modem cable)
Plug one end of the serial cable into the console port (also known as a serial port or DB9 RS232C asynchronous serial port) of the RouterBOARD and the other end in your PC (which hopefully runs Windows or Linux). You can also use a USB-Serial adapter. Run a terminal program (HyperTerminal, or Putty on Windows) with the following parameters for All RouterBOARD models except 230:
115200bit/s, 8 data bits, 1 stop bit, no parity, flow control=none by default.
RouterBOARD 230 parameters are:
9600bit/s, 8 data bits, 1 stop bit, no parity, hardware (RTS/CTS) flow control by default.
If parameters are set correctly you should be able to see login prompt.
Now you can access router by entering username and password:
MikroTik 4.15
MikroTik Login:

  MMM      MMM       KKK                          TTTTTTTTTTT      KKK
  MMMM    MMMM       KKK                          TTTTTTTTTTT      KKK
  MMM MMMM MMM  III  KKK  KKK  RRRRRR     OOOOOO      TTT     III  KKK  KKK
  MMM  MM  MMM  III  KKKKK     RRR  RRR  OOO  OOO     TTT     III  KKKKK
  MMM      MMM  III  KKK KKK   RRRRRR    OOO  OOO     TTT     III  KKK KKK
  MMM      MMM  III  KKK  KKK  RRR  RRR   OOOOOO      TTT     III  KKK  KKK

  MikroTik RouterOS 4.15 (c) 1999-2010       http://www.mikrotik.com/


 >
Detailed description of CLI login is in login process section.
Monitor and Keyboard
If your device has a graphics card (ie. regular PC) simply attach a monitor to the video card connector of the computer (note: RouterBOARD products don’t have this, so use Method 1 or 2) and see what happens on the screen. You should see a login promt like this:
MikroTik v3.16
Login:
Enter admin as the login name, and hit enter twice (because there is no password yet), you will see this screen:
Now you can start configuring the router, by issuing the setup command.
This method works with any device that has a video card and keyboard connector
Detailed Instructions
0. Power On RouterOS machine. Let it load, first boot takes a bit more.
1. If you are using a laptop or a computer with a wireless connection, turn it off: disconnect from Acces Point, turn off laptop switch, or disable interface.
2. Select a ethernet interface in your computer (if you have more than one) and connect it using a ethernet cable to the routerOS machine. Disable or disconnect the interfaces you are not using.
3. Set a IP/subnet mask to the selected interface. The selected IP address doesn’t matter at this moment, but should be in the same range that RouterOS Machine will be, in order to save some time after initial configuration.
5. Open winbox.
6. Make sure there’s no IP/MAC written in the address field, I had problems discovering MACs when there are addresses in there.
7. Click the button and wait for your RouterOS MAC appear. Click on it.
8. Enter username and password in their respective fields. By default, username is: admin and there is no password, leave it blank.
9. Uncheck «Secure Mode». It can cause some troubles using MAC-Winbox.
10. Click and wait for login process to finish.
11. Do a basic configuration to your RouterOS machine. Set the desired IPs and click on Winbox window. Make sure to remember the assigned IP address.
12. Configure your computer IP address to the same range that RouterOS, if you didn’t set in the same range before.
13. Enter RouterOS machine IP address in Winbox Address field
14. If you have security package enabled (by default, it is), check «Secure Mode» box to crypt the transmission. It’s not needed if you are sure nobody else can get connection to your RouterOS Machine
15. Continue configuration process.
Discontinued
The RB750GL is a small SOHO router in a white plastic case.
It has five independent Gigabit Ethernet ports and optional switch chip functionality for wire speed Gigabit throughput. It’s probably the most affordable MPLS capable Gigabit router on the market and now it is even more affordable than before. Compared to the previous model, the RB750GL has almost the same performance, but is significantly lower cost, only $59.95!
With it’s compact design and clean looks, it will fit perfectly into any SOHO environment.
Box contains: RB750GL, plastic case, power adapter
Send purchase questions
Specifications
| Details | |
|---|---|
| Product code | RB750GL |
| Architecture | MIPSBE |
| CPU | AR7242 |
| CPU core count | 1 |
| CPU nominal frequency | 400 MHz |
| Dimensions | 113x89x28mm. Weight without packaging and cables: 129g |
| License level | 4 |
| Operating System | RouterOS |
| Size of RAM | 64 MB |
| Storage size | 64 MB |
| Storage type | NAND |
| Tested ambient temperature | -30C to +70C |
| Suggested price | $59.95 |
Included parts
12V 1A power adapter
BrochureOpen
Quick GuideOpen
RouterOS current releaseDownload
RouterBoot firmware
Download
User GuideOpen
RouterOS software manualOpen
Declaration of conformity
- All tests are done with Xena Networks specialized test equipment (XenaBay),and done according to RFC2544 (Xena2544)
- Max throughput is determined with 30+ second attempts with 0,1% packet loss tolerance in 64, 512, 1518 byte packet sizes
- Test results show device maximum performance, and are reached using mentioned hardware and software configuration, different configurations most likely will result in lower results
Starting Winbox
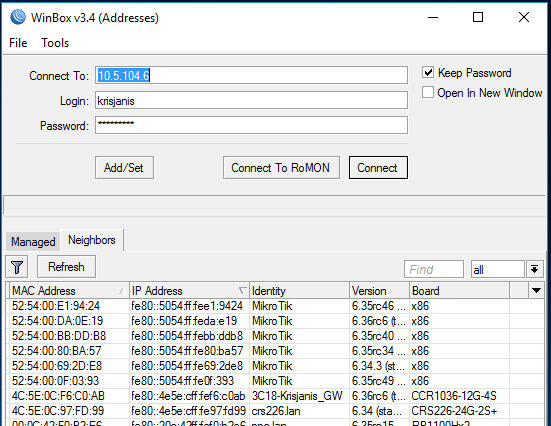
To connect to the router enter IP or MAC address of the router, specify username and password (if any) and click on Connect button. You can also enter the port number after the IP address, separating them with a colon, like this 192.168.88.1:9999. The port can be changed in RouterOS services menu.
Note: It is recommended to use IP address whenever possible. MAC session uses network broadcasts and is not 100% reliable.
You can also use neighbor discovery, to list available routers use Neighbors tab:
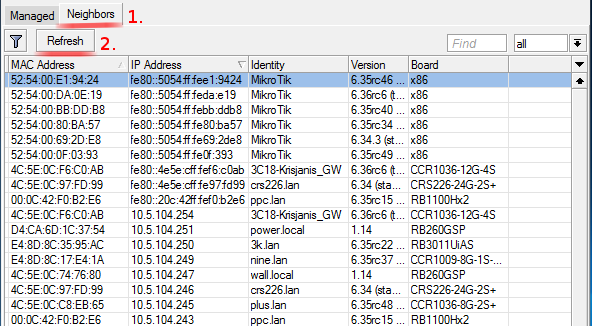
From list of discovered routers you can click on IP or MAC address column to connect to that router. If you click on IP address then IP will be used to connect, but if you click on MAC Address then MAC address will be used to connect to the router.
Note: Neighbor discovery will show also devices which are not compatible with Winbox, like Cisco routers or any other device that uses CDP (Cisco Discovery Protocol). If you will try to connect to SwOS device, then connection will be established through web browser
Description of buttons and fields of loader screen
Simple mode:
— Buttons/check-boxes
- Connect — Connect to the router
- Connect To RoMON — Connect to RoMON Agent
- Add/set — Save/Edit any of saved router entries in Managed tab.
- Open In New Window — Leaves loader open in background and opens new windows for each device to which connection is made.
— Fields
- Connect To: — destination IP or MAC address of the router
- Login — username used for authentication
- Password — password used for authentication
- Keep Password — if unchecked, password is not saved to the list
Advanced mode:
— Buttons/check-boxes
- Browse — Browse file directory for some specific session
- Keep Password — if unchecked, password is not saved to the list
- Secure mode — if checked, winbox will use DH-1984 for key exchange and modified and hardened RC4-drop3072 encryption to secure session.
- Autosave session — Saves sessions automatically for devices to which connection are made.
— Fields:
- Session — Saved router session.
- Note — Note that is assigned to save router entry.
- Group — Group to which saved router entry is assigned.
- RoMON Agent — Select RoMON Agent from available device list
Description of menu items in loader screen
— File
- New — Create new managed router list in specified location
- Open — Open managed router list file
- Save As — Save current managed router list to file
- Exit — Exit Winbox loader
— Tools
- Advanced Mode — Enables/Disables advanced mode view
- Import — Imports saved session file
- Export — Exports saved session file
- Move Session Folder — Change path where session files are stored
- Clear cache — Clear winbox cache
- Check For Updates — Check for updates for Winbox loader
Warning: Managed routers list is not encrypted by default. To encrypt it, set the master password!
It is possible to use command line to pass connect to, user and password parameters automatically:
winbox.exe ]]
For example (with no password):
winbox.exe 10.5.101.1 admin ""
Will connect to router 10.5.101.1 with user «admin»without password.
It is possible to use command line to pass connect to, user and password parameters automatically to conenct to router through RoMON. In this case RoMON Agent must be saved on Managed routers list so Winbox would know user and password for this device:
winbox.exe --romon ]]]
For example (with no password):
winbox.exe --romon 10.5.101.1 D4:CA:6D:E1:B5:7D admin ""
Will connect to router D4:CA:6D:E1:B5:7D through 10.5.101.1 RoMON Agent with user «admin» without password.
IPv6 connectivity
Winbox supports IPv6 connectivity. To connect to the routers IPv6 address, it must be placed in square braces the same as in web browsers when connecting to IPv6 server.
Example:
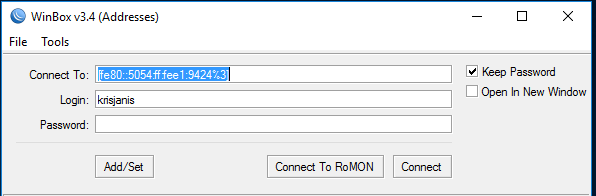
Winbox neighbor discovery is now capable of discovering IPv6 enabled routers. As you can see from the image below, there are two entries for each IPv6 enabled router, one entry is with IPv4 address and another one with IPv6 link-local address. You can easily choose to which one you want to connect:


