Лучшие программы wake-on-lan для windows
Содержание:
Hardware settings
The target computer’s motherboard and Network Interface Controller have to support Wake-on-LAN. The target computer has to be physically connected (with a cable) to a router or to the source computer for WoL to work properly. Some wireless cards have support for Wake on Wireless (WoWLAN or WoW).
The Wake-on-LAN feature also has to be enabled in the computer’s BIOS. Different motherboard manufacturers use slightly different language for this feature. Look for terminology such as «PCI Power up», «Allow PCI wake up event» or «Boot from PCI/PCI-E».
Note that some motherboards are affected by a bug that can cause immediate or random whenever the BIOS WoL feature is enabled.
The main window
The main content section of the main window is divided into three
parts. On the left are the optional “groups”, or “folders”.
This can be turned on or off via the “Folders” button.
The center section shows the current status of all of the hosts
in the database. You can change this view via the “Views”
button. Hosts are “pinged” to determine if they are on-line or
off-line, and this can be controlled via the “Pinger” button.
When a host changes state, on-line / off-line, a notifcation sound
is heard. This is controlled via the options page.
The right section has two “Hot Buttons”, which are used to wake
up all hosts at once, or shutdown all hosts at once. When
using “Start All”, there is a 750ms delay between each host starting
up. This is to prevent a power overload if many hosts are
started at the same time.
The “Schedule” button is used to access the task-scheduler function. This is used to schedule wake-ups and shut-downs to occur in the future.

WOL main window
Double-clicking a host will bring up the “properties” page for that host.Right-clicking a host will bring up a list of available actions to use on that host. These include:
New Host: You can add a new host here.Wake Up: This will send a WOL command to turn on the host.Shut Down: This will use Netbios to shutdown the host, or the “shutdown command” if specified.Abort Shutdown: If you have selected a shutdown with a warning message, and the time hasn’t expired, you may cancel the shutdown.Remote Desktop: Select this to open a Windows Remote Desktop connection to the host.Message: Use this to send popup messages to remote hosts.Properties: Used to change the settings for this host.Clear IP: If you have DHCP hosts, you can remove their ip’s from the database with this option.Delete: Remove this host from the database.
Menu Options
-
File
- New Host – Use this to add a new host to the database
- Import Settings – You can import a database XML file
- Export Settings – You can save your current database to a file
- Print – Print a listing of the database
- Exit
- Edit
-
View
- Toolbar – turn on/off the toolbar
- Status Bar – turn on/off the status bar
- Folders – turn on/off the folders (groups) display
- Show Groups – display hosts in groups (online / offline), or all mixed together
- Show Hot Buttons – turn on/off the “start all”, “shutdown all” buttons
- Event Log – Displays the event viewer
- Minimize to task tray – This feature can be used to put WOL into the task tray next to the clock. When WOL is on the task tray, notifications popup when hosts change state. You may also right-click the task-tray icon to access some common commands.
Auto Start with Windows – Turn this feature on to have WOL start automatically when you log into Windows
Reset Window Layout
Language
- Portugese
- German
- French
- Russian
- English
Tools
- Options – Used to set general program options for WOL
- Search for Machines – The search tool can help you find hosts and determine their MAC addresses
- Schedule – You can schedule wakeup / shutdown events in the future
- Listener – The “Listener” is a tool that displays all WOL packets received, useful in troubleshooting
- Trace Log – This is a debugging tool that creates a log file in your “My Documents” folder. You can send the file to our developers to help troubleshoot a problem.
Help
- Contents – Displays this help file
- Donate – You can donate money to help the project
- License – Displays the GNU Open Source license
Ограничение скорости в локалке
Здесь мы будем ограничивать скорость обмена данными для определенного абонента. Роутер может идентифицировать подключенное к нему устройство по адресу MAC, и затем скорость будет понижена именно для выбранного устройства.
В то же время можно задать правило, согласно которому ограничение по скорости будет действовать для определенного IP-адреса или их набора. Второй метод чаще применяют так: в качестве IP-адресов указывается весь диапазон, с которым работает сервер DHCP. Ну а те пользователи, на которых ограничение не распространяется, должны использовать статические IP, не принадлежащие диапазону DHCP-сервера. Это – пример, но не рекомендация. Переходим к настройке.
Идентификация по аппаратному адресу
Итак, Вы решили, что проще будет определять абонента по MAC-адресу, а не по IP, и для него нужно установить ограничение по скорости. Пара советов, как узнать адрес MAC.
Вкладка DHCP Client List
- Если абонент подключен к сетевому комбайну, откройте вкладку «DHCP Client List» и найдите того, кто Вам нужен
- Если речь идет о компьютере, посмотрите значение MAC в «Состоянии» соединения (выполните переход «Поддержка» -> «Подробности»)
- На корпусе смартфонов и некоторых других девайсов есть наклейка, где адрес MAC напечатан в явном виде.
Запишите требуемое значение на листик, так как его придется вписывать с клавиатуры. Если сложностей не возникло, переходите к следующему этапу.
Address Reservation
Нажмите кнопку «Add New». В появившемся поле сверху Вы впишете требуемый MAC-адрес. Ну а нижнее поле предназначено для установки IP-адреса (используйте любое значение из диапазона «локалки»). Самый беспроигрышный вариант – устанавливать тот IP, который уже был присвоен устройству (смотрите вкладку «DHCP Client List»). Проверив, что в списке «Status» выбрано значение «Enabled», нажмите «Save». Роутер уйдет в перезагрузку.
Остался последний этап. Откройте вкладку «Bandwidth Control» -> «Rules List». Тут нужно нажать «Add New»:
В поле «IP Range» Вы прописываете тот IP-адрес, который был закреплен за устройством на предыдущем этапе:
Ввод IP-адреса
Конечно, нужно заполнить поля «Engress Bandwidth» и «Ingress Bandwidth» (те самые значения ограничения скоростей), а затем Вы нажимаете «Save». Можете проверить, что скорость скачивания и отдачи теперь является ограниченной, причем, только у одного абонента.
Используем диапазон IP-адресов
Выше мы рассматривали, как ограничить скорость для определенного локального устройства. Но можно ограничить ее для целого набора устройств. При этом даже можно указать, что ограничение распространяется на всех абонентов, получающих адрес через DHCP. Последний из методов рассматривается далее.
Выясним, какой диапазон адресов используется для автоматической выдачи. Откройте вкладку «DHCP Settings» и посмотрите, чему равно значение «Start IP» и «End IP»:
Как видите, ничего сложного здесь нет, мы просто использовали те же цифры, что указаны в настройках DHCP, указали тот же диапазон адресов.
Помните, что на каждой из вкладок Вы нажимаете «Save», и только тогда изменения вступают в силу.
Если ограничение, как указано выше, распространяется на весь диапазон сервера DHCP, то дальше можно поступить следующим образом. Любое новое локальное устройство вы настраиваете на автоматическое получение маски и адреса, если для него скорость надо ограничить. А если этого не нужно, то присвойте сетевой карточке маску с последним нулем, а также адрес вида 192.168.1.X, где «X» принадлежит интервалу 2-99 или 200-255. Указанные цифры являются верными для нашего примера.
Misc
Settings for the Dude program itself.
- Undo queue size — how many actions should be kept in the Undo memory
- Database commit interval — How often should the Dude database be saved
- Mac Mapping Refresh Interval — How often to update the
- Ask confirmation when removing — whether to show you the confirmation dialogs
- Resolve MAC address manufacturer — in Table views, will show device MAC address as Routerboard:20:94:61 and similar, depending on manufacturer
- Contents pane behavior — how to open new panes from the left-hand menu, possible options:
- Single click open
- Double click open
- Double click insert top
How to use Wake-on-LAN
Now that the computer is set up to use Wake-on-LAN, you need a program that can send the magic packet required to instigate the startup. TeamViewer is one example of a free remote access tool that supports Wake-on-LAN. Since TeamViewer is made specifically for remote access, its WoL function is handy when you need into your computer while away but forgot to turn it on before you left.
TeamViewer can use Wake-on-LAN in two ways. One is through the network’s public IP address, and the other is through another TeamViewer account on the same network (assuming the other computer is on). This lets you wake the computer without configuring router ports since the other local computer that has TeamViewer installed can relay the WoL request internally.
One Wake-on-LAN tool that runs on Ubuntu is called powerwake. Install it with the following command:
sudo apt-get
Once installed, enter powerwake followed by the IP address or hostname that should be turned on, like this:
powerw
or:
powerwake
В-третьих, настроем Брандмауэр (Firewall)
- Откройте Панель управления
- Откройте Брандмауэр Windows
- В левой области выберите Дополнительные параметры
- В диалоговом окне “Брандмауэр Windows” (режим повышенной безопасности) в левой области щелкните — Правила для входящих подключений, и потом, в правой области, щелкните — Создать правило.
- Откроется мастер создания правила для нового входящего подключения.
- Выбираем “Для порта”
- Нажимаем кнопку “Далее”
- Выбираем “протокол UDP”
- Галочку “Определенные локальные порты” и пишем “7,9” (это значит, что вы хотите открыть порт 7 и 9 для входящих подключений)
- Нажимаем кнопку “Далее”
- Оставляем галочку напротив “Разрешить подключение”
- Нажимаем кнопку “Далее”
- Убираем галочку напротив “Публичный”
- Нажимаем кнопку “Далее”
- Даем имя Вашему правилу, например “WoL”
- Нажимаем кнопку “Готово”
Брандмауэр настроен.
Если у Вас Windows 8, Windows 8.1 или Windows 10, Вам нужно деактивировать быстрый запуск.
Начиная с Windows 8, стандартная процедура выключения помещает компьютер в «гибирилизации». Поскольку Windows не поддерживает Wake-on-LAN для этого состояния, рекомендуется
деактивировать быстрый запуск. После этого запуска компьютер всегда, при выключении, ставится
в спящий режим.
Примечание. Для этого процесса требуются административные права.
Чтобы отключить быстрый запуск под Windows, выполняем такие действия:
1. Запускаем компьютер.
2. Открываем панель управления.
Откроется окно панели управления.
3. Нажмите «Система» и «Безопасность».
4. В разделе «Электропитание» жмите «Изменить».
5. Нажмите ссылку — Изменить настройки, которые сейчас недоступны.
6. Снимите флажок — Включить быстрый запуск (рекомендуется).
7. Быстрый запуск теперь отключен.
Script repository
Sub-menu level:
Contains all user created scripts. Scripts can be executed in several different ways:
- on event — scripts are executed automatically on some facility events ( scheduler, netwatch, VRRP)
- by another script — running script within script is allowed
- manually — from console executing command or in winbox
Note: Only scripts (including schedulers, netwatch etc) with equal or higher permission rights can execute other scripts.
| Property | Description |
|---|---|
| comment (string; Default: ) | Descriptive comment for the script |
| dont-require-permissions (yes | no; Default: no) | Bypass permissions check when script is being executed, useful when scripts are being executed from services that have limited permissions, such as Netwatch |
| name (string; Default: «Script») | name of the script |
| policy (string; Default: ) | list of applicable policies:
Read more detailed policy descriptions |
| source (string;) | Script source code |
Read only status properties:
| Property | Description |
|---|---|
| last-started (date) | Date and time when the script was last invoked. |
| owner (string) | User who created the script |
| run-count (integer) | Counter that counts how many times script has been executed |
Menu specific commands
| Command | Description |
|---|---|
| run (run ) | Execute specified script by ID or name |
Environment
Sub-menu level:
Contains all user defined variables and their assigned values.
 > :global example;
 > :set example 123
 > /environment print
"example"=123
Read only status properties:
| Property | Description |
|---|---|
| name (string) | Variable name |
| user (string) | User who defined variable |
| value () | Value assigned to variable |
Job
Sub-menu level:
Contains list of all currently running scripts.
Read only status properties:
| Property | Description |
|---|---|
| owner (string) | User who is running script |
| policy (array) | List of all policies applied to script |
| started (date) | Local date and time when script was started |
Настройка Wake on LAN на компьютере.
Первым делом нужно настроить Windows. Рассмотрим на примере Windows 10. Нажимаем комбинацию клавиш Win+X, выбираем пункт сетевые подключения. В сетевых подключениях находим нашу сетевую карту (подключение к локальной сети), щелкаем по нему правой кнопкой и открываем свойства, затем нажимаем кнопку настроить. Открываем вкладку «Управление электропитанием», тут необходимо поставить галочку «разрешить этому устройству выводить компьютер из ждущего режима». Затем, если вы счастливый обладатель сетевой карты Realtek, открываем вкладку дополнительно.
В ней необходимо проверить три параметра:
- Включение по локальной сети после отключения.
- Включить при совпадении шаблона.
- Включить при срабатывании функции Magic Packet.
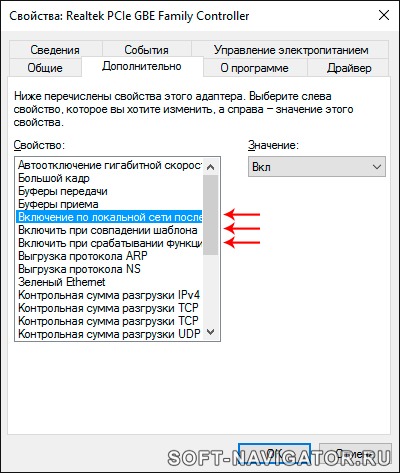
Все эти параметры должны быть включены, так же они могут быть подписаны на английском, зависит от вашего драйвера. На этом пока настройки в Windows окончены.
Step 2: Windows operating system WoL setup
-
Find and open Network adapters. Ignore Bluetooth connections and virtual adapters. Double-click (or double-tap) Network adapters or select the + or > button next to it to expand that section.
-
Right-click or tap-and-hold the adapter that belongs to the active internet connection. Examples of what you might see are Realtek PCIe GBE Family Controller or Intel Network Connection, but it varies depending on the computer.
-
Choose Properties.
-
Open the Advanced tab.
-
Under the Property section, select Wake on Magic Packet. If you can’t find this, skip to Step 8; Wake-on-LAN might work anyway.
-
From the Value menu on the right, choose Enabled.
-
Open the Power Management tab. It might be called Power, depending on the version of Windows or network card.
-
Enable Allow this device to wake the computer and Only allow a magic packet to wake the computer. These settings might be under a section called Wake-on-LAN and be a single setting called Wake on Magic Packet.
If these options don’t appear or are greyed out, update the network adapter’s device drivers. However, it’s possible that the network card doesn’t support WoL. This is most likely true for wireless network interface cards (NICs).
-
Select OK to save the changes and exit that window. You can also close Device Manager.
Step 2: Linux WoL Setup
The steps for turning on Wake-on-LAN for Linux are most likely not the same for every Linux OS, but here’s how to do it in Ubuntu:
-
Search for and open Terminal, or press the Ctrl+Alt+T shortcut.
-
Install ethtool with this command:
sudo apt-ge
data-type=»code»>
-
See if your computer supports Wake-on-LAN:
data-type=»code»>
Look for the Supports Wake on value. If there’s a g there, then Wake-on-LAN can be enabled.
If eth0 isn’t your default network interface, modify the command to reflect that. The ifconfig -a command lists the available interfaces. Look for the ones with a valid inet addr (IP address).
-
Set up Wake-on-LAN in Ubuntu:
sudo etht
data-type=»code»>
If you get a message about the operation not being supported, then you most likely saw a d during the last step, which means you can’t enable Wake-on-LAN on Ubuntu.
-
After the command runs, rerun the one from Step 3 to make sure that the Wake-on value is g instead of d.
Программы для использования с Wake-On-LAN
Linux
Для операционной системы существует несколько популярных утилит, для удаленного включения компьютера с помощью технологии Wake on LAN. Одна из самых популярных — это etherwake.
Программа etherwake устанавливается в популярных дистрибутивах следующим образом:
В CentOS/RedHat:
В Debian/Linux Mint/Ubuntu:
Используется она просто — нужно выполнить саму утилиту с MAC адресом компьютера, который необходимо включить. К примеру, включения компьютера с MAC адресом 12-34-45-78-90-AB будет выглядеть так:
Если нужно включить компьютер по имени или ip адресу, то придется открыть файл /etc/ethers и вписать в него с новой строки пару «MAC адрес — имя компьютера». Выглядит подобная запись следующим образом:
Теперь, когда имени sysadmin присвоен MAC адрес 12-34-45-78-90-AB, можно воспользоваться именем компьютера в etherwake:
Аналогично будет выглядеть запись для IP, с той разницей, что после MAC адрес будет написан IP адрес:
Windows
Используя программу WakeMeOnLan вы можете использовать технологию Wake on LAN для включения любого количества компьютеров удаленно по сети или через Интернет. Программа имеет удобную графическую оболочку, а также поддерживает работу в режиме командной строки. Скачать её можно с официального сайта.
Для использования программы из графического интерфейса, необходимо сперва добавить его в программу (File — Add New Computer), после чего нажать на нем правой кнопкой мыши и выбрать пункт «Wake Up Selected Computers».
Примеры использования из командной строки:
Включение компьютера с IP адресом 192.168.2.1:
Включение компьютера с именем PC01:
Включение компьютера с MAC адресом 12-34-45-78-90-AB:


