Asp.net core: ваше первое приложение на linux c использованием visual studio code
Содержание:
Windows as a developer machine
Windows is a popular operating system and it can be a great cross-platform development environment. This section describes cross-platform features such as the Windows Subsystem for Linux (WSL) and the new Windows Terminal.
Windows Subsystem for Linux
With WSL, you can install and run Linux distributions on Windows. This enables you to develop and test your source code on Linux while still working locally on your Windows machine.
When coupled with the Remote — WSL extension, you get full VS Code editing and debugging support while running in the context of WSL.
See the Developing in WSL documentation to learn more or try the Working in WSL introductory tutorial.
New Windows Terminal
Available from the Microsoft Store, the Windows Terminal (Preview) lets you easily open PowerShell, Command Prompt, and WSL terminals in a multiple tab shell.
Обновление дистрибутива LinuxUpdate your Linux distribution
В некоторых дистрибутивах WSL Linux отсутствуют библиотеки, необходимые для запуска сервера VS Code.Some WSL Linux distributions are lacking libraries that are required by the VS Code server to start up. Вы можете добавить дополнительные библиотеки в дистрибутив Linux с помощью диспетчера пакетов.You can add additional libraries into your Linux distribution by using its package manager.
Например, чтобы обновить Debian или Ubuntu, используйте:For example, to update Debian or Ubuntu, use:
Чтобы добавить wget (для получения содержимого с веб-серверов) и CA-Certificates (чтобы разрешить приложениям на основе SSL проверять подлинность SSL-соединений), введите:To add wget (to retrieve content from web servers) and ca-certificates (to allow SSL-based applications to check for the authenticity of SSL connections), enter:
Next steps
Once you have installed and set up VS Code, these topics will help you learn more about VS Code:
- Additional Components — Learn how to install Git, Node.js, TypeScript, and tools like Yeoman.
- User Interface — A quick orientation to VS Code.
- Basic Editing — Learn about the powerful VS Code editor.
- Code Navigation — Move quickly through your source code.
- Debugging — Debug your source code directly in the VS Code editor.
- Proxy Server Support — Configure your proxy settings.
If you’d like to get something running quickly, try the Node.js tutorial walkthrough that will have you debugging a Node.js web application with VS Code in minutes.
Start Visual Studio Code
Once the VS Code is installed on your system, you can launch it either from the command line or by clicking on the VS Code icon in graphical mode.
$ code
OR
Ubuntu 18:04: Activities >> Search for Visual Studio Code
Install Visual Studio Code on Ubuntu 18.04 – Start Visual Studio Code on Ubuntu 18.04
Linux Mint 19: Menu >> Programming >> Visual Studio Code
Install Visual Studio Code on Linux Mint 19 – Start Visual Studio Code on Linux Mint 19
Debian 9: Activities >> Search for Visual Studio Code
Install Visual Studio Code on Debian 9 – Start Visual Studio Code on Debian 9
Visual Studio Code running on Ubuntu 18.04:
Install Visual Studio Code on Ubuntu 18.04 – Visual Studio Code running on Ubuntu 18.04
Visual Studio Code running on Linux Mint 19:
Install Visual Studio Code on Linux Mint 19 – Visual Studio Code Running on Linux Mint 19
Visual Studio Code running on Debian 9:
Install Visual Studio Code on Debian 9 – Visual Studio Code Running on Debian 9
Common questions
What command-line arguments are supported by the Windows Setup?
VS Code uses Inno Setup to create its setup package
for Windows. Thus, all the Inno Setup command-line switches are available for use.
Additionally, you can prevent the Setup from launching VS Code after completion with .
On certain devices, editor scrolling is not smooth but laggy for an unpleasant experience. If you notice this issue, make sure you install the Windows 10 October 2018 update where this issue is fixed.
Icons are missing
I installed Visual Studio Code on my Windows 7 or 8 machine. Why are some icons not appearing in the workbench and editor?
VS Code uses SVG icons and we have found instances where the .SVG file extension is associated with something other than . We’re considering options to fix it, but for now here’s a workaround:
Using the Command Prompt:
- Open an Administrator Command Prompt.
- Type .
Using the Registry Editor (regedit):
- Start .
- Open the key.
- Find the key.
- Set its Data value to .
- Exit .
Windows as a Linux developer machine
Another option for Linux development with VS Code is use a Windows machine with the Windows Subsystem for Linux (WSL).
Windows Subsystem for Linux
With WSL, you can install and run Linux distributions on Windows. This enables you to develop and test your source code on Linux while still working locally on a Windows machine. WSL supports Linux distributions such as Ubuntu, Debian, SUSE, and Alpine available from the Microsoft Store.
When coupled with the Remote — WSL extension, you get full VS Code editing and debugging support while running in the context of a Linux distro on WSL.
See the Developing in WSL documentation to learn more or try the Working in WSL introductory tutorial.
Использование docker multi-stage для сборки windows образов
Всем привет! Меня зовут Андрей, и я работаю DevOps инженером в компании Exness в команде разработки. Моя основная деятельность связана со сборкой, деплоем и поддержкой приложений в docker под операционной системой Linux (далее — ОС). Не так давно у меня появилась задача с теми же активностями, но в качестве целевой ОС проекта стала Windows Server и набор проектов на C++. Для меня это было первое плотное взаимодействие c docker контейнерами под ОС Windows и в целом с приложениями на C++. Благодаря этому я получил интересный опыт и узнал о некоторых тонкостях контейнеризации приложений в ОС Windows.
Common questions
I’m getting a «Running without the SUID sandbox» error?
You can safely ignore this error.
Debian and moving files to trash
If you see an error when deleting files from the VS Code Explorer on the Debian operating system, it might be because the trash implementation that VS Code is using is not there.
Run these commands to solve this issue:
«Visual Studio Code is unable to watch for file changes in this large workspace» (error ENOSPC)
When you see this notification, it indicates that the VS Code file watcher is running out of handles because the workspace is large and contains many files. The current limit can be viewed by running:
The limit can be increased to its maximum by editing and adding this line to the end of the file:
The new value can then be loaded in by running . Note that Arch Linux works a little differently, See Increasing the amount of inotify watchers for details.
While 524,288 is the maximum number of files that can be watched, if you’re in an environment that is particularly memory constrained, you may wish to lower the number. Each file watch takes up 1080 bytes, so assuming that all 524,288 watches are consumed, that results in an upper bound of around 540 MiB.
Another option is to exclude specific workspace directories from the VS Code file watcher with the setting. The default for excludes and some folders under , but you can add other directories that you don’t want VS Code to track.
I can’t see Chinese characters in Ubuntu
We’re working on a fix. In the meantime, open the application menu, then choose File > Preferences > Settings. In the Text Editor > Font section, set «Font Family» to . If you’d rather edit the file directly, set as shown:
Package git is not installed
This error can appear during installation and is typically caused by the package manager’s lists being out of date. Try updating them and installing again:
The code bin command does not bring the window to the foreground on Ubuntu
Running on Ubuntu when VS Code is already open in the current directory will not bring VS Code into the foreground. This is a feature of the OS which can be disabled using .
Under General > General Options > Focus & Raise Behaviour, set «Focus Prevention Level» to «Off». Remember this is an OS-level setting that will apply to all applications, not just VS Code.
Cannot move or resize the window while X forwarding a remote window
If you are using X forwarding to use VS Code remotely, you will need to use the native title bar to ensure you can properly manipulate the window. You can switch to using it by setting to .
Using the custom title bar
The custom title bar and menus were enabled by default on Linux for several months. The custom title bar has been a success on Windows, but the customer response on Linux suggests otherwise. Based on feedback, we have decided to make this setting opt-in on Linux and leave the native title bar as the default.
The custom title bar provides many benefits including great theming support and better accessibility through keyboard navigation and screen readers. Unfortunately, these benefits do not translate as well to the Linux platform. Linux has a variety of desktop environments and window managers that can make the VS Code theming look foreign to users. For users needing the accessibility improvements, we recommend enabling the custom title bar when running in accessibility mode using a screen reader. You can still manually set the title bar with the Window: Title Bar Style () setting.
Broken cursor in editor with display scaling enabled
Due to an upstream issue #14787 with Electron, the mouse cursor may render incorrectly with scaling enabled. If you notice that the usual text cursor is not being rendered inside the editor as you would expect, try falling back to the native menu bar by configuring the setting to .
Download deb file of VS Code for Ubuntu from Official VS Code Website:
This method is the simplest method to install VS Code on your Linux Ubuntu Unity 18.04.2 LTS. Kindly follow the below steps to get VS Code on your Ubuntu.
- Go to VS Code Official Page.
- You will find a lot of Download options, Windows, Linux, Mac.
- In the Linux Section, Download the .deb file available.
- Kindly wait till the download finishes.
- Once the download is completed then simply run the .deb file on your Linux Ubuntu.
- The file will open on the Ubuntu Software. Choose the Install option now.
 Choose Install
Kindly wait till the installation completes. Once the installation is done then you can open and use Visual Studio Code Linux from All Applications.
 Visual Studio Code Linux
Download Visual Studio Code Linux for Fedora, SUSE, RHEL:
If you are looking to download VS Code for Linux Distros such as Fedora and SUSE and RHEL, then you use the Official Visual Studio Code Website itself to download their .rpm file using which you can install VS Code on the above mentioned Linux Distributions.
Горячие клавиши
До сих пор мы рассмотрели два сочетания клавиш:
- : Открыть настройки
- : Открыть командную строку
Command Palette обеспечивает доступ ко всем функциям Visual Studio Code, включая сочетание клавиш для общих операций. Если вы устанавливаете расширение, любые действия, инициируемые вручную, будут перечислены здесь. Однако для таких расширений, как Prettier и Beautify, они будут использовать одну и ту же команду Format. Visual Studio Code также имеет свой собственный встроенный модуль форматирования. Чтобы указать, какой плагин должен выполнять действие, вам нужно перейти в редактор настроек и изменить конфигурацию стандартного форматера. Вот пример того, как я установил это в моем случае:
Вы также можете указать другой форматер для конкретного языкового режима. Вот еще несколько сочетаний клавиш, которые необходимо запомнить:
- позволит вам перейти к любому файлу или символу, набрав его имя
- проведет вас по последнему набору открытых файлов
- позволит вам перейти к определенному символу в файле
- позволит вам перейти к определенной строке в файле
Вот мои любимые команды, которые я часто использую при написании кода:
- : нажмите несколько раз, чтобы выбрать одинаковые ключевые слова. Когда вы начинаете печатать, он переименовывает все выбранные ключевые слова
- : Добавить курсор выше или ниже, чтобы редактировать несколько строк одновременно
- : Добавить курсор в нескольких местах для одновременного редактирования в разных разделах кода
- : Добавить 2 или более строк в одну.
- : Поиск ключевого слова в текущем файле
- : Поиск и замена в текущем файле
- : Поиск по всем файлам
Если вы зайдете в меню параметров, вы найдете горячие клавиши для большинства команд. Лично я никогда не привык к некоторым сочетаниям клавиш по умолчанию, которые поставляются с Visual Studio Code из-за использования таких редакторов, как Atom, в течение длительного времени. Решением, которое я нашел, было просто установить Atom Keymap. Это позволяет мне использовать сочетание клавиш для переключения боковой панели. Если вы хотите отредактировать привязки клавиатуры самостоятельно, просто перейдите в меню File > Preferences > Keyboard Shortcuts. (Code > Preferences > Keyboard Shortcuts в macOS).

Просто о NModbus (RTU)
Tutorial
Данная статья рассчитана на новичков.
Теория
Modbus — коммуникационный протокол, основанный на архитектуре ведущий-ведомый (master-slave). Использует для передачи данных интерфейсы RS-485, RS-422, RS-232, а также Ethernet сети TCP/IP. NModbus – большая библиотека на C#, включающая в себя реализацию всех режимов работы с протоколом. Модель реализации классов этой библиотеки позволяет работать с любым Modbus-устройством, но только с одним, поскольку классы библиотеки инкапсулируют в себе порт, не позволяя реализовать синхронизацию между несколькими Modbus-объектами. Данный протокол достаточно популярен при разработке разной периферии для умного дома, а так же интернета вещей.
Итак, для того, чтобы управлять чем-либо, нам необходимо знать, что и куда отправлять. Значит нам нужна карта регистра.
Уточню, что ячейки регистра бывают:
1. Только для чтения
2. Для чтения и записи
3. Только для записи(подтверждение записи допустимо выдавать кодом ошибки)
Самая простая карта, выглядит примерно таким образом:
Так же, там присутствуют разные пояснения, о том например, какое максимальное/минимальное значение может быть передано по адресу и тд.
Visual Studio 2019
Данная версия имеет так много функций, которые, впрочем ориентированы на рост производительности.
Вот самые весомые из них:
- улучшенный поиск,
- очистка кода в один клик,
- управление запросами
Давайте рассмотрим основные функции и улучшения IDE.
- Стартовая страница. В VS2019 вид окна запуска изменилась кардинально.
- Create Project. Дизайн окна «Создать новый проект» также изменился, однако содержит функции, почти аналогичные предыдущим вариантам Visual Studio.
- Live Share. Улучшает совместную работу разработчиков
- Лучший поиск. Эта функция предназначена для увеличение производительности разработчика. Новый поиск способен искать практически все. Например
- меню
- команды
- опции
- устанавливаемые компоненты
- код проекта
- онлайн
- Очистка кода одним щелчком. Мы видим новую опцию при открытии файла, которая сообщает о работоспособности файла.
- Управление Pull-запросами. Мы можем просмотреть код для запуска и отладки запросов извлечения из репозитория Azure.
Установка VS Code и расширения Remote WSLInstall VS Code and the Remote WSL extension
-
Перейдите на страницу установки VS Code и выберите двоичный установщик 32 или 64.Visit the VS Code install page and select the 32 or 64 bit installer. Установите Visual Studio Code в Windows (не в файловой системе WSL).Install Visual Studio Code on Windows (not in your WSL file system).
-
При появлении запроса на Выбор дополнительных задач во время установки обязательно установите флажок Добавить в путь , чтобы можно было легко открыть папку в WSL с помощью команды Code.When prompted to Select Additional Tasks during installation, be sure to check the Add to PATH option so you can easily open a folder in WSL using the code command.
-
Установите Пакет расширений для удаленной разработки.Install the Remote Development extension pack. Этот пакет расширений включает расширение Remote-WSL в дополнение к расширениям Remote-SSH и Remote-Container, что позволяет открывать любую папку в контейнере, на удаленном компьютере или в WSL.This extension pack includes the Remote — WSL extension, in addition to the Remote — SSH, and Remote — Containers extensions, enabling you to open any folder in a container, on a remote machine, or in WSL.
Важно!
Чтобы установить расширение Remote-WSL, потребуется версия 1,35 или более поздняя VS Code.In order to install the Remote-WSL extension, you will need the 1.35 May release version or later of VS Code. Не рекомендуется использовать WSL в VS Code без расширения Remote-WSL, так как будет потеряна поддержка автоматического завершения, отладки, linting и т. д. Забавный факт. это расширение WSL устанавливается в $HOME/.вскоде/екстенсионс (введите команду в PowerShell).We do not recommend using WSL in VS Code without the Remote-WSL extension as you will lose support for auto-complete, debugging, linting, etc. Fun fact: this WSL extension is installed in $HOME/.vscode/extensions (enter the command in PowerShell).
Расширения в VS Code RemoteExtensions inside of VS Code Remote
Расширение Remote-WSL разделяет VS Code в архитектуру «клиент-сервер» с помощью клиента (пользовательского интерфейса), работающего на компьютере Windows, и сервера (код, Git, подключаемые модули и т. д.), запускаемые удаленно.The Remote-WSL extension splits VS Code into a “client-server” architecture, with the client (the user interface) running on your Windows machine and the server (your code, Git, plugins, etc) running remotely.
При запуске VS Code удаленно на вкладке «расширения» отобразится список расширений, разделенных между локальным компьютером и дистрибутивом WSL.When running VS Code Remote, selecting the ‘Extensions’ tab will display a list of extensions split between your local machine and your WSL distribution.
Установка локального расширения, например темы, должна быть установлена только один раз.Installing a local extension, like a theme, only needs to be installed once.
Некоторые расширения, такие как расширение Python или все, что обрабатывает такие действия, как linting или Отладка, должны устанавливаться отдельно на каждом удаленном распределении WSL.Some extensions, like the Python extension or anything that handles things like linting or debugging, must be installed separately on each remote WSL distributions. VS Code отобразит значок предупреждения , а также зеленую кнопку «установить в WSL», если установлено локальное расширение, которое не установлено на удаленном компьютере WSL.VS Code will display a warning icon , along with a green «Install in WSL» button, if you have an extension locally installed that is not installed on your WSL Remote.
Дополнительные сведения см. в VS Code документах:For further information, see the VS Code docs:
-
При запуске VS Code Remote в WSL сценарии запуска оболочки запускаться не будут.When VS Code Remote is started in WSL, no shell startup scripts are run. Дополнительные сведения о выполнении дополнительных команд или изменении среды см. в этой .See this for more info on how to run additional commands or modify the environment.
-
Возникли проблемы при запуске VS Code из командной строки WSL?Having problems launching VS Code from your WSL command line? В этом содержатся советы по изменению переменных пути, устранению ошибок расширения, связанных с отсутствием зависимостей, устранению проблем с завершением строк Git, установке локального VSIX на удаленном компьютере, запуску окна браузера, порту localhost для блокировки, веб-сокеты не работают, ошибки при хранении данных расширения и многое другое.This includes tips on changing path variables, resolving extension errors about missing dependencies, resolving Git line ending issues, installing a local VSIX on a remote machine, launching a browser window, blocker localhost port, web sockets not working, errors storing extension data, and more.
Установка системы Visual Studio 2013
Запустив процесс установки системы Visual Studio 2013, вы увидите диалоговое окно, показанное на рисунке ниже:
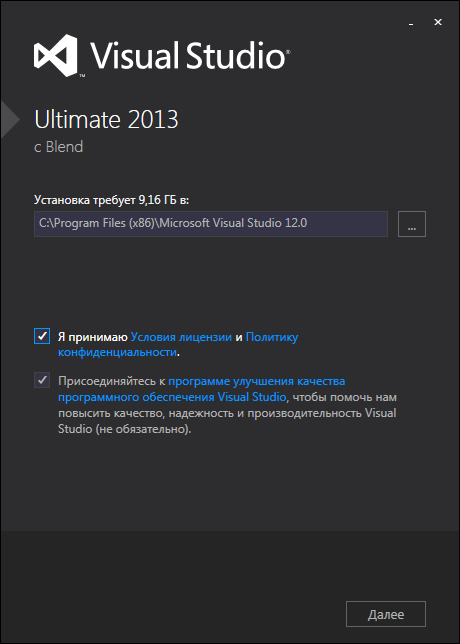
После того, как вы прочтете информацию о лицензиях, вы можете нажать на флажок, чтобы принять условия и перейти к следующему экрану в программе установки. Вы также увидите возможность присоединиться к программе Visual Studio Experience Improvement. Если вы сделаете это, время от времени будет отправляться анонимная информация о том, как вы используете Visual Studio.
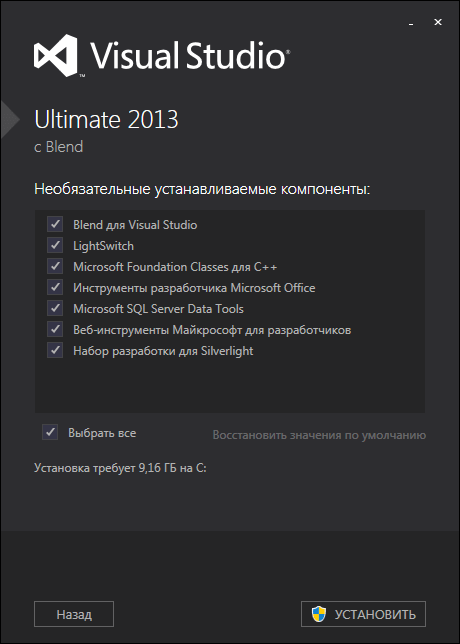
После того, как вы нажмете кнопку «Далее», Visual Studio предложит на выбор установку дополнительных компонентов IDE:
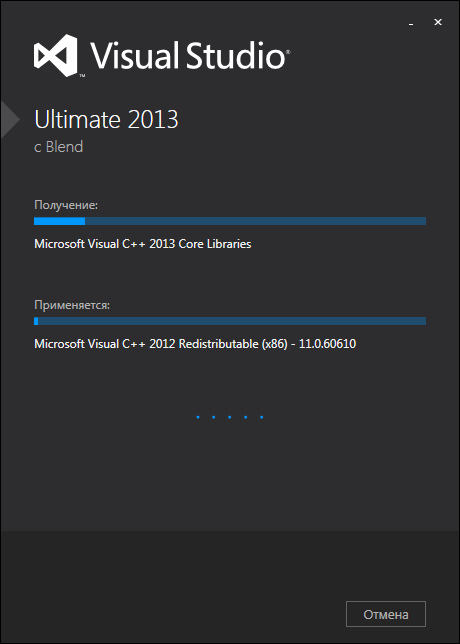
Выбран компоненты для установки, вы увидите обновленное окно выполнения. В зависимости от того, какие компоненты были установлены на вашем компьютере ранее, вы можете получить предложение перегрузить компьютер посередине процесса установки.
Установив все компоненты, вы увидите итоговое диалоговое окно. Вы должны внимательно его просмотреть, чтобы убедиться в том, что в процессе установки не возникло никаких ошибок.
Run in WSL
In the WSL terminal, make sure you are in the helloWorld folder, and type in to launch Visual Studio Code. The argument tells VS Code to open the current folder.

The first thing you’ll see is a message about «Installing VS Code Server» (the c7d83e57… number is the version of the VS Code Server that matches the client-side tools you just installed). VS Code is installing a small server on the Linux side that the desktop VS Code will then talk to. That server will then install and host extensions in WSL, so that they run in the context of the tools and frameworks installed in WSL. In other words, your language extensions will run against the tools and frameworks installed in WSL, not against what is installed on the Windows side, as it should for the proper development experience.
The next thing that happens is VS Code will start and open the folder. You may see a quick notification telling you that VS Code is connecting to WSL, and you may be prompted to allow access to the Node.js-based server.

Now, when you hover over , you get the proper Linux path.

Integrated Terminal
Run Terminal > New Terminal (⌃` (Windows, Linux Ctrl+`)) to open a new terminal instance.
You’ll start a new instance of the bash shell in WSL, again from VS Code running on Windows.
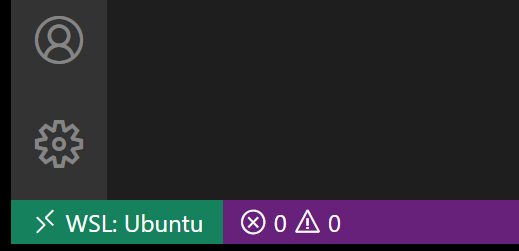
Tip: In the lower left corner of the Status Bar, you can see that you’re connected to your WSL: Ubuntu instance.
Улучшения специальных возможностей в Visual Studio 2019 for Mac
Перевод
Выпуск Visual Studio 2019 for Mac версии 8.4.4 включает в себя многочисленные изменения в цветовой палитре значков, предупреждений и сообщений об ошибках. Новый внешний вид легко бросается в глаза, а новая цветовая гамма еще более заметна. В это статье я расскажу, почему эти изменения действительно важны и что именно было изменено.
В настоящее время более 1 миллиарда человек имеют ту или иную форму инвалидности. Людям практически ежедневно приходится сталкиваться с различными проблемами. К ним относятся ограничения подвижности, когнитивные и нервные нарушения, проблемы с речью и слухом. В связи с этим мы хотим рассказать об улучшениях визуальной доступности в самых последних версиях Visual Studio for Mac.
Итог
На сегодняшний день я не так много работаю с кодом (веб разработка), и еще реже пользуюсь подобными редакторами. Поэтому оценивать могу их лишь поверхностно. Однако, положительные отзывы других пользователей, а также популярность вопроса о том, как установить Visual Studio Code в Ubuntu, позволяют говорить о том, что редактор заслуживает внимания.
Отдельно стоит похвалы кроссплатформенность и бесплатное распространение редактора. Это определенно добавляет ему популярности. Так же, вы сами только что могли убедиться, насколько просто его установить в Debian based дистрибутивах. И на этом по данной теме все.
Метки DebianUbuntu


