Virtualbox для windows
Содержание:
Extras (missing Guest Additions)
This extra section is necessary, because sometimes people have trouble finding the Guest Additions! In general,
whenever you click Install Guest Additions …, VirtualBox is supposed to mount
the Guest Additions ISO. But this may not happen. There are several ways to rectify the situation:
First, if the Guest Additions are not found, VirtualBox may prompt you to access Internet and download the ISO
file. You only have to do this once. Unfortunately, I do not have a screenshots to share on this one.
Alternatively, you can download the image yourself and then manually mount it as a CD-ROM, under the
Settings for the particular virtual machine.
Then, the next time you launch the virtual machine, the Guest Additions will be mounted as a CD-ROM. To install
the Additions, on Windows, double-click the executable; on Linux, run the scripts as demonstrated above.
From here, you’re on common grounds.
Stable branch builds
If you are experiencing some problem with VirtualBox and want to find out whether it has been fixed before you file a bug report, if you want to help our quality testing, or if you just want a particular fix early, you may wish to try out a test build of the current release series.
These builds are expected to be almost as stable as released versions, and we accept bug reports against them. They may contain some features which we plan to include in a future stable release but not necessarily the next. For any mission critical use of VirtualBox we of course always recommend purchasing a support contract.
Whonix ™-Default[edit]
Note:
- From VirtualBox v6+ it is no longer necessary to power off the virtual machine.
- For better usability, package shared-folder-help has already added user to group .
- Navigate to the shared folder settings of the virtual machine: → → →
- Click the folder icon that has a symbol in the upper right-hand section of the screen.
- → Navigate to the folder you want to share.
- → Type: . A different folder name can be utilized, but is recommended so it is the same as the example documented below — do not use (without the trailing )!
- Check if you do not want to write to that folder from within the guest.
- Check .
- → Leave as is (leave it empty and do not make any changes).
- Check (if that option exists).
- Press to close shared folder dialog.
- Press to close VirtualBox settings.
- The process is now complete and the shared folder can be used.
VirtualBox shared folders are found inside the virtual machine in folder .
By default, VirtualBox uses the prefix .
In the above example, the folder will become . It can be opened using a file manager like Thunar. To open it using the the command line, run.
cd /media/sf_shared
cd /media/sf_shared
Whonix-Custom-Workstation ™[edit]
If you are using a Whonix-Custom-Workstation additional steps are required. Please click on expand on the right.
Two options exist: automatic mounting or manual mounting. The automatic mounting method is described below. For additional information on shared folders refer to the . Any additional questions are unspecific to Whonix and should be addressed as per the Free Support Principle.
- Install VirtualBox guest additions inside the VM.
-
Add the user that will utilize shared folders from inside the VM to group :
sudo addgroup user vboxsf
sudo addgroup user vboxsf
- A reboot is required to make group changes take effect.
- Follow the instructions above.
Miscellaneous[edit]
TODO: document
/usr/sbin/vbox-uninstall-guest-additions
Debuggingedit
To help debug issues, inspect the following logs and services.
cat /var/log/vboxadd-install.log
cat /var/log/vboxadd-install.log
sudo systemctl status vboxadd
sudo systemctl status vboxadd
sudo systemctl status vboxadd-service.service
sudo systemctl status vboxadd-service.service
ls -la /opt/VBoxGuestAdditions-*/init/
ls -la /opt/VBoxGuestAdditions-*/init/
Issuesedit
To document any problems, utilize the following short link to this wiki page: https://www.whonix.org/wiki/ga
If the following message appears during a kernel upgrade, it is a non-issue.
/etc/kernel/postinst.d/vboxadd:
VirtualBox Guest Additions: Building the modules for kernel 5.6.0-0.bpo.2-amd64.
Failed to rename process, ignoring: Operation not permitted
update-initramfs terminated by signal TERM.
: VirtualBox guest additions from package virtualbox-guest-additions-iso installation helper by Whonix developers
TODO: document.
Footnotesedit
- Host -> Whonix-Gateway clipboard sharing enable by default?
-
https://forums.whonix.org/t/security-risks-of-virtualbox-shared-folders/10119
-
To learn more about VirtualBox shared folders, see: .
-
Admittedly, this recommendation does not have a strong rationale. Disabling additional features in other virtualizers or general applications will similarly lead to less code paths being utilized and arguably increasing security. VirtualBox software is not special in this regard.
- Because otherwise you cannot change VirtualBox VM settings.
- Using /lib/systemd/system/mnt-shared-vbox.service .
-
If the option is unavailable, upgrade VirtualBox.
-
Alternatively folder can be chosen. The VirtualBox default means that folder would be owned by owner and group .
-
This is specific to the VirtualBox version; newer versions do not have this option anymore.
Check if this setting should persist after restart of the virtual machine. Otherwise this setting will be temporary. -
This step is required. Quote :
-
- Package .
- Installing VirtualBox Guest Addition by Default?
- http://www.webcitation.org/6HqJVN0br
- https://www.whonix.org/w/index.php?title=Ga&action=edit
Whonix is Supported by Evolution Host DDoS
Protected VPS. Stay private and get your VPS with Bitcoin or Monero.
Search engines: YaCy | Qwant | ecosia | MetaGer | peekier | Whonix Wiki
Follow:
Donate:
Share:
|
Have you read our Documentation , Technical Design and Developer Portal links yet?
This is a wiki. Want to improve this page? Help is welcome and volunteer contributions are happily considered! Read, understand and agree to , then Edit! Edits are held for moderation. Policy of Whonix Website and Whonix Chat and Policy On Nonfreedom Software applies.
Copyright (C) 2012 — 2020 ENCRYPTED SUPPORT LP. Whonix is a trademark. Whonix is a licensee of the Open Invention Network . Unless otherwise noted, the content of this page is copyrighted and licensed under the same Freedom Software as Whonix itself. (Why?)
Whonix is a derivative of and not affiliated with Debian . Debian is a registered trademark owned by Software in the Public Interest, Inc .
Whonix is produced independently from the Tor anonymity software and carries no guarantee from The Tor Project about quality, suitability or anything else.
By using our website, you acknowledge that you have read, understood and agreed to our Privacy Policy, Cookie Policy, Terms of Service, and E-Sign Consent. Whonix is provided by ENCRYPTED SUPPORT LP. See Imprint, Contact.
Install Guest Additions on Linux guest
Again, a fairly simple procedure. Repeat the first step. This will mount the VirtualBox Guest Additions ISO
(included with the program) as a CD-ROM drive inside the virtual machine.
A file manager windows might popup, depending on your guest configuration, showing all the available options,
including Guest Additions for both 32-bit and 64-bit systems, Windows and Linux alike — and even Solaris, not
surprising, considering VirtualBox owned by Sun. On most modern Linux distros, the system will auto-mount
CD-ROMs and launch file browsers / managers.
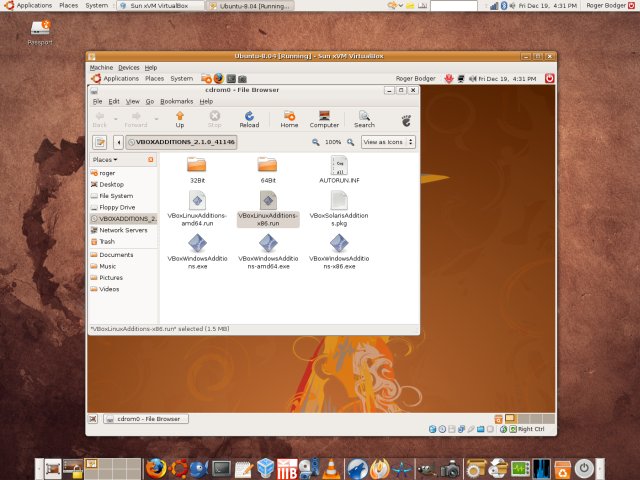
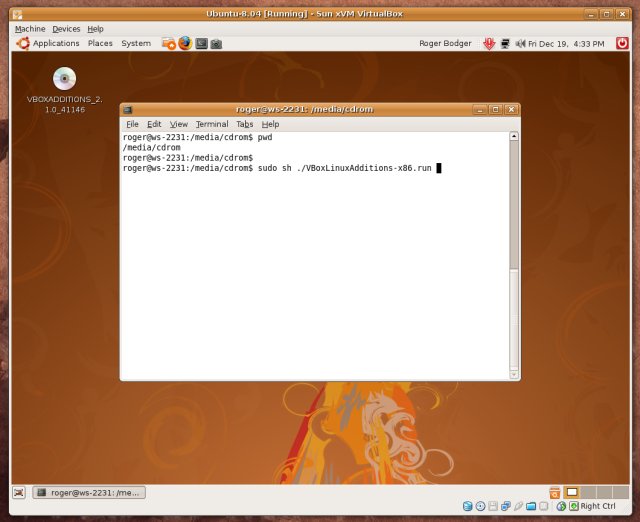
Choose the right package for your hardware architecture. In our case, this is x86. Open a terminal window and
run the script with root privileges:
sudo sh ./<script-relevant-for-your-architecture>
See image:
Wait a few moments until the installation is complete. Reboot.
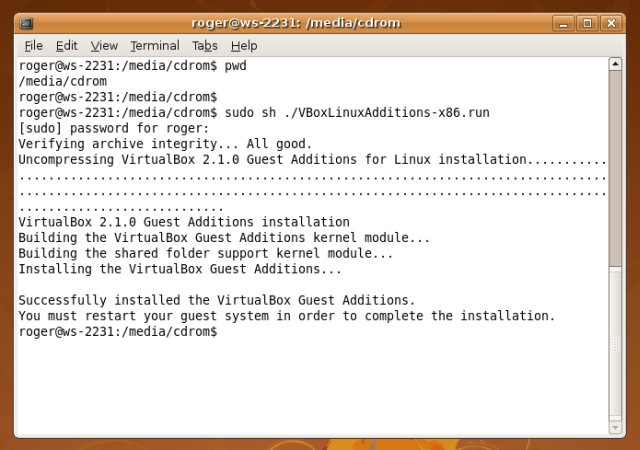
And that’s it!
Install VirtualBox Guest Additions on Windows
One thing to keep in mind is that Guest Additions, as the name says, are additions to the Guest OS and not the host OS. Therefore, in this case the guest OS running on the virtual machine is Windows (7, 8.X, and 10). The host OS on which VirtualBox is installed can be anything. This is a perfect setup where your host OS is Linux and would like to get on to Windows for few tasks here and there.
Windows VirtualBox Guest Additions setup is extremely simple. You do not have to download Oracle VirtualBox Guest Additions CD. All you have to do is, when Windows virtual appliance is running, go to -> as shown in the picture below. This will mount the VBox Guest Additions CD as a drive for installation.
Insert VBox Guest Additions CD
Now open or , and open the Guest Additions CD. The picture below shows VBox Windows 10 with Guest Additions CD open. Find executable file and double click it to run it. Alternatively, you may also click on the executable file for your architecture (amd64 or x86) to install VirtualBox Guest Additions on Windows.
Run VBox Guest Additions Installer for Windows
Leave the default options as is and click through the steps to start Guest Additions installation. That is it, just sit and watch. The installer will automatically prepare and install VBox Guest Additions on Windows.
Install VirtualBox Guest Additions on Windows
Once the installation finishes, reboot your guest OS, and you are done. You should now be able to run the guest OS in fullscreen mode, drag and drop things between guest and host OS, share clipboards, and do much more. In my opinion, if you use VirtualBox then Guest Additions are a must-have. VirtualBox also offers what is known as , which adds some advanced features. But most users do not need the Extension Pack. Go ahead install VirtualBox Guest Additions on Windows guest OS and enjoy added performance and features.
Conclusion
The installation of VirtualBox Guest Additions is even simpler than VMware Tools. Then again, so is the
installation of VirtualBox. Either way, the procedure is simple and fast and rather painless. Minimal tinkering
with the command line is involved. Now, you have also learned how to master VirtualBox so that you can benefit
most from your guest machines.
Hopefully, this article, as well as the VMware Tools guide, help clear some of the mist. This way, we can move
on to more complicated things. Hint: in the next articles, we’ll talk optimization, bridged networking … and
even 3D acceleration? Stay tuned.
P.S. If you find this article useful, please support Dedoimedo.
Cheers.
Development branch builds (bottom of page)
If you make any sort of mission-critical use of VirtualBox — particularly if you do not have a support contract — you are advised to regularly try out our development branch builds to make sure that everything you depend on still works as you expect. Catching problems at the development stage greatly improves your chances of having them solved before they reach a stable release, and increases your voice in the development process. The builds are usually usable for day-to-day work — we use them ourselves — for people who can deal with occasional surprises. Please report development build problems on IRC or the developer mailing list, not on the bug tracker.
A list of things worth testing for in test builds can be found here: .
Pick out your area of interest.
Builds
Latest 6.1.x test builds
| Windows | 6.1.x revision 139930 |
| macOS | 6.1.x revision 139930 |
| Linux 64-bit | 6.1.x revision 139930 |
| Linux EL6 64-bit | 6.1.x revision 139930 |
| Linux EL7 64-bit | 6.1.x revision 139930 |
| Linux EL8 64-bit | 6.1.x revision 139930 |
| Solaris | 6.1.x revision 139930 |
| Guest Additions | 6.1.x revision 139928 |
| Extension Pack | 6.1.x revision 139930 |
| SDK | 6.1.x revision 139930 |
Latest 6.0.x test builds
| Windows | 6.0.x revision 139674 |
| macOS | 6.0.x revision 139674 |
| Linux 64-bit | 6.0.x revision 139674 |
| Linux EL6 64-bit | 6.0.x revision 139674 |
| Linux EL7 64-bit | 6.0.x revision 139674 |
| Linux EL8 64-bit | 6.0.x revision 139674 |
| Solaris | 6.0.x revision 139674 |
| Guest Additions | 6.0.x revision 139674 |
| Extension Pack | 6.0.x revision 139674 |
| SDK | 6.0.x revision 139674 |
Latest 5.2.x test builds
| Windows | 5.2.x revision 139677 |
| macOS | 5.2.x revision 139677 |
| Linux 32-bit | 5.2.x revision 139677 |
| Linux 64-bit | 5.2.x revision 139677 |
| Linux EL6 64-bit | 5.2.x revision 139677 |
| Linux EL7 64-bit | 5.2.x revision 139677 |
| Linux EL8 64-bit | 5.2.x revision 139677 |
| Solaris | 5.2.x revision 139677 |
| Guest Additions | 5.2.x revision 139677 |
| Extension Pack | 5.2.x revision 139436 |
| SDK | 5.2.x revision 139677 |
Development snapshots
| Windows | development revision 139669 |
| macOS | development revision 139664 |
| Linux 64-bit | development revision 139787 |
| Linux EL6 64-bit | development revision 139663 |
| Linux EL7 64-bit | development revision 139659 |
| Linux EL8 64-bit | development revision 139659 |
| Solaris | development revision 139668 |
| Guest Additions | development revision 139787 |
| Extension Pack | development revision 139662 |
| SDK | development revision 139678 |


