Unifi — how to migrate from cloud key to cloud key or udm
Содержание:
Securing an API key
When you use API keys in your applications, ensure that they are kept secure
during both storage and transmission. Publicly exposing your credentials can
result in your account being compromised, which could lead to unexpected charges
on your account. To help keep your API keys secure, follow these best practices:
-
Do not embed API keys directly in code. API keys that are embedded in code
can be accidentally exposed to the public. For example, you may forget to
remove the keys from code that you share. Instead of embedding your API keys
in your applications, store them in environment variables or in files outside
of your application’s source tree. -
Do not store API keys in files inside your application’s source tree. If you
store API keys in files, keep the files outside your application’s source tree
to help ensure your keys do not end up in your source code control system.
This is particularly important if you use a public source code management
system such as GitHub. -
Set up .
By adding restrictions, you can reduce the impact of a compromised API key. -
Delete unneeded API keys to minimize exposure to attacks.
-
Regenerate your API keys periodically. You can regenerate API keys from the
Credentials page by
clicking Regenerate key for each key. Then, update your applications to use
the newly-generated keys. Your old keys will continue to work for 24 hours
after you generate replacement keys. -
Review your code before publicly releasing it. Ensure that your code does not
contain API keys or any other private information before you make your code
publicly available.
Frequently Asked Questions
My password isn’t working. What is the default username and password for UniFi devices?
The UniFi devices can have two possible factory-default credential sets:
- root/ubnt
- ubnt/ubnt
Note that you may require multiple sets of credentials when using UniFi:
- device credentials
- controller credentials
- Cloud Access Portal credentials
- UniFi Cloud Key and SSH credentials
For more information, see UniFi — Accounts and Passwords for Controller, Cloud Key, and Other Devices.
Does the UniFi Network Controller have to run at all times?
Since UniFi devices retain their settings, internet connectivity will work even if the controller is offline.
However, the features running directly on the controller will be lost. This includes statistics, reporting, manually applied user groups and the Guest Portal.
For more information about using Guest Networks and running UniFi Access Points without the controller, see the following articles:
- UniFi — Configuring the SELFRUN State
- UniFi — Guest Network, Guest Portal and Hotspot System
What are the UniFi System requirements?
These are the minimum system requirements for the UniFi Network Controller to run optimally. It is important to read the Release Notes of each software version release. It will include any special considerations to keep in mind. A link to the Release Notes will he available in the Downloads page along with the corresponding software version, or find past Release Notes in the UniFi Updates Blog.
When hosting on computer or server:
- Operating System:
- Linux: Ubuntu Desktop / Server 16.04; Debian 9 «Stretch»
- Windows: Windows 10; Windows Server 2016
- macOS: Mavericks 10.9, 10.10 Yosemite, 10.11 El Capitan, 10.12 Sierra, 10.13 High Sierra, 10.14 Mojave, 10.15 Catalina.
- CPU: x86-64 Processor (Intel / AMD x64 Processors)*
- RAM: 2GB*
- Network: 100Mbps Wired Ethernet*
- HDD: Minimum 10GB free (20GB or more preferred)*
- Java: Java Runtime Environment (JRE) 8. Java 8 does not come bundled with the UniFi Network Controller software after version 5.11.47, so this must be installed separately. The UniFi Network Controller does not support Java 9.
- Web Browser: Google Chrome
- MongoDB: version 3.2 or later. Mongo is offered bundled: default is 2.4.14 (for macOS and Windows only).
*Actual Storage, CPU, RAM, and Network speed requirements will depend on many factors including the number of UniFi devices managed by the controller, number of clients, features enabled, and data retention settings. For database repair, you require free space equal to the current database size, plus 2GB.
What generation is my UniFi device?
The table below shows the generation and wave of devices.
UniFi Access Points
UniFi Security Gateways (Firewall)
UniFi Controller Hardware (UCK, UDM and UAS)
|
Generation 1 Devices |
Generation 2 Devices (AC Wave 1) |
Generation 3 Devices (AC Wave 2) |
|
|
|
* End of Life (EoL) and unsupported as of UniFi Network Controller version 5.7. Download here most current Controller version compatible (v5.6.40 LTS).
|
UniFi Switch (US models) |
UniFi Switch (USW models) |
|
|
|
UniFi Routing & Firewall |
|
|
UniFi Controller Hardware |
|
Resolution
ATTENTION:Only users with the Super Administrator role can enable and disable Cloud Access. See user roles in the UniFi Network Controller under Settings > Admins.
1. Post-Migration Steps Needed
If this occurrence is happening after migration the device may appear to be changing IPs, going from online to offline, or presenting other similar symptoms. This indicates that the old Cloud Key has not been reset/taken offline. To resolve this, simply reset the Cloud Key back to factory defaults and unplug it to prevent conflict between the two Cloud Keys.
2. Disable and Re-Enable Cloud Access
After verifying that the SSO account is correct, that Cloud Access has been enabled and assigned to the proper account, and that the issues are unrelated to migration, this may indicate that the device is in a corrupt state with the Cloud Service.
To resolve this quickly, simply disable and re-enable Cloud Access by going to the UniFi Controller’s Settings > Cloud Access, and clicking the button labeled Disable and Remove Cloud Access in the bottom right corner of the screen.

Once this is finished, the Cloud Access section of the controller should appear as so:
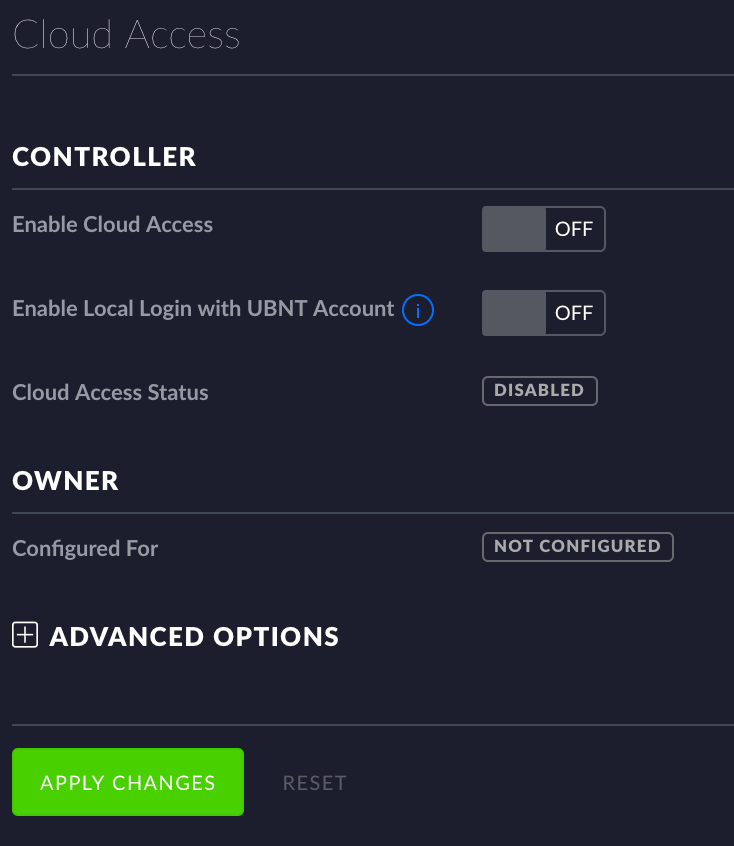
To re-enable, set Enable Cloud Access to ON. Log in with your SSO login and go to https://network.unifi.ui.com to confirm the issue is resolved.
Issue Still Not Resolved
1. Collecting Cloud Status Logs from Controller
If the issue is still not resolved, you may want to collect more information to help pinpoint the exact issue. To do this:
- Go to Settings >Maintenance > Services > Log Level, change Cloud Access to Debug, and click Apply.
- Attempt to disable and re-enable the Cloud Access again, once finished, grab the server.log file from the controller and look for error messages related to Cloud Access. If you need help locating that file you can use this in the section How to View Log Files: UniFi Network Controller.
- After you enable logs you can also find then in the Insights tab filtering by controller logs and you can download from here too.
- An error that resembles the following may be logged:
<webapi-10> WARN sdn - failed to register controller to SDN: device.svc.ubnt.com
If you identify an error message and wish to report, please post on the Community or submit a support request with logs/error message noted.
2. Reset & Restore
At this point, you may opt to reset your Cloud Key and restore from a backup. This will resolve most residual errors related to a corrupt Cloud Key backup. Follow the steps in this article:
Applying API key restrictions
API keys are unrestricted by default. Unrestricted keys are insecure because
they can be used by anyone from anywhere. For production applications, you
should set both application restrictions and API restrictions.
To add API key restrictions:
-
Navigate to the
APIs & Services→Credentials
panel in Cloud Console. -
Select the name of an existing API key.
Adding application restrictions
Application restrictions specify which web sites, IP addresses, or apps can use
an API key. Add application restrictions based on your application type. You
can only set one restriction type per API key.
Choose the restriction type based on the needs of your application.
-
Use None for testing purposes only.
-
Use HTTP referrers for API clients that run on a web browser, so that only
the specified pages can call the API. These types of applications expose their
API keys publicly, so we recommend using a
service account instead. See the
section below for
examples. -
Use IP addresses to limit API key access to certain IP addresses.
-
Use Android apps for Android applications. This option requires adding
your package name and SHA-1 signing-certificate fingerprint. -
Use iOS apps for iOS applications. This option requires adding at least
one iOS bundle identifier to restrict API calls to specific iOS bundles.
Adding HTTP restrictions
API keys used by web applications should have HTTP restrictions. To add
HTTP restrictions:
-
Select HTTP referrers (web sites) in the Application restrictions
section. -
Input at least one restriction in the Website restrictions section.
-
If your domain supports both HTTP and HTTPS, both restrictions must be added
separately. -
You can optionally use wildcard characters () for the subdomain and/or
path.
The following table shows example scenarios and restrictions, from most
restrictive to least restrictive. We recommend using the most restrictive
example that fits your use case.
| Scenario | Restrictions |
|---|---|
| Allow a specific URL. |
Add a single restriction with an exact path. For example: |
| Allow any URL in a single subdomain or naked domain. |
You must set at least two restrictions to allow an entire domain.
|
| Allow any subdomain URLs in a single domain. |
You must set at least two restrictions.
|
Adding API restrictions
API restrictions specify which APIs can be called using the API key. All API
keys used by production applications should have API restrictions.
To set API restrictions:
-
Select Restrict key in the API restrictions section.
-
Select all API names that your API key needs to call from the dropdown.
-
Select the Save button.
Causes
The most common cause for a Cloud Key to incorrectly appear as Managed by Other is either that the login used to log in to https://network.unifi.ui.com is not the same that was associated with the UCK, or that the UCK hasn’t been granted Cloud Access to the UniFi Network Controller. Verify that the SSO account is correct and that the right account is associated in the Controller’s Settings > Admins section.
Cases where the Cloud Key appeared properly on this account previously, but is now appearing as “Managed by Other”, usually point to a conflict preventing the Cloud Key from being detected correctly by the cloud service. This is most often caused by Cloud Key migration, where a backup was restored on a different Cloud Key and both devices are attempting to authenticate to our cloud service with the same identifier.
Introduction
The UniFi Cloud Key product line offers an easy and convenient means for managing a UniFi Network. The Cloud Key is intended to be used in places where remote access is required and it comes prepared for management over the UniFi Cloud dashboard: https://network.unifi.ui.com/.
Once enabled, UniFi’s Cloud Service associates the UniFi administrator’s SSO login with the Cloud Key device. When a Cloud Key appears «Managed by Other» it typically indicates that the Cloud Key has been configured for remote use with a different SSO account.
In some less common cases, a user may encounter an issue where their Cloud Key appears as “Managed by Other” despite being associated to the correct account. This article will explain how to resolve these issues.
Frequently Asked Questions
How do I install the controller on my UniFi Dream Machine or UniFi Cloud Key?
There’s no need for a separate setup since all UDM, UDM-Pro and UCK models come with the UniFi Network Controller pre-installed.
You will go through the process of configuring the controller on these devices during the initial device setup and configuration.
I’m getting a Java-related error during setup, what do I do?
The UniFi Network Controller requires Java, so you’ll need to install Java 8 for your specific platform before re-running the installer.
The install is not finishing successfully, what could it be?
Make sure that all are met and that all ports used by UniFi are open. If that is all in order, check that the ethernet cables are in good working condition, changing them with others if need be.
How do I access the controller configuration page if I don’t know my IP?
First, try accessing the controller via one of the common addresses: localhost:8443 or 192.168.1.1:8443
If this doesn’t work, you will need to find out the address of your gateway by using commands like ipconfig/ifconfig or device discovery tools like Ubiquiti’s WiFiman.
I’m getting a «Your connection is not private» security warning when accessing the controller in my browser, should I be concerned?
There’s nothing to worry about as it’s the intended behavior when connecting to your controller locally. Simply proceed to the next page by clicking Advanced > Proceed.
How do I upgrade after the initial setup?
When a new stable controller version becomes available, you will receive an upgrade prompt in your dashboard. Click it to upgrade to the latest version. For other methods of controller upgrades, see our Upgrading articles.
Introduction
Amazon Web Services currently offers a «Free Tier» VM for twelve months for new users consisting of a t2.micro instance with 1 vCPU, 1GiB of memory and 30GiB of Storage with a variety of operating systems. When the Free Tier period expires, your VM will continue to operate as normal and the services will be billed on a monthly basis. For more details on pricing, see Amazon EC2 Pricing.
This article walks you through the process of launching an instance that meets the Free Tier eligibility criteria, but you are free to choose a larger instance type or a larger storage volume.
The Free Tier type typically provides enough resources to support small to medium UniFi deployments. You can always upgrade your Instance Type and Storage Volume in the future after you have launched your VM.
User Tip:When installing in a VM, you might encounter entropy issues. The fix is to install . This is an external link for a tutorial on the subject.
How to Restore from Last Working Backup
Once your reset has completed successfully your Cloud Key should be in a factory default state, which will eliminate any database corruption/corrupted configuration of the Cloud Key. Now you are ready to restore from your last known working backup. Here are instructions on how to restore from a backup:
Restore Method 1: Via UniFi Setup Wizard
- Open the Cloud Key management portal in the browser by typing the IP address of the Cloud Key as a URL: i.e. https://192.168.1.15.
- You may receive a Privacy Error, in Chrome, click Advanced > Proceed to (unsafe).
- Select Unifi Network Launch.
- The UniFi Setup Wizard will present you with a couple of options setup from scratch or restore from backup. In this case, we will select restore from backup.
- Select which backup option you want. This could be a backup from the Micro SD card (My local backups) or a backup file you have stored on your PC (upload backup file) then just select the file and click Restore.

Restore Method 2: Via WebUI
- Open the Cloud Key management portal in the browser by typing the IP address of the Cloud Key as a URL: i.e. https://192.168.1.15.
- You may receive a Privacy Error, in Chrome, click Advanced > Proceed to (unsafe).
- Click Manage Cloud Key.
- Login with default UniFi credentials (can be a combination of either one of these, depending on production date):
- Username: ubnt
- Password: ubnt
- Username: root
- Password: ubnt
- Go to the Controllers tab.
- Click the Stop UniFi button, once the Start Up Network button appears clickable and you opened the drop down menu «settings and maintenance for the UniFi Network controller» proceed to the next step.
-
Click on Restore and you will get a menu of the available backups that you have on your Micro SD card.
NOTES & REQUIREMENTS:
This method will not allow you to restore from a file on your computer it will only work if you have auto-updates enabled with a Micro SD card inserted in the Cloud Key prior to doing the restore process. If those requirements are not met then you will need to use «Restore Method 1: Via UniFi Setup Wizard».
Set Up a New UniFi Device

When setting up a new UniFi device, follow its Quick Start Guide to connect the hardware and launch the Setup Wizard.
If you are setting up multiple UniFi devices, connect them together and launch the Setup Wizard. It will allow you to adopt all of the connected devices at once.
The image above displays a typical UniFi network topology with a UniFi Cloud Key, UniFi Security Gateway and a UniFi Switch.
If you are using a UniFi Dream Machine, which acts as a Cloud Key, switch and a gateway, your topology might look like this:

If you’re not sure how to connect several devices together, remember:
- Gatekeeper devices like routers and gateways connect to the internet via the WAN port (sometimes identified with a globe icon).
- Other devices like access points, switches and clients connect to gatekeepers and to each other via the LAN ports.


