Installing tizen studio
Содержание:
- Connect Everything
- Sign app with Certificates
- PO File Editor
- Enhancement of Development Environment and Core Component
- Using the CLI Installer
- Displaying Profile Templates
- Building the Project
- Installing the Application on a Target
- Openness, Optimization, and Opportunities
- Prerequisites
- Setting Configuration Options
- Prerequisites for Using the Platform IDE
- Running Your Application
- Creating a Certificate Profile
- Issuing a Tizen Certificate
- Managing Certificate Profiles
- Application Marketplace
- Установка и настройка Tizen Studio
- Specfile Editor
- Installing Additional Packages with CLI
- Tizen .NET Features and Components
Connect Everything
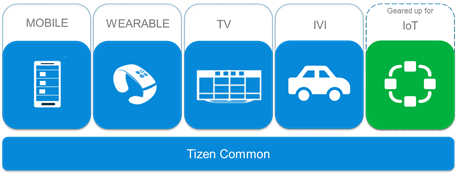
As diverse devices are getting smarter and more connected, there is a strong need for a software platform for integrated services with connected products. Tizen is designed for this and has been advancing to connect everything. To support different types of devices with seamless user experience, Tizen categorizes the features and functions as profiles. There are currently 4 profiles and the amount will grow as more products are included in the ecosystem. In the near future, lots of Internet-connected devices are anticipated to be on the market and IoT (Internet of Things) services will pervade everyone’s daily life. Tizen is moving forward to the future of everything connected.

Sign app with Certificates
On commercialized products you need to setup certificates manually using IDE 🙁
 rm -rf .sign Release Debug # we will rebuild it using IDE :(
 ~/tizen-studio/tools/sdb devices # observe your device SN, to replace instead of ${user}
 List of devices attached
 # 0000FFFF0000FFFF         device          SM-Z200F
If lucky you’ll get ~/SamsungCertificate/${user}/
with author.p12, distributor.csr, distributor.p12, distributor.pri, author.crt, distributor.crt, author.pri, author.pub, author.csr
And backup ~/tizen-studio-data/keystore/author.p12 is same to ~/SamsungCertificate/user/author.p12
A file like this one, will be used to store password and sign your tpk
PO File Editor
The PO file editor is used to edit files to generate compiled gettext files, which are used by Tizen platform applications to localize the user interface.
NoteThere is no specific wizard to create the files. To create a file, go to New > Other > General > File and save the file with the extension.
Figure: PO file editor
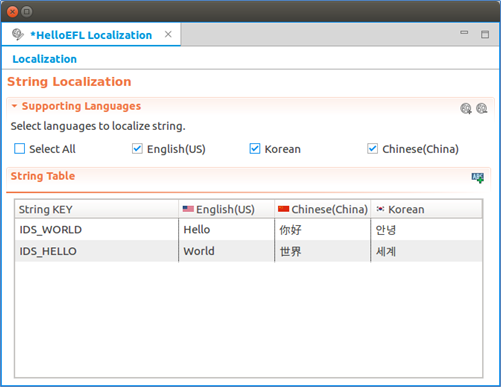
- To open the PO file editor, double-click the file in the Project Explorer view.
- To add a new string key, click the Add String Key icon.
An empty row is added to the string table. Fill in the details for the row.
- To remove a string key, right-click the key and select Remove.
- To add a language, click the Add Language icon.
In the Add Languages dialog, select the language code item you want.
Figure: Adding a language
- To remove a language, in the Supporting Languages pane, click the Remove Language icon and select the applicable language code item in the Remove Languages dialog.
Enhancement of Development Environment and Core Component
-
Tizen .NET
It is the development environment for developing high quality and high performance application in C#. There is an enhancement in the Tizen Development environment in Tizen 5.5.
The latest Xamarin.Forms 4.0 and the latest .NET Core 3.0 are now supported. Xamarin.Forms on Tizen .NET is a complete cross-platform UI toolkit that allows you to create native UI. The latest .NET Core supports unloading DLL, AOT, pre-loading, pre-initialization, Tiered complications and MPGO for enhancing application launching time. Also, there is memory optimization by reducing relocation of DLL files, pre-loading for resource sharing and so on. The .NET Core 3.0 Runtime is faster, lighter than its previous version. With all these enhancements, the application launching time is reduced by 28% and memory usage is reduced by 20%. New Tizen extension for the official visual studio for Mac is also released in Tizen 5.5. The key features of the Tizen extension are the Tizen.NET application development environment, the Tizen IDE tools, and the application debugging using .NET Core debugger.
-
Watchface Complication API
Tizen 5.5 provides an easy way to create custom complications in a watch face. These APIs provide various kinds of complication types. You can deploy various kinds of complication services such as health, battery, air pollution, and so on by using these APIs.
-
Supports Lottie animation
The Lottie animations are supported in Tizen 5.5. Lottie was named by AirBnB. It is a library that renders ‘After Effects animations’ in real time. The animation is exported as a Lottie file which has a JSON format. The file contains information about visual shapes such as rectangle, circle, path and fill methods like the traditional vector graphics elements.
-
Multi-assistant Framework
It aims to support various AI assistants at the same time for better usability. The framework defines a common interface for making an assistant of the multi-assistant framework. It also provides an expandable wake-up engine that recognizes invocation keyword for each assistant and supports to add a new keyword.
-
Multi-device distributed web engine
It is designed for both memory resource requirements mitigation and JavaScript execution speed enhancement to overcome the resource constraints of the low-end devices. With the prior multi-process design of the web engine, the memory usage of the renderers becomes significant as multiple tabs are created. CPU resource consumption of the renderer processes is also substantial as web applications get complicated. To manage hardware resources and to make resource usage predictable in low-end devices, the multi-device distributed web engine introduces features for offloading renderer processes over the network to resource-free devices while the browser process runs on the local low-end device.
-
User Awareness Framework
Smart devices could provide useful services based on the user presence context. Tizen 5.5 supports User Awareness Framework based on multiple sensors. Currently, Wi-Fi, BLE, motion, and light sensors are supported and it could be extended to support other types of sensors based plug-in architecture.
Using the CLI Installer
The CLI (command line interface) provides functional tools for running the CLI installer without the GUI environment.
To install Tizen Studio using the CLI installer:
-
Run the CLI installer:
- On Microsoft Windows, the command prompt opens and the installer is automatically executed.
- On Ubuntu and macOS, open the terminal, go to the directory where the installer is downloaded, and enter the command to apply the execute permission to the installer file. Then, execute the installer by entering the command with the following syntax:
Table: Install options
Option Description Displays the Tizen Studio software license agreement. You must use this option alone. Do not use with other options. Accepts the license terms. Skips the Java version check. Table: Install command parameters
Parameter Description Specifies the installation directory path. If you do not enter the path, Tizen Studio is installed in the default directory (). -
If you agree to the software license and the license terms, enter Y(yes) for the conditions.
-
Enter the Tizen Studio installation location.
The CLI installer begins to install the Web App Development platform and tools on your computer.
Displaying Profile Templates
The command displays a list of project templates or rootstraps suitable to a given option.
Syntax:
tizen list <option>
Options:
| Option | Description |
|---|---|
| Displays the list of project templates for Tizen native applications. | |
| Displays the list of project templates for Tizen Web applications. | |
| Displays the list of available rootstraps. The rootstrap is a set of build configurations, which consists of the profile, platform version, and target architecture. If you specify the argument, a set of frameworks installed for this rootstrap is displayed. |
Examples:
- List all native application templates.
Windows, Ubuntu, and macOS:
> tizen list native-project


mobile-2.3		service_app
mobile-2.3		basic_edc_ui
mobile-2.3		shared_library
wearable-2.3		service_app
wearable-2.3		basic_edc_ui
wearable-2.3		shared_library
- List rootstraps.
Windows, Ubuntu, and macOS:
> tizen list rootstrap

mobile-2.3-device.core		Mobile 2.3, armel
mobile-2.3-emulator.core	Mobile 2.3, i386
mobile-2.4-device.core		Mobile 2.4, armel
mobile-2.4-emulator.core	Mobile 2.4, i386
wearable-3.0-device.core	Wearable 3.0, armel

> tizen list rootstrap wearable-3.0-device.core
rootstrap : wearable-3.0-device.core

Native_API              base        Native_API Libraries
bixby                   add-on
Building the Project
The command builds the Tizen native or Web project. To build the native project, 3 options are needed: architecture, compiler, and configuration. If you do not set these options, the default values are used. You can check or set the default build options with the command.
Syntax:
tizen <sub-command>
Sub-commands:
| Sub-command | Description |
|---|---|
| Build the Tizen native project.
Options are:
|
|
| Build the Tizen Web project.
Options are:
|
Examples:
- Build the native project with the , , and options.
Windows:
> tizen build-native -a x86 -c llvm -C Debug -- C:\Users\workspace\basic
> dir C:\Users\workspace\basic\Debug
Ubuntu and macOS:
$ tizen build-native -a x86 -c llvm -C Debug -- ~/workspace/basic
$ ls ~/workspace/basic/Debug
- Build the native project with the default configuration and the bixby add-on framework.
Windows:
> tizen build-native -f bixby -- C:\Users\workspace\basic
> dir C:\Users\workspace\basic\Debug
Ubuntu and macOS:
$ tizen build-native -f bixby -- ~/workspace/basic
$ ls ~/workspace/basic/Debug
- Build the native project with a rootstrap.
Windows:
> tizen build-native -r mobile-2.4-device.core -C Release -- C:\Users\workspace\basic
> dir C:\Users\workspace\basic\Release
Ubuntu and macOS:
$ tizen build-native -r mobile-2.4-device.core -C Release -- ~/workspace/basic
$ ls ~/workspace/basic/Release
- Build the Web project with default options.
Windows:
> tizen build-web -- C:\Users\workspace\basicWeb
> dir C:\Users\workspace\basicWeb\.buildResult
Ubuntu and macOS:
$ tizen build-web -- ~/workspace/basicWeb
$ ls ~/workspace/basicWeb/.buildResult
Installing the Application on a Target
The command installs a Tizen application on a target.
Syntax:
tizen install
Options:
| Option | Description |
|---|---|
| , | Specifies the Tizen package file name. |
| , | Specifies the target name to install the package. |
| , | Specifies the serial to install the package. |
| Specifies the directory path of the package file. |
Examples:
Install the basic application, whose package name is org.tizen.basic-1.0.0-i386.tpk, on the emulator-26101.
Windows:
> tizen install -n org.tizen.basic-1.0.0-i386.tpk -s emulator-26101 — C:\Users\workspace\basic\Debug
Ubuntu and macOS:
$ tizen install -n org.tizen.basic-1.0.0-i386.tpk -s emulator-26101 — ~/workspace/basic/Debug
Openness, Optimization, and Opportunities
Tizen is a Linux-based, open-source software platform. Anyone can contribute and freely develop the system software and applications, which is beneficial for both device manufacturers and application developers. Furthermore, by supporting Web applications with open Web technologies, Tizen provides developers with flexibility and extensibility. Based on the open ecosystem, users can expect various experiences from Tizen devices and services. With its openness, Tizen can pursue continuing progress and expanding ecosystem.
Tizen is built to work on diverse devices and profiles are defined accordingly. Currently, 4 profiles are supported: mobile, wearable, TV, and IVI (In-Vehicle Infotainment). Features of each profile provide product-optimized functionality and performance.
From Tizen 3.0, all profiles are built on top of a common, shared infrastructure called Tizen Common. Based on the common components, devices and features under new categories or profiles can be easily added up for emerging technologies. Therefore, Tizen is adaptable and customizable for new products. In the foreseeable future, for example, IoT devices and services will be prevalent and Tizen is taking proactive steps toward the opportunities in the new markets.
Prerequisites
To work with Visual Studio Tools for Tizen, your computer must have:
-
At least 1.5 GB of available disk space
-
Visual Studio 2017 to use Tizen 4.0 and 5.0
-
Visual Studio 2019 to use Tizen 4.0 and higher
Visual Studio Tools for Tizen works with all Visual Studio variations, including Community. Installing or re-installing Visual Studio with .NET desktop development and .NET Core cross-platform development toolsets is recommended.
-
Java Development Kit (JDK)
You must install Oracle Java Development Kit (JDK) 8 or OpenJDK 12 to use
Tizen Baseline SDK. Make sure you download and install the EXACT version.-
OpenJDK 12 and OpenJFX: .
-
Emulator Requirements
The Tizen Emulator for Visual Studio has the same requirements as the emulator in Tizen Studio. To check the detailed hardware and software requirements for Tizen Emulator, see .
-
Intel Hardware Acceleration Execution Manager (Intel HAXM) speeds up the Tizen emulation on Intel-VT-enabled systems. The Intel HAXM installation is started automatically as part of the Visual Studio Tools for Tizen installation. For more information, see Hardware Accelerated Execution Manager.
-
Make sure Hyper-V is disabled (in Windows 10 or higher):
-
Input Control Panel on the Search box in Windows 10.
-
Click Control Panel > Programs and Features > Turn Windows features on or off.
-
Disable Hyper-V and click OK.
-
Reboot the computer.
-
Setting Configuration Options
The command displays, sets, replaces, and removes CLI configuration options. The CLI configuration keys are:
- : Sets the default executable architecture type.
- : Sets the default compiler.
- : Sets the default build configuration.
- : Sets the default path of security profile file.
- : Sets the default connection timeout value. The default is 60000 milliseconds.
Syntax:
tizen cli-config
Options:
| Option | Description |
|---|---|
| , | Specifies whether the operation must be done for a global scope (for all installed SDKs or for the current Tizen Studio only). |
| Sets a value for the CLI configuration key. | |
| , | Displays the list of all CLI configuration keys and values. |
| , | Removes the CLI configuration key and value. |
Examples:
- Display a list of all configurations for which values are set.
Windows, Ubuntu, and macOS:
> tizen cli-config -l
default.build.architecture=x86
default.build.compiler=llvm
default.build.configuration=Debug
default.sdb.timeout=60000
- Set a path globally.
Windows:
> tizen cli-config –g "default.profiles.path=C:\Users\workspace\.metadata\.plugins\org.tizen.common.sign\profiles.xml"
Ubuntu and macOS:
$ tizen cli-config –g default.profiles.path=~/workspace/.metadata/.plugins/org.tizen.common.sign/profiles.xml
Prerequisites for Using the Platform IDE
To use the platform IDE, you must install the GBS and MIC development tools and set up the development environment, including the git, gerrit, and proxy configuration. For more information, see Installing Development Tools.
- Git Build System (GBS): command line tool that supports Tizen package development.
- Image Creator (MIC): command line tool that supports Tizen image creation.
For more information on the following issues, see Setting up Development Environment:
- How to register a user account to gain access to tizen.org
- How to configure Secure Shell (SSH) for the gerrit access
- How to configure the git
If your system is using a proxy server, you must configure your proxy server environment. For more information, see Network Connections.
Running Your Application
You can run the application on the emulator or a real target device.
Running on the Emulator
To run the application on the emulator:
- Launch an emulator instance in the Emulator Manager:
-
In the Tizen Studio menu, select Tools > Emulator Manager.
- In the Emulator Manager, select a wearable emulator from the list and click Launch.
If no applicable emulator instance exists, .
The emulator is launched in its own window. You can also see the new emulator instance and its folder structure in the Device Manager.
-
- Generate a security profile.
Before you run the application, you must sign your application package with a certificate profile in the Tizen Studio.
- Run the application:
-
In the Project Explorer view, right-click the project and select Run As > Tizen Native Application.
Alternatively, you can also select the project in the Project Explorer view and do one of the following:
- Press the Ctrl + F11 key.
- Click the run icon in the toolbar.
If you have created multiple emulator instances, select the instance you want from the combo box in the toolbar before selecting to run the application. If you select an offline emulator, it is automatically launched when you select to run the application.
-
Confirm that the application launches on the emulator.
Note If the emulator display has switched off, you cannot see the application launch. To switch the display on, click the Power key (in the lower-right corner of the emulator).
- Change the watch face.
To change the watch face and make the installed watch application visible:
- If the emulator display has been switched off, activate it by pressing the Power key (in the lower-right corner of the emulator).
- On the home screen (showing the default watch face), press the Power key.
- In the Recent Apps screen, select Settings > Watch faces and styles > Watch faces.
- Swipe right until you find your application icon, and select it.
The Clock changed message is displayed.
- Press the Back key (in the upper-right corner of the emulator device) multiple times, until the home screen with your new watch face is shown.
While the application is running, the Log view in the Tizen Studio shows the log, debug, and exception messages from the methods defined in the log macros. To see the view, in the Tizen Studio menu, go to Window > Show View > Log.
-
For more information on using the emulator features, see Using Emulator Control Keys, Menu, and Panel and Using Extended Emulator Features.
Running on a Target Device
To run the application on a target device:
- Connect the wearable target device to your computer:
- Define settings on the device:
-
Go to Settings > Connections, and switch on Bluetooth.
- Go to Settings > Connections, and switch on Wi-Fi.
The device and the computer must be connected to the same Wi-Fi network.
Note the IP address the device is using.
- Go to Settings > Gear info, and switch on the debugging mode.
-
-
In the terminal, enter the following commands:
cd tizen-sdk/tools
./sdb connect <IP address of Gear S2>
Use the IP address you noted before.
Instead of the terminal, you can also use the for the connection.
-
In the first attempt, the connection fails and the device asks for user confirmation. To allow Gear to read log data, copy files to and from your computer, and install the application manually, click the accept mark.
- In the Device Manager, confirm that the device is connected (shown in the device list).
- Define settings on the device:
- Generate an author certificate.
Before you run the application, you must sign your application package with a certificate profile in the Tizen Studio.
- Run the application:
- In the Device Manager, select the device.
- In Project Explorer view, right-click the project and select Run As > Tizen Native Application.
Alternatively, you can also select the project in the Project Explorer view and do one of the following:
- Press the Ctrl + F11 key.
- Click the run icon in the toolbar.
If you have both a connected device and existing emulator instances, select the device from the combo box in the toolbar before selecting to run the application.
- Confirm that the application launches on the target device.
Like with the , you can change the watch face in the device settings to see the watch application on the home screen.
NoteThe application is launched using the default debug run configuration. To create and use another configuration:
- In the view, right-click the project and select .
- In the window, click the icon (), define the configuration details, and launch the application by clicking .
Creating a Certificate Profile
Note It is recommended to keep your certificates and password safe in the local repo to prevent it from being compromised.
You can create a new certificate profile with the Certificate Manager:
-
In the Tizen Studio menu, select Tools > Certificate Manager.
- In the Certificate Manager window, click + to create a new profile.
The certificate profile creation wizard opens.
- Enter a name for the profile and click Next.
- Add the author and distributor certificates:
-
Select whether to create a new author certificate or use a previously created author certificate, and click Next.
Define the existing author certificate or enter the required information for a new certificate, and click Next.
- You can use the default Tizen distributor certificate or another distributor certificate if you have one. In general, the default Tizen distributor certificate is used and you do not need to modify the distributor certificates. You can also select the privilege level of the distributor certificate (in native and Web applications).
- Click Finish.
-
Issuing a Tizen Certificate
The command generates a Tizen certificate for your application. If you want to upload your application to the Tizen Store or install the application to a Tizen device, you must generate a Tizen certificate.
Syntax:
tizen certificate
Options:
| Option | Description |
|---|---|
| , | Specifies an alias name of the certificate. |
| , | Specifies the password of the certificate. |
| , | Specifies the user’s country code, which consists of 2 letters. |
| , | Specifies the user’s state. |
| , | Specifies the user’s city. |
| , | Specifies the user organization. |
| , | Specifies the user’s organization unit. |
| , | Specifies the user name. |
| , | Specifies the user email. |
| , | Specifies the file name without a file extension. A certificate file is created with the file name. If you skip this option, the default file name, , is used on creating the certificate file. |
| Specifies the output directory path to create the certificate. If you skip this option, the default output directory path, , is used on saving the certificate file. |
Examples:
Managing Certificate Profiles
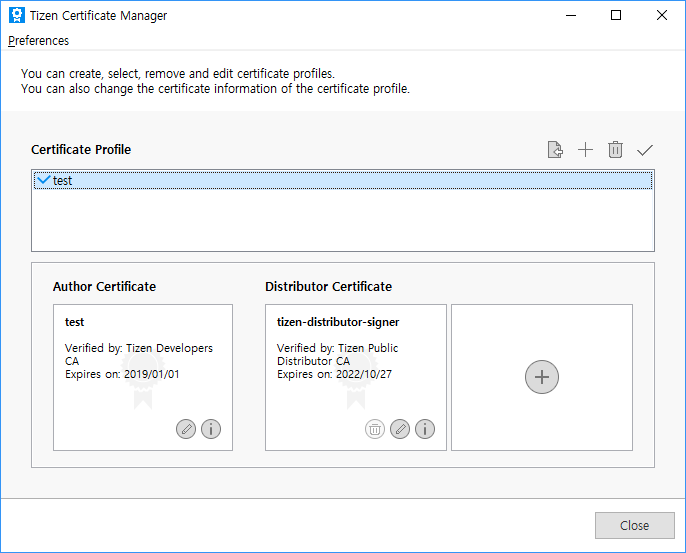
You can view, edit, and remove the certificate profiles you have created.
Figure: Managing certificate profiles
To manage a certificate profile:
- To see the details of an individual certificate within the selected certificate profile, click the info button ().
Figure: Certificate information
- To change the author or distributor certificate of the selected certificate profile, click the pencil button ().
Figure: Changing the certificate
- To remove the selected certificate profile, click the trash button ().
- To set the selected certificate profile as active, click the check button ().
The active profile is used when you package your application.
Figure: Removing the certificate profile or setting it active
Application Marketplace
As a platform, Tizen provides the foundation for many different applications and services, which lead to rich user experiences and chances of new businesses. For easy access and reliable trade of applications, efficient distribution channels are necessary for both users and developers. The Tizen Store is a marketplace of Tizen applications, where users can find useful applications and developers can distribute their valuable creations. It provides various application categories, such as All Games, Education, Entertainment, Kids, Finance, Lifestyle, and Social networking. Users can download applications of their choice and enrich their experiences with the Tizen devices. Application developers can monetize or share their applications for free in the marketplace.
Установка и настройка Tizen Studio
Для начала, нужно скачать и установить нужный софт на Ваш ПК или ноутбук. Загружаем и ставим Java, далее нужно скачать Tizen Studio with IDE installer
Важно: выбирайте версию которая соответствует Вашей системе Windows: 32/64 bit
После установки Java, переходим к установке Tizen Studio, если необходимо, то можно поменять путь установки.
После успешной установки приложения, должен появится Package Manager, но если в друг этого не произошло то идём в папку с установленной программой (tizen-studio\package-manager) и находим там файл package-manager.exe и запускаем Package Manager.
Далее выбираем install напротив Tizen SDK tools.
После установки переходим на вкладку Extension SDK и выбираем install напротив Extras.
Теперь переходим к настройке самого телевизора на Tizen OS. Открываем Smart Hub, переходим в раздел Приложения и по очередности нажмите на пульте последовательно кнопку «1», «2», «3», «4», «5», если их нет на пульте нажмите на экранном пульте. В окне разработки выбираем ON и нажимаем Enter, далее введите IP вашего компьютера и выбираем OK.
Далее перезагружаем телевизор. (Выключаем с пульта и отключаем от электро сети секунд на 30)
Теперь включаем телевизор и переходим в раздел Приложения, если Вы всё сделали правильно, то появиться надпись Developer Mode.
Теперь заходим в Ваш, ранее созданный аккаунт Самсунг. Нажимаете на плюсик и вводите свои данные.
Также, Вам нужно узнать IP адрес тв, для этого переходим в Menu и выбираем Сеть/Состояние сети/ Настройки IP.
Теперь, возвращаемся к Вашему ПК, и запускаем уже установленное приложение Tizen Studio, найти его можно в папке 9tizen-studio/ide/TizenStudio.exe). После запуска Tizen Studio: 1) Выбираем Подключение ТВ, 2) выбираем Плюсик, 3) вводим любое имя (Name), 4) вводим IP телевизора, 5) теперь нажимаем Add (как показано на фото ниже).
Далее переводим переключатель в положение On.
Теперь нужно создать сертификат автора и дистрибьютора. Для этого, нужно зайти в раздел Tools, и выбрать Certificate Manager.
Выбираем Плюсик.
Далее Samsung.
Теперь устанавливаем галочку на TV и выбираем далее (Next).
Здесь можете ввести любое название сертификата.
Дальше нужно ввести любое Author name и Password (Важно: эти данные нужно где то сохранить, так как вполне возможно они понадобится вам будущем
Дальше видим окно с просьбой войти в свой аккаунт. Вводим данные аккаунта, который ранее создали на оф сайте Samsung.
После удачного входа переходим дальше Next.
Теперь нужно ввести Password, можно использовать такой же как ранее создавали, всё остальное оставляем как есть.
Если всё сделано правильно, то появится окно с сообщением о создании сертификатов
Важно: нужно сохранить сертификаты в другом месте, не факт, что получить их можно только один раз на конкретный телевизор, папка с сертификатами находится в Диск:\Users\Имя пользователя\SamsungCertificate
Создание проекта в Tizen Studio и установка приложений на телевизор
Выбираем значок создания проекта (слева в вверху), выбираем Template и нажимаем далее.
Здесь нужно выбирать TV.
Теперь выбираем Web Application.
Basic Project.
Здесь можно ввести любое Project name и выбираем Finish.
Теперь, Вам нужно скачать и распаковать, например приложение ForkPlayer для Tizen TV или выбрать Другое. Дальше нужно открыть архив с файлами приложения и перетащить в проект, согласившись со всем.
Теперь нужно нажимать правой кнопкой мышки по названию проекта и выбрать Run As — 1, а затем Tizen Web Application. Если всё сделано правильно, то приложение запустится на вашем телевизоре.
Specfile Editor
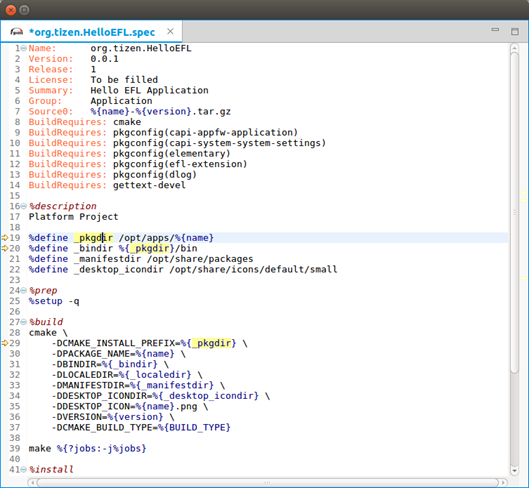
The Specfile Editor Plug-in for Eclipse provides useful features to help you manage files. The plug-in allows you to leverage several Eclipse GUI features in editing the files, including an outline view in the editor, auto-completion, highlighting, file hyperlinks, and folding.
NoteThe Tizen Platform IDE does not support features relevant to rpmlint and createrepo.
To set the Specfile Editor configuration, go to Window > Preferences > Others > Specfile Editor in the IDE toolbar. For more information, see Help Contents > Specfile Editor User Guide > Configuring Specfile Editor Settings.
Figure: Specfile Editor
Installing Additional Packages with CLI
Run the CLI Package Manager with the command using the following syntax:
package-manager-cli install <package name>
Table: Install command parameters
| Parameter | Description |
|---|---|
| Accepts the license terms. | |
| Skips the Java version check. | |
| Proxy configuration value. Use one of the following values: direct, auto, or ip:port. | |
| If you want to install packages from a local SDK image, specify the full path of the SDK image file. | |
| Administrator (sudo) password for authentication. Ubuntu only. | |
| Name of the package you want to install. You can enter multiple package names (such as NativeIDE and Emulator).
To retrieve the names of installable packages, use the following command: package-manager-cli show-pkgs |
Tizen .NET Features and Components
Tizen .NET enables you to build .NET applications with Xamarin.Forms and Tizen .NET framework. Xamarin.Forms allows you to easily create a user interface, and TizenFX API provides numerous interfaces to much of the hardware that is found in modern TV, mobile, wearable, and IoT devices.
Figure: Tizen .NET architecture

Tizen .NET consists of the following main components:
-
.NET Core
is an , general-purpose development platform maintained by Microsoft and the .NET community on . It is cross-platform (supporting Windows, macOS, and Linux) and can be used to build device, cloud, and IoT applications.
See to learn more about .NET Core, including its characteristics, supported languages and frameworks, and key APIs.
-
Xamarin.Forms
provides cross-platform APIs, which allow you to create user interfaces that can be shared across platforms. The Visual Studio Tools for Tizen enables Tizen support for Xamarin.Forms.
-
Tizen.Wearable.CircularUI
provides Tizen wearable-specific user interfaces. It is a set of extension APIs of Xamarin.Forms. Tizen.Wearable.CircularUI APIs are supported only on Tizen wearable devices with Tizen .NET support, unlike the Xamarin.Forms which support cross platforms.
-
TizenFX API
TizenFX API allows applications to call into platform-specific functionality from the shared code. This functionality enables Xamarin.Forms applications to do things a native application can do, without causing the portable part of the application to become littered with operating system-specific details.
TizenFX supports C# APIs, which expose Tizen-specific features such as Tizen application framework, account management, location services, media services, and connectivity.
Visual Studio Tools for Tizen
Visual Studio Tools for Tizen provides Tizen-specific tools to improve your productivity.
You can create a Tizen .NET application project with the Project Wizard tool in Visual Studio Tools for Tizen. When you create a new project with a specific template, Project Wizard uses it to automatically create basic functionalities, and default project files and folders for the application.
The Visual Studio Tools for Tizen extension is registered in Visual Studio Marketplace. You can install the extension from Visual Studio Marketplace in the Visual Studio IDE. To download Visual Studio 2017 for Tizen, click . To use the latest version of Visual Studio, download .
For more information, see the Visual Studio Tools for Tizen guides.


