Server side include
Содержание:
- Setup
- Client Side Languages
- Server Side Languages
- Conclusion
- Examples
- Conclusion
- Дальнейшая разработка
- File Includes[edit]
- Configuration
- Directives
- Server Side Languages
- Сборка и сервер
- Applications Of Server-Side Experimentation
- Design
- Точки входа для приложения
- Компоненты и роутинг
- Full Stack Examples
- Compatibility
- Conclusion
- Режим разработки
- Данные, собираемые при посещении сайта
- Server-Side Testing Vs. Client-Side Testing
- Server-Side Testing Challenges
- Features
Setup
The element is not available on the default installation of IIS 7 and later. To install it, use the following steps.
Windows Server 2012 or Windows Server 2012 R2
- On the taskbar, click Server Manager.
- In Server Manager, click the Manage menu, and then click Add Roles and Features.
- In the Add Roles and Features wizard, click Next. Select the installation type and click Next. Select the destination server and click Next.
- On the Server Roles page, expand Web Server (IIS), expand Web Server, expand Application Development, and then select Server Side Includes. Click Next. .
- On the Select Features page, click Next.
- On the Confirm installation selections page, click Install.
- On the Results page, click Close.
Windows 8 or Windows 8.1
- On the Start screen, move the pointer all the way to the lower left corner, right-click the Start button, and then click Control Panel.
- In Control Panel, click Programs and Features, and then click Turn Windows features on or off.
- Expand Internet Information Services, expand World Wide Web Services, expand Application Development Features, and then select Server-Side Includes.
- Click OK.
- Click Close.
Windows Server 2008 or Windows Server 2008 R2
- On the taskbar, click Start, point to Administrative Tools, and then click Server Manager.
- In the Server Manager hierarchy pane, expand Roles, and then click Web Server (IIS).
- In the Web Server (IIS) pane, scroll to the Role Services section, and then click Add Role Services.
- On the Select Role Services page of the Add Role Services Wizard, select Server Side Includes, and then click Next.
- On the Confirm Installation Selections page, click Install.
- On the Results page, click Close.
Windows Vista or Windows 7
- On the taskbar, click Start, and then click Control Panel.
- In Control Panel, click Programs and Features, and then click Turn Windows Features on or off.
- Expand Internet Information Services, then select Server Side Includes, and then click OK.
Client Side Languages
Client side development is done almost exclusively in JavaScript. This is, of course, in addition to basic HTML and CSS code. The reason JavaScript is called a client side language is because it runs scripts on your computer after you’ve loaded a web page. Here’s an example:
That JavaScript code takes the string ‘Hello’ and pops it into the element with an ID of ‘hello’ – let’s say it was an . What was originally inside that element gets replaced, but if you open up the source code of that page, you’ll still see that original text and not ‘Hello’.
This is because ‘Hello, world!’ was dynamically added to the HTML document – it was not a part of the original document that was loaded by your browser. However, what you will be able to see see is the JavaScript code which was run by your computer.
Server Side Languages
A server side or back-end language runs its scripts before the HTML is loaded, not after.
There are a range of server side languages in use on the web today. PHP is one of the most popular, as well as Ruby on Rails, ASP.NET and many others. They are called server side languages because their scripts are run not on your computer, but on the server which hosts the website and sends down the HTML code.
Consider this PHP code:
This code has the exact same effect as the JavaScript code we looked at in the previous section. It puts the string ‘Hello, world!’ into the element with an ID of ‘hello’. But view the HTML source and what you see is a different story. Inside the tags will be the string ‘Hello’.
On the other hand, the PHP code that was run by the server will be nowhere to be seen. This is because the server will have already taken care of the PHP, and what gets sent to your computer is the resulting pure HTML.
Conclusion
Most websites make use of both a client side and a server side language. Although there are things both can do, there are some things which can only be done server side, and there are some things which can only be done client side.
Front-end scripting is good for anything that requires user interaction, such as a simple game. Back-end scripting is good for anything that requires dynamic data to be loaded, such as a notice that tells the user they’re logged in.
To write your own front-end and back-end scripts, you should learn web development.
Examples
An AWS Elastic Load Balancer (ELB) is an example of a server-side discovery router.
A client makes HTTP(s) requests (or opens TCP connections) to the ELB, which load balances the traffic amongst a set of EC2 instances.
An ELB can load balance either external traffic from the Internet or, when deployed in a VPC, load balance internal traffic.
An ELB also functions as a Service Registry.
EC2 instances are registered with the ELB either explicitly via an API call or automatically as part of an auto-scaling group.
Some clustering solutions such as Kubernetes and Marathon run a proxy on each host that functions as a server-side discovery router.
In order to access a service, a client connects to the local proxy using the port assigned to that service.
The proxy then forwards the request to a service instance running somewhere in the cluster.
Conclusion
In today’s competitive digital landscape, customers are the ultimate source of validation your business needs (at least the only one that matters). Test deep within your entire stack and wide across your product features to let your customers decide what works and what needs to be fixed.
With server-side testing, you need not hold back with your ideas. Even the most complex of mobile app pages or most sophisticated of product features can be optimized to fuel conversions and improve your bottom line.
To ensure your website, product, and in fact, every digital touchpoint is optimized for the best, most seamless user experience, be sure to embed deep testing in your marketing and product endeavors.
With this server-side testing guide, you’re all set to get started on your deep experimentation roadmap. So, set the ball rolling, deliver delightful experiences, and build futuristic products- with server-side testing!
Дальнейшая разработка
SSR не накладывает почти никаких ограничений на разработку приложений. Достаточно просто помнить о том, что нельзя использовать браузерное API там, где код выполняется на сервере, в остальных же случаях выносить код в клиентские хуки beforeMount/mounted.
Также приложение, созданное для работы с SSR, будет корректно работать и без SSR, так что подобный подход можно использовать для обычных SPA, чтобы при внезапном появлении требований к SEO не ломать голову и не писать костыли для оптимизации ваших сайтов.
Могут быть проблемы с директивами, роль которых часто сводится к манипуляции с DOM, но их легко решить, отдавая альтернативную реализацию (пустую?) вместо самой директивы на сервере ().
В общем и целом это всё, что необходимо учесть перед началом разработки самого приложения. Дальше вы просто создаёте компоненты, подключаете компоненты-страницы к соответствующим роутам и, если всё сделано правильно, будете получать срендеренную страницу с сервера и корректно работающее приложение на клиенте.
File Includes[edit]
Another type of include statement is #include file. This statement works just like the virtual include except that the path to the file must be relative to the directory where the current page resides. In other words, you cannot access the directory structure starting from the document root (meaning the root of the website.)
Below is the same example as before with the virtual includes replaced with file includes. When running this script under IIS, you may get an error when trying to access a parent directory in this manner. For this reason, I prefer to use virtual includes whenever possible.
<!-- #include file="../lib/header.asp" -->

<h1>Hello World</h1>

<!-- #include file="../lib/footer.asp" -->
Configuration
Server-side processing in DataTables is enabled through use of the option. Simply set it to and DataTables will operate in server-side processing mode. You will also want to use the option to specify the URL where DataTables should get its Ajax data from. As such, the simplest server-side processing initialisation is:
Configuration of how DataTables makes the Ajax request is configured through the option. In the above example we used it as a string, which instructs DataTables to use its default settings for making the Ajax request. However, you can customise these settings by passing in as an object. As an object, maps directly onto the jQuery configuration object, so any options you can use in a jQuery request, you can also use with DataTables! For example, to make a POST request:
For further information about the Ajax options available in DataTables, please refer to the documentation.
Directives
Common
The following are SSI directives from the times of NCSA HTTPd (the 1990s). They are supported by all implementations.
| Directive | Parameters | Description | Example |
|---|---|---|---|
| file or virtual | This is probably the most used SSI directive, allowing the content of one document to be transcluded in another. The file or virtual parameters specify the file (HTML page, text file, script, etc.) to be included. Includes the contents of another file or the result of running a CGI script. If the process does not have access to read the file or execute the script, the include will fail. «virtual» specifies the target relative to the domain root, while «file» specifies the path relative to the directory of the current file. When using «file» it is forbidden to reference to absolute paths. Higher directories (..) are usually forbidden, unless explicitly configured. The Apache documentation recommends using «virtual» in preference to «file». |
<!--#include virtual="menu.cgi" --> <!--#include file="footer.html" --> |
|
| cgi or cmd | This directive executes a program, script, or shell command on the server. The cmd parameter specifies a server-side command; the cgi parameter specifies the path to a CGI script. The PATH_INFO and QUERY_STRING of the current SSI script will be passed to the CGI script, as a result «exec cgi» should be used instead of «include virtual». |
<!--#exec cgi="/cgi-bin/foo.cgi" --> <!--#exec cmd="ls -l" --> |
|
| var | This directive displays the contents of a specified HTTP environment variable. Variables include HTTP_USER_AGENT, LAST_MODIFIED, and HTTP_ACCEPT. |
Your IP address is: <!--#echo var="REMOTE_ADDR" --> |
|
| timefmt, sizefmt, or errmsg | This directive configures the display formats for the date, time, filesize, and error message (returned when an SSI command fails). |
<!--#config timefmt="%y %m %d" --> <!--#config sizefmt="bytes" --> <!--#config errmsg="SSI command failed!" --> |
|
| and | file or virtual | These directives display the date when the specified document was last modified, or the specified document’s size. The file or virtual parameters specify the document to use. The file parameter defines the document as relative to the document path; the virtual parameter defines the document as relative to the document root. |
<!--#flastmod virtual="index.html" --> <!--#fsize file="script.pl" --> |
Control directives
Control directives are later added to SSI. They include the ubiquitous if-elif-else-endif flow control and variable writing as well as more exotic features like loops only found in some implementations.
| Directive | Parameters | Description | Example | Found in |
|---|---|---|---|---|
|
expr | The if statement. Used for condition tests that may determine and generate multiple logical pages from one single physical page. is a shorthand for nested else-if. and do not accept parameters.
Expression syntax vary among implementations. Variable existence and equality/regex checks are commonly supported. Jigsaw uses expressions split over multiple attributes instead. |
<!--#if expr="${Sec_Nav}" -->
<!--#include virtual="secondary_nav.txt" -->
<!--#elif expr="${Pri_Nav}" -->
<!--#include virtual="primary_nav.txt" -->
<!--#else -->
<!--#include virtual="article.txt" -->
<!--#endif -->
|
Ubiquitous. |
| set | var, value | Sets the value of a SSI variable. Apache provides additional parameters for encodings. |
<!--#set var="foo" value="bar" --> |
Apache, Nginx |
| This directive outputs a list of all SSI variables and their values, including environmental and user-defined variables. It has no attributes. |
<!--#printenv --> |
Apache |
Server Side Languages
A server side or back-end language runs its scripts before the HTML is loaded, not after.
There are a range of server side languages in use on the web today. PHP is one of the most popular, as well as Ruby on Rails, ASP.NET and many others. They are called server side languages because their scripts are run not on your computer, but on the server which hosts the website and sends down the HTML code.
Consider this PHP code:
This code has the exact same effect as the JavaScript code we looked at in the previous section. It puts the string ‘Hello, world!’ into the element with an ID of ‘hello’. But view the HTML source and what you see is a different story. Inside the tags will be the string ‘Hello’.
On the other hand, the PHP code that was run by the server will be nowhere to be seen. This is because the server will have already taken care of the PHP, and what gets sent to your computer is the resulting pure HTML.
Сборка и сервер
Для работы SSR необходим сервер (express в примере) на Node.js, который также будет заниматься сборкой проекта на лету во время разработки. Тут много кода, так что будет проще посмотреть примеры точки запуска сервера и конфигурации сервера для разработки.
Несколько тонкостей:
- Нужно подготовить общий шаблон таким образом, чтобы плагин vue-meta на клиенте понял, что разметка уже готова и не продублировал meta теги. Для этого нужно просто вставить специальный атрибут без значения в тег . Название атрибута , так что в вашем проекте оно может быть другим (я, например, решил заменить его на , так как это короче).
- Также в шаблон нужно подставить всё необходимое из плагина vue-meta: атрибуты для html и body, мета-теги, link, noscript и т.д… В простейшем варианте это происходит :
- Для корректной обработки серверного бандла (который был предварительно собран с помощью webpack’а) нужно использовать vue-server-renderer, которому нужно указать файл с бандлом и его кодировку. Подробнее о параметрах можно почитать в официальной документации. Там есть как минимум один интересный параметр runInNewContext, который позволит довольно неплохо оптимизировать рендеринг, но при соблюдении определённых правил (о чём речь пойдёт ниже, в разделе про точки входа).
- Так как все данные из API загружаются во время рендеринга, то нет необходимости загружать их повторно на клиенте. Но клиент, очевидно, не может просто вынуть их из разметки, поэтому необходимо передать ему данные вместе с разметкой. Решается эта задача максимально просто: в разметку добавляется script, где все нужные данные записываются в переменные. Сами данные обрабатываются или, ещё лучше, с помощью serialize-javascript.
Applications Of Server-Side Experimentation
A/B Test Deep Within Your Stack
One of the most fundamental uses of server-side testing is to test two or more variations of any webpage or mobile app. While this works just like client-side testing, the only difference is in the way variations are rendered. For server-side, it is done directly via the server while for client-side, changes are applied on the browser. A server-side testing tool is used instead of a client-side one in cases when tests are run on complex or dynamic elements that are beyond the scope of UI or when the modifications to be made are beyond the scope of a basic visual or code editor. An example of this would be running an A/B test on the shipping amount for an eCommerce store. Since the prices shown on the screen are rendered dynamically from the server, a sophisticated server-side testing tool is required to run this test.

Evaluate Your Features Before Rollout With Feature Testing
With Feature Testing, you can test multiple product features as well as multiple variations of a feature until you are sure you are rolling out the best one. Server-side testing allows you to create test variations with different product features or different variations of a product feature so you can experiment with them thoroughly, measure their impact based on critical metrics and then roll out the winning variation. Most importantly, you get real-time visibility into your products’ features’ performance. For instance, if you are a SaaS company and want to launch a free trial for your product, you can create multiple variations with different duration of free-trial periods, identify the winning variation and then make it available universally.

Manage Features’ Lifecycle With Feature Flag Management
Also referred to as Feature Toggle, Feature Flags enable you to turn your features ON/OFF and thereby alter user experience, without having to deploy new code. Once rolled out, you can simply control your features – enable them for some users, disable them for others, hide them for a certain period, and so on. If necessary, you can also roll out an incomplete feature and simply hide it until you are confident about making it live. From studying user response to a certain feature to turning it ON/OFF, all of it can be done in real-time.

Deliver Features Confidently with Staged Feature Rollouts
Testing on the server-side allows you to mitigate risk by rolling out features in stages. You can segment your audience, make a particular feature available only to a small percentage of them, measure its performance, and systematically make it available to all your customers in progressive stages (or even create your alpha and beta launch groups). You can also roll back a feature immediately in case a bug is found, modify it and re-launch it on the go. The valuable data and feedback accumulated from these iterations can help you drive constant innovation and rapidly evolve your product features.

Design
As a simple programming language, SSI supports only one type: text. Its control flow is rather simple, choice is supported, but loops are not natively supported and can only be done by recursion using include or using HTTP redirect. The simple design of the language makes it easier to learn and use than most server-side scripting languages, while complicated server-side processing is often done with . SSI is Turing complete.
SSI has a simple syntax: . Directives are placed in HTML comments so that if SSI is not enabled, users will not see the SSI directives on the page, unless they look at its source. Note that the syntax does not allow spaces between the leading «<» and the directive. Apache tutorial on SSI stipulates the format requires a space character before the «—>» that closes the element.
Точки входа для приложения
Как я упоминал выше, необходимо создать 2 отдельные входные точки (entry в webpack) приложения для SSR и для клиента. Собственно, здесь так же, как и в конфигах webpack — 3 файла с общим, серверным и клиентским кодом.
Общий код (app.js) включает общую инициализацию приложения, то есть подключает Vue-плагины, создаёт vuex store, router и новый root-компонент. Также здесь регистрируются глобальные компоненты, фильтры и директивы.
Здесь же root-компоненту нужно подмешать vue-файл с шаблоном и логикой уже самого приложения, чтобы главный компонент приложения и root-компонент стали одним целым.
Важно, что для vue-server-renderer есть опция runInNewContext, которую можно отключить, получив при этом неплохой прирост производительности. Но для его использования необходимо каждый раз снова инициализировать приложение, поэтому в app.js я возвращаю функцию, производящую инициализацию, а не готовый объект Vue-компонента
Код же, исполняемый непосредственно в этом файле, будет выполнен только один раз при запуске сервера, о чём необходимо помнить. Здесь можно регистрировать общие моменты, не зависящие от данных, получаемых в рантайме — регистрировать компоненты, фильтры, директивы, извлекать переменные окружения и т.д. и т.п.
Точка входа для клиента (client.js). Здесь создаётся приложение с помощью функции из app.js, затем грузится и выполняется всё необходимое для корректной работы в браузере.
Здесь же производится замена объекта data для компонента, который должен быть показан на данной странице и состояния vuex store.
Завершаем код тем, что берём root-компонент и вызываем у него в корневой элемент приложения. Этому элементу будет автоматически дан атрибут , поэтому можно сделать так: .
Точка входа для SSR (server.js). Здесь просто создаётся функция, которая будет принимать контекст запроса (то есть объект request из express) и инициализировать приложение. Функция должна вернуть promise, который будет выполнен в тот момент, когда все необходимые данные загружены из API, а приложение будет готово к отправке клиенту.
Порядок действий в этой функций может быть таким (код):
- Создаём приложение из app.js.
- Настраиваем baseUrl в axios таким образом, чтобы он мог обратиться к серверу API локально (при необходимости). Здесь просто нужно помнить, что браузера нет, а значит и нет объекта location, из которого можно хотя бы взять домен и протокол, так что это нужно будет прописать вручную.
- Задаём обработчик для vue-router ready (), который будет выполнен при нахождении соответствия компонентов и URL:
- Берём все асинхронные компоненты для данной страницы и выполняем их функции для вытягивания асинхронных данных. Собираем возращённые промисы в массив.
- Ждём выполнения всех промисов в .
- Резолвим, добавляя к контексту информацию из vue-meta, vuex state, а так же записываем в компоненты и в контекст данные, полученные в результате выполнения асинхронных операций.
- Говорим роутеру, что пришло время обработать URL из контекста ().
Далее все полученные данные будут обработаны http-сервером, компоненты отдадут свою разметку, данные с разметкой будут записаны в шаблон, получившийся HTML отправится клиенту.
Компоненты и роутинг
Код для регистрации роутера и компонентов для него.
Для разработки приложения с SSR нужно исходить из того, что только root-компонент или компоненты, которые привязаны к роутам, имеют возможность асинхронно загрузить данные перед рендерингом. Для этих компонентов специальным образом нужно обрабатывать изменения роута и записывать данные, которые вернул сервер после рендеринга. Для этих целей хорошим решением будет создать mixin, который автоматически подключается к каждому компоненту при инициализации роутера. Пример кода подобного mixin’а.
В prefetch-mixin нужно добавить примерно следующее:
- created-хук, который будет брать поле prefetchData (при инициализации приложения в это поле пишется data компонента, пришедшая с сервера после рендеринга или просто записанная напрямую во время рендеринга на сервере) и полностью заменять значения полей на значения из , но только до того, как приложение уже полностью инициализировано, что мы можем выяснить из поля .
- beforeMount-хук будет вызывать prefetch только на клиенте уже после загрузки страницы в том случае, если произошёл переход на другой роут.
- beforeRouteUpdate-хук будет вызывать prefetch только на клиенте при изменении параметров роута.
Full Stack Examples
All the examples in this documentation are standalone examples that can be run inside the documentation
and exported to Plunker. This is excellent as you can easily inspect fully working examples. To allow this,
all the examples have mocked servers (as the examples in the docs and Plunker are client-side only).
To accompany the examples in the documentation, we also provide the following full stack examples for
reference. We advise using the examples in the documentation to learn about the Server-Side Row Model
and then using the full stack examples as reference.
The full stack examples are as follows:
- Node.js connecting to MySQL
- Java Server connecting to Oracle
- GraphQL connecting to MySQL
- Java Server connecting to Apache Spark
Compatibility
| Version | Notes |
|---|---|
| IIS 10.0 | The element was not modified in IIS 10.0. |
| IIS 8.5 | The element was not modified in IIS 8.5. |
| IIS 8.0 | The element was not modified in IIS 8.0. |
| IIS 7.5 | The element was not modified in IIS 7.5. |
| IIS 7.0 | The element was introduced in IIS 7.0. |
| IIS 6.0 | The element replaces the IIS 6.0 SSIExecDisable metabase property. |
Note
The cmd directive for #exec is disabled for SSI files in IIS 7; you can only use the cgi directive. For example, you can use the following command with a cgi directive:
But you can no longer use the use the following command with a cmd directive:
If you attempt to use the cmd directive in SSI files on IIS 7, you will receive the following error message:
The CMD option is not enabled for #EXEC calls
Conclusion
Most websites make use of both a client side and a server side language. Although there are things both can do, there are some things which can only be done server side, and there are some things which can only be done client side.
Front-end scripting is good for anything that requires user interaction, such as a simple game. Back-end scripting is good for anything that requires dynamic data to be loaded, such as a notice that tells the user they’re logged in.
To write your own front-end and back-end scripts, you should learn web development.
Disclosure of Material Connection: Some of the links in the post above are “affiliate links.” This means if you click on the link and purchase the item, I will receive an affiliate commission. Regardless, I only recommend products or services I use personally and believe will add value to my readers.
Режим разработки
В случае запуска сервера в режиме разработки сам сервер будет работать примерно так же. Отличаются лишь 2 момента — по-другому обрабатываются ошибки, возникшие при рендеринге, а так же подменяется renderer и разметка общего шаблона на новые при изменении кода приложения.
Помимо самого сервера нужно запустить для генерации сборки на лету при изменении исходников. Перед этим инициализируется webpack со всеми нужными для разработки плагинами типа HotModuleReplacementPlugin.
Также нужно сообщать клиенту о новых сборках бандла. Для этого понадобятся webpack-dev-middleware и webpack-hot-middleware. Они отвечают за доставку изменившегося кода клиенту при появлении новых сборок (то есть каждый раз, когда изменяется исходный код приложения).
Отдельно запускается и подменяется серверный бандл на новый при его изменении. В моём случае сообщаем о том, что он изменился, с помощью простого коллбэка (строка 50 в , строка 73 в ).
Данные, собираемые при посещении сайта
Персональные данные
Эти данные собираются в целях оказания услуг или продажи товаров, связи с пользователем или иной активности пользователя на сайте, а также, чтобы отправлять пользователям информацию, которую они согласились получать.
Мы не проверяем достоверность оставляемых данных, однако не гарантируем качественного исполнения заказов или обратной связи с нами при некорректных данных.
Данные собираются имеющимися на сайте формами для заполнения (например, регистрации, оформления заказа, подписки, оставления отзыва, обратной связи и иными).
Формы, установленные на сайте, могут передавать данные как напрямую на сайт, так и на сайты сторонних организаций (скрипты сервисов сторонних организаций).
Также данные могут собираться через технологию cookies (куки) как непосредственно сайтом, так и скриптами сервисов сторонних организаций. Эти данные собираются автоматически, отправку этих данных можно запретить, отключив cookies (куки) в браузере, в котором открывается сайт.
Не персональные данные
Кроме персональных данных при посещении сайта собираются не персональные данные, их сбор происходит автоматически веб-сервером, на котором расположен сайт, средствами CMS (системы управления сайтом), скриптами сторонних организаций, установленными на сайте. К данным, собираемым автоматически, относятся: IP адрес и страна его регистрации, имя домена, с которого вы к нам пришли, переходы посетителей с одной страницы сайта на другую, информация, которую ваш браузер предоставляет добровольно при посещении сайта, cookies (куки), фиксируются посещения, иные данные, собираемые счетчиками аналитики сторонних организаций, установленными на сайте.
Эти данные носят неперсонифицированный характер и направлены на улучшение обслуживания клиентов, улучшения удобства использования сайта, анализа посещаемости.
Server-Side Testing Vs. Client-Side Testing
Consider the following situation. An eCommerce store owner, with an aim to optimize for better conversions, wants to test two different checkout flows on both his/her website and mobile app at the same time. To do so, they need an advanced testing methodology, which is more inherent to the process and integrates with the website to ensure a seamless user experience. Neither of which is possible by simple A/B testing on the client-side, and that is why server-side testing is required.
As opposed to client-side testing which involves delivering variations of a webpage that rest on the visitors’ browser (client), server-side testing allows tests to be run and modifications to be made directly on the webserver and then render the same to the visitor’s browser or mobile app. Both have varied scope and serve diverse business needs. Server-side testing is more robust and is built for fairly complex tests, while its client-side testing is meant to deal with simpler, UI-related tests.
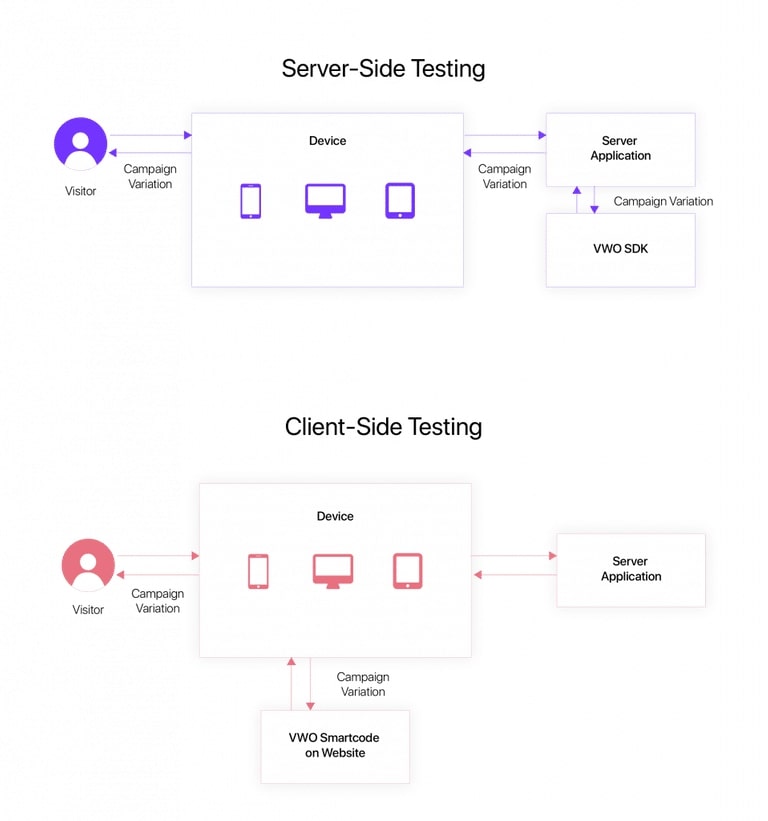 Client-Side Testing vs. Server-Side Testing Flow Diagram
Here’s a look at the core differences between the two:
| Parameter | Client-Side A/B Testing | Server-Side A/B Testing |
| Getting Started | Simple implementation; requires a single code | Complex implementation; additional code to be deployed to run multi-channel tests |
| Implementation of Tests | WYSIWYG/DIY editor required to create test variations | Each variation needs to be coded separately, no drag/drop available |
| Scope | Limited to cosmetic changes; experiments revolve around the design, placement, messaging of the key elements on a web page | Ability to test deeply; experiments revolve around products’ UX, algorithms’ efficiency, sign-up flows, etc |
| Performance | Asynchronous code can cause Flicker EffectSynchronous code can increase page load time | No noticeable performance impact |
| Privacy | Privacy can be compromised as experiment attributes are visible on the end user’s client | More secure as experiment attributes are safe with the company servers |
| Channels | Restricted to desktop and mobile web. Doesn’t work for app.Cannot seamlessly run cross-channel and omnichannel tests simultaneously | Works for both web and app.
Can seamlessly run cross-channel and omnichannel tests simultaneously |
While client-side testing can help you quickly figure out and make simpler improvements to your website that can positively impact your conversion funnel, server-side testing can help you go deeper and run advanced tests to optimize your products’ entire lifecycle. Each of the techniques complements the other and helps you overcome unique roadblocks in your optimization journey. So, deciding between the two depends completely on the scenario at hand, availability of resources, business goals, and teams’ optimization maturity.
Server-Side Testing Challenges
Dependency On Developers
Right from creating and running a test to making modifications after a winning variation is declared, a dedicated development team is required to run an end-to-end server-side test. This poses two challenges. First, it makes marketers, product managers, and UXers less autonomous. They can’t single-handedly run tests and optimize user experiences, and improve experiences solely at their end. Second, there is an additional investment required for hiring resources dedicated to the same. However, if you use server-side testing continuously and strategically, and make it an inherent part of your business growth, you can rest assured of a return worth the investment.
Relatively Slower Implementation And Execution
If compared to its counterpart, server-side testing is more complex in its operation as variations have to be coded before the test can begin. Hence, implementing and executing an entire server-side test campaign can be slower than running a client-side one. However, since server-side testing is used for testing more impactful website elements and crucial product features, dedicating that extra time is immensely rewarded with deep insights into how you can optimize your entire stack, as well as UX.
Features
You may benefit from the combination of all these features or just be interested in a subset. The features of the
Server-Side Row Model are:
-
Lazy-Loading of Groups: The grid will load the top level rows only. Children
of groups are only loaded when the user expands the group. Some applications may use
the Server-Side Row Model for this one feature alone e.g. you might have a managers database table,
you can display a list of all managers, then click ‘expand’ on the manager and the grid
will then request to get the ’employees’ for that manager. -
Server-Side Grouping, Pivot and Aggregation: Because the data is coming back from the server one group
level at a time, this allows you to do aggregation on the server, returning back the aggregated
results for the top level parent rows. For example you could include ’employee count’ as an attribute
on the returned manager record, to say how many employees a manager manages. -
Infinite Scrolling: Rows are read back from the server in blocks to provide the experience
of infinite scrolling. This happens at each grouping level
(i.e. the top level rows are brought back in blocks, then when you expand a group, the children
of that group are also loaded in blocks). This allows viewing very large datasets in the browser by
only bringing back data one block at a time. This feature re-uses the logic from the
Infinite Scrolling row model, so understanding
how that row model works will help you in understanding this part of the Server-Side Row Model. -
Slice and Dice: Assuming your server-side can build the data query, you can allow the user
to use the ag-Grid UI to drag columns around to select what columns you want to group by and aggregate
on. What the user selects will then be forwarded to your datasource as part of the request. This feature
is advanced and will require some difficult server-side coding from you, however if done correctly then
your users will have an experience of slicing and dicing large data in real time, something previously
only available in expensive reporting tools, which you can now embed into your JavaScript application.


