Установка openssh для windows server 2019 и windows 10installation of openssh for windows server 2019 and windows 10
Содержание:
Установка и настройка Putty
Putty – это очень популярный клиент для Windows для передачи данных по SSH. Кроме того, client Putty можно использовать и для других оболочек: протокола Telnet, SCP для копирования файлов, как клиент SFTP и утилиту keygen для генерации ключей.
Если вы не собираетесь использовать все функции программы, к примеру, не хотите использовать туннель, то можете скачать отдельный модуль client Putty для получения доступа по SSH и все – решать вам.
Еще одно преимущество и причина, почему лучше выбрать client Putty – это наличие большого числа модификаций этого приложения. Программисты любят переделывать программы с открытым кодом, вот и этот клиент неоднократно претерпел изменений. Если хотите установить на свой компьютер именно оригинальный client, то скачивайте файл-установщик с официального сайта, а не с файлобменников и т. п.
Основная задача клиентской программы – это получить доступ к серверу. Большинство используют в SSH аутентификацию при помощи публичных ключей. Потому вам понадобится модуль keygen и его настройка, чтобы сформировать свой открытый ключ для получения доступа к серверу. Итак, скачайте keygen с официального сайта Putty. После того, как вы скачаете keygen, распакуйте его, так как он идет в архиве. После этого запустите.
Чтобы добавить новый публичный ключ, вам нужно узнать, какой тип SSH использует сервер. Если у главы сервера стоит адекватный сисадмин, то, скорее всего, вам нужно будет в параметрах keygen выбрать версию SSH 2RSA. Также не забудьте прописать число генерируемых битов, например, 2048 бит. После этого жмите кнопку Generate. Далее появится сообщение о том, что ключ сгенерирован и вам предложат заполнить поля с кодовой фразой. Но упаси вас сисадмин делать это! Если заполните кодовую фразу, то придется каждый раз ее писать, как совершаете какое-то действие на сервере, что весьма неудобно. Ведь это лишит вас всех прелестей использования аутентификации при помощи открытых ключей. Если вы все же не боитесь трудностей, то указывайте ключевую фразу вместе с комментарием к ней, чтобы вы поняли со временем, что вообще написали там.
После проделанного вам нужно будет отыскать публичный ключ. Генератор создаст открытый ключ и секретный. Второй трогать не нужно, а вот публичный понадобится для размещения его на сервере, чтобы вы смогли подключаться по SSH. Найти сгенерированный ключ можно внутри файла id_rsa.pub через поиск в Windows. Далее скопируйте его и отправьте на сервер, чтобы ключ был добавлен в файл с перечнем публичных ключей для авторизации пользователей. Только так ваш client сможет подключиться по SSH.
Чтобы использовать client Putty по прямому его назначению, то есть чтобы подключиться по SSH к другому серверу Windows, вам нужно знать IP и имя хоста. После этого запускаете client Putty и в разделе “Сессия” заполняете необходимую информацию для подключения к серверу. А именно: вписываете в Host name имя сервера либо в поле IP address – IP-адрес хоста. Порт оставляйте как и есть – равным 22-м, а в названии сессии пропишите что угодно. После того, как введенные данные сохранятся, откроется командная строка с фразой login as. Вам нужно будет вписать имя пользователя, под которым вы входите на сервер и ваш пароль. Учтите, что “Скопировать/Вставить” не получится – в командной строке такая функция запрещена во избежание кражи паролей.
Также вы сможете создать туннель при помощи Putty. Туннель в этом клиенте не так сложно настроить. Для начала вам нужно узнать параметры, которым будет соответствовать туннель, а именно куда перенаправлять IP-адрес и делать проброс. Настроить туннель вы сможете в одноименной вкладке “Туннель” или “Tunnels”. Вам всего лишь нужно будет указать тип проброса, порт и IP-адреса откуда делать перенаправление и куда будет вести созданный туннель. Сделать это не сложно, если знать точные параметры для проброса.
https://youtube.com/watch?v=RhD08kJOTy0
Latest news
2020-06-27 PuTTY 0.74 released
PuTTY 0.74, released today, is a bug-fix and security release. It
fixes bugs in 0.73, including one possible vulnerability, and also
adds a
to mitigate a minor information leak in SSH host key policy.
2019-09-29 PuTTY 0.73 released
PuTTY 0.73, released today, is a bug-fix release. It fixes a small number of bugs since 0.72, and a couple of them have potential security implications.
2019-07-20 PuTTY 0.72 released
PuTTY 0.72, released today, is a bug-fix release. It fixes a small
number of further security issues found by the 2019 EU-funded
HackerOne bug bounty, and a variety of other bugs introduced in 0.71.
2019-07-08 Bug bounty concluded
The EU-funded bug bounty programme is now closed. Many thanks to
everybody who sent in reports!
2019-03-25 Bug bounty continues
This year’s EU-funded bug bounty programme is still
running. It was originally scheduled to end on 7th March, but
there was money left over in the budget. So while that money lasts,
you still have a chance to earn some by finding vulnerabilities in
PuTTY 0.71 or the development snapshots!
As before, vulnerabilities should be reported through the
HackerOne web site
in order to qualify for a bounty: if you send reports directly to the
PuTTY team in the usual way, then we’ll still fix them, but we can’t
provide money for them.
2019-03-16 PuTTY 0.71 released
PuTTY 0.71, released today, includes a large number of security fixes,
many of which were found by the recent EU-funded HackerOne bug bounty.
There are also other security enhancements (side-channel resistance),
and a few new features.
It’s also the first release to be built for Windows on Arm.
2019-01-18 EU bug bounty for finding vulnerabilities in PuTTY
From now until 7th March, you can earn money by reporting security
vulnerabilities in PuTTY!
HackerOne is running a bug
bounty programme for PuTTY, funded by the European Union as part
of the ‘Free and Open Source Software Audit’ project
(EU-FOSSA 2). If you report a vulnerability through their web site, it
may qualify for a bounty. (The exact amount will depend on how serious
the problem is, and there’s also a bonus for providing a patch that
fixes it.)
For more details, or if you have something to report, see the link
above.
(Please note that HackerOne will only consider vulnerabilities
reported to them. If you send a report directly to the PuTTY
team in the usual way, then of course we’ll still fix it, but we can’t
also arrange for you to get paid.)
2018-08-25 GPG key rollover
This week we’ve generated a fresh set of GPG keys for signing PuTTY
release and snapshot builds. We will begin signing snapshots with the
new snapshot key, and future releases with the new release key. The
new master key is signed with the old master keys, of course. See
the keys page for more information.
2017-07-08 PuTTY 0.70 released, containing security and bug fixes
PuTTY 0.70, released today, fixes further problems with Windows DLL
hijacking, and also fixes a small number of bugs in 0.69, including
broken printing support and Unicode keyboard input on Windows.
SSH Academy
IAM
IAM Zero Trust Framework
Gartner CARTA
Standing Privileges
Zero Standing Privileges (ZSP)
Ephemeral access
PrivX lean PAM
Identity management
Active Directory
Administrators
Domain administrators
Local administrators
Jump server
IAM Just in time
Just-in-time security tokens
Multi-Factor Authentication (MFA)
OpenID Connect (OIDC)
PAM (Privileged Access Management)
Legacy PAM
Password generator
Password strength
Password vaults
Privileged accounts
PASM
Privilege Elevation and Delegation Management
Privileged session management
Radius
Root accounts
Service accounts
System accounts
Sudo
Users
User IDs
Superuser
Vagrant
Cloud
Cloud applications
Cloud computing
Cloud computing characteristics
Cloud computing companies
Cloud computing definition
Cloud computing models
Cloud computing pros and cons
Cloud computing security
Cloud storage
Cloud technology
IaaS
PaaS
SaaS
SaaS companies
SaaS security
Secure Shell
Secure Shell
Secure Shell protocol
SSH software downloads
SSH certificate authentication
Ipsec
Network monitoring
Port 22
RCP
rlogin
RSH
SCP
Session key
Automated connections
SSH command
SSH configuration
SSHFS SSH File System
SSH for Windows
SSH servers
Tectia SSH Server
SSH server configuration
SSO using SSH agent
Telnet
WinSCP
SSH keys
CAC and PIV smartcards
OpenSSH key authorization
Passphrases
Passphrase generator
Copy ID
Host key
Authorized key
Authorized key file
SSH key basics
SSH key identities
SSH key management
Universal SSH Key Manager
SSH key proliferation
SSH keygen
SSH keys for SSO
Public key authentication
SSH compliance
SSH key compliance
Basel III
COBIT
Cybersecurity framework
Fips 140
Fips 199
Fips 200
GDPR
HIPAA
ISACA
ISACA SSH guide
ISO 27001
NERC-CIP
NIS directive
NIST 7966
NIST 7966 download
NIST 800-53
PCI-DSS
Sans Top 20
Sarbanes Oxley
sshd OpenSSH server process
PuTTY
PuTTY download
PuTTY manuals
PuTTY for Windows
PuTTY for Mac
PuTTY for Windows
PuTTY for Windows installation
PuTTY public keys
PuTTYgen for Linux
PuTTYgen for Windows
SSH tunneling example
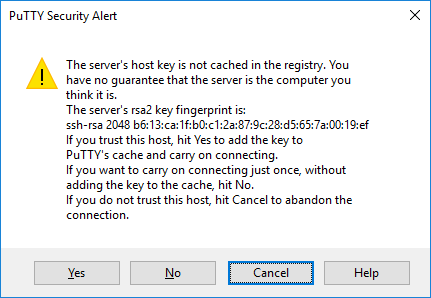
Security alert dialog box
When you connect to a server for the first time, you are likely to see a dialog about the server’s host key not being cached in the registry. This is normal when you are connecting to a server for the first time. If you ever get this with a server, it could mean that someone is trying to attack your connection and steal your password using a man-in-the-middle attack.
But as said, the first time you connect, this is normal, and you should just click Yes. If you want to be fancy, you can check the displayed key fingerprint and make sure it is the same that is used by the server. In real life, almost nobody does that. It is more secure to use a proper SSH key management solution anyway.
How to set up SSH to natively connect to your server from Windows 10
Since the OpenSSH client in Windows 10 is still in the beta stage, the client is not installed by default in Windows 10. But not to worry! The process is simple and only requires a few clicks and a restart of your computer to begin using SSH right from the command prompt or Powershell. Let’s take a look at how to install OpenSSH on your Windows workstation.
Note:
Because the OpenSSH client was introduced in the Windows 10 Fall Creators Update, you’ll need to first update to at least that version of the operating system. You can update using Windows Updates or by following the link above. Once updated, you’ll be on Windows 10 version 1709. To see which version of Windows you are running, click on the start menu, then select Settings -> System -> About.
Enable Windows 10 Developers Mode
Because this feature is only available in Developers Mode, you’ll need to first make sure you’ve enabled that option. Don’t worry, it should only take a few minutes to download the 6 MB file necessary to enter Developers Mode.
- Click the windows start menu and type Developers Settings in the search bar on the lower left hand side of the screen.
- You should see an option called For developers settings in the results. To open you can hit the Enter key, or mouse click the option.
- With the windows settings opened to the For Developers menu you can change the mode. By default, under Use developer features, you should see Windows Store Apps selected. However, we want to select Developer Mode.
Install the OpenSSH Client
Now that we have Windows 10 in developer mode the SSH client can be installed on Windows.
- Click the windows start menu and type start typing Apps in the search bar on the lower left hand side of the screen.
- You should see an option called Apps & Features in the results. To open you can hit the Enter key, or mouse click the option.
- Find and click Manage Optional Features.
-
Next, click Add a feature. You should be presented with a list of features. Scrolling to the bottom, you should find Open SSH Client(Beta).
Note:
There is also an OpenSSH Server option, but this will allow others to connect to your computer using SSH, which may be a security issue.. - Click OpenSSH Client to expand it and then select Install. Once installed, it will disappear from the list.
All you need to do now is reboot your computer and you are ready to start using SSH from the command prompt or Powershell!
How to Log in with SSH Keys
There are many methods to create key pairs for SSH authentication. And you also have available on Windows, which you can use in the command prompt. After you create the pair, add the public key to your server and disable password logins. Afterwards, save the private key on your Windows computer.
When you log in you can provide the path to this (private) key after the parameter in a command such as:
Otherwise you can move a private key to its default location. After the first connection, the SSH client creates a directory, , in your current user directory. You can open the directory by typing this in the command prompt:
Now, copy your private key here and name it .
From now on, you can log in with this private key without using the parameter.
Automate with SSH keys, but manage them
SSH keys can be used to automate access to servers. They are commonly used in scripts, backup systems, configuration management tools, and by developers and sysadmins. They also provide single sign-on, allowing the user to move between his/her accounts without having to type a password every time. This works even across organizational boundaries, and is highly convenient.
However, unmanaged SSH keys can become a major risk in larger organizations.
-
ssh-keygen — Create keys
-
ssh-copy-id — Provision access on servers
-
authorized_keys — Authorized keys file format
The PrivX On-Demand Access Manager can be used as an alternative for SSH keys, eliminating the need for permanent keys and passwords on servers entirely.
Server for Windows or other platforms
You don’t need to worry about a server if you are going to connect to a school or work server. However, if you are planning to use PuTTY to log into your own systems, then you may need to install and enable a server.
Most Linux and Unix systems come with OpenSSH preinstalled. On some distributions, you may need to install the server. On Debian-derived systems, the following will install the server:
On Red Hat systems, the following will install the server:
Depending on the system, you may also need to start the server if you don’t want to reboot. The following should work on most systems:
For Windows, the Tectia SSH is a popular choice and comes with commercial support services. It also runs on IBM z/OS mainframes. Unix/Linux are available with support for business-critical applications.
Using OpenSSH in Windows 10
To use OpenSSH, after you’ve completed the above steps, just open Powershell or the command prompt and enter the command SSH to see the list of current arguments it accepts.
OpenSSH in Windows works just like it does in other operating systems. For example, to connect to a server example.com with username Dave, I would enter the command:
By default, the client attempts to make the connection on port 22. If you need to specify a different port, just use the –p flag, followed by the alternate port number:
(using the port that is open on your server for ssh)
And that is it. Your Windows computer can now use SSH directly from the operating system. No more having to download or launch any third-party applications.
For further explanation of SSH and the optional commands visit SSH Communications Security, the company behind SSH (Secure Shell).
FireSSH для Firefox
Данный ssh клиент является плагином для популярного браузера Mozilla Firefox. Скачать его можно по этой ссылке:
https://addons.mozilla.org/ru/firefox/addon/firessh/
Установите его, и перезапустите браузер.
Для запуска FireSSH нажмите в Firefox кнопку «Меню», затем «Разработка». Далее выберите пункт «FireSSH». Клиент будет запущен и вы увидите следующее окно.
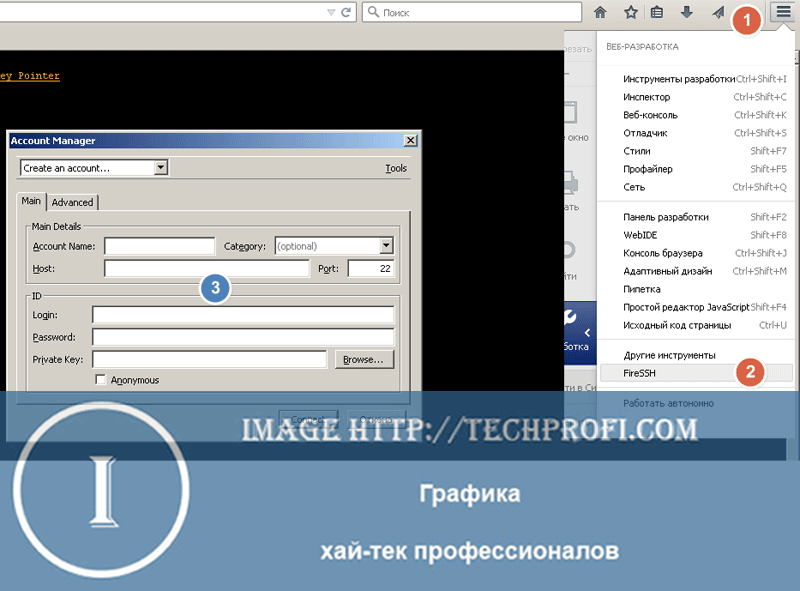
На вкладке «Main» вы должны ввести все параметры подключения — логин, пароль и тд. Вкладка «Advanced» позволяет настроить параметры SSH туннелирования.
Поскольку FireSSH является плагином для браузера, работать он может на всех популярных операционных системах — Linux, Mac OS, Android.


