Как изменить лицензирование smartgit после 30 дней коммерческого использования в ubuntu?
Содержание:
Graph view
The Graph displays the log graph («history») starting from the selected Branches anchors. Branches/tags and other refs will show up at the «appropriate» commits. In case of File (or Subtree) Logs or filtered Logs (see Filter input field, below), every ref will be mapped to the most recent commit of the graph which is still part of the ref’s history. In case of File (or Subtree) Logs, the file (or subtree) content of the mapped ref commit will be identical to the content of the actual commit to which the refs points. For filtered Logs, there is no such relation between the mapped commit and the actual commit, still you will be able to see which of your filtered commits are part of which ref’s history.
Update Check
smartgit.updateCheck.enabled
Set to to disable the automatic checking and disallow the manual checking for new program versions by hiding the corresponding menu items Help|Check for New Version and Help|Check for Latest Build. You should only turn this check off for network installations where SmartGit users may not be able to perform the update themselves. When settings this option, you will probably also want to hide the corresponding page from the Preferences, using .
Note that this will also disable notifications of new bugfix releases which you can upgrade to for free and which improve the stability or reliability of SmartGit.
If you just want to switch off automatic checking, use instead.
smartgit.updateCheck.automatic
Set to to disable the automatic check for new versions on a global level which can be convenient e.g. for network installations. To disable the check for an individual installation/user, better do that in the Preferences, section SmartGit Updates.
smartgit.updateCheck.alwaysUpgradeToLatestBuild
Set to to make SmartGit check for the availability of a new latest build on start up. Latest Builds are the «bleeding edge» builds between subsequent (minor) release builds, like between version 8.0.1 and 8.0.2 or 8.1 preview 3 and 8.1 preview 4. They will contain the latest improvements and bugfixes. Usually we will ask you to manually fetch the latest build using Help|Check for Latest Builds.
Installing/running multiple SmartGit versions in parallel
You can install multiple versions of SmartGit in parallel and you can even run them at the same time. This will be useful if you want to primarily work with the Preview version, but have the latest released version still present as fall back. SmartGit has separate settings areas for different versions, so it’s only an issue of «installation» :
- On Linux, simply unpack every SmartGit bundle you want to use to a different directory
- On MacOS, simply unpack every SmartGit DMG you want to use to a different directory
- On Windows,
- either use only portables bundles for every SmartGit version you want to work with and unpack them to different directories
- use exactly one installer bundle for the primary SmartGit version you want to work with and additional portable bundles for the other version(s)
Типовые значения ошибок системы лицензирования
Если файл лицензии расположен корректно, а программа всё равно не запускается, то узнать причину вы всегда можете по коду ошибки (табл. 2).
Таблица 2
|
Код ошибки |
Описание ошибки и пути решения проблемы |
|
1 |
«Файл лицензии не найден» — программа не смогла найти файл лицензии. Проверьте папку с файлом (см. выше). Там ли файл лицензии? Нет ли других файлов лицензии на используемый программный продукт? |
|
2 |
«Некорректный синтаксис файла лицензии» — это значит, что найденный файл лицензии программой не распознается. Возможно, он некорректно загрузился из Интернета или сбита кодировка в почтовой программе. Проверьте структуру файла лицензии и запросите его снова с помощью Мастера регистрации |
|
4 |
«Число доступных лицензий выбрано» — возникает при сетевом лицензировании продукта и означает, что на данный момент используется максимально доступное число лицензий. Выходов из этой ситуации несколько: расширить число доступных лицензий; дождаться, когда лицензия на продукт освободится, и др. |
|
5 |
«Нет лицензии на этот продукт» — система лицензирования не смогла найти лицензию на используемый вами программный продукт. Это сообщение появляется, если на компьютере зарегистрирована другая версия программного продукта или вообще другой программный продукт (например, файл лицензии получен на nanoCAD ВК 2.0, а вы запускаете nanoCAD СПДС 2.0). Обычно так случается, если вы получили файл лицензии вручную: из «Личного кабинета» или от службы технической поддержки. Нужно запросить файл лицензии на используемый вами программный продукт, |
|
8 |
«Криптоключ файла лицензии нарушен» — такая ошибка появляется, если нарушена структура файла лицензии, например после редактирования лицензии в текстовом редакторе. Файл лицензии необходимо удалить, после чего запросить новый через Мастер регистрации |
|
10 |
«Срок действия лицензии закончился» — обычно такое сообщение появляется, когда закончилась временная лицензия на программный продукт — например истек срок действия оценочной версии или абонемента на программный продукт |
|
21 |
«Файл лицензии не поддерживает эту версию продукта» — программный продукт запрашивает более высокую версию, чем разрешает файл лицензии. Обычно такая ситуация складывается, если вы получили файл лицензии вручную: из «Личного кабинета» или от службы технической поддержки. Запросите новый файл лицензии, при этом лучше использовать Мастер регистрации |
|
30 |
«Не могу прочитать файл лицензии» — возможно, на компьютере нет доступа к папке, в которой расположен файл лицензии |
|
34 |
«Различное время между сервером и клиентом» — такое сообщение обычно появляется при сетевом лицензировании и в том случае, если на рабочем месте пользователя переведено системное время. Следует синхронизировать время между сервером и рабочим местом |
|
62 |
«Нет сетевого соединения (tcp/ip)» — как правило, такая ошибка появляется при сетевом лицензировании и отсутствии на компьютере подключения к локальной сети |
|
88 |
«Системные часы были переведены назад» — обычно такое сообщение появляется, если на рабочем месте пользователя переведено назад системное время, то есть обнаружена попытка обмана системы лицензирования. В операционной системе необходимо выставить корректное время |
|
95 |
«Ошибка сетевого подключения к THIS_HOST» — такая ошибка происходит, если в сети есть компьютер с сетевым именем this_host. В сетевом файле лицензий необходимо указать настоящее сетевое имя сервера |
Possible Problems & Solutions
Authenticating with two or more accounts
If you want to authenticate to your GitHub repositories, using two or more accounts, open Preferences, section Hosting Providers, open the GitHub hosting provider there and deselect Use OAuth token for repository authentication. When pulling/pushing a GitHub repository for the next time, SmartGit will ask you for Username and Password. For the Username, just enter the appropriate GitHub account name, for the Password it’s recommended to generate a new Personal Access Token in your GitHub account settings.
Depending on your Git configuration, Git might request credentials only per-domain instead of per-repository. If so, try to reconfigure:
git config --global credential.useHttpPath true
Or even more selectively:
git config --global credential.github.com.useHttpPath true
Private repositories do not show up
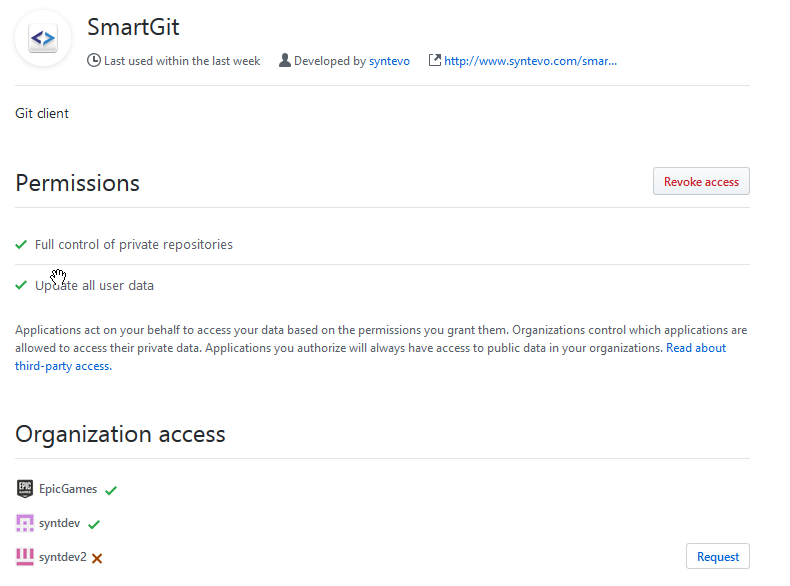
If you are authenticating using OAuth and you can’t see private repositories of your GitHub organization or pushing to your organization’s repositories fails with HTTP error code 403, make sure that your organization allows Third-party access and SmartGit is Approved. Your organization settings might look like this:

Note that the screenshot above shows the interface of the organization’s manager. If you are not the manager, but just a member of the organization, you can request access for SmartGit to this organization from your Settings — Applications, tab Authorized OAuth Apps: select SmartGit here and check for which organizations you may request access. The screenshot below shows for which access can be requested. Once done so, the organization manager will receive a notification and may confirm.
Git-Flow Pull Requests will be closed on Finish Feature
When using Git-Flow or Git-Flow Light in combination with pull requests, pull requests may be marked as Closed instead of Merged after invoking Finish Feature. This happens when you have Delete Feature Branch selected for the Finish Feature dialog: with this option selected, the local and remote feature branch will be deleted immediately, however the resulting merge/rebase has not yet been pushed. If a branch will be deleted before it has been merged, GitHub will mark the pull request as Closed. If it’s only deleted after the branch has been merged, it will be marked as Merged. If you don’t want your pull requests to become Closed, unselect Delete Feature Branch, push the resulting merge/rebase first and only then Delete the feature branch from GitHub (e.g. from the Branches view).
Background Commands
Options on this page define what operations SmartGit might perform automatically when it is in background.
Local and Remote Changes
If Detect Remote Changes is selected, SmartGit will poll the remote repositories of the favorite Git repositories in regular intervals for changes. To avoid excessive overhead, by default only the lightweight command is invoked, so you only get a notification about changes. Note that this command will not notice if, for example, the currently checked out feature branch has been merged and removed.
If Fetch closed ‘favorite’ repositories or Fetch open repositories when idle is selected, SmartGit also will perform fetch-operations which actually will fetch the changes from the remote repositories, but can be more resource-hungry.
Выпуски Autodesk 2019, 2018 и 2017
Если программное обеспечение запускается, выполните действия ниже.
- В правом верхнем углу щелкните треугольник раскрывающегося списка рядом с именем пользователя.
- В раскрывающемся меню выберите «Управление лицензиями».
- В диалоговом окне Диспетчера лицензий нажмите кнопку «Изменение типа лицензии».
- Перезапустите программу. Следуйте указаниям в зависимости от того, отображается ли экран начала работы.
здесь
Экран начала работы отображается
- Если экран отображается, выберите один из следующих вариантов.
- Однопользовательская лицензия
- Многопользовательская лицензия
- Ввод серийного номера
- Запуск пробной версии
- Если вы не уверены, что выбрать, щелкните «Необходима помощь в выборе».
Windows
- Если экран начала работы не отображается, удалите следующий файл LGS.data.
C:\ProgramData\Autodesk\CLM\LGS\ключ_продукта_версия_программы.0.0.F\LGS.data
Например, в AutoCAD 2019 файл может находиться в папке: C:\ProgramData\Autodesk\CLM\LGS\001K1_2019.0.0.F\LGS.data.
- При наличии однопользовательской лицензии удалите следующие папки и файлы:
- C:\ProgramData\Autodesk\ADUT
- C:\Users\пользователь\AppData\Roaming\Autodesk\ADUT (если существует).
- C:\Users\пользователь\AppData\local\Autodesk\Web Services\LoginState.xmlПримечание. Если папки и файлы скрыты, см. раздел Отображение скрытых файлов.
- Перезапустите программное обеспечение Autodesk.
macOS
- Если экран начала работы не отображается, удалите следующий файл LGS.data.
/Library/Application\ Support/Autodesk/CLM/LGS/ключ_продукта_версия_программы.0.0.F/LGS.data
Например, в AutoCAD 2018 файл может располагаться в следующей папке: /Library/Application\ Support/Autodesk/CLM/LGS/777J1_2018.0.0.F/LGS.data
Примечание. По этой ссылке доступен список всех ключей продуктов Autodesk.
- При наличии однопользовательской лицензии также удалите следующие папки и файлы:
- /Users/имя_пользователя/Library/Application\ Support/Autodesk/ADUT (если существует)
- /Users/имя_пользователя/Library/Application Support/Autodesk/Web Services\LoginState.xml
- /Library/Preferences/FLEXnet Publisher/FLEXnet все файлы, имена которых начинаются с adskПримечание. Не удаляйте файлы, не связанные с Autodesk, из папки FLEXnet. Для отображения скрытых файлов перейдите в Finder > «Переход» > «Переход к папке». Вставьте путь и нажмите клавишу ENTER.
- Перезапустите программное обеспечение Autodesk.
Details view
The Details view shows details on the selected commit:
- branches and tags shows all branch/tag-refs which are displayed in the Graph for the selected commit. When the Log is filtered, branches and tags will show the mapped refs by default. You may set Low-level Property in the Preferences to only show those refs which are actually located at the commit.
- on branches shows all branch-refs for which the selected commit is an ancestor reachable by following only «primary» parents, i.e. is part of the branch’s «natural» history
- merged to branches shows all branch-refs for which the selected commit is an ancestor, but only reachable by following at least one merge parent (2nd or higher parent of a commit)
Возможности
Интерфейс главного окна SmartGit/Hg похож на файловые менеджеры (такие, как Проводник Windows): слева в нем дерево каталогов, а справа — таблица файлов, содержащая все файлы репозитория и рабочего дерева каталогов. Он использует такие понятия файловых менеджеров, как диалоги, мастера Drag-n-drop для основных задач управления версиями, таких как сохранение, ветвление и сравнение. История открытого репозитория отображается в отдельном окне, также называемом Log window, а многие команды Git/Mercurial могут быть выполнены как через главное окно, так и через Log window, например, переключение между ветками, слияние веток, создание веток и тегов, и т. д. Дополнительные инструменты включены для обеспечения работы «из коробки»:
- diff-вьювер файлов, которые показывает два файла рядом, подсвечивает различия между ними и позволяет их редактировать.
- Так называемый ‘решатель конфликтов’, которыми обычно являются 3-х сторонние слияния. Используется для разрешения конфликтов слияния.
- Встроенный SSH-клиент (опционально, можно также использовать внешний SSH-клиент).
Initialization
To initialize the Review system for your local repository invoke Review|Configure.
SmartGit will query all currently configured remotes to see whether any of them already contains a Review database. If this is the case, SmartGit will clone this database and connect the local Review system to it. If none of the remotes contains a Review database, a completely new database will be created and the will be populated from the repository log.
For a shared repository (including all its clones), the initialization of a completely new database should only be done once, e.g. when starting to introduce the Review system for your project. This will usually happen in one of the clones. After the initialization of the local repository, invoke Review|Configure and select Initialize a Remote to push your Review database back to the selected remote, thus initializing this repository as well. From this point on, Review|Configure can be invoked in all other clones of the shared repository to clone and connect to the same Review database.
Review Local Changes
SmartGit offers different ways to review local changes:
- The Changes view shows the changes of the selected file. Use the small arrow buttons in its toolbar to navigate from change to change over all shown committable (text) files.
- To open an editable Compare window click the Changes toolbar button or double-click a file in the Commit dialog.
- To commit only parts of modified files, use the Index Editor for that file. This allows to freely edit the file’s Git Index content as well as the working tree content. The Git Index content can be committed with the next commit independent of the working tree content.
Шаг 3. Создание репозитория
Ты можешь создать любое количество репозиториев, у каждого из которых будет issue tracking, wiki, условия для проведения code review и многое другое.
Политика разработчиков Github предполагает бесплатное использование хостинга для всех open-source проектов.
Чтобы создать новый репозиторий нажмём кнопку + в верхней части экрана и выберем New repository
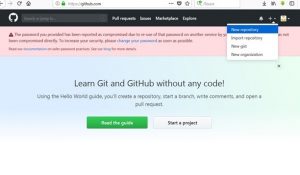 Создание репозитория на Гитхабе
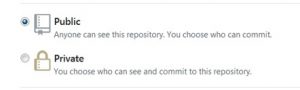
Многие разработчики рано или поздно сталкиваются с необходимостью создания приватного репозитория, код из которого доступен только их команде. Для этих случаев на Github’е есть определённый тарифный план.
Но пока острой необходимости в создании приватного репозитория у нас нет, создадим обычный.
Жмём волшебную кнопку Create внизу экрана, и репозиторий готов.
Program Updates
SmartGit stores program updates which have been downloaded automatically through SmartGit itself by default in your home directory/profile. This allows «light weight», patch-like updates which do not require write access to the actual SmartGit installation directory. As a consequence, your SmartGit installation directory is usually not up-to-date, but it will launch the downloaded updates from the directory. Only under specific conditions, SmartGit will detect that an upgrade of the installation directory itself is necessary («installation update»). Depending on your operating system, the updates cache can be found at:
- Windows:
- MacOS:
- Linux:
Technical Details
The root directory of the Updates directory contains sub-directories for every major version. Such a major version directory contains a file for the latest downloaded build and a -file which points to the currently used build. Usually, this will be the highest build which shows up in this directory. The -file only configures which binaries are part of the build by linking to the actual binaries which are stored in the -subdirectory and which are shared among all builds.
Each new build has a corresponding, digitally-signed control file which contains information about all required application files with their download location and the expected file content hash. To reduce band-width, application files only will be downloaded if they are not yet locally available. After download, the content will be verified with the hash from the control file.
When starting SmartGit, the from the installation directory is launched. This uses the file from the Updates directory to determine which updated SmartGit files to launch that contain the actual application code.
Create Repositories
If you have no Git or Mercurial repository available, but want to create a new local one (just for you), click Repository|Add or Create.
Now enter the directory of the new repository. This either can be an already existing one, but you also can enter a new one. In the latter case it will be create automatically.
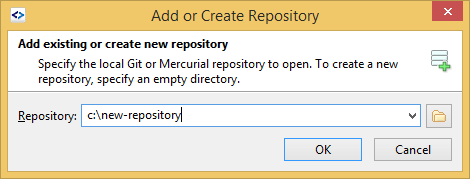
Clicking OK will check whether the entered directory is already a repository (contains either a .git or .hg subdirectory). If it is not already an repository, SmartGit will ask you whether to initialize it. If both, Git and Mercurial executables, are configured in the preferences, you will see following choice (otherwise a simpler confirmation dialog):
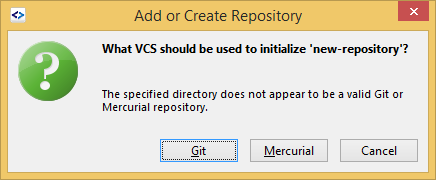
Now you’ve created a new Git or Mercurial repository. You can add files (outside SmartGit) to the entered directory and later commit those in SmartGit.
You also can use these steps to add already existing repositories to SmartGit. Just enter their path as for the new repository. An alternative to open an existing repository is to drag it from your file manager into SmartGit’s Repositories view.
License user/seat tracking
For licenses with a large number of users, it can be helpful to track the number of active SmartGit users over time. For this purpose, SmartGit can optionally access («ping») a configurable URL which can be used to collect these user statistics on the server side. This requires customer-specific configuration because in different companies different means define a person (user), e.g. by a user-specific unique environment variable value. A simple implementation on the server-side would just be a virtual host logging to a separate access log file. The resulting log files can be analyzed, e.g. using .
smartgit.license.defaultPath
By default, SmartGit will look for a «default» license file in the installation default directory. You can use this system property to specify a different file system path for the default license to look for.
Example
To have SmartGit take the default license from , set:
smartgit.license.alwaysCheckForNewerDefaultLicense
By default, SmartGit will only look for a default license, if there is no or no valid existing license. Sometimes, it may be desirable to replace even valid licenses by newer default licenses. To do so, set:
Example
smartgit.license.serverPing.url
Enables the license user tracking feature and specifies the URL (template) which SmartGit will connect to on startup and once per day. The template is basically a URL for which following keywords will be replaced:
- will be replaced by the user’s email found in the file.
- will be replaced by SmartGit’s version followed by a # and the build number, e.g.
- will be replaced by a unique string of the registered SmartGit license file.
- will be replaced by the value of the corresponding (case-sensitive!) key from the registered SmartGit license file, e.g. .
- will be replaced by the Java system property . For instance, will be replaced by the Java system property .
- will be replaced by the environment variable . For instance, will be replaced by the environment variable .
smartgit.license.serverPing.method
Specifies the HTTP request method to be used, either or (defaults to ).
Example
Following configuration will track users on (including a custom environment variable) at .
smartgit.license.serverPing.method=get
smartgit.license.serverPing.url=http://www.syntevo.com/smartgit/server-ping?email=${email}&name=${prop.user.name}&id=${env.USERID}
Секреты командной разработки
Разработка – это почти всегда командная игра. Пора учиться работать в команде.
Даже если пока что в твоей команде только монитор, системник (или старенький ноутбук) и острое желание стать программистом, всё равно пора учиться.
Программисту проще стать своим среди своих, ведь за него говорят не дежурные улыбки, перекуры и чаепития с печеньками, а чёткие строки кода, элегантные функции и безупречная работа готовых приложений.
Чтобы эффективно работать в команде, мало знать синтаксис языка, ключевые библиотеки и уметь обращаться с базами данных. Необходимо уметь работать в удобной для команды системе контроля версий.
О системах контроля версий их преимуществах и недостатках можно почитать здесь.
В этой статье мы перейдём от теории к практике и расскажем, как работать с git’ом.
Log
In the Log window of your repository, you can interact with GitHub in following ways.
Pull Requests
When initially loading the Log, SmartGit will also refresh information on related Pull Requests from the GitHub server:
- Incoming pull requests are those which other users are requesting to pull from their repositories. They are displayed in a separate category called Pull Requests in the Branches view.
- Outgoing pull requests are those which you have sent to other users/repositories, requesting them to pull your changes. They are display directly below the local (or if it does not exist), the remote branch in the Branches view.
Incoming pull requests, in first place, are just known on the server. To get the commits, which such a pull request includes, locally, use invoke Fetch Pull Request from the context menu of the pull request. This will fetch all commits from the foreign repository to a special branch in your local repository and will create an additional merge node between the base commit from which the pull request has been forked and the latest (foreign) pull request commit. When selecting this merge node in the Commits view, you can see the entire changes which a multi-commit pull request includes and you can on these changes, if necessary. After commenting changes, it’s probably a good idea to Reject the pull request to signal the initiator of the pull request, that modifications are required before you are willing to pull his changes. If you are fine with a pull request, you may Merge it. This will request the GitHub server to merge the pull request and then SmartGit will pull the corresponding branch, so you will have the merged changes locally available.
Outgoing pull requests can be Fetched as well, however this is usually not necessary, as the pull request belongs to you and it contains your own commits. If you decide that you want to take a pull request back, use Retract.
For a pull request which had been fetched once, there was a special ref created which will make it show up in the Pull Requests category, even if it is not present on the server anymore. In this case, you may use Drop Local Data on such a pull request to get rid of the corresponding ref, the local merge commit, all other commits of the pull request and the entry in Pull Requests as well. It’s safe to use Drop Local Data, as it will only affect the local repository and you can re-fetch a pull request anytime you like using Fetch again.
You can invoke Review|Sync to manually update the displayed information. Usually you will want to do that, if you know that server-side information has changed since the Log has been opened.
To create a pull request, use Create Pull Request from the context menu of the Branches view.
GitHub allows to comment on a commit itself or individual line changes (diffs). Comments can be applied to a commit or to a Pull Request. Comments will be refreshed together with pull requests after opening a Log or when manually invoking Review|Sync.
Commit comments will show up in the Commits view. Comments on individual lines will show up in the Changes view and the affected files will be highlighted in the Files and Commits view, too. This works the same way for line-comments of Pull Requests, provided that the pull request has been Fetched and the local pull request merge commit has been selected.
Comments can be created, modified and removed using the corresponding actions from the Comments menu or context menu actions in the Commits and Changes view. If a pull request merge commit is selected, only line-comments of the pull request can be manipulated.
Some behavior of the GitHub integration can be customized by .
Поддержка Subversion
SmartGit/Hg может использоваться как клиент Subversion, расширенный функциональностью Git:
- Когда создаются коммиты, они вначале сохраняются локально, вместо немедленной отправки (‘push’) в SVN-репозиторий. Пользователь может сам решить, когда отправить в репозиторий локально сохраненные коммиты. Основными преимуществами такого локального хранилища являются повышенная производительность из-за отсутствия сетевых задержек и возможность работать и коммитить в режиме офлайн.
- Коммиты, которые еще не отправлены в репозиторий, могут быть изменены множеством способов: несколько коммитов могут быть объединены в один, один коммит может быть разбит на несколько, может быть изменен порядок коммитов, коммиты могут быть отменены, и т. д.. Цель таких изменений — дать возможность ‘причесать’ локальную историю перед тем, как она станет официальной историей. Позднее приведенную в порядок историю гораздо легче исследовать, например, для поиска источника определенной ошибки в программе.
Решение
Чтобы устранить эту проблему, попробуйте выполнить указанные ниже действия.
Способ 1: Убедитесь, что отображение панели инструментов не отключено
-
В правом верхнем углу окна нажмите кнопку Овал.
Примечание
При нажатии этой кнопки скрываются все панели инструментов. Второй щелчок вызывает отображение панелей инструментов.
-
Если панели инструментов отображаются, закройте и перезапустите Word, чтобы убедиться, что отображаются соответствующие панели инструментов.
Если способ 1 не решил проблему, воспользуйтесь способом 2.
Способ 2: сброс панелей инструментов и меню в Word
Вы можете восстановить параметры панелей инструментов и меню в меню Настройка панелей инструментов и меню, все сохраненные настройки удаляются, а все параметры возвращаются к исходным параметрам по умолчанию.
- Откройте Word.
- В меню выберите пункт Просмотр .
- Выберите пункт панели инструментов.
- Выберите пункт Настройка панелей инструментов и меню.
- Выберите панели инструментов и меню в верхней части окна Настройка панелей инструментов и меню.
- Выберите в списке элемент, который требуется сбросить (строка меню, Стандартная, Форматирование).
- Щелкните Сброс.
- Нажмите кнопку ОК при подсказке: «вы действительно хотите сбросить внесенные изменения…»
- Нажмите кнопку ОК.
Примечание
Если в меню нет представления, можно также управлять нажатием панели инструментов Стандартная и перейти к разделу Настройка панелей инструментов и меню.
Если способ 2 не решил проблему, воспользуйтесь способом 3.
Способ 3: создание новой обычной заметке шаблона
Когда создается новый шаблон Normal, все сохраненные настройки удаляются, а все параметры возвращаются к исходным параметрам по умолчанию.
Шаг 1: завершение работы со всеми программами
Чтобы выйти из активных приложений, выполните указанные ниже действия.
-
В меню Apple выберите команду принудительно завершить работу.
-
Выберите приложение в окне «принудительное завершение работы приложений».
Примечание
Не удается выйти из программы Finder.
-
Нажмите кнопку Force Quit (завершить работу).
-
Повторяйте предыдущие действия, пока не будут завершены все активные приложения.
Предупреждение
Когда приложение принудительно завершает работу, все несохраненные изменения в открытых документах не сохраняются.
Когда закончите, нажмите красную кнопку в левом верхнем углу и перейдите к шагу 2.
Шаг 2: Word 2008 и 2011: перемещение файла шаблона Normal. dotm в корзину
- Закройте все приложения Microsoft Office.
- В меню Перейти выберите Домашняя.
-
Откройте библиотеку.
Примечание
Папка «Библиотека» скрыта в MAC OS X Лион. Чтобы отобразить эту папку, нажмите клавишу OPTION и, удерживая ее, щелкните меню Перейти.
- Выберите папку Поддержка приложений .
- Выберите папку Майкрософт .
- Откройте папку Office .
- Откройте папку шаблоны пользователя .
- Переместите Normal. dotm в корзину.
- Запустите Word, при выборе команды выйти из Word в меню Word будет создан новый шаблон Normal. dotm.
Примечание
Если на компьютере Макинтош ранее было установлено приложение Word 2004, а теперь есть Word 2008 или Word 2011, также проверьте, присутствует ли в системе обычный файл Word 2004 (если это так), также следует удалить этот обычный файл шаблона.
Шаг 3: Word 2004: перемещение файла Normal Template в корзину
- Закройте все приложения Microsoft Office.
- В меню Перейти выберите Домашняя.
- Выберите папку документы .
- Выберите папку * * Microsoft User Data * *.
- Наведите обычный режим в корзину.
- Запустите Word, при выборе команды выйти из Word в меню Word будет создан новый шаблон Normal.


