Защита от прослушивания разговоров
Содержание:
X-Lite
X-Lite
Product: X-Lite
Company: CounterPath
OS: Windows, MacOS, Linux
Overview: CounterPath’s X-Lite helps you seamlessly transition from a traditional phone environment into the world of Voice over IP.
The latest release of X-Lite provides a completely redesigned interface that allows for a contact-centric or dialpad-centric user experience, or a combination of the two. It also provides you with some of the most popular features of our fully loaded Bria and eyeBeam softphones so you can take them for a test drive before you make your purchase.
Having a simple voice conversation, you’ll soon see why having a softphone on your desktop or laptop is the ultimate communications experience.
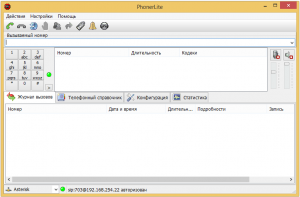
Звонилка
Не берусь говорить что моё мнение единственно верное, но за всё время работы с Asterisk я перепробовал не меньше 20 разных программ звонилок, и не скажу что бы они мне все прям уж так понравились, тем более если речь заходит о использовании софтфона для юр.лица то тут нужно что бы программа по возможности была бесплатная, действительно зачем платить 30$ за программу, если можно чуток добавить и уже купить нормальный VoIP-телефон. В общем к чему я всё это, встречайте лучший на мой взгляд SoftPhone — PhonerLite.
Итак в чём же плюсы этой программы перед остальной массой звонилок?
Первый и самый пожалуй главный плюс — стабильность, за всё время работы с этой программой она у меня ни разу ни зависла, ни каких тормозов или непонятных действий.
Второй и пожалуй тоже достаточно важный плюс — . Программу в соответствии с её лицензией можно использовать абсолютно бесплатно в любых целях, полностью бесплатный SIP SoftPhone для Windows. В остальном программка не сильно отличается от своих собратьев — есть многоканальность, есть русский язык, справочник, журнал вызовов, поддержка разных кодеков, холд, есть даже автоподнятие трубки т.е. всё необходимое для счастья, ну может не совсем всё, но мне хватает с головой.
Вводную часть мы закончили, поэтому я ещё расскажу и покажу как PhonerLite установить и настроить для работы с Астериском, как всегда на примере FreePBX Distro.
Для начала нужно будет загрузить программу, сделать это можно с официального сайта — http://www.phonerlite.de/ в разделе который называется Downloads.
SIP2SIP.info + Blink Pro
Now let’s go over what you can do with Blink Pro when you’re using a SIP account from AG Projects. As we already established, perhaps the easiest way to get started on Blink Pro is to just create a new SIP2SIP.info account; it not only automatically registers this SIP client for you, but it also unlocks several other features.
Important Note: We do not want to give you the false impression the developer built a closed system. According to AG Projects, their SIP infrastructure products—and this includes Blink—are strictly built on IETF standards. All the VoIP, IM, Chat, File Transfer, and Conferencing features were implemented based on their corresponding IETF standards.
For example, the chat drawer that displays the conference information is RFC4575, file transfer is RFC5547, and the chat room is draft-ietf-simple-chat-09.
A valid question you might be asking right now is, “Well, if this is true, then why can’t my SIP service use the Chat Sessions feature? Why can’t OnSIP?” The short and simple answer is that service providers and phone manufacturers/app developers pick and choose what to implement. There is usually more than enough common ground for interoperability, but every once in a while you come across something that is more or less unique to one service.
Пример настройки
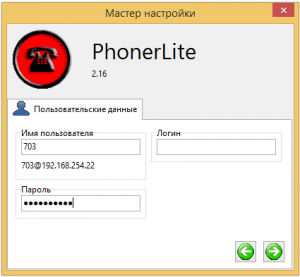
Установка простая, а настройка ещё проще. После запуска установочного пакета надо будет указать путь и принять текст лицензионного соглашения. Затем программа автоматически запускает мастер настройки.
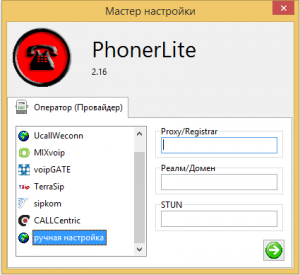
На первом шаге нам нужно указать адрес нашего Астериск в поле Proxy/Registrar. И переходим к следующему шагу.
На втором шаге указываем имя пользователя и пароль (предварительно надо создать запись на астериске)
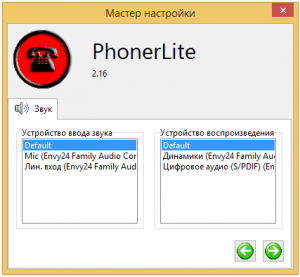
В третьем шаге выбираем устройства звука.
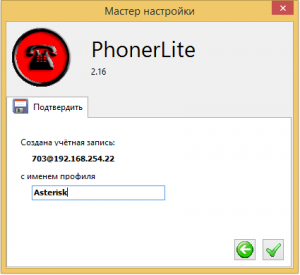
Последний шаг — имя профиля, имя профиля особой роли не играет, можете указывать что угодно. На этом настройка закончена Вы уже можете совершать звонки. Но для лучшей работы я порекомендовал ещё изменить настройки кодеков.
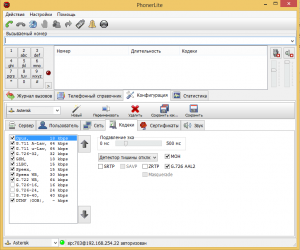
Для этого переходим на вкладку конфигурация, затем выбираем вкладку Кодеки. Опускаем кодек Opus нижe по списку. В локальной сети нет смысла применять кодеки отличные от A-law, U-law. К тому же качество голоса с Opus корявенькое. Если Вы собираетесь использовать программу для звонков через интернет, то в этом случае рекомендую на самый верх поднять кодек iLBC. Он обеспечивает замечательное качество звука при довольно таки хорошем сжатии и поддерживается Астериском. После внесённых изменений не забудьте нажать кнопку Сохранить.
Встроенный SIP-клиент Android
Уже встроено в телефон, поэтому работает «из коробки» и доступно в настройках устройства. Это действенный и простой способ использовать SIP-телефонию, которую к тому же легко настроить.
Доступ к настройкам, может отличаться, в зависимости от производителя. Стандартная функция SIP-телефонии не доступна на некоторых андроид устройствах.
Настройки стандартного SIP клиента на андроид
На устройствах Xiaomi и Redmi: Настройки -> Системные приложения -> Телефон -> Расширенные настройки -> SIP аккаунты -> Использование SIP телефонии -> И тут, необходимо добавить SIP аккаунт.
Для большинства других устройств: Настройки -> Телефон -> Учетные записи.
Все, что вам нужно сделать, это ввести свой логин, пароль и адрес сервера. Все довольно просто, никаких лишних препятствий. Вы можете перейти к дополнительным настройкам и при необходимости ввести адрес прокси и номер порта.
Чтобы иметь возможность принимать звонки, необходимо проверить параметр «Принимать входящие звонки», в противном случае вы сможете совершать только исходящие звонки.
Как только вы сохраните настройки, ваш телефон будет зарегистрирован на сервере провайдера телефонии.
Отныне вы сможете совершать звонки через Интернет наряду со стандартными звонками через SIM-карту. Для того, чтобы определить разницу между вызовами GSM и VoIP, за исключением крошечного знака, отображаемого в верхнем правом углу, необходимо определить использование SIP телефонии:
- Для всех вызовов. Все звонки будут совершаться только через интернет. Если вам нужно позвонить через мобильную сеть, перейдите в настройки и включите другой тип исходящих вызовов.
- Только для SIP вызовов. В этом случае для каждого контакта требуется отдельное поле с указанием номера телефона для интернет-вызовов.
- Выбирать при осуществлении вызова: Сотовая связь или VoIP. Самый надоедливый, но «гибкий» способ. Это может быть полезно при определенных обстоятельствах.
Самым оптимальным вариантом при использовании платного SIP провайдера, является настройка ограничения — только для SIP вызовов. Во-первых, не на столько многие абоненты используют SIP. Во-вторых, сохранение SIP идентификатора абонента является такой же обыденностью как и сохранение 11-ти значного номера телефона.
При пользовании бесплатными SIP провайдерами оптимальным решением будет разграничительный выбор — разрешить для всех вызовов.
При использовании бесплатных SIP-провайдеров, иногда телефоны теряют регистрацию на сервере, без каких-либо уведомлений. Другими словами, вы думаете, что находитесь в сети, но на самом деле ваш телефон находится в автономном режиме и не может принимать входящие звонки. Более того, тесты показали небольшое снижение громкости во время разговора по сравнению с мобильной связью и платными провайдерами.
В то же время, качество интернет-связи было более чем достойным с использованием Zadarma. В целом, процесс очень прост, так как он был разработан для пользователей с базовыми навыками VoIP, чтобы они могли просто использовать SIP.
FgVoIP
FgVoIP
Product: FgVoIP
Company: FG Microtec
OS: BlackberryOS
Overview: fg’s BlackBerry SIP VoIP Client is a feature rich soft phone application for BlackBerry devices. It can register to any SIP VoIP provider or IP/SIP capable PBX using a WiFi connection in office, campus, home, hotel rooms, public hot-spots etc.
Its much like having a BlackBerry desktop phone in your pocket, providing significantly higher overall productivity while at the same time lowering telephony costs.
Experience the freedom of choosing your own VoIP provider whenever you want, wherever you want. All you need is a WiFi network and a VoIP account.
IM Chat Sessions
Probably the most interesting feature in Blink Pro is “Chat Sessions.” If you and your colleagues are using SIP2SIP.info accounts, there are a number of ways to start one. You can either a) right-click on a contact and select “Start Chat Session,” b) select a contact and select “Start Chat Session” from the “IM” button at the bottom of your SIP client, or c) select “Call” from the top nav, choose “Join Conference,” create a conference room, and invite participants.
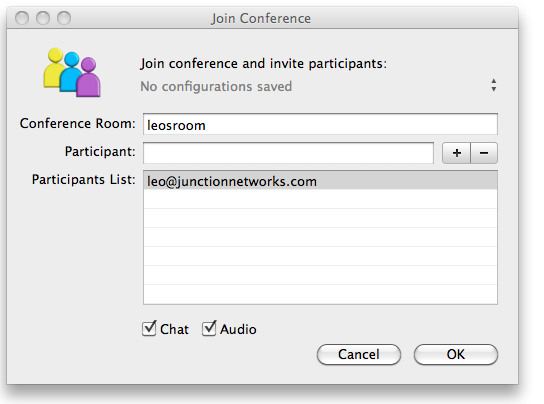
Note that if you select method C, you can choose any name you want for the conference room—it will be in the form roomname@conference.sip2sip.info. A free ad hoc HD conference room is created each time you start a new “chat session.” Users can dial in to this address to enter the conference from any SIP device, and the conference room can even dial out to people you want to invite to the session.
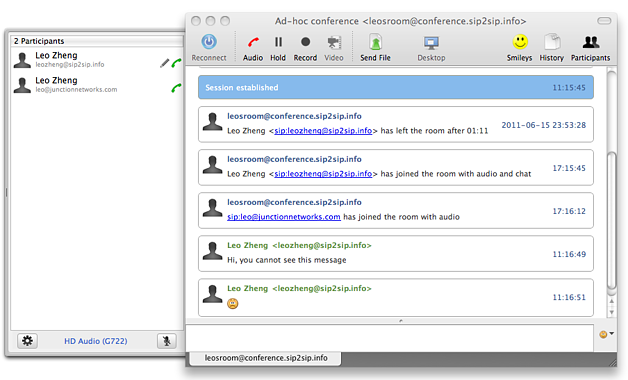
Conference participants are listed in a tab on the left. The pencil and phone icons indicate how each person is participating in the conversation. People who are not using Blink and a SIP2SIP.info account will not be able to view the chat session window, which means they cannot participate in IM, file sharing, etc. Users can participate in multiple chat sessions simultaneously and switch between them by clicking on the tabs representing each session at the bottom of the window. Note that it is very unlikely that you will be able to start a chat session using methods A and B with someone who is not using a SIP2SIP.info account on Blink. You can, however, start a conference room and add his SIP address or phone number to the participant list. In this latter scenario, the conference room dials out to invite them in. You can also drag and drop any of your contacts into the participants tab to easily invite them to join the session after it has been established.
The IM chat room functions much like you would expect it to. The chat room makes a note each time someone enters and leaves the conversation and will also record other specific actions, such as when a user shares a file with the conference. The “audio” button at the top of the window is used to toggle the audio portion of the chat session. The other buttons are pretty self-explanatory; you can record the entire session, put it on hold, send files, and view the entire history of the room. We did not try to use the desktop sharing button within the chat session, so we’re not quite sure how that will work, especially if there are many people in the conference.
Taki
Taki
Product: Taki
Company: Taki
OS: BlackBerry 10, BlackBerry PlayBook
Overview: Taki is a native SIP softphone for BlackBerry PlayBook and
BlackBerry 10 platforms.
Main Features:
— Multiple SIP accounts support
— Multiple simultaneous calls
— Call recording
— Conference calls
— Advanced call control: Transfer, Hold, Mute, Reject, Redial, switch
between multiple active calls
— Speaker phone support
— Address book. Integration with local contacts on BlackBerry 10 phones
— Comprehensive SIP settings (port binding, outbound proxy, registrar,
codecs priority, NAT traversal, STUN, Presence, and more)
— Transports: UDP/TCP
— Audio codecs: G.711a/u, GSM, iLBC, G.722 (HD), Speex (NB, WB, UWB)
— Built for BlackBerry
MizuPhone
Product: MizuPhone
Company: Mizutech
OS: Windows
Overview:
Mizu SoftPhone is our award winner professional VoIP client application based on the open standard SIP protocol with an easy to use modern interface. With Mizu SoftPhone you can connect to any SIP server on the public internet or on your local area network.
Multiple accounts and multiple SIP server registrations combined with a powerful dial plan can minimize your telecom bills while using the greatest features from the VoIP industry.
Features include built-in encryption, IM, presence, HD Video, history with voice records, skype like voice quality using ultra-wideband codecs and much more.
A free edition is also available based on the same engine as our corporate sip softphone but it has some features disabled (like G.729 and wideband codecs, multiple accounts and file transfer over SIP).
App Configuration
The registration process on Blink Pro is no different than it is on Blink Lite.
Blink Pro is currently available for the Mac OSX and can be purchased through the Mac App Store for $49.99.
When you open up the application for the first time, you should see a menu that asks you to add a SIP account. You can either add an existing account or choose to create a new @sip2sip.info account. To provision your OnSIP account, select “Add an existing account.” You’ll notice that the only two other fields on this menu are SIP address and password.
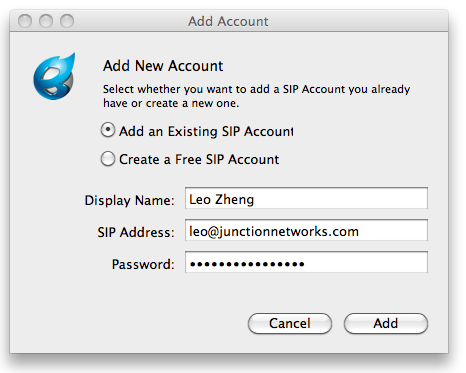
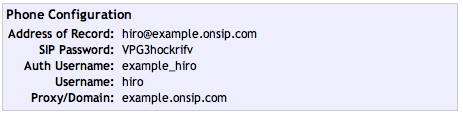
Log in to your OnSIP admin portal to retrieve your SIP credentials. You can find this information in the user detail pages under the Users tab in the Phone Configuration section.
Enter in the values as follows:
- Display Name > Your Choice
- SIP Address > Address of Record
- Password > SIP Password
Press “Add.”
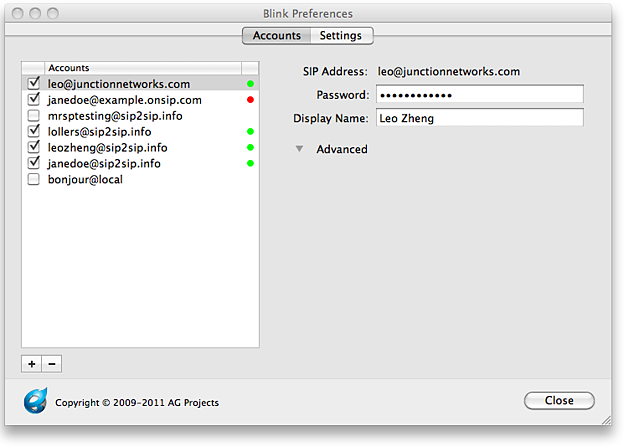
Next, go into Blink Preferences and click “Accounts” at the top of the screen. Your account should be listed here on the left with a red circle, indicating that you are not yet registered. On the right, you should see a drop-down menu labeled “Advanced.” Click it and select “Authentication.” Enter your Auth Username in the field provided. The red circle should turn green. Next, click on the “Advanced” drop-down menu again and select “SIP Signaling.” Enter “sip.onsip.com” into the field labeled “Outbound Proxy.”
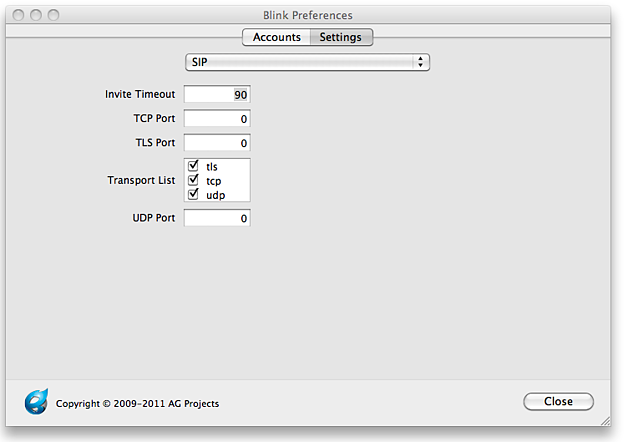
To modify your voice codecs, select “RTP” from the “Advanced” dropdown menu. Alternatively, you can choose “Advanced” from the menu at the top of the Blink Pro Preferences menu. The options listed at the top of the “Advanced” page has more properties you can modify. Select “SIP Signaling” from the drop-down menu and make sure that “UDP” is selected under “protocols.”
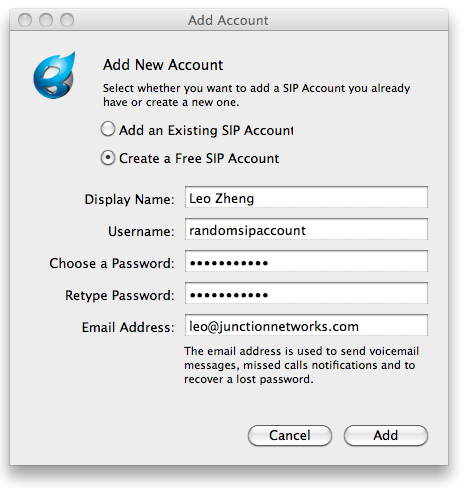
To register a new SIP2SIP.info SIP account on Blink Pro, select “Create a Free SIP account” at the “Add Account” menu. Fill out the fields and click the “Add” button to register Blink Pro with your new SIP account. That’s all there is to it.
Unlike Blink Lite, Blink Pro allows you to save and register multiple SIP accounts on the client at a time.
Compatibility Testing
At Junction Networks, we put each of the phones we use through a multi-step interoperability test in which we apply ~30 test cases. Here’s an example of a test case:
We evaluate things from a business user’s perspective, where call-handling options such as call transfer are critical. Blink Pro supports neither blind nor attended transfer as far as we can tell. You can drag and drop your contacts into an ongoing call, but this creates a conference call, and there’s no way to remove yourself from the session and keep the conversation going between the other two participants.
We were also unable to successfully send DTMF tones using Blink Pro. According to the help section on icanblink.com, you can focus calls and anything you press on the keyboard afterward will automatically be translated into DTMF tones:
This did not work for us, even when we were using the PCMU codec with “Inband DTMF” enabled. There was no indication that the application was recognizing any of our keyboard inputs during a call. We found several reports of users who were able to get it to work after multiple attempts. Either way, Blink Pro currently does not interact with auto-attendants reliably, which is problematic for our business users. All of our employees are behind an auto-attendant. The developers informed us that a dialpad will be included in the next update.
App and sketch changes
-
Change your ethernet sketch from
to
or to
-
Change your WIFI sketch from
to
or to
-
Change your rasp PI javascript from
to
-
or in case of USB when running blynk-ser.sh provide ‘-s’ option with address of your local server
IMPORTANT
Blynk is being constantly developed. Mobile apps and server are updated often. To avoid problems during updates either turn off auto-update for Blynk app, or update both local server and blynk app at same time to avoid possible migration issues.
IMPORTANT
Blynk local server is different from Blynk Cloud server. They are not related at all. You have to create new account when using Blynk local server.
Advanced local server setup
For more flexibility you can extend server with more options by creating file in same folder as .
Example could be found here.
You could also specify any path to file via command line argument . You can
do the same with via and via .
For example:
Available server options:
-
Blynk app, https, web sockets, admin port
-
Http, hardware and web sockets port
-
For simplicity Blynk already provides server jar with built in SSL certificates, so you have working server out of the box via SSL/TLS sockets. But as certificate and it’s private key are in public this is totally not secure. So in order to fix that you need to provide your own certificates. And change below properties with path to your cert. and private key and it’s password. See how to generate self-signed certificates
-
User profiles folder. Folder in which all users profiles will be stored. By default System.getProperty(«java.io.tmpdir»)/blynk used. Will be created if not exists
-
Folder for all application logs. Will be created if it doesn’t exist. «.» is dir from which you are running script.
-
Log debug level. Possible values: trace|debug|info|error. Defines how precise logging will be. From left to right -> maximum logging to minimum
-
Maximum allowed number of user dashboards.
-
100 Req/sec rate limit per user. You also may want to extend this limit on .
-
this setting defines how often you can send mail/tweet/push or any other notification. Specified in seconds
-
Maximum allowed user profile size. In Kb’s.
-
Number of strings to store in terminal widget (terminal history data)
-
Period for flushing all user DB to disk. In millis
-
Specifies maximum period of time when hardware socket could be idle. After which socket will be closed due to non activity. In seconds. Leave it empty for infinity timeout
-
Mostly required for local servers setup in case user want to log raw data in CSV format. See (#raw-data-storage) section for more info.
-
Comma separated list of administrator IPs. Allow access to admin UI only for those IPs. You may set it for 0.0.0.0/0 to allow access for all. You may use CIDR notation. For instance, 192.168.0.53/24.
-
Default admin name and password. Will be created on initial server start
-
Host for reset password redirect and certificate generation. By default current server IP is taken from «eth» network interface. Could be replaced with more friendly hostname. It is recommended to override this property with your server IP to avoid possible problems of host resolving.
homer — HOMER — 100% Open-Source SIP / VoIP Packet Capture & Monitoring
- Shell
HOMER is a robust, carrier-grade, scalable SIP Capture system and VoiP Monitoring Application offering HEP/EEP, IP Proto4 (IPIP) encapsulation & port mirroring/monitoring support right out of the box, ready to process & store insane amounts of signaling, logs and statistics with instant search, end-to-end analysis and drill-down capabilities for ITSPs, VoIP Providers and Trunk Suppliers using SIP signaling protocol. Powered at the core by SIPCAPTURE Module for industry-standard Kamailio or OpenSIPS, HOMER provides virtually unlimited scope for granular capture configuration either stand-alone or using our companion Capture Agent Project.
monitoring
troubleshooting
voip
rtc
pcap
flow
callflow
cdr
correlation
capture-agent
packet-capture
packet-sniffer
analytics
webrtc
encapsulation
sip
statistics
opensips
kamailio


