Установка и использование виртуальной сетевой лаборатории eve-ng совместно с ansible. первый опыт
Содержание:
- Sure Universal Remote
- Usage
- Installation
- Universal TV Remote
- Get the app
- Smart TV Remote
- Google Home
- Yatse
- Что такое mRemoteNG?
- Smart Things Mobile
- Remote: что это и как подключить
- Использование Unified Remote для управления компьютером с телефона
- Налаштування
- Протокол удаленного рабочего стола (RDP)
- CetusPlay Remote (Free)
- Power
- IFTTT
- Control4 for OS3
- Mi Remote
- Установка Unified Remote
- Amazon Alexa
- Shortcuts
- Installing
- Безопасная оболочка (SSH)
- Uninstall
- Anymote Universal Remote
- Multimedia
- Fast forward/rewind
- Presentation
- Power
Sure Universal Remote
(Image credit: Sure Universal)
Sure Universal Remote combines the best of IR and Wi-Fi remotes to create a truly universal remote that can handle old-school IR-controlled devices such as TVs and set top boxes while also handling smart appliances and home automation systems through Wi-Fi.
The developers boast that the app supports almost 1 million appliances, and the app also allows users to create «systems» of multiple appliances that can be controlled with a single tap, for easy one-button controls to, say, turn all your living room media devices on and off.
Download Sure Universal Remote: Android
Usage
If your PS4 is on your local network, is turned on or in standby mode and does not have Discovery explicitly disabled, Chiaki should find it.
Otherwise, you can add it manually.
To do so, click the «+» icon in the top right, and enter your PS4’s IP address.
You will then need to register your PS4 with Chiaki. You will need two more pieces of information to do this.
Obtaining your PSN AccountID
Starting with PS4 7.0, it is necessary to use a so-called «AccountID» as opposed to the «Online-ID» for registration (streaming itself did not change).
This ID seems to be a unique identifier for a PSN Account and it can be obtained from the PSN after logging in using OAuth.
A Python 3 script which does this is provided in scripts/psn-account-id.py.
Simply run it in a terminal and follow the instructions. Once you know your ID, write it down. You will likely never have to do this process again.
Obtaining a Registration PIN
To register a PS4 with a PIN, it must be put into registration mode. To do this, on your PS4, simply go to:
Settings -> Remote Play (ensure this is ticked) -> Add Device
You can now double-click your PS4 in Chiaki’s main window to start Remote Play.
Installation
Packaging
Downloads are provided in three different packages.
Binary package
The binary package of mRemoteNG is a compiled version of mRemoteNG which comes in an MSI installer.
This is the most common way to install mRemoteNG and get up and running.
Portable package
The portable package contains a modified version of the executable which stores and loads all your settings from files in the application’s directory.
This package can be used to run mRemoteNG from a USB stick and preserve your configuration wherever you go.
Source package
This contains the source code from which mRemoteNG is build.
You will need to compile it yourself using Visual Studio.
Download
mRemoteNG is available as a redistributable MSI package or as a portable ZIP package and can be downloaded from the following locations:
- GitHub
Command line install
The MSI package of mRemoteNG can be installed using the command line:
| Property | Value | Description |
|---|---|---|
| INSTALLDIR | This allows you to set the installation directory from the command line. For paths that contain spaces, enclose the path in double quotes («»). This overrides any value found in the registry. | |
| IGNOREPREREQUISITES | or | When set to , the installer will not be halted if any prerequisite check is not met. You must still run the installer as administrator. |
Examples
Install to a custom folder
Ignore prerequisites during a normal install
Ignore prerequisites during a silent install
Turn on verbose logging by using the argument at the command line.
Universal TV Remote
(Image credit: WaveSpark)
Wait, another app called Universal TV Remote. Yes, though this one used to be known as IR Universal Remote. And it turns your IR blaster-equipped smartphone into a universal remote for a variety of devices, such as TVs, set top boxes, DVD players and air conditioners.
The free version of the app comes with a variety of pre-built remote control templates; you’re also able to create a single custom remote control that you can save. Paying for the full version of the app removes ads and unlocks the ability to create multiple custom remotes which you can share with other users.
Download Universal TV Remote: Android
Get the app
Linux
On Debian (testing and sid for now) and Ubuntu (20.04):
You could also build the app manually (don’t worry, it’s not that
hard).
Windows
For Windows, for simplicity, a prebuilt archive with all the dependencies
(including ) is available:
scrcpy-win64-v1.16.zip(SHA-256: 3f30dc5db1a2f95c2b40a0f5de91ec1642d9f53799250a8c529bc882bc0918f0)
choco install scrcpy
choco install adb    # if you don't have it yet
scoop install scrcpy
scoop install adb    # if you don't have it yet
You can also build the app manually.
macOS
brew install scrcpy
You need , accessible from your . If you don’t have it yet:
brew cask install android-platform-tools
You can also build the app manually.
Smart TV Remote
(Image credit: Adiroid)
Adiroid’s Smart TV Remote requires a bit more setup than other remote control apps, but this IR/Wi-Fi remote app works with a wide variety of hardware and TVs, from your device’s internal IR blaster or an external IR device, as well as a W-iFi based controller for a number of older Samsung smart TVs.
Among the best features of the app is its configurable interface, allowing you to easily create channel hotkeys and lay out the buttons as you wish. There’s also support for multiple devices so you can command your TV, set-top box, and stereo all from a single app.
Download Smart TV Remote: Android
Google Home
(Image credit: Google)
With Google releasing an increasing number of smart home devices such as the Google Home and Chromecast devices, the old Google Cast app has been rebranded as Google Home.
While the name and the coat of paint may have changed, Google Home still does the job as the all-in-one command center for your Chromecast and other Google devices, while also supporting an expanded range of smart appliances such as lights, cameras, and thermostats.
Google Home showcases a wide range of Cast-enabled apps, featuring content from these apps and allowing you to do things like use the app to open up and stream a new episode from a Netflix series. The device control tab handles everything from dimming the lights to controlling speaker volume, and you can even set automated routines to trigger with a single button press.
Download Google Home: Android
Yatse
(Image credit: Tolriq)
Kodi is a fantastic open source media center for playing local and streaming media on your HTPC and connected devices. While there is an official remote control app for Kodi (known as Kore), you can also get your hands on a feature-packed third-party remote app, Yatse, which adds on to the basics like playback controls with features such as voice control, support for Plex and Emby servers, widget controls, and custom controls.
In-app purchases unlock extra features such as streaming media to and from your Android device, cloud-saved settings, and more. With an app like Yatse, there’s little reason to fidget around with a keyboard or mouse for your HTPC or Kodi box, just sit back, relax, and put on your favorite shows and streams.
Download Yatse: Android
Что такое mRemoteNG?
Проще говоря, mRemote — это «агрегатор удаленных соединений». То есть он обрабатывает сведения о соединении, такие как: учетные данные, имя хоста / IP и тип (I.E. RDP, SSH и т. Д.), Среди прочих (модификатор порта I.E., если локальный диск должен быть перенаправлен и т. Д.). Когда вы открываете такое соединение, он становится вкладкой в окне программы. Это упрощает переход между соединениями, как и между веб-страницами в браузере. mRemoteNG — это версия «следующего поколения» исходной программы mRemote. mRemote был «диспетчером удаленных соединений», который был открытым. mRemotNG, дает все функциональные возможности, которые оригинал имел и добавил некоторые из своих собственных, в дополнение к постоянному совершенствованию, чтобы дать более плавный опыт ».
Smart Things Mobile
(Image credit: Samsung)
Of course, TVs aren’t the only things that you can now control remotely from an Android phone. Samsung’s Smart Things Mobile app serves as a centralized control app for devices connected to your Smart Things hub device, such as smart outlets, motion sensors, and more.
Users can configure the behavior of each device, monitor the status of things like whether a smart outlet is turned on or off or whether a door is closed or open. You also can schedule actions and configurations, and the Smart Things app can also connect with the Amazon’s Echo smart speakers, providing you with voice control for your connected devices and switches.
Download Smart Things Mobile: Android
Remote: что это и как подключить
Пришло время ответить на главный вопрос. Remote на магнитоле Pioneer и Remote in на магнитоле Sony: что это и одно ли это и то же?
Провод Remote на магнитоле — это выход на её колодке питания, предназначенный для включения и выключения периферийным оборудованием посредством подачи и снятия напряжения 12В. Этот провод традиционно делается голубого цвета.
Провод rem на магнитоле
Выход Remote организуется через транзисторный ключ, расположенный на плате аудиосистемы. В среднем его пропускная способность ограничивается 200 мА. Более точная информация указывается в инструкции к модели.
Подключение магнитолы 2din
Важно помнить, что если в аудиосистеме несколько усилителей звука, провод подключается поочередно к каждому из них. Сделать это можно разведя провода паутинкой
То есть, нужно протянуть провод от первого усилителя ко второму, от него к третьему. Таким способом можно подключить до пятидесяти усилителей.
Однако случается, что после такого подключения несколько усилителей не работают. Причина может крыться непосредственно в их схематике. Тогда последовательность действий меняется. Перед каждым входом remote, прямо в клемму, устанавливается диод. Сам провод просто припаивается.
Вход усилителя
При подключении по этой схеме, усилители начинают правильно работать, не принося больше проблем.
Порой возникает необходимость установить на Remote реле. Сопротивление катушки должно быть от 80 Ом. Лучше всего для этого подходит ВАЗовское реле. После его установки выход remote не перегрузится и не сгорит.
Подключение проводится по следующей схеме:
- 85 колодка реле соединяется с проводом;
- Далее он через предохранитель тянется к 87 колодке;
- Предохранитель ставят на место смены сечения. В большинстве случаев, он и будет являться дистрибьютором.
- 86 колодка либо ставится на «минусовый» провод или кузов.
Подключение провода Remote
В таком случае, 30 колодка будет являться усиленным выходом провода Remote на магнитоле
Важно помнить, что устанавливать реле не всегда необходимо. Нужно исходить из ситуации
Также при наличии нескольких усилителей, подключать их следует друг за другом. При этом реле ставить нельзя.
Устанавливать его можно только при наличии периферического оборудования, которое будет работать вместе с аудиосистемой.
Использование Unified Remote для управления компьютером с телефона
lass=»remon-after-2nd-h2″ id=»remon-780554651″>
После того, как все необходимое установлено, первый запуск и использование Unified Remote будет выглядеть следующим образом:
- Запускаем приложение на телефоне: на первом шаге вам предложат войти с аккаунтом Google, но это не обязательно (можно нажать «Skip this step»). Сразу после этого либо отобразится список компьютеров с Unified Remote, к которым можно подключиться, либо, если такой компьютер один, подключение произойдет автоматически.
- Вы окажетесь на главном экране приложения, где собраны возможные функции удаленного управления, которые будут рассмотрены далее.
- Если нажать по значку «Плюс», вы сможете добавить новые «пульты», например, для управления медиа плеером VLC, запуска меню «Пуск» Windows (указанные мною элементы бесплатны, но часть предлагаемых дополнительно элементов управления требуют приобретения полной лицензии Unified Remote).
- В бесплатной версии время от времени вы будете видеть сообщение с предложением приобретения полной версии, как на скриншоте ниже, просто нажимаем «Skip and continue».
Сами элементы управления несмотря на то, что русский язык интерфейса в Unified Remote отсутствует, достаточно просты:
- Basic Input — просто экран для управления мышью (для правого клика — нажатие двумя пальцами), с него же возможен запуск виртуальной клавиатуры и регулировки громкости.
- File Manager — файлы на вашем компьютере. При выборе какого-то файла он запускается именно на компьютере, а не на телефоне.
- Keyboard — клавиатура.
- Media — инструменты для управления воспроизведением медиа-файлов.
- Power — выключение, перезагрузка, выход из системы, блокировка удаленного компьютера.
- Screen — просмотр удаленного экрана (бесплатно недоступно).
Также на компьютере, где запущен сервер Unified Remote вы увидите соответствующую иконку в области уведомлений, по правому клику на которую раскрывается меню. Если в нем выбрать «Manager», в браузере откроется настройка Unified Remote. Здесь, например, можно отключить или настроить «пульты» для разных приложений.
Если открыть «Client», открывается управление в качестве клиента, в том числе возможность использовать элементы управления в рамках браузера. Похоже, управление возможно и между различными компьютерами, а не только с телефона, но убедиться и проверить методы подключения для этого у меня не было возможности.
В целом, приложение удобное, особенно если под вечер у вас нет желания вставать и подходить к компьютеру, который что-то проигрывает или выполняет другие задачи. Можно рекомендовать к использованию.
А вдруг и это будет интересно:
Налаштування
Для налаштування вам необхідно на телефоні під’єднатися до Wi-Fi мережі Wemos_00000000 (замість нулів буде серійний номер вашої плати).
Стандартний пароль — 12345678. Ви можете його змінити за вашим бажанням.
Після підключення відкриваєте веб-переглядач і переходите за адресою 192.168.4.1 — це адреса для налаштувань.
Налаштування точки доступу
- SSID — назва вашої моделі у Wi-Fi мережі. Це може бути, наприклад, номерний знак, або ваш нікнейм…
- PASSWORD — пароль доступу. Типово встановлено 12345678
Налаштування сервоприводу
- center — Положення сервоприводу при русі прямо, в градусах
- left — Положення сервопривду при вивороті коліс до упору в ліво, в градусах
- right — Положення сервопривду при вивороті коліс до упору в право, в градусах
- Stearing potenciometer linearity — лінійність керма
- Linear — кермо лінійне. Відхилення керма на 1 градус повертає колеса на 1 градус.
- Y = X^2/X кермо не лінійне. При позиціях, близьких до нуля, на один градус зміни положення керма колеса повертаються менше.
При позиціях, близьких до крайніх положень, колеса повертаються швидко. На високих швидкостях це дозволяє маневрувати плавніше.
Налаштування тягового мотора
- Minimum PWM speed — мінімальне значення ШІМ, яке необхідне для того, щоб мотор міг зрушити модель з місця.
- Speed potenciometer linearity — лінійність значень потенціометра.
- Linear — потенціометр лінійний.
- Y = X^2/X Потенціометр не лінійний. При позиціях близьких до нуля на одиницю зміни положення потенціометра швидкусть наростає повільно.
При позиціях, близьких до максимальних положень, швидкість наростає швидко.
Налаштування світла
- Head light PWM — значення ШІМ для переднього світла фар
- High light PWM — значення ШІМ для дальнього світла фар
- Parking light PWM — значення ШІМ для габаритних стоянкових вогнів
- Turn light PWM — значення ШІМ для поворотів та аварійної світлової сигналізації
- Stop light duration — проміжок часу, на який включається стоп-сигнал після зупинки моделі
- Back light timeout — проміжок часу, через який вимикається світло заднього ходу після зупинки моделі
- Back light PWM — Значення ШІМ для світла заднього ходу
Протокол удаленного рабочего стола (RDP)
Протокол удаленного рабочего стола — это способ удаленного подключения к машинам Windows, которые Microsoft испекла в своих бизнес-классах.
Если вам нужно обновить, мы написали статьи о том, как включить RDP и подключиться к нему через Интернет.
Настройки для RDP довольно прямолинейны, и, хотя вы можете изменить их по умолчанию, нет реальной необходимости.
Вам необходимо заполнить такую информацию, как: UserName, Password & Domain (если применимо).

После того, как вся информация будет заполнена, вы можете дважды щелкнуть по имени соединения, и вы должны быть подключены так же, как вы использовали бы старый добрый MSTSC, с той лишь разницей, что соединение содержится в окне программы (если вы специально не изменяете это поведение) , и вам больше никогда не придется повторно вводить информацию.
Советы RDP
Хотя вам не нужно ничего менять по умолчанию, рекомендуется включить следующие настройки в разделе «Перенаправление», потому что они очень полезны:
Комбинации клавиш. Этот параметр делает так, что ключевые комбо, такие как «Win + E» и т. П., Перенаправляются на удаленный компьютер, несмотря на то, что соединение RDP не находится в полноэкранном режиме.
Дисковые накопители. При включении этого параметра удаленный компьютер получает «подключенный сетевой диск» к компьютеру, с которого вы подключаетесь
Это очень упрощает передачу файлов с вашего компьютера, но обратите внимание, что он накладывает вектор заражения на вирусы
Использовать консольный сеанс — этот параметр «Протокол» должен использоваться для указания того, что вы хотите подключиться к тому же сеансу, что и тот, который идет на экран аппарата, а не только обычный в фоновом режиме (какая MS ограничивает количество одновременных подключений к).
CetusPlay Remote (Free)
(Image credit: CetusPlay Global)
The CetusPlay Remote app serves as a WiFi-based universal remote app for a variety of set-top boxes and devices, such as Android TV and Fire TV. Simply install the remote app on your phone and the CetusPlay receiver app in your TV, and it’ll guide you through the rest of the setup process.
You’ll also get a rundown of features from CetusPlay, which include a variety of control modes, media Casting from your device, launching TV apps, screenshots, and more. The app is ad-supported, with a $5.99 in-app purchase to remove advertising.
Download CetusPlay: Android
Power
Allows you to shut down, restart, sleep and lock a remote computer.
Legend
Windows — identifies Windows OS and offers you buttons which are applicable.
Mac OS X — identifies Mac OS X and offers you buttons which are applicable.
Linux — identifies Linux OS and offers you buttons which are applicable.
Mac OS X
Unfortunately, the operating system does not offer a reliable power interface, so Power contains only experimental Linux commands (e.g. shutdown).
Linux
The power interface requires root privileges, because it is based on commands – shutdown, pm-suspend. If you want to control the power of your computer, add su/sudo to the starter (e.g. cd server-path; sudo java -jar Remote\ PC\
Server.jar).
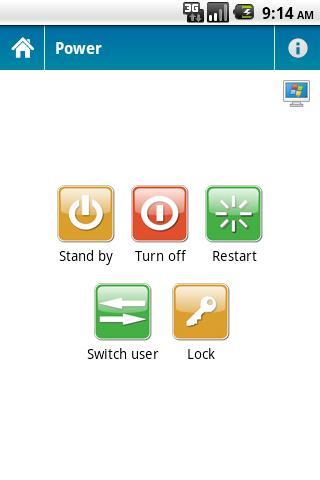
- Stand By – sleep computer
- Turn off – turn off computer
- Restart – restart computer
- Switch – switch the current user
- Lock – lock computer
IFTTT
(Image credit: IFTTT)
IFTTT is a fantastic mobile task automation app, and it also makes a great addition to smart appliances that take advantage of the Internet of Things. The app allows users to create customized «recipes» or tasks built around the structure «If this, then that» (from which the app takes its name).
IFTTT employs a wide variety of triggers and actions ranging from websites, apps, and even smart devices, appliances, and peripherals. You can even browse through other people’s trending and featured recipes, as well as themed collections and all-time favorites that you can install or modify. Using a variety of triggers, from GPS to Wi-Fi connection, you can automatically turn smart appliances on or off at your return, or trigger tasks with a status message.
Download IFTTT: Android
Control4 for OS3
(Image credit: Control4)
Control4 offers up a range of solutions for smart home automation, with users able to control smart appliances and connected utilities such as doors, heating, lights, multimedia systems and more through Control4’s OS3 home operating system. While Control4 has dedicated remote control slates and devices, you can also use the Control4 for OS3 app on your Android phone to access and command your connected devices and appliances.
Designed for improved customizability compared to previous Control4 OSes, users can personalize their interface and use the Favorites bar for fast access to frequently used devices or room controls. You also get a new active media bar for playback controls of media that you’re playing or streaming.
Download Control4 for OS3: Android
Mi Remote
(Image credit: Xiaomi)
You don’t need a Xiaomi phone to take advantage of the Mi Remote app — which is good since Xiaomi phones aren’t on sale in the US. But Mi Remote will work with almost any phone with a built-in IR blaster, whether you’re packing a Samsung, HTC, or Huawei device.
Mi Remote is a multi-purpose IR remote app, compatible with a wide variety of IR-controlled devices, such as TVs, air conditioners, set top boxes, DVRs, projectors, and digital cameras. You can even use the app as a remote control for smart TVs that accept commands over standard Wi-Fi protocols. You can also expand the app with the Peel Mi Remote extension, which adds a TV guide and personalized show recommendations to the core Mi Remote experience.
Download Mi Remote: Android
Установка Unified Remote
Прежде чем приступить к использованию телефона для дистанционного управления в Unified Remote, потребуется установить приложение на сам смартфон, а также на компьютер:
После установки на всех устройствах можно приступать, единственное требование: оба устройства должны быть либо подключены к одной Wi-Fi сети, либо между ними должно присутствовать Bluetooth подключение.
Примечание: при каких-либо проблемах с подключением и при наличии сторонних антивирусов или файрволлов как на компьютере, так и на телефоне, попробуйте временно отключить их и проверить, решит ли это проблему.
Amazon Alexa
(Image credit: Amazon)
Of course, Google is far from the only player in the smart home hub and home automation game. Amazon’s Echo smart speaker also functions as an internet-enabled smart home hub, and the Alexa app turns your phone into a setup guide and remote control for your Alexa-enabled devices.
Among the many different Alexa skills, the Alexa app can show you what music is playing and information you’ve searched for. You can let the app manage your alarms, searches, music playback, shopping lists and more, making Alexa an increasingly capable smart assistant that learns from your shopping, surfing and media habits.
Download Alexa App: Android
Shortcuts
In the following list, MOD is the shortcut modifier. By default, it’s
(left) Alt or (left) Super.
It can be changed using . Possible keys are , ,
, , and . For example:
# use RCtrl for shortcuts
scrcpy --shortcut-mod=rctrl

# use either LCtrl+LAlt or LSuper for shortcuts
scrcpy --shortcut-mod=lctrl+lalt,lsuper
is typically the Windows or Cmd key.
| Action | Shortcut |
|---|---|
| Switch fullscreen mode | MOD+f |
| Rotate display left | MOD+← (left) |
| Rotate display right | MOD+→ (right) |
| Resize window to 1:1 (pixel-perfect) | MOD+g |
| Resize window to remove black borders | MOD+w | Double-click¹ |
| Click on | MOD+h | Middle-click |
| Click on | MOD+b | Right-click² |
| Click on | MOD+s |
| Click on (unlock screen) | MOD+m |
| Click on | MOD+↑ (up) |
| Click on | MOD+↓ (down) |
| Click on | MOD+p |
| Power on | Right-click² |
| Turn device screen off (keep mirroring) | MOD+o |
| Turn device screen on | MOD+Shift+o |
| Rotate device screen | MOD+r |
| Expand notification panel | MOD+n |
| Collapse notification panel | MOD+Shift+n |
| Copy to clipboard³ | MOD+c |
| Cut to clipboard³ | MOD+x |
| Synchronize clipboards and paste³ | MOD+v |
| Inject computer clipboard text | MOD+Shift+v |
| Enable/disable FPS counter (on stdout) | MOD+i |
| Pinch-to-zoom | Ctrl+click-and-move |
¹Double-click on black borders to remove them.²Right-click turns the screen on if it was off, presses BACK otherwise.³Only on Android >= 7.
All Ctrl+key shortcuts are forwarded to the device, so they are
handled by the active application.
Installing
You can either download a pre-built release (easier) or build Chiaki from source.
Downloading a Release
Builds are provided for Linux, Android, macOS and Windows.
You can download them here.
- macOS: Drag the application from the into your Applications folder.
- Windows: Extract the file and execute .
Building from Source
Dependencies are CMake, Qt 5 with QtMultimedia, QtOpenGL and QtSvg, FFMPEG (libavcodec with H264 is enough), libopus, OpenSSL 1.1, SDL 2,
protoc and the protobuf Python library (only used during compilation for Nanopb). Then, Chiaki builds just like any other CMake project:
For more detailed platform-specific instructions, see doc/platform-build.md.
Безопасная оболочка (SSH)
Протокол Secure Shell или SSH — это самый известный способ подключения к Linux-машинам, который, если вы выполняете какое-либо администрирование Linux, вы, вероятно, уже встретили. Если вы еще этого не сделали, вы можете проверить этот праймер.
Чтобы создать SSH-тип соединения, снова создайте общее RDP-соединение и щелкните по настройке «Протокол». Это откроет стрелку, чтобы открыть раскрывающееся меню выбора.
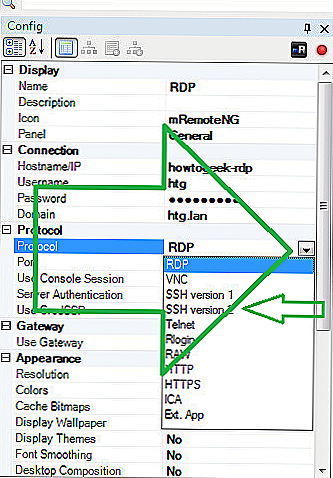
Выберите тип SSH версии 2 (если только у вас нет конкретной причины использовать версию 1), и как только вы введете информацию для компьютера, к которому вы подключаетесь, вам должно быть хорошо идти.
Uninstall
Standard Uninstall
mRemoteNG basic binary package can be uninstalled with Windows Control Panel. If for some reason it does not work please
follow information provided below for Manual Uninstall.
Manual Uninstall
If you are using the Portable version, simply deleting the folder that contains mRemoteNG should be sufficient. These uninstall instructions are only necessary for the normal binary .MSI installed version of mRemoteNG
-
Delete the folder where mRemoteNG was installed. By default, this is:
-
Delete the mRemoteNG install entry from one of the following locations. Search for «mRemoteNG» in the DisplayName field:
- x86:
- x64:
-
(Optional) If you would also like to delete user data remove
Anymote Universal Remote
(Image credit: Color Tiger)
If you’ve got an IR blaster mounted inside an older smartphone such as the HTC One, Samsung Galaxy S6, LG G3, try Anymote. This little app turns your blaster-equipped smartphone into a universal remote for a wide variety of appliances, from TVs, set top boxes, DVD players or just about any device that accepts IR commands.
The app has a lot of cool features, such as the ability to create custom remotes that bring together commands from different devices into a single screen (for example, turning on your TV, DVD player and sound system on with a single tap) and the ability to create custom macros. The app can also function as a Wi-Fi remote for a variety of devices and apps, such as Sonos speakers, the Kodi media center, or VLC.
Anymote is a free download, though with an in-app purchase you can add unlimited remotes.
Download Anymote: Android
Multimedia
At first choose a multimedia player which you want to control.
Legend
Recommended — the player is native.
Windows only — the player works only on Windows.
Mac OS X only — the player works only on Mac OS X.
Linux only — the player works only on Linux.
Alert — the player is based on keyboard shortcuts and its windows must be in the foreground.
!
Red exclamation mark — same as Alert, but only for specific buttons.
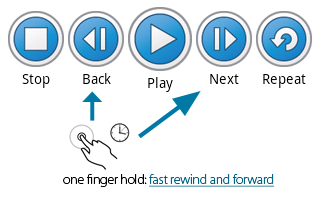
Fast forward/rewind
Clicking on Back or Next button will change the song to next/previous in your playlist. If you hold the button, you will rewind or forward the current song.
Warning: Windows Media Player and Rhythmbox do not support this feature.
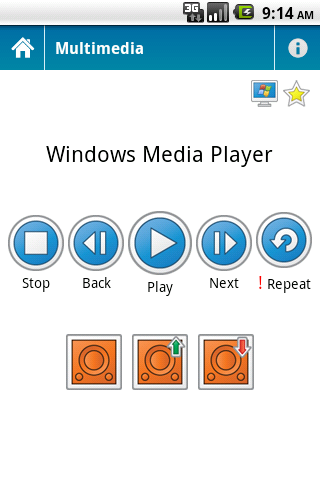
- Stop – stop your current song
- Back – play previous song
- Play – play/pause current song
- Next – play next song
- Repeat – toggle on/off repeating mode
- Sound – turn on/off sound
- Sound up – increase the volume
- Sound down – decrease the volume
- Preference – list of media players
- Note – some players are based on keyboard shortcuts
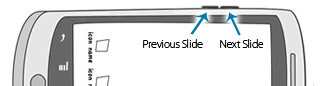
Presentation
At first choose Microsoft PowerPoint or Adobe Reader which you want to control.
Moves the slideshow with Volume hardware buttons.
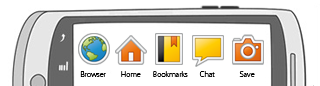
Custom Interface
Create your own custom interface which is based on keyboard shortcuts. Most modern applications have control via keyboard shortcuts, and now you can use their
potential fully remotely.
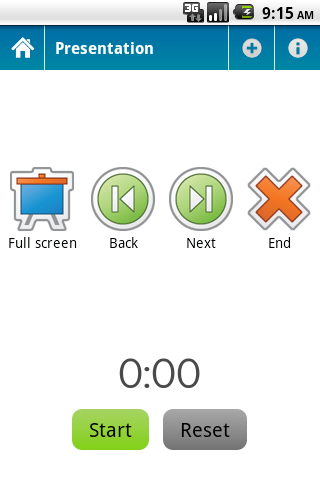
- Launch – run presentation
- Previous – previous slide
- Next – next slide
- Close – exit presentation
- Note – the players are based on keyboard shortcuts
Power
Allows you to shut down, restart, sleep and lock a remote computer.
Legend
Windows — identifies Windows OS and offers you buttons which are applicable.
Mac OS X — identifies Mac OS X and offers you buttons which are applicable.
Linux — identifies Linux OS and offers you buttons which are applicable.
Mac OS X
Unfortunately, the operating system does not offer a reliable power interface, so Power contains only experimental Linux commands (e.g. shutdown).
Linux
The power interface requires root privileges, because it is based on commands – shutdown, pm-suspend. If you want to control the power of your computer, add su/sudo to the starter (e.g. cd server-path; sudo java -jar Remote\ PC\
Server.jar).
- Stand By – sleep computer
- Turn off – turn off computer
- Restart – restart computer
- Switch – switch the current user
- Lock – lock computer
Published on 31th of May, 2017


