Python random.seed() function to initialize the pseudo-random number generator
Содержание:
- Cython
- Choose a random element from a multidimensional array in Python
- Quick Start
- 2) np.random.normal
- New Bit Generators
- CJS / Node.js usage
- 9) np.random.randint
- A quick introduction to NumPy
- If you want to learn data science in Python, learn NumPy
- Version notes
- NumPy random normal generates normally distributed numbers
- New Bit Generators
- 8) np.random.poisson
- Applications of np.random.seed
- Генератор псевдослучайных чисел — seed() модуль random
- The syntax of numpy random normal
- How to get a seed value used by a random generator
- Python NumPy
- Quick Start
Cython
Cython can be used to unpack the provided by a BitGenerator.
This example uses and the example from above. The usual caveats
for writing high-performance code using Cython – removing bounds checks and
wrap around, providing array alignment information – still apply.
#!/usr/bin/env python3
#cython: language_level=3
"""
This file shows how the to use a BitGenerator to create a distribution.
"""
import numpy as np
cimport numpy as np
cimport cython
from cpython.pycapsule cimport PyCapsule_IsValid, PyCapsule_GetPointer
from libc.stdint cimport uint16_t, uint64_t
from numpy.random cimport bitgen_t
from numpy.random import PCG64
from numpy.random.c_distributions cimport (
      random_standard_uniform_fill, random_standard_uniform_fill_f)


@cython.boundscheck(False)
@cython.wraparound(False)
def uniforms(Py_ssize_t n):
    """
    Create an array of `n` uniformly distributed doubles.
    A 'real' distribution would want to process the values into
    some non-uniform distribution
    """
    cdef Py_ssize_t i
    cdef bitgen_t *rng
    cdef const char *capsule_name = "BitGenerator"
    cdef double[::1 random_values

    x = PCG64()
    capsule = x.capsule
    # Optional check that the capsule if from a BitGenerator
    if not PyCapsule_IsValid(capsule, capsule_name):
        raise ValueError("Invalid pointer to anon_func_state")
    # Cast the pointer
    rng = <bitgen_t *> PyCapsule_GetPointer(capsule, capsule_name)
    random_values = np.empty(n, dtype='float64')
    with x.lock, nogil
        for i in range(n):
            # Call the function
            random_valuesi = rng.next_double(rng.state)
    randoms = np.asarray(random_values)

    return randoms
The BitGenerator can also be directly accessed using the members of the
struct.
@cython.boundscheck(False)
@cython.wraparound(False)
def uint10_uniforms(Py_ssize_t n):
    """Uniform 10 bit integers stored as 16-bit unsigned integers"""
    cdef Py_ssize_t i
    cdef bitgen_t *rng
    cdef const char *capsule_name = "BitGenerator"
    cdef uint16_t[::1 random_values
    cdef int bits_remaining
    cdef int width = 10
    cdef uint64_t buff, mask = x3FF

    x = PCG64()
    capsule = x.capsule
    if not PyCapsule_IsValid(capsule, capsule_name):
        raise ValueError("Invalid pointer to anon_func_state")
    rng = <bitgen_t *> PyCapsule_GetPointer(capsule, capsule_name)
    random_values = np.empty(n, dtype='uint16')
    # Best practice is to release GIL and acquire the lock
    bits_remaining =
    with x.lock, nogil
        for i in range(n):
            if bits_remaining < width
                buff = rng.next_uint64(rng.state)
            random_valuesi = buff & mask
            buff >>= width

    randoms = np.asarray(random_values)
    return randoms
Cython can be used to directly access the functions in
. This requires linking with the
library located in .
def uniforms_ex(bit_generator, Py_ssize_t n, dtype=np.float64):
    """
    Create an array of `n` uniformly distributed doubles via a "fill" function.

    A 'real' distribution would want to process the values into
    some non-uniform distribution

    Parameters
    ----------
    bit_generator: BitGenerator instance
    n: int
        Output vector length
    dtype: {str, dtype}, optional
        Desired dtype, either 'd' (or 'float64') or 'f' (or 'float32'). The
        default dtype value is 'd'
    """
    cdef Py_ssize_t i
    cdef bitgen_t *rng
    cdef const char *capsule_name = "BitGenerator"
    cdef np.ndarray randoms

    capsule = bit_generator.capsule
    # Optional check that the capsule if from a BitGenerator
    if not PyCapsule_IsValid(capsule, capsule_name):
        raise ValueError("Invalid pointer to anon_func_state")
    # Cast the pointer
    rng = <bitgen_t *> PyCapsule_GetPointer(capsule, capsule_name)

    _dtype = np.dtype(dtype)
    randoms = np.empty(n, dtype=_dtype)
    if _dtype == np.float32
        with bit_generator.lock
            random_standard_uniform_fill_f(rng, n, <float*>np.PyArray_DATA(randoms))
    elif _dtype == np.float64
        with bit_generator.lock
            random_standard_uniform_fill(rng, n, <double*>np.PyArray_DATA(randoms))
    else
        raise TypeError('Unsupported dtype %r for random' % _dtype)
    return randoms
Choose a random element from a multidimensional array in Python
Most of the time we work with 2-d or 3-d arrays in Python. Let assume you want to pick a random element from it then how to do it? Let see this with an example. In this example, We used function to pick a random element from the multidimensional array.
A random choice from 2d array
Output:
Printing 2D Array


 ]

Choose random row from a 2D array


Random number from random row is
66
Note: Above all, examples are not cryptographically secure. If you are doing this for any security-sensitive application then to cryptographically secure random output, use instead of .
Read more on how to generate random data in Python securely.
Now, Let see how to generate a cryptographically secure random choice.
Output:
cryptographically secure random choice - The Godfather
Quick Start
Call to get a new instance of a , then call its
methods to obtain samples from different distributions. By default,
uses bits provided by which has better statistical
properties than the legacy used in .
# Do this
from numpy.random import default_rng
rng = default_rng()
vals = rng.standard_normal(10)
more_vals = rng.standard_normal(10)

# instead of this
from numpy import random
vals = random.standard_normal(10)
more_vals = random.standard_normal(10)
can be used as a replacement for . Both class
instances hold a internal instance to provide the bit
stream, it is accessible as . Some long-overdue API
cleanup means that legacy and compatibility methods have been removed from
|
Notes |
||
|
, |
Compatible with |
|
|
, |
Add an kwarg |
|
|
removed |
Use |
|
|
removed |
Use |
See for more information
Something like the following code can be used to support both
and , with the understanding that the interfaces are slightly
different
try
    rg_integers = rg.integers
except AttributeError
    rg_integers = rg.randint
a = rg_integers(1000)
Seeds can be passed to any of the BitGenerators. The provided value is mixed
via to spread a possible sequence of seeds across a wider
range of initialization states for the BitGenerator. Here is used and
is wrapped with a .
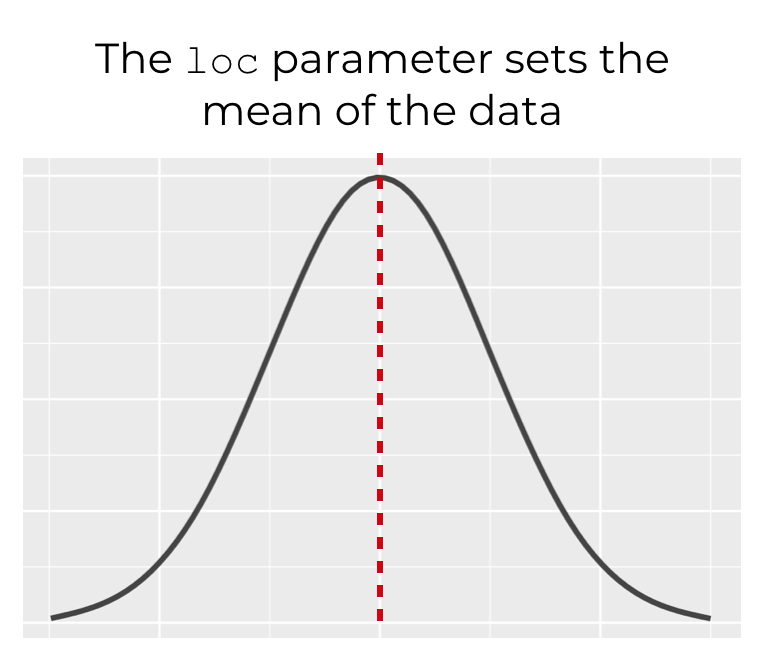
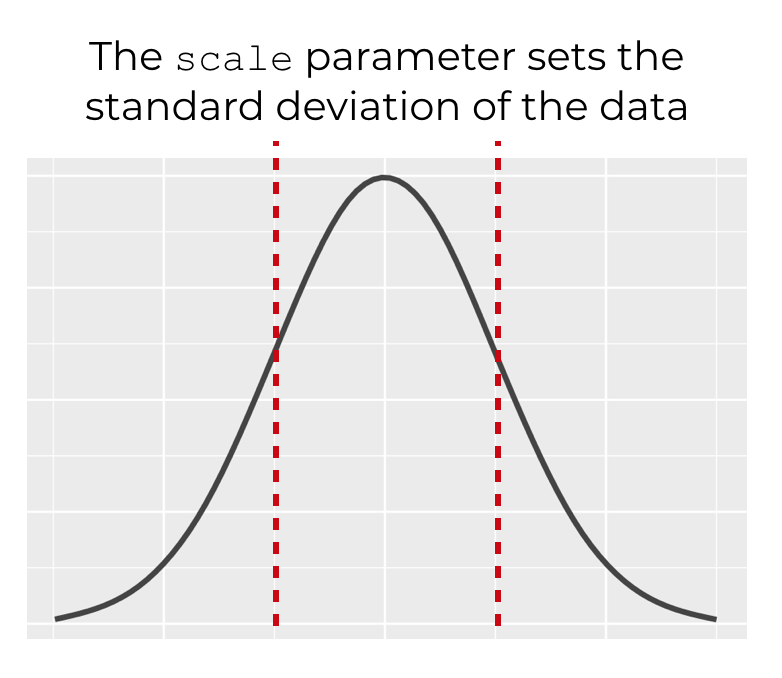
2) np.random.normal
np.random.normal returns a random numpy array or scalar whose elements are randomly drawn from a normal distribution
Syntax
np.random.normal(loc=0.0, scale=1.0, size=None)
loc – It represents Mean (“centre”) of the distribution. It is float or array_like of floats
scale – It represents Standard deviation (spread or “width”) of the distribution. It is float or array_like of floats
size (optional) – It represents the shape of the output array. If the given shape is, e.g., (m, n, k), then m n k samples are drawn. If the size is None (default), a single value is returned, if loc and scale are both scalars. Otherwise, np.broadcast(loc, scale).size samples are drawn.
New Bit Generators
can be used with user-provided s. The simplest
way to write a new BitGenerator is to examine the pyx file of one of the
existing BitGenerators. The key structure that must be provided is the
which contains a to a struct pointer of type
,
typedef struct bitgen {
  void *state;
  uint64_t (*next_uint64)(void *st);
  uint32_t (*next_uint32)(void *st);
  double (*next_double)(void *st);
  uint64_t (*next_raw)(void *st);
} bitgen_t;
which provides 5 pointers. The first is an opaque pointer to the data structure
used by the BitGenerators. The next three are function pointers which return
the next 64- and 32-bit unsigned integers, the next random double and the next
raw value. This final function is used for testing and so can be set to
the next 64-bit unsigned integer function if not needed. Functions inside
use this structure as in
CJS / Node.js usage
// Local PRNG: does not affect Math.random.
var seedrandom = require('seedrandom');
var rng = seedrandom('hello.');
console.log(rng());                  // Always 0.9282578795792454

// Global PRNG: set Math.random.
seedrandom('hello.', { global: true });
console.log(Math.random());          // Always 0.9282578795792454

// Autoseeded ARC4-based PRNG.
rng = seedrandom();
console.log(rng());                  // Reasonably unpredictable.

// Mixing accumulated entropy.
rng = seedrandom('added entropy.', { entropy: true });
console.log(rng());                  // As unpredictable as added entropy.

// Using alternate algorithms, as listed above.
var rng2 = seedrandom.xor4096('hello.')
console.log(rng2());
Starting in version 3, when using via require(‘seedrandom’), the global
is no longer available.
9) np.random.randint
np.random.randint returns a random numpy array or scalar, whose element(s) is int, drawn randomly from low (inclusive) to the high (exclusive) range.
Syntax
np.random.randint(low, high=None, size=None, dtype=’l’)
low – It represents the lowest inclusive bound of the distribution from where the sample can be drawn. Unless high=None, in which case this parameter is one above the highest such integer. The input is int
high (optional) – It represents the upper exclusive bound of the distribution from where the sample can be drawn. (see above for behavior if high=None). The input is int.
size (optional) – It represents the shape of the output. The input is int or tuple of ints. If the given shape is, e.g., (m, n, k), then m n k samples are drawn. Default is None, in which case a single value is returned.
dtype (optional) – It represents the required dtype of the result. The default value is ‘np.int’.
A quick introduction to NumPy
If you’re a real beginner with NumPy, you might not entirely be familiar with it.
With that in mind, let’s briefly review what NumPy is.
NumPy is a module for the Python programming language that’s used for data science and scientific computing.
Specifically, NumPy performs data manipulation on numerical data. It enables you to collect numeric data into a data structure, called the NumPy array. It also enables you to perform various computations and manipulations on NumPy arrays.
Essentially, NumPy is a package for working with numeric data in Python.
For more details about NumPy, check out our tutorial about the NumPy array.
If you want to learn data science in Python, learn NumPy
That’s it. You can use the NumPy random normal function to create normally distributed data in Python.
If you really want to master data science and analytics in Python though, you really need to learn more about NumPy. Here, we’ve covered the np.random.normal function, but NumPy has a large range of other functions. The np.random.normal function is just one piece of a much larger toolkit for data manipulation in Python.
Having said that, if you want to be great at data science in Python, you’ll need to learn more about NumPy.
Check out our other NumPy tutorials on things like how to create a numpy array, how to reshape a numpy array, how to create an array with all zeros, and many more.
Version notes
The random number sequence is the same as version 1.0 for string seeds.
- Version 2.0 changed the sequence for non-string seeds.
- Version 2.1 speeds seeding and uses window.crypto to autoseed if present.
- Version 2.2 alters non-crypto autoseeding to sweep up entropy from plugins.
- Version 2.3 adds support for «new», module loading, and a null seed arg.
- Version 2.3.1 adds a build environment, module packaging, and tests.
- Version 2.3.4 fixes bugs on IE8, and switches to MIT license.
- Version 2.3.6 adds a readable options object argument.
- Version 2.3.10 adds support for node.js crypto (contributed by ctd1500).
- Version 2.3.11 adds an option to load and save internal state.
- Version 2.4.0 adds implementations of several other fast PRNGs.
- Version 2.4.2 adds an implementation of Baagoe’s very fast Alea PRNG.
- Version 2.4.3 ignores nodejs crypto when under browserify.
- Version 2.4.4 avoids strict mode problem with global this reference.
- Version 3.0.1 removes Math.seedrandom for require(‘seedrandom’) users.
- Version 3.0.3 updates package.json for CDN entrypoints.
- Version 3.0.5 removes eval to avoid triggering content-security policy.
The standard ARC4 key scheduler cycles short keys, which means that
seedrandom(‘ab’) is equivalent to seedrandom(‘abab’) and ‘ababab’.
Therefore it is a good idea to add a terminator to avoid trivial
equivalences on short string seeds, e.g., Math.seedrandom(str + ‘\0’).
Starting with version 2.0, a terminator is added automatically for
non-string seeds, so seeding with the number 111 is the same as seeding
with ‘111\0’.
When seedrandom() is called with zero args or a null seed, it uses a
seed drawn from the browser crypto object if present. If there is no
crypto support, seedrandom() uses the current time, the native rng,
and a walk of several DOM objects to collect a few bits of entropy.
Each time the one- or two-argument forms of seedrandom are called,
entropy from the passed seed is accumulated in a pool to help generate
future seeds for the zero- and two-argument forms of seedrandom.
On speed — This javascript implementation of Math.random() is several
times slower than the built-in Math.random() because it is not native
code, but that is typically fast enough. Some details (timings on
Chrome 25 on a 2010 vintage macbook):
- seeded Math.random() — avg less than 0.0002 milliseconds per call
- seedrandom(‘explicit.’) — avg less than 0.2 milliseconds per call
- seedrandom(‘explicit.’, true) — avg less than 0.2 milliseconds per call
- seedrandom() with crypto — avg less than 0.2 milliseconds per call
Autoseeding without crypto is somewhat slow, about 20-30 milliseconds on
a 2012 windows 7 1.5ghz i5 laptop, as seen on Firefox 19, IE 10, and Opera.
Seeded rng calls themselves are fast across these browsers, with slowest
numbers on Opera at about 0.0005 ms per seeded Math.random().
NumPy random normal generates normally distributed numbers
So NumPy is a package for working with numerical data. Where does np.random.normal fit in?
As I mentioned previously, NumPy has a variety of tools for working with numerical data. In most cases, NumPy’s tools enable you to do one of two things: create numerical data (structured as a NumPy array), or perform some calculation on a NumPy array.
The NumPy random normal function enables you to create a NumPy array that contains normally distributed data.
Hopefully you’re familiar with normally distributed data, but just as a refresher, here’s what it looks like when we plot it in a histogram:

Normally distributed data is shaped sort of like a bell, so it’s often called the “bell curve.”
Now that I’ve explained what the np.random.normal function does at a high level, let’s take a look at the syntax.
New Bit Generators
can be used with user-provided s. The simplest
way to write a new BitGenerator is to examine the pyx file of one of the
existing BitGenerators. The key structure that must be provided is the
which contains a to a struct pointer of type
,
typedef struct bitgen {
  void *state;
  uint64_t (*next_uint64)(void *st);
  uint32_t (*next_uint32)(void *st);
  double (*next_double)(void *st);
  uint64_t (*next_raw)(void *st);
} bitgen_t;
which provides 5 pointers. The first is an opaque pointer to the data structure
used by the BitGenerators. The next three are function pointers which return
the next 64- and 32-bit unsigned integers, the next random double and the next
raw value. This final function is used for testing and so can be set to
the next 64-bit unsigned integer function if not needed. Functions inside
use this structure as in
8) np.random.poisson
np.random.poisson returns a random numpy array or scalar whose element(s) are drawn randomly from a poisson distribution
Syntax
np.random.poisson(lam=1.0, size=None)
lam – It represents the expectation of interval, should be >=0. A sequence of expectation intervals must be broadcastable over the requested size. The input is float or array_like of floats.
*size (optional) – It represents the shape of the output. The input is int or tuple of ints. If the given shape is, e.g., (m, n, k), then m n k samples are drawn. If size is not given, then a single value is returned if lam is a scalar. Otherwise, np.array(lam).size samples are drawn.
Applications of np.random.seed
Now that I’ve explained the basics of NumPy random seed, I want to tell you a few applications …
Here’s where you might see the np.random.seed function.
Probability and statistics
It’s possible to do probability and statistics using NumPy.
Almost by definition, probability involves uncertainty and randomness. As such, if you use Python and NumPy to model probabilistic processes, you’ll need to use np.random.seed to generate pseudo-random numbers (or a similar tool in Python).
Random sampling
More specifically, if you’re doing random sampling with NumPy, you’ll need to use numpy.random.seed.
NumPy has a variety of functions for performing random sampling, including numpy random random, numpy random normal, and numpy random choice.
In almost every case, when you use one of these functions, you’ll need to use it in conjunction with numpy random seed if you want to create reproducible outputs.
Monte Carlo Methods
Monte Carlo methods are a class of computational methods that rely on repeatedly drawing random samples.
I won’t go into the details here, since Monte Carlo methods are a little complicated, and beyond the scope of this post.
Essentially though, Monte Carlo methods are a powerful computational tool used in science and engineering. In fact, Monte Carlo methods were initially used at the Manhattan Project!
Monte Carlo methods require random numbers. In most cases, when these methods are used, they actually use pseudo-random numbers instead of true random numbers.
Machine learning
Interested in machine learning?
Great … it’s a powerful toolset, and it will be extremely important in the 21st century.
Broadly speaking, pseudo-random numbers are important in machine learning.
Performing simple tasks like splitting datasets into training and test sets requires random sampling. In turn, random sampling almost always requires pseudo-random numbers.
So if you’re doing machine learning in Python, you’ll almost certainly need to use NumPy random seed …
Deep learning
More specifically, you’ll also probably use pseudo-random numbers if you want to do deep learning.
For example, if you want to do deep learning in Python, you’ll often need to split datasets into training and test sets (just like with other machine learning techniques). Again, this requires pseudo-random numbers.
… so when people do deep learning in Python, you’ll frequently see at least a few uses of numpy.random.seed.
Генератор псевдослучайных чисел — seed() модуль random
- Метод используется для инициализации генератора псевдослучайных чисел в Python;
- Модуль использует значение из , или отправной точки как основу для генерации случайного числа. Если значения нет в наличии, тогда система будет отталкиваться от текущего времени.
Пример использования в Python:
Python
import random
random.seed(6)
print(«Случайное число с семенем «,random.random())
print(«Случайное число с семенем «,random.random())
|
1 |
importrandom random.seed(6) print(«Случайное число с семенем «,random.random()) print(«Случайное число с семенем «,random.random()) |
Вывод:
Shell
Random number with seed 0.793340083761663
Random number with seed 0.793340083761663
|
1 |
Random number with seed0.793340083761663 Random number with seed0.793340083761663 |
The syntax of numpy random normal
The syntax of the NumPy random normal function is fairly straightforward.
Note that in the following illustration and throughout this blog post, we will assume that you’ve imported NumPy with the following code: . That code will enable you to refer to NumPy as .
Let’s take a quick look at the syntax.

Let me explain this. Typically, we will call the function with the name . As I mentioned earlier, this assumes that we’ve imported NumPy with the code .
Inside of the function, you’ll notice 3 parameters: , , and .
Let’s talk about each of those parameters.
The parameters of the np.random.normal function
The np.random.normal function has three primary parameters that control the output: , , and .
I’ll explain each of those parameters separately.
loc
The parameter controls the mean of the function.
This parameter defaults to , so if you don’t use this parameter to specify the mean of the distribution, the mean will be at 0.
The parameter controls the standard deviation of the normal distribution.
By default, the parameter is set to 1.
size
The parameter controls the size and shape of the output.
Remember that the output will be a NumPy array. NumPy arrays can be 1-dimensional, 2-dimensional, or multi-dimensional (i.e., 2 or more).
This might be confusing if you’re not really familiar with NumPy arrays. To learn more about NumPy array structure, I recommend that you read our tutorial on NumPy arrays.
Having said that, here’s a quick explanation.
The argument that you provide to the parameter will dictate the size and shape of the output array.
If you provide a single integer, , np.random.normal will provide random normal values in a 1-dimensional NumPy array.
You can also specify a more complex output.
For example, if you specify , np.random.normal will produce a numpy array with 2 rows and 3 columns. It will be filled with numbers drawn from a random normal distribution.
Keep in mind that you can create ouput arrays with more than 2 dimensions, but in the interest of simplicity, I will leave that to another tutorial.
The np.random.randn function
There’s another function that’s similar to np.random.normal. It’s called np.random.randn.
Just like np.random.normal, the np.random.randn function produces numbers that are drawn from a normal distribution.
The major difference is that np.random.randn is like a special case of np.random.normal. np.random.randn operates like np.random.normal with and .
So this code:
np.random.seed(1)
np.random.normal(loc = 0, scale = 1, size = (3,3))
Operates effectively the same as this code:
np.random.seed(1)
np.random.randn(3, 3)
How to get a seed value used by a random generator
Sometimes it is useful to be able to reproduce the data given by a pseudo-random number generator. As you already know random data generation is dependent on a seed value. By re-using a seed value, we can regenerate the same data multiple times as multiple threads are not running.
For example, You want to reproduce the results you are getting in a particular run. In such cases, you want to know what seed is used, so that you can reproduce that result. The current seed value is essential when you want reproducible results.
If you are using a custom seed value, you must remember that Python’s Random generator doesn’t store seed in memory. i.e., It doesn’t provide any method to get the current seed value. It is up to you to save the seed if you want to reuse it.
It is not possible to get the automatic seed back out from the generator. But you can try this alternative
Output:
Seed was: 7616533358804326209
125
The above way is time-based, so each time you execute it, it will produce different seed, and if you like the result, you can use that seed to get the same result back.
Now, I will use the same seed (7616533358804326209) to get the same result back.
Output:
Random Number 175
As you can see we got the same number as a result
Note: Using the above approach you can reproduce the result of any random module function
Python NumPy
NumPy IntroNumPy Getting StartedNumPy Creating ArraysNumPy Array IndexingNumPy Array SlicingNumPy Data TypesNumPy Copy vs ViewNumPy Array ShapeNumPy Array ReshapeNumPy Array IteratingNumPy Array JoinNumPy Array SplitNumPy Array SearchNumPy Array SortNumPy Array FilterNumPy Random
Random Intro
Data Distribution
Random Permutation
Seaborn Module
Normal Distribution
Binomial Distribution
Poisson Distribution
Uniform Distribution
Logistic Distribution
Multinomial Distribution
Exponential Distribution
Chi Square Distribution
Rayleigh Distribution
Pareto Distribution
Zipf Distribution
NumPy ufunc
ufunc Intro
ufunc Create Function
ufunc Simple Arithmetic
ufunc Rounding Decimals
ufunc Logs
ufunc Summations
ufunc Products
ufunc Differences
ufunc Finding LCM
ufunc Finding GCD
ufunc Trigonometric
ufunc Hyperbolic
ufunc Set Operations
Quick Start
Call to get a new instance of a , then call its
methods to obtain samples from different distributions. By default,
uses bits provided by which has better statistical
properties than the legacy used in .
# Do this (new version)
from numpy.random import default_rng
rng = default_rng()
vals = rng.standard_normal(10)
more_vals = rng.standard_normal(10)

# instead of this (legacy version)
from numpy import random
vals = random.standard_normal(10)
more_vals = random.standard_normal(10)
can be used as a replacement for . Both class
instances hold a internal instance to provide the bit
stream, it is accessible as . Some long-overdue API
cleanup means that legacy and compatibility methods have been removed from
|
Notes |
||
|
, |
Compatible with |
|
|
, |
Add an kwarg |
|
|
removed |
Use |
|
|
removed |
Use |
See for more information.
Something like the following code can be used to support both
and , with the understanding that the interfaces are slightly
different
try
    rg_integers = rg.integers
except AttributeError
    rg_integers = rg.randint
a = rg_integers(1000)
Seeds can be passed to any of the BitGenerators. The provided value is mixed
via to spread a possible sequence of seeds across a wider
range of initialization states for the BitGenerator. Here is used and
is wrapped with a .
from numpy.random import Generator, PCG64
rg = Generator(PCG64(12345))
rg.standard_normal()
Here we use to create an instance of to generate a
random float:
>>> import numpy as np
>>> rng = np.random.default_rng(12345)
>>> print(rng)
Generator(PCG64)
>>> rfloat = rng.random()
>>> rfloat
0.22733602246716966
>>> type(rfloat)
<class 'float'>
Here we use to create an instance of to generate 3
random integers between 0 (inclusive) and 10 (exclusive):


