Подробный обзор, настройка и установка qt creator
Содержание:
Assumptions and Prerequisites
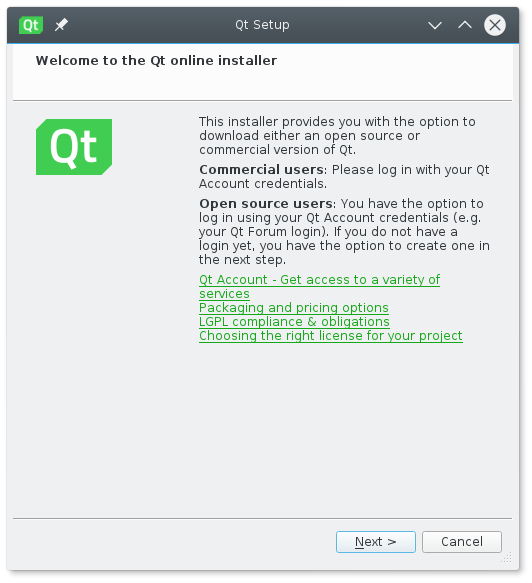
For this example I will assume you want to install Qt 5.6.0 or 5.7.0 on a recent release of Ubuntu Desktop Linux. The procedure will be similar with other Linux distributions. As in the blog for Windows, we will use Qt’s online installer.
It should be noted that many Linux distributions already have Qt and Qt Creator available as standard distribution packages. This is often the easiest way to set up a Qt development environment. On Ubuntu Linux, for example, you can install Qt Creator using the command:
$ sudo apt-get install qtcreator
A downside of this approach is that the versions of Qt and Creator packaged for your Linux distribution may not be the latest versions, and you are typically only offered one particular Qt version. Using the Qt online installer as I describe here will allow you to install the latest Qt release or one or more older releases, as well as install optional modules that may not be available as packages for your Linux distribution.
The Qt installer for Linux does not include a C++ compiler. You will need to separately install the GNU gcc compiler, make program, and other packages for software development. In addition, building graphical Qt applications requires OpenGL libraries and headers installed. On Ubuntu and other Debian-based Linux systems you can get OpenGL and the minimal set of development tools by installing the packages libgl1-mesa-dev and build-essential, i.e. by running this command:
$ sudo apt-get install build-essential libgl1-mesa-dev
This is the bare minimum needed for software development. You will typically also want to install the gdb debugger (packaged as gdb on Ubuntu) and possibly some optional tools like git, clang, etc. Qt Creator will make use of these if present and you can install them any time after installing Qt Creator, if desired.
Installation Steps
The first step is to download the online installer. You can directly download the latest installer from http://download.qt.io/official_releases/online_installers/

You need to select either the 32-bit or 64-bit installer, depending on the architecture of your system. The file qt-unified-linux-x86-online.run is the 32-bit installer and qt-unified-linux-x64-online.run is the 64-bit version. If you are unsure what architecture your system is running, you can run the Linux command arch and examine the output. An output of «i686» indicates 32-bit and «x86_64» is 64-bit on Intel-compatible systems.
Select and download the appropriate installer. Your web browser probably won’t let you directly run it until you make the file executable. You can do that by opening a terminal window, navigating to the downloads directory, and using the chmod command. Here is an example:
$ cd ~/Downloads
$ chmod a+x qt-unified-linux-x64-2.0.3-1-online.run
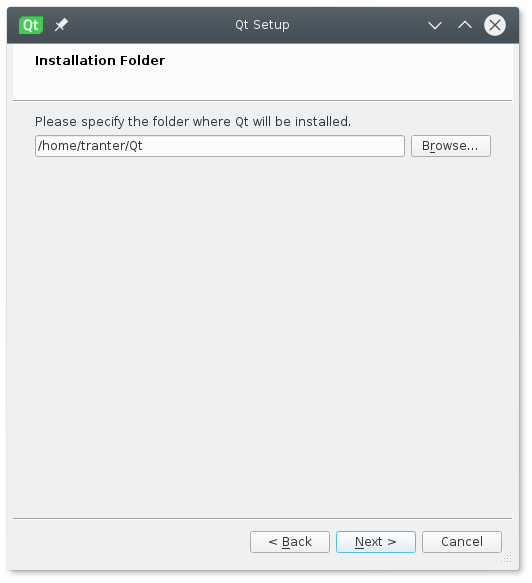
You are now ready to run the installer. You have two options. If you run it as a normal user, it will be installed in the current user’s home directory, making the install suitable for use only by the user who installed it. If you run the installer as root, it will be installed globally and be available to all users on the machine.
For the per user install, the default installation will be a subdirectory called Qt in the current working directory. For the global install, the default location is /opt/Qt.
Determine whether you want to install per user or global and then run the installer. For a per user install, just run it as the current user, e.g.
$ ./qt-unified-linux-x64-2.0.3-1-online.run
For the global install you can run it as root using the sudo command, e.g.
$ sudo ./qt-unified-linux-x64-2.0.3-1-online.run
The installer should now launch. The steps will be the same as on Windows. The previous blog post provided screen shots and described each step in the installer process in detail.
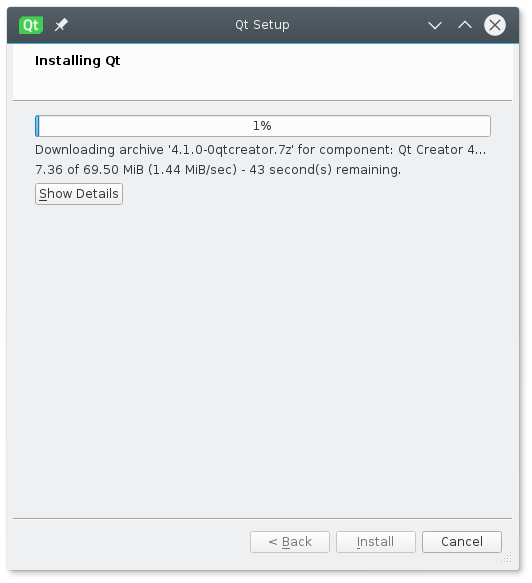
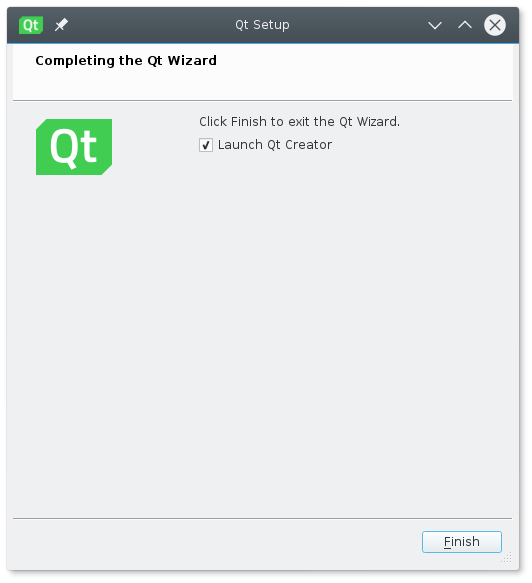
Once done, you can launch Qt Creator.

You should check that it correctly set up at least one auto-detected kit, compiler, Qt version, and debugger (if present):

As I suggested in the other blog, this would be a good time to create some sample projects to test your installation. Use the New Project Wizard and confirm that you can create the project, build it and run the application. Testing both widget and QML-based projects is recommended.

You are now ready for Qt software development!
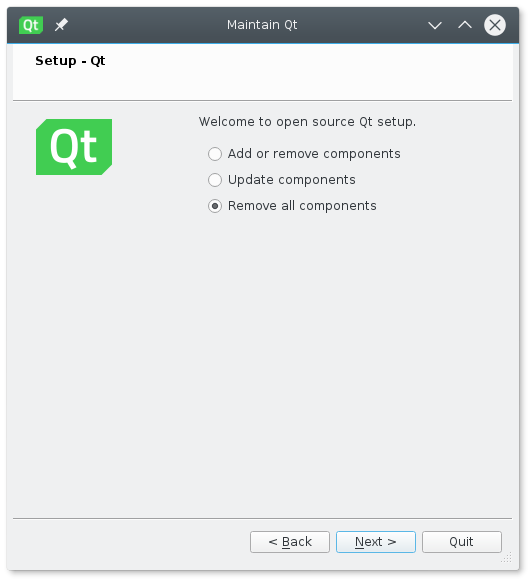
If you want to update, add or remove any components, you can run the maintenance tool, which can be found under the install directory as MaintenanceTool.
Earlier Versions
This section describes PyQt version 3 (for Qt 3).
PyQt implements around 300 classes and over 5,750 functions and methods including:
- a substantial set of GUI widgets
-
classes for accessing SQL databases (ODBC, MySQL, PostgreSQL, Oracle)
-
QScintilla, Scintilla-based rich text editor widget
- data aware widgets that are automatically populated from a database
- an XML parser
- SVG support
- classes for embedding ActiveX controls on Windows (only in commercial version)
Earlier versions of PyQt included a graphical debugger called eric, written using PyQt, which can be used to debug PyQt and ordinary Python console applications. It’s now available separately as eric4 from http://eric-ide.python-projects.org/index.html.
PyQt includes pyuic which generates Python code from GUI designs created with Qt Designer. This makes PyQt very useful as a rapid prototyping tool for applications that will eventually be (partly or completely) implemented in C++ because the user interface designs can be re-used without modification.
Getting updates
To update both the qt5.git repo as well as the submodules to the list of revisions that are known to work, run
$ git pull
$ perl init-repository -f
In addition, you should pass the same parameters to init-repository as you did in .
Unlike a «normal» git submodule update, this ensures that any changes to the module structure are automatically pulled as well.
If you are planning to do nightly builds, consider using the script qt5_tool that lives in qtrepotools/bin. It provides options for updating the repository, cleaning and building. For example, qt5_tool -u -c -b can be used to clean, update and build. qt5_tool -p -c -b would be used to pull all modules to the head of their master branches.
Depending upon what changed in the source since it was last updated you might have to run configure again. The safe thing to do is to always run config.status -recheck-all in the build directory after updating.
- Hint1: The submodule update does a checkout in submodules, potentially hiding any local commits you’ve done. If the latter happened to you (and you haven’t been working with branches anyhow), git reflog is your friend.
- Hint2: When creating scripts for updates on Windows, note that git clean often fails if some process locks a file or folder.
Links
CameronLaird’s personal notes on Python GUIs http://phaseit.net/claird/comp.lang.python/python_GUI.html includes over 25 links to toolkits and techniques for connecting python with a GUI.
Opendocs previously had some material on Qt programming with Python for on-line reading, but ownership of the domain appears to have lapsed. An online version of Boudewijn Rempt’s book about PyQt for Qt 3, GUI Programming with Python: QT Edition, is still available. An up-to-date book covering PyQt4, Rapid GUI Programming with Python and Qt by Mark Summerfield, is now available in print and as an online «rough cut». More details can be found on the PyQt Wiki.
— Wikipedia article describing several IDE’s and GUI Builders.
Getting the source code
First clone the top-level Qt 5 git repository:
$ git clone git://code.qt.io/qt/qt5.git
or (if you’re behind a firewall and want to use the https protocol):
$ git clone https://code.qt.io/qt/qt5.git
Then check out the target branch (see Branch Guidelines):
$ cd qt5
$ git checkout v5.12
Getting the submodule source code
Relevant options for init-repository:
- --module-subset=default,-qtwebengine : Consider skipping the web module (Qt WebEngine) by passing this option. It is quite big and takes a long time to compile (and is often a source of compile errors), so it is recommended to only download it if you intend to use it. You can always re-run init-repository later on to add it.
- --branch : Check out the branch tips instead of the SHA1s of the latest successful integration build.
- --codereview-username <Jira/Gerrit username> : If you plan to contribute to Qt, you may specify your codereview username (pay attention to capitalization!) so that the git remotes are properly set up. Note that it is recommended to adjust your ssh configuration instead.
$ cd qt5
$ perl init-repository
In order to build a specific release of Qt, you can checkout the desired tag:
$ cd qt5
$ git checkout v5.12.0
$ perl init-repository
Note: init-repository is currently unable to initialize tags that are too old. An alternative way to build a specific release or branch of Qt5 (although without linking of the gerrit account for code reviewing) is to use git submodule update --init in place of the init-repository script. That translates to:
$ git clone https://code.qt.io/qt/qt5.git                     # cloning the repo
$ cd qt5
$ git checkout v5.8.0                                         # checking out the specific release or branch
$ git submodule update --init --recursive                     # updating each submodule to match the supermodule
More information can be found in Get The Source.
The Meta Object
Qt provides a meta-object system. Meta-object (literally «over the object») is a way to achieve some programming paradigms that are normally impossible to achieve with pure C++ like:
- Introspection : capability of examining a type at run-time
- Asynchronous function calls
To use such meta-object capabilities in an application, one can subclass and mark it so that the meta-object compiler (moc) can interpret and translate it.
Code produced by moc includes signals and slots signatures, methods that are used to retrieve meta-information from those marked classes, properties handling… All this information can be accessed using the following method:
const QMetaObject * QObject::metaObject () const
class contains all the methods that deal with meta-objects.
Important macros
The most important macro is Q_OBJECT. Signal-Slot connections and their syntax cannot be interpreted by a regular C++ compiler. The moc is provided to translate the QT syntax like «connect», «signals», «slots», etc into regular C++ syntax.
This is done by specifying the Q_OBJECT macro in the header containing class definitions that use such syntax.
mywidget.h
class MyWidget  public QWidget
{
 Q_OBJECT
 public
  MyWidget(QWidget *parent = );
}
Others marker macros for moc are
- signals
- public / protected / private slots
that mark the different methods that need to be extended.
SIGNAL and SLOT are also two very important and useful macros. When a signal is emitted, the meta-object system is used to compare the signature of the signal, to check the connection, and to find the slot using it’s signature. These macros are actually used to convert the provided method signature into a string that matches the one stored in the meta-object.
Примечания
- ↑ (англ.). Сайт Nokia. Дата обращения 10 мая 2010.
- ↑ (англ.). Сайт PyQt. Дата обращения 10 мая 2010.
- (англ.). Сайт PyQt. Дата обращения 10 мая 2010.
- (англ.). Сайт Eric IDE. Дата обращения 10 мая 2010.
- (англ.). Python Wiki. Дата обращения 10 мая 2010.
- (англ.). Python Wiki. Дата обращения 10 мая 2010.
- (англ.). Nokia. Дата обращения 10 мая 2010.
- (англ.). Сайт PyQt. Дата обращения 14 августа 2010.
- ↑ (англ.). KDE.news. Дата обращения 13 августа 2010.
- (англ.). Сайт PyQt. Дата обращения 10 мая 2010.
- (англ.). Сайт PySide. Дата обращения 10 мая 2010.
- ↑
- (англ.). Сайт PyQt. Дата обращения 10 мая 2010.
- (англ.). Сайт PyQt. Дата обращения 10 мая 2010.
- (англ.). Сайт PyQt. Дата обращения 2 июля 2013.
Qt for Python
Официальный логотип Qt for Python.
PySide
Модуль был выпущен в середине июня 2018 года как Technical Preview (с поддержкой Qt 5.11), и в декабре 2018 года он был официально выпущен для Qt 5.12 без тега Technical Preview tag.
Эта вики-страница отслеживает прогресс разработки проекта Qt for Python и предоставляет сопутствующую дополнительную информацию.
| Linux | macOS | Windows | ||||
|---|---|---|---|---|---|---|
| 32bit | 64bit | 32bit | 64bit | 32bit | 64bit | |
| Python 2.7 | * | * | ** | ** | ||
| Python 3.5+ | * | * | *** | *** |
*: No Qt release.
**: Проблема MSVC с Python 2.7 и Qt.
***: 5.14 не будет работать на Windows с Python 3.8.0, пожалуйста, используйте Python 3.8.1 или выше.
Установите PySide2 через pip, запустив: pip install PySide2
Как это выглядит?
1 import sys
2 from PySide2.QtWidgets import QApplication, QLabel
3
4 if __name__ == "__main__":
5     app = QApplication(sys.argv)
6     label = QLabel("Hello World")
7     label.show()
8     sys.exit(app.exec_())
Traditional syntax: SIGNAL () and SLOT()
QtCore.SIGNAL() and QtCore.SLOT() macros allow Python to interface with Qt signal and slot delivery mechanisms.
This is the old way of using signals and slots.
The example below uses the well known clicked signal from a QPushButton.
The connect method has a non python-friendly syntax.
It is necessary to inform the object, its signal (via macro) and a slot to be connected to.
 1 import sys
 2 from PySide2.QtWidgets import QApplication, QPushButton
 3 from PySide2.QtCore import SIGNAL, QObject
 4
 5 def func():
 6     print("func has been called!")
 7
 8 app = QApplication(sys.argv)
 9 button = QPushButton("Call func")
10 QObject.connect(button, SIGNAL ('clicked()'), func)
11 button.show()
12
13 sys.exit(app.exec_())
Установка (Linux / Mac OS X)
Примечание: Установка будет необходима только если вы не использовали опции -developer-build или -prefix «%PWD%/qtbase». В противном случае вы можете просто пользоваться Qt из каталога сборки.
Для установки, выполните
make install
Но если вы желаете провести установку в нестандартный каталог, для того чтобы протестировать Qt5, вам необходимо описать где будет находиться каталог bin вашей установки в переменной PATH. Также вы должны или удостовериться, что не имеете переменнной среды QTDIR, или опишите в этой переменной путь установки перед тем как будете выполнять make install. Например, при установке в /opt/qt5 (это предполагает, использование bash; для csh-подобных оболочек вы должны будете сначала выполнить setenv эквиваленты):
PATH=/optqt5$PATH QTDIR=/optqt5 make install
Примеры программ
Программа Hello, world!
Стандартный минималистичный пример, дающий представление о PyQt. Программа показывает пустое окно, обладающее базовыми функциями — изменение размера, сворачивание, разворачивание:
#! /usr/bin/env python2
# -*- coding: utf-8 -*-
#
import sys
from PyQt4.QtGui import * # компоненты интерфейса

# Каждое приложение должно создать объект QApplication
# sys.argv - список аргументов командной строки
application = QApplication(sys.argv)

# QWidget - базовый класс для всех объектов интерфейса
# пользователя; если использовать для виджета конструктор
# без родителя, такой виджет станет окном
widget = QWidget()

widget.resize(320, 240) # изменить размеры виджета
widget.setWindowTitle("Hello, World!") # установить заголовок
widget.show() # отобразить окно на экране

sys.exit(application.exec_()) # запуск основного цикла приложения
|
|
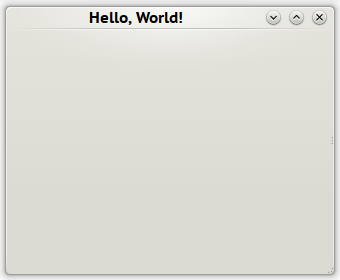 Результат выполнения программы в Linux с KDE
Более сложный пример
В этом примере показаны принципы создания более серьёзных программ. Используется Python 3 и Qt Designer. Применяется объектно-ориентированный подход, позволяющий разделить визуальное представление и логику программы.
Состав программы:
- test.pyw — главный файл, запускающий программу.
- mainform.py — файл описания главного окна.
- mainform.ui — файл, содержащий автоматически сгенерированное при помощи Qt Designer описание главного окна. В программе Qt Designer был создан проект, основанный на QDialog и выбраны 2 элемента: кнопка с именем pushButton, текстовая метка с именем label.
Содержание файла test.pyw:
#! /usr/bin/env python3
#
import sys
from PyQt4 import QtCore, QtGui # подключает основные модули PyQt
import mainform # подключает модуль описания формы

def main():
    app = QtGui.QApplication(sys.argv)  # создаёт основной объект программы
    form = mainform.MainForm()  # создаёт объект формы
    form.show()  # даёт команду на отображение объекта формы и содержимого
    return app.exec()  # запускает приложение

if __name__ == "__main__"
    sys.exit(main())
Содержание файла mainform.py:
#! /usr/bin/env python3
#
from PyQt4 import QtCore, QtGui, uic # подключает основные модули PyQt

# прототип главной формы
class MainForm(QtGui.QDialog):

    # конструктор
    def __init__(self):
        super(MainForm, self).__init__()

        # динамически загружает визуальное представление формы
        uic.loadUi("mainform.ui", self)

        # связывает событие нажатия на кнопку с методом
        self.connect(self.pushButton, QtCore.SIGNAL("clicked()"),
            self.setLabelText)

    def setLabelText(self):
        self.label.setText("New label text")
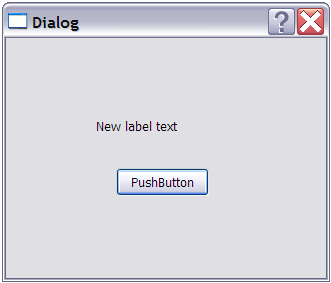 Результат выполнения программы в Windows XP
В этом примере довольно простая функциональность, представленная методом setLabelText. Однако при необходимости реализовать более сложную обработку поступающих данных, целесообразно вынести эту обработку в отдельный модуль (файл).
Introduction to Qt
Qt (pronounced as «cute», not «cu-tee») is a cross-platform framework that is usually used as a graphical toolkit, although it is also very helpful in creating CLI applications. It runs on the three major desktop OSes, as well as on mobile OSes, such as Symbian, Nokia Belle, Meego Harmattan, MeeGo or BB10, and on embedded devices. Ports for Android (Necessitas) and iOS are also in development.
Qt has an impressive collection of modules, including
- QtCore, a base library that provides containers, thread management, event management, and much more
- QtGui and QtWidgets, a GUI toolkit for Desktop, that provides a lot of graphical components to design applications.
- QtNetwork, that provides a useful set of classes to deal with network communications
- QtWebkit, the webkit engine, that enable the use of web pages and web apps in a Qt application.
- QtSQL, a full featured SQL RDBM abstraction layer extensible with own drivers, support for ODBC, SQLITE, MySQL and PostgreSQL is available out of the box
- QtXML, support for simple XML parsing (SAX) and DOM
- QtXmlPatterns, support for XSLT, XPath, XQuery and Schema validation
Getting Started with PyQt
PyQt5:
-
PyQt5 Tutorial — Python GUI with Qt — A complete tutorial covering all widgets and more.
-
15 Minute Apps — «A collection of 15 small — minute — desktop applications written in Python using the PyQt framework.»
-
Learn PyQt — PyQt5 tutorial series, regularly updated basic concepts through to multithreading and custom widgets — Martin Fitzpatrick
PyQt4:
-
PyQT4 Tutorial — A step by step PyQt4 tutorial
-
ZetCode’s PyQT4 tutorial — Another step by step PyQt4 tutorial
-
Introducing PyQt4 for GUI Application Development — a talk presented at EuroPython 2006
-
Creating GUI Applications with PyQt and Qt Designer — a talk presented at PyCon UK 2007
-
PyQt by devendra laulkar @ Barcamp pune3 — a video of a short introduction to PyQt
-
An Introduction to PyQt: creating GUIs with Python’s QT bindings — first published the December 2007 issue of Python Magazine
-
write a web browser by python — Creating a WebKit-based browser with PyQt
Articles that seem to be no longer online:
-
PyQt4 Lab 1 — Creating a simple editor window in Qt 4.
-
PyQT Webkit Browser in 2 minutes — a screencast on YouTube
-
PyQt4 by Example — By Roberto Alsina
-
The PyQt Intro — a series of introductory articles in tutorial format
-
Qt Designer video tutorial — By Guyon Morée
-
PyQT-tutorial — Similar to below’s «uses Qt Designer, very good for beginners.», but this one’s for PyQt4
-
PyQt basics — Nelson Mimura Gonzalez — Aug 3, 2012 (articles page here) This document aims at rapidly introducing PyQt from installation to basic usage.
Authors, please fix the links and move them back into the section above.
The Performance Analyzer
You may have heard about the Performance Analyzer (called «CPU Usage Analyzer» in Qt Creator 4.6 and earlier). It is all about profiling applications using the excellent «perf» tool on Linux. You can use it locally on a Linux-based desktop system or on various embedded devices. perf can record a variety of events that may occur in your application. Among these are cache misses, memory loads, context switches, or the most common one, CPU cycles, which periodically records a stack sample after a number of CPU cycles have passed. The resulting profile shows you what functions in your application take the most CPU cycles. This is the Performance Analyzer’s most prominent use case, at least so far.
Issues
Linux
Try installing the libx11-xcb-dev package:
$ sudo apt-get install libx11-xcb-dev
afterwards you have to re-run configure and force qtbase/src/plugins/platforms/xcb to recompile.
on Fedora:
$ su - -c "yum install libicu-devel"
- You can also compile Qt without Qt WebKit by deleting / renaming the qtwebkit, qtwebkit-examples-and-demos directories.
Qt D-Bus fails to build due to «inconsistent user-defined literal suffixes»
This occurs when you attempt to build Qt 5 with GCC 4.7 while D-Bus < 1.4.20 is present on your system. (For example, the default Fedora 17 installation is prone to this error.) The error message is this:
qdbusinternalfilters.cpp:124:36: error: inconsistent user-defined literal suffixes ‘DBUS_INTROSPECT_1_0_XML_PUBLIC_IDENTIFIER’ and ‘DBUS_INTROSPECT_1_0_XML_SYSTEM_IDENTIFIER’ in string literal
Solution: either upgrade to a newer version of D-Bus or edit that one line of the header file manually.
…::isNull is not defined (from qvariant_p.h)
C++11 support is detected while your GCC doesn’t properly support it. Fixed by passing -no-c11 to the configure options.
Touchscreen (or Wacom tablet) doesn’t work
Qt depends on having libxi (including development headers), supporting XInput protocol 2.2 or higher, available at build time in order to have multi-touch support. Otherwise configure will fall back to XInput 2.0 which does not support touchscreens. To prove that is the problem, try this:
$ export QT_XCB_DEBUG_XINPUT_DEVICES=1
and try your Qt application again. At startup, Qt will enumerate the input devices available, like this
XInput version 2.2 is available and Qt supports 2.2 or greater
input device … (keyboard, mouse etc.) …
input device Advanced Silicon S.A CoolTouch System
has valuator "Abs MT Position X" recognized? true
has valuator "Abs MT Position Y" recognized? true
has touch class with mode 1
it's a touchscreen with type 0 capabilities 0x21 max touch points 10
If it does not say Qt supports 2.2 or greater, it means the headers weren’t available when Qt was built, so the support for touch was not included. If you do have 2.2 or greater but it doesn’t say it’s a touchscreen at the end, there may be some other problem such that the touchscreen is not recognized, and you may want to write up a bug, after verifying that touch works in other X11 applications.
Windows
Note that if you’re shadow-building Qt, the source directory and build directory must be on the same drive, nested equally deeply. Also, make sure there are no old build artifacts in the source directory.
Examples
Responding to an event
Remember our button app? Let’s try to actually make something with this app, like being able to close it while clicking on the button. We already know that provides the clicked signal. We also have to know that provides the quit slot, that closes the application.
In order to make a click on a button close the app, we have to connect the signal clicked of the button to the quit slot of QApplication instance. We can modify the code from the previous chapter to do this, but before that, you might wonder how to access to the QApplication instance while you are in another class. Actually, it is pretty simple, since there exists a static function in , with the following signature, that is used to get it:
QApplication * QApplication::instance()
This leads to the following modification of our previous code:
window.cpp
#include "window.h"

#include <QApplication>
#include <QPushButton>

Window::Window(QWidget *parent)
 QWidget(parent)
 {
  // Set size of the window
  setFixedSize(100, 50);

  // Create and position the button
  m_button = new QPushButton("Hello World", this);
  m_button->setGeometry(10, 10, 80, 30);

  // NEW : Do the connection
  connect(m_button, SIGNAL (clicked()), QApplication::instance(), SLOT (quit()));
 }
While clicking on the button inside of the window, the application should quit.
Qt for Python
Qt for Python official logo.
PySide
The module was released mid June 2018 as a Technical Preview (supporting Qt 5.11),
and it was officially released without the Technical Preview tag, in December 2018 for Qt 5.12.
This wiki page tracks the progress of the Qt for Python project development and provides further information concerning the effort.
| Linux | macOS | Windows | ||||
|---|---|---|---|---|---|---|
| 32bit | 64bit | 32bit | 64bit | 32bit | 64bit | |
| Python 2.7 | * | * | ** | ** | ||
| Python 3.5+ | * | * | *** | *** |
*: No Qt release.
**: MSVC issue with Python 2.7 and Qt.
***: 5.14 will not work on Windows with Python 3.8.0, please use Python 3.8.1 or greater.
Get PySide2 via pip by running: pip install PySide2
What does it look like?
1 import sys
2 from PySide2.QtWidgets import QApplication, QLabel
3
4 if __name__ == "__main__":
5     app = QApplication(sys.argv)
6     label = QLabel("Hello World")
7     label.show()
8     sys.exit(app.exec_())
Using trace points for profiling
After creating the trace points, you need to tell Qt Creator to use them for profiling. There is a convenient shortcut for this in the Performance Analyzer Settings. You can access the settings either for your specific project in the «Run» settings in «Projects» mode, or globally from the «Options» in the «Tools» menu. Just select»Use Trace Points». Then Qt Creator will replace your current event setup with any trace points it finds on the target system, and make sure to record a sample each time a trace point is hit.

After this, you only need to press the «Start» button in the profiler tool bar to profile your application. After the application terminates, Qt Creator collects the profile data and displays it.
Известные программы, использующие PyQt
- Cura — приложение нарезки 3D-модели для 3D-принтеров с открытым исходным кодом.
- Electrum — популярный open-source Bitcoin криптокошелек.
- Arduino IDE — реализация Arduino на PyQt.
- Jabbim — кроссплатформенная открытая программа мгновенного обмена сообщениями по протоколу XMPP.
- Eric IDE — интегрированная среда разработки для Python;
- GNS3 — графический симулятор сети.
- Anki — программа для облегчения запоминания слов, выражений и любой другой информации с помощью интервальных повторений.
- Calibre, приложение для управления электронными книгами
- Dropbox, файлообменник
- fman, кроссплатформенный файловый менеджер
- Kodos, Отладчик регулярных выражений Python
- Leo, планировщик и редактор грамотного программирования
- Ninja-IDE, расширяемая среда разработки Python с открытым исходным кодом
- OpenLP, программа проекции текстов с открытым исходным кодом
- OpenShot, программа для редактирования видео
- Orange, структура интеллектуального анализа данных и визуализации
- Puddletag, кроссплатформенный редактор тегов ID3 с открытым исходным кодом
- QGIS, бесплатное программное обеспечение для настольных систем Geographic Information Systems (GIS)
- qt-recordMyDesktop, Интерфейс Qt4 для recordMyDesktop
- Spyder, Python Data Science IDE
- TortoiseHg, графический интерфейс для программы управления источниками Mercurial (Hg)
- Veusz, научное приложение для черчения
Transmitting information with signals and slots
Here is a simpler example for information transmission. It only displays a progress bar and a slider (created by ) inside a window, and while the slider is moved, the value of the progress bar is synced with a very simple connection.
The interesting signals and slots are:
void QSlider::valueChanged(int value);
void QProgressBar::setValue(int value);
QSlider automatically emits the signal valueChanged with the new value passed as a parameter when the value is changed, and the method setValue of QProgressBar, is used, as we have seen, to set the value of the progress bar.
This leads to the following code:
#include <QApplication>
#include <QProgressBar>
#include <QSlider>

int main(int argc, char **argv)
{
 QApplication app (argc, argv);

 // Create a container window
 QWidget window;
 window.setFixedSize(200, 80);

 // Create a progress bar
 // with the range between 0 and 100, and a starting value of 0
 QProgressBar *progressBar = new QProgressBar(&window);
 progressBar->setRange(, 100);
 progressBar->setValue();
 progressBar->setGeometry(10, 10, 180, 30);

 // Create a horizontal slider
 // with the range between 0 and 100, and a starting value of 0
 QSlider *slider = new QSlider(&window);
 slider->setOrientation(Qt::Horizontal);
 slider->setRange(, 100);
 slider->setValue();
 slider->setGeometry(10, 40, 180, 30);

 window.show();

 // Connection
 // This connection set the value of the progress bar
 // while the slider's value changes
 QObject::connect(slider, SIGNAL (valueChanged(int)), progressBar, SLOT (setValue(int)));

 return app.exec();
}
Widgets
Radio button is a standard GUI component. It is often used to make a unique choice from a list. In Qt, the is used to create radio buttons.
Thanks to a nice heritance, a QRadioButton behaves just like a QPushButton. All properties of the QPushButton are also the same in the QRadioButton, and everything that was learned in the second chapter can be reused here.
- text
- icon
- tooltip
- …
By default, QRadioButtons are not grouped, so many of them can be checked at the same time. In order to have the «exclusive» behaviour of many radio buttons, we need to use . This class can be used like this: We allocate a new button group and attach it to the parent object. Note that the parent object might be the mainwindow, or «this»:
QButtonGroup *buttonGroup = new QButtonGroup(object);

// Add buttons in the button group
buttonGroup->addButton(button1);
buttonGroup->addButton(button2);
buttonGroup->addButton(button3);
...
What we want is to create a menu picker. In a window, a list of yummy plates should be displayed with radio buttons, and a push button that is used to select the chosen plate should be displayed.
Obviously, nothing will happen (now) when the buttons are clicked.


