Блочные устройства qemu
Содержание:
Reclaim disk space from a sparse image file (qcow2/ vmdk)
Category : How-to
Get Social!
 Sparse disk image formats such as qcow2 only consume the physical disk space which they need. For example, if a guest is given a qcow2 image with a size of 100GB but has only written to 10GB then only 10GB of physical disk space will be used. There is some slight overhead associated, so the above example may not be strictly true, but you get the idea.
Sparse disk image files allow you to over allocate virtual disk space – this means that you could allocate 5 virtual machines 100GB of disk space, even if you only have 300GB of physical disk space. If all the guests need 100% of their 100GB disk space then you will have a problem. If you use over allocation of disk space you will need to monitor the physical disk usage very carefully.
There is another problem with sparse disk formats, they don’t automatically shrink. Let’s say you fill 100GB of a sparse disk (we know this will roughly consume 100GB of physical disk space) and then delete some files so that you are only using 50GB. The physical disk space used should be 50GB, right? Wrong. Because the disk image doesn’t shrink, it will always be 100GB on the file system even if the guest is now using less. The below steps will detail how to get round this issue.
Другие решения
Некоторые предприятия используют такую программу, как «Склад и реализация». Она разработана не только для обобщения информации, получаемой с обычных участков хранения компании. Прикладное решение можно использовать для учета сведений, поступающих с внешних складов, имеющих структуру онлайн-магазина. Приложение позволяет обслуживать заказы по телефону и электронной почте.
Программа «Склад+», как гласят отзывы, довольно простая и удобная. В ней присутствует весь необходимый набор опций. С помощью приложения легко создаются приходные и расходные документы, печатаются накладные, счета-фактуры и прочие бумаги. Кроме этого, прикладное решение осуществляет расчет продажных цен с заданными коэффициентами.
Программа «Склад 2005» разработана для обобщения информации на малых предприятиях, ведущих торговую деятельность. В ней можно формировать отчеты по хранящейся продукции, движению изделий и денег. Приложение построено по модели мультивалютного учета. В нем можно составлять таблицы валютных курсов.
Программа «Складской учет товаров» используется для оперативного отражения информации. С помощью приложения пользователь отслеживает остатки материалов и продукции, получает отчеты на любую интересующую дату. Обобщение сведений осуществляется на основании карточек.
Программа «ОК-Склад» является достаточно мощным приложением. Прикладное решение подходит для производственных и торговых предприятий. В программе присутствует полный набор необходимых функций. Одним из достоинств приложения считается его интерфейс. Он понятен и удобен для пользователя.
Networking
QEmu provides two modes of networking. In both modes, a virtual network adapter is created inside Windows XP guest.
User mode networking
In user mode networking, QEmu manages network interface internally in the user mode emulator application. QEmu provides DHCP host which assigns a dynamic IP for the guest OS. TCP and UDP ports can be redirected from the host OS to the guest OS using QEmu command line parameters.
         QEMU VLAN      <------>  Firewall/DHCP server <-----> Host network
                           |          (10.0.2.2)
                           |
                           ---->  DNS server (10.0.2.3)
                           |
                           ---->  SMB server (10.0.2.4)
Pros
Easy to set up
Cons
- Only TCP and UDP connections are available by default. Ping command, for example, doesn’t work inside the guest OS
- Incoming connections must be configured beforehand
TAP network
In TAP networking, QEmu connects the guest OS ethernet to the host OS using TAP network bridge. Linux creates a network interface (tap0) which appears in the ip addr listing, as do other interfaces. Furthermore, it is possible to bridge network traffic to the guest OS using normal Linux network bridging functionalities.
For examples, see following pages
Pros
Provides full emulated IP stack
Cons
Difficult to set up. The set-up is especially cumbersome if you try to run QEmu without root privileges.
VDE and Dnsmasq
This is an alternative to TAP networking. Most of this is from the page and http://compsoc.dur.ac.uk/~djw/qemu.html.
Caution: The following package, «dnsmasq» provides dns, tftp and dhcpd services. An LTSP standalone server would be affected because dnsmasq would interfere with the dhcpd and tftp services.
* Install the packages vde dnsmasq:
sudo apt-get install vde dnsmasq
* In the file /etc/sysctl uncomment the following line to allow IP forwarding:
net.ipv4.conf.default.forwarding=1
* In the file /etc/modules, add a new line with «tun», to make that module load on boot.
* Add the new network interface. Edit the file /etc/network/interfaces and paste this:
auto qtap0
iface qtap0 inet static
        address 10.111.111.254
        netmask 255.255.255.0
        pre-up /sbin/modprobe ipt_MASQUERADE
        pre-up /usr/bin/vde_switch --tap qtap0 --sock /var/run/vde.ctl  \
                                   --daemon --group vde2-net --mod 775  \
                                   --mgmt /var/run/vde.mgmt --mgmtmode 770  \
                                   --pidfile /var/run/vde_switch.pid
        pre-up /etc/init.d/dnsmasq restart
        up iptables -t nat -A POSTROUTING -o eth0 -j MASQUERADE
        down iptables -t nat -D POSTROUTING -o eth0 -j MASQUERADE
        post-down kill -s HUP `cat /var/run/vde_switch.pid`
Temporary vdeq control sockets are created in /tmp, the vde_switch socket in /var/run/vde.ctl/ , and the management socket is /var/run/vde.mgmt .
More info about vde_switch (VDE): http://wiki.virtualsquare.org/index.php/VDE
* Configure DNSmasq. Edit the file /etc/dnsmasq.conf and change the following options:
user=nobody
domain=qemu.lan
interface=qtap0
dhcp-range=10.111.111.1,10.111.111.253,255.255.255.0,10.111.111.255,8h
To avoid the need for root privileges add the group «vde2-net» to all users that will use VDE (log-out and log-in for this to take effect)
sudo usermod -aG vde2-net $USER
Either restart the PC or simply do:
sudo sh -c "echo 1 > /proc/sys/net/ipv4/ip_forward"
sudo modprobe tun
sudo ifup qtap0
Then you will have a virtual network on qtap0 interface. VM will be able to connect to the Internet (because of the iptable line on /etc/network/interfaces), but will not be accessible from it.
To run a VM with the virtual network use vdeqemu instead of qemu:
vdeqemu -net vde,vlan=0 -net nic,vlan=0 -m 384 -boot c windows.img
In Karmic, there is no vdeqemu, rather, package vde2 provides a simple wrapper. Instead of the above command, substitute vdeqemu with vdeq qemu, or vdeq qemu-system-x86_64, and then the rest of your options, thus:
vdeq qemu -net vde,vlan=0 -net nic,vlan=0 -m 384 -boot c windows.img
or if using a 64-bit host,
vdeq qemu-system-x86_64 -net vde,vlan=0 -net nic,vlan=0 -m 384 -boot c windows.img
See for more details on using qemu-launcher and qemuctl with VDE and KVM hardware virtualisation
QEMU 4.2.
QEMU 4.2 выпущен со многими улучшениями для виртуализации Linux.
В ПО есть много изменений, которые завершатся к концу 2019 году. Перечислим некоторые моменты обновления ведущего эмулятора с открытым исходным кодом:
- Поддержка расширений Intel AVX-512 BFloat16 (BF16).
- В последних обновлениях всех моделей процессоров расширения TSX (Transactional Synchronization Extensions) по умолчанию отключены. Это связано с недавней уязвимостью TSX Async Abort / Zombieload Variant Two.
- Лучшая производительность для эмуляции Tiny Code Generator (TCG) ядер ARM.
- Еще одно улучшение, производительности утилиты может появиться в недавних библиотеках Gcrypt и Nettle. Теперь QEMU использует собственный режим шифрования библиотеки XTS. В результате, наблюдается значительное повышение производительности для шифрования AES-XTS
- Драйвер блока LUKS теперь поддерживает Falloc
- Поддержка на ARM
- Поддержка модели ASpeed AST2600.
- Arm SVE (Scalable Vector Extensions) теперь поддерживается гостевыми KVM
QEMU 4.0 — запущен только в апреле 2019 года, и уже активно разрабатывается v. 5.0, чтобы сменить v. 4.2.
На момент написания статьи известно не много, но все же перечислим на каких функциях делается упор на поддержку:
- устройств VirtIO IOMMU,
- XIVE для гостей POWER KVM
- ioctl часов реального времени
Если исходить из четырехмесячного темпа релиза, то выпуск QEMU 5.0 состоится скорее всего, в апреле 2020.
Sheepdog disk images
Sheepdog is a distributed storage system for QEMU. It provides highly
available block level storage volumes that can be attached to
QEMU-based virtual machines.
You can create a Sheepdog disk image with the command:
qemu-img create sheepdog///IMAGE SIZE
where IMAGE is the Sheepdog image name and SIZE is its
size.
To import the existing FILENAME to Sheepdog, you can use a
convert command.
qemu-img convert FILENAME sheepdog///IMAGE
You can boot from the Sheepdog disk image with the command:
qemu-system-x86_64 sheepdog:///IMAGE
You can also create a snapshot of the Sheepdog image like qcow2.
qemu-img snapshot -c TAG sheepdog///IMAGE
where TAG is a tag name of the newly created snapshot.
To boot from the Sheepdog snapshot, specify the tag name of the
snapshot.
qemu-system-x86_64 sheepdog:///IMAGE#TAG
You can create a cloned image from the existing snapshot.
qemu-img create -b sheepdog///BASE#TAG sheepdog:///IMAGE
where BASE is an image name of the source snapshot and TAG
is its tag name.
You can use an unix socket instead of an inet socket:
qemu-system-x86_64 sheepdog+unix:///IMAGE?socket=PATH
If the Sheepdog daemon doesn’t run on the local host, you need to
specify one of the Sheepdog servers to connect to.
Что такое QEMU?
Не будет преувеличением сказать, что виртуализация — это очень востребованная в настоящее время технология. Сегодня по запросу слова виртуализация в поисковой системе выдается примерно 22 миллиона результатов. Например, только за один месяц корпорация EMC объявила о выводе на рынок ценных бумаг подразделения VMware, Citrix System объявила о планах покупки XenSource, появилось множество новых компаний в сегменте виртуализации. На этом, как оказалось, колоссальном рынке постоянно обнаруживаются новые ниши. Но за всеми разговорами о первоначальных публичных предложениях и поглощениях в области виртуализации в эти дни легко забыть о некоторых других уже существующих технологиях виртуализации.
В этой статье будет представлено одно из наиболее интересных приложений виртуализации, не фигурирующее на первых полосах новостей — QEMU. QEMU — это приложение, которое можно применять для многих целей. Его можно использовать для виртуализации гостевой операционной системы или в качестве полнофункционального машинного эмулятора, запускающего операционные системы, предназначенные для процессора хост-системы или других процессорных архитектур.
Upload OVA to Proxmox/ KVM
Category : How-to
Get Social!
Proxmox does not have native support for an OVA template which is surprising considering it’s the open format for creating packaged virtual machines, or virtual appliances as they are often referred.
We can still get an OVA template running in Proxmox but it will take a little bit of work to transform it into a functional VM.
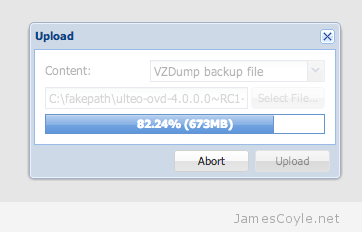
First off, lets get the OVA file uploaded to the Proxmox server; you can do this using SCP or the Proxmox web GUI. If you use the Proxmox web GUI you will need to rename the OVA to end in a iso extension and upload it as a ISO image content. Depending on the size of the OVA file and the bandwidth you have available, it may take a while to upload the file. The file will then be available in the dump folder in the selected storage.
SSH onto your Proxmox server and locate the OVA file. An OVA file is simply a tar file containing an image file and some configuration for things like CPU, RAM, etc. Run the tar command to extract the components of the OVA file onto your file system.
tar - my.ovf
The output will be two or more files – one will be an OVF file which contains the settings and configuration of the virtual machine and one or more files will be VMDKs which are the disk images of the virtual machine.
Although you can run a VMDK file in Proxmox, it’s recommended to use qcow2 which is the default file format for Proxmox virtual machines. Run the VMDK file through the converter – note this can take a while with large files.
qemu-img convert -f vmdk myvm-disk1.vmdk -O qcow2 myvm-disk1.qcow2
We now need to get the image into a VM with some hardware so that we can begin to use it. This is where things get tricky – the OVF file is not compatible with Proxmox and needs to be manually understood. The principle here is we are going to use the Proxmox web GUI to create a VM and replace the empty disk image which is created with our recently converted qcow2 image.
You can use vi to open the OVF file and understand some of the basic settings which are required for the VM. Open the OVF file and look for the following XML tags:
- OperatingSystemSection
- VirtualHardwareSection
- Network
- StorageControllers
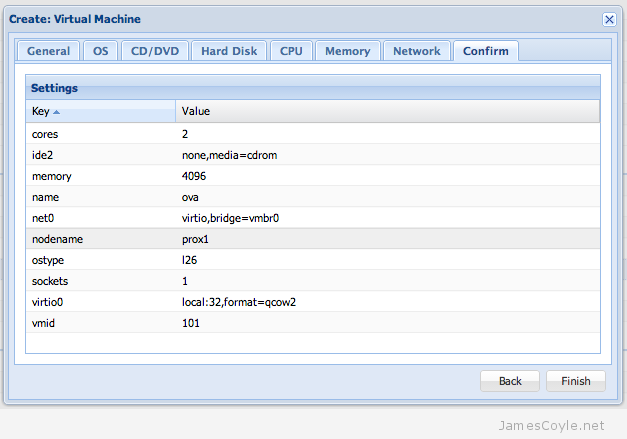
You should be able to get a rough idea of the requirements for the KVM. In the Proxmox web GUI, click on Create VM and create a VM which meets the requirements of the image you converted. Make sure that you select qcow2 for the disk format. After clicking Finish an empty VM will be created – in this example I used local storage and VMID 101 so the disk images are stored in /var/lib/vz/images/101.
Copy the previously converted qcow2 image over the existing image – be sure to overwrite the existing image otherwise your image will not be used and KVM will try to start with a blank, empty image.
mv /tmp/myvm-disk1.qcow2 /var/lib/vz/image/101/vm-101-disk-1.qcow2
Debugging tips
Command line options
-d unimp,guest_errors
(logs unimplemented features and guest errors to stdout)
-trace 'pmu_*'
(logs all PMU accesses to stdout)
-trace 'usb*'
(logs all USB accesses to stdout)
Macsbug
Macsbug can be used with Mac OS guest to tell you what exactly stopped booting. The link for it is below.
Mac OS 9.2 comes with a built-in debugger. To use it, set the OpenBIOS variable “APPL,debug”:
Via QEMU’s command-line options:
-prom-env aapl,debug=2000000
In OpenBIOS type:
dev /
2000000 encode-int *Note: the number can be replaced with the many options available
“ AAPL,debug” property
then to boot from a cd type:
boot cd:,\\:tbxi
To boot from a hard drive image:
boot hd:,\\:tbxi
Debugging qemu-system-ppc with GDB on an x86 Linux host
 ./configure -target=powerpc-linux --enable-sim-powerpc
 make && sudo make install
Launch qemu-system-ppc(64) with -s and -S. Qemu will pause and listen on port 1234 for GDB.
Set -prom-env «auto-boot?=false» —nographic on the command line for the Qemu instance to be debugged.
qemu-system-ppc -s -S -prom-env "auto-boot?=false" --nographic
Open another terminal and launch the GDB you just built:
 gdb-powerpc-linux
 target remote localhost:1234
 continue
You can set a breakpoint in GDB, like this:
break *0x20dccc
Type «boot» in the terminal running Qemu.
Under 9.04 (Jaunty)
Install package qemu and one of the qemu gui helpers (I used Qemu Launcher). Set it to create new empty image (I set it for 10Gbytes). Set to boot from CD. Set RAM size to about half your RAM (for installation I have set the same and it worked thou). Hit ‘Launch’. The system will boot from CD and install itself, make sure to hit F12 to select boot from hard disk when the first reboot occurs. Tested on : Pentium M 1.4GHz, 512M RAM (Dell Lattitude D600 laptop, Windows installed from CD accompanying this laptop, WinXP professional). No mention of any hardware virtualization in /proc/cpuinfo. And no BIOS upgrade either to enable if any. Graphic :set to Cirrus Logic compatible; Impressions : Installation takes some 12 hours in total It is surprisingly responsive even when RAM size is set to 256M. el_es
Драйвера и доводка
По окончанию процесса установки диспетчер устройств недосчитается некоторых драйверов. Предположительно, это могут быть:
Нужно скормить им драйвера из набора , что подключены через IDE CD-ROM в предыдущем разделе.
Делается это стандартно: правой кнопкой на желтый знак вопроса, обновить драйвера, путь к файлам.
Вот весь список, а это соседняя страница RedHat доков, где установка драйверов показана подробнее.
- Balloon, the balloon driver, affects the PCI standard RAM Controller in the System devices group.
- vioserial, the serial driver, affects the PCI Simple Communication Controller in the System devices group.
- NetKVM, the network driver, affects the Network adapters group. This driver is only available if a virtio NIC is configured. Configurable parameters for this driver are documented in Appendix E, NetKVM Driver Parameters.
- viostor, the block driver, affects the Disk drives group. This driver is only available if a virtio disk is configured.
Оборудование
Тут постепенно начинается область безграничных возможностей и 101 способов сделать по-своему, поэтому я покажу, как это работает у меня, а вы можете настроить более точно под свои нужды.
У меня выбран дисплей и звуковое устройство . Нет, конечно, если у вас уйма времени и желание во всем разобраться до самых тонкостей — дерзайте и пробуйте альтернативные подходы, но у меня звук взлетел, вернее завибрировал, только с такими настройками. Во второй части, посвященной прогулке по граблям и отлову багов, я расскажу об этом подробнее. В закладке видео я выставил , ибо с этой опцией, благодаря волшебному драйверу, мне удалось добиться нормального разрешения экрана.
Подключаться к ВМ можно разнообразно.
- Через графический интерфейс virt-manager
- Выбрать дисплей VNC-сервер и подключаться через vnc-клиента
- Установить Spice-клиента и подключаться через него
- К Windows можно подключиться через rdp, если включен терминальный сервер
У меня вариант 3, для Gentoo это программа
Сеть
Такой простой выбор сетевых опций дает результат превосходящий ожидания. Создаются 3 дополнительных сетевых интерфейса: virbr0, virbr0-nic, vnet0.
В создается свод правил, вот основные:
Windows ВМ:
Повторяю, все это libvirtd создает сам, ничего для этого делать не надо. В результате имеем нормальный роутинг между хостом и ВМ, можно обмениваться файлами по . Можно пойти дальше и создать шару на Windows, а на Linux хосте настроить samba, но мне это показалось избыточным.
Virtual FAT disk images
QEMU can automatically create a virtual FAT disk image from a
directory tree. In order to use it, just type:
qemu-system-x86_64 linux.img -hdb fat:/my_directory
Then you access access to all the files in the
directory without having to copy them in a disk image or to export
them via SAMBA or NFS. The default access is read-only.
Floppies can be emulated with the option:
qemu-system-x86_64 linux.img -fda fat:floppy:/my_directory
A read/write support is available for testing (beta stage) with the
option:
qemu-system-x86_64 linux.img -fda fat:floppy:rw:/my_directory
What you should never do:
Заключение
Как видно, складских программ достаточно много. Выбор будет зависеть от разных факторов. Основными критериями считаются объем продукции на складах, скорость оборота товара, количество контрагентов, необходимость составления дополнительных документов и так далее. Если говорить об универсальных приложениях, то, несомненно, самым лучшим решением будет программа «1С».
Необходимость наличия программы учета товара на складе
возникает у каждого предпринимателя. Большое разнообразие продукции является основной причиной подобного приобретения. Тем более, автоматизация предпринимательской деятельности способствует оптимизации рабочего процесса, и ведение отчетности становится намного проще и быстрее.
Программа учета на складе
предоставляет собой инструмент, функции которого позволяют контролировать и выстраивать все необходимые процессы в правильном направлении. Это закупки, хранение и реализация товара. И с помощью отличного программного обеспечения лучше заняться осуществлением подобных действий, нежели длительным и неинтересным учетом продукции вручную.
Различают такие лучшие про
граммы складского учета
, которые составляют ТОП-20:
Каждая из них имеет свои определенные функциональные возможности, преимущества и недостатки использования.
Программа
ведения учета на складе
: особенности выбора
При отборе наиболее подходящего программного обеспечения, необходимо учитывать определенные факторы, влияющие на дальнейшее его использование.
- Простой и удобный интерфейс, без яркого оформления и ненужных функций.
- Совместимость с другими подобными программами, в случае возможного перемещения или сопоставления данных.
- Вероятность приспособления программного обеспечения к определенному виду бизнеса.
- Легкость в использовании, возможность беспрепятственно решить проблему учета товара на складе.
Программы складского учета и торговли
— основные виды
Существует много различного программного обеспечения для ведения отчетности на складах предпринимателя. Они отличаются, прежде всего, возможностью установки на компьютере или с использованием сети (применение облака).
- учет собственных и комиссионных товаров;
- печать документов;
- статистика продаж и расчет прибыльности по каждому товару;
- интеграция с фискальным регистратором или другим оборудованием.
К другим относят возможность всесторонней работы с клиентской базой и обмен данными.
Плюсы и минусы
Программа складского учета на производстве
«МойСклад» имеет ряд существенных преимуществ. По , начавших свой бизнес, среди них различают возможность использования любой операционной системой и наличие специального приложения для iOS и Android. К тому же, быстрое подключение новых складов или других помещений к системе и надежность сервиса с возможностью сохранять данные без риска их потерять являются основными задачами, которые выполняет программное обеспечение.
Существуют также и недостатки этой системы. К ним относят сложный к восприятию интерфейс, невозможность удаления своего аккаунта самостоятельно, трудности с установкой сервиса под определенный бизнес. Но, несмотря на это, программа «МойСклад» постоянно обновляется и улучшается, превращая недостатки в ее преимущества.


