Файлы
Содержание:
With Statement
You can also work with file objects using the with statement. It is designed to provide much cleaner syntax and exceptions handling when you are working with code. That explains why it’s good practice to use the with statement where applicable.
One bonus of using this method is that any files opened will be closed automatically after you are done. This leaves less to worry about during cleanup.
To use the with statement to open a file:
Now that you understand how to call this statement, let’s take a look at a few examples.
You can also call upon other methods while using this statement. For instance, you can do something like loop over a file object:
You’ll also notice that in the above example we didn’t use the “file.close()” method because the with statement will automatically call that for us upon execution. It really makes things a lot easier, doesn’t it?
Mode
Including a mode argument is optional because a default value of ‘r’ will be assumed if it is omitted. The ‘r’ value stands for read mode, which is just one of many.
The modes are:
- ‘r’ – Read mode which is used when the file is only being read
- ‘w’ – Write mode which is used to edit and write new information to the file (any existing files with the same name will be erased when this mode is activated)
- ‘a’ – Append mode, which is used to add new data to the end of the file; that is new information is automatically amended to the end
- ‘r+’ – Special read and write mode, which is used to handle both actions when working with a file
So, let’s take a look at a quick example where we write file named “workfile” using the python open method.
This snippet opens the file named “workfile” in writing mode so that we can make changes to it. Be sure you have the correct file path. The current information stored within the file is also displayed – or printed – for us to view.
Once this has been done, you can move on to call the objects functions. The two most common functions are read and write.
Create file using Python
To get more familiar with text files in Python, let’s create our own and do some additional exercises.
Using a simple text editor, let’s create a file. You can name it anything you like, and it’s better to use something you’ll identify with. In this example, we will use a , but you could also create a .
For the purpose of this tutorial, however, we are going to call the new file “testfile.txt”.
Once the new file is created, it will be blank. The next step is to add content using the python write method.
To manipulate the file, write the following in your Python environment (you can copy and paste if you’d like):
Naturally, if you open the text file – or look at it – using Python you will see only the text we told the interpreter to add. We didn’t add any characters above, but you certainly can “\n” to format your when viewing.
Python NumPy
NumPy IntroNumPy Getting StartedNumPy Creating ArraysNumPy Array IndexingNumPy Array SlicingNumPy Data TypesNumPy Copy vs ViewNumPy Array ShapeNumPy Array ReshapeNumPy Array IteratingNumPy Array JoinNumPy Array SplitNumPy Array SearchNumPy Array SortNumPy Array FilterNumPy Random
Random Intro
Data Distribution
Random Permutation
Seaborn Module
Normal Distribution
Binomial Distribution
Poisson Distribution
Uniform Distribution
Logistic Distribution
Multinomial Distribution
Exponential Distribution
Chi Square Distribution
Rayleigh Distribution
Pareto Distribution
Zipf Distribution
NumPy ufunc
ufunc Intro
ufunc Create Function
ufunc Simple Arithmetic
ufunc Rounding Decimals
ufunc Logs
ufunc Summations
ufunc Products
ufunc Differences
ufunc Finding LCM
ufunc Finding GCD
ufunc Trigonometric
ufunc Hyperbolic
ufunc Set Operations
Обработка PDF документов
В Linux для работы с файлами PDF всё проще, есть мощные инструменты командной строки, такие как и . Но, поскольку, PDF — межплатформенный открытый формат электронных документов, хотелось бы с таким же удобством работать и в Windows, и в macOS. При этого нужна фантазия и усилия разработчика. Вот и совсем недавно встретилась задачка переноса информации из PDF‑файла в базу данных. Естественно, задача автоматизации здесь имеет свою уникальную специфику и без разработки здесь ну совсем никак.
Это руководство — начало небольшой серии, где будут рассмотрены полезные для разработчика библиотеки, позволяющие создавать собственные скрипты Python для решения рутинных задач автоматизации
В первой части внимание сконцентрировано на манипулировании существующими PDF‑файлами. Вы узнаете, как читать и извлекать содержимое (текст и изображения) и разбивать документы на отдельные страницы
Вторая часть будет посвящена наложению водяных знаков в документ. Третья часть посвящена исключительно написанию/созданию PDF‑файлов, а также удалению и повторному объединению отдельных страниц в новый документ.
Python NumPy
NumPy IntroNumPy Getting StartedNumPy Creating ArraysNumPy Array IndexingNumPy Array SlicingNumPy Data TypesNumPy Copy vs ViewNumPy Array ShapeNumPy Array ReshapeNumPy Array IteratingNumPy Array JoinNumPy Array SplitNumPy Array SearchNumPy Array SortNumPy Array FilterNumPy Random
Random Intro
Data Distribution
Random Permutation
Seaborn Module
Normal Distribution
Binomial Distribution
Poisson Distribution
Uniform Distribution
Logistic Distribution
Multinomial Distribution
Exponential Distribution
Chi Square Distribution
Rayleigh Distribution
Pareto Distribution
Zipf Distribution
NumPy ufunc
ufunc Intro
ufunc Create Function
ufunc Simple Arithmetic
ufunc Rounding Decimals
ufunc Logs
ufunc Summations
ufunc Products
ufunc Differences
ufunc Finding LCM
ufunc Finding GCD
ufunc Trigonometric
ufunc Hyperbolic
ufunc Set Operations
File Positions
The tell() method tells you the current position within the file; in other words, the next read or write will occur at that many bytes from the beginning of the file.
The seek(offset) method changes the current file position. The offset argument indicates the number of bytes to be moved. The from argument specifies the reference position from where the bytes are to be moved.
If from is set to 0, it means use the beginning of the file as the reference position and 1 means use the current position as the reference position and if it is set to 2 then the end of the file would be taken as the reference position.
Example
Let us take a file foo.txt, which we created above.
#!/usr/bin/python

# Open a file
fo = open("foo.txt", "r+")
str = fo.read(10)
print "Read String is : ", str

# Check current position
position = fo.tell()
print "Current file position : ", position

# Reposition pointer at the beginning once again
position = fo.seek(0, 0);
str = fo.read(10)
print "Again read String is : ", str
# Close opend file
fo.close()
This produces the following result −
Read String is :  Python is
Current file position :  10
Again read String is :  Python is
Извлечение изображений из PDF с помощью PyMuPDF
Переходим к изображениям. PyMuPDF упрощает извлечение изображений из документов PDF с использованием метода . Скрипт, приведённый ниже, основан на примере из вики-страницы PyMuPDF и извлекает и постранично сохраняет все изображения из PDF в формате PNG. Если изображение имеет цветовое пространство CMYK, оно будет сначала преобразовано в RGB.
import fitz

pdf_document = "source/Computer-Vision-Resources.pdf"
doc = fitz.open(pdf_document)

print("Исходный документ", doc)
print("\nКоличество страниц: %i\n\n------------------\n\n" % doc.pageCount)
print(doc.metadata)

page_count = 0
for i in range(len(doc)):
    for img in doc.getPageImageList(i):
        xref = img
        pix = fitz.Pixmap(doc, xref)
        pix1 = fitz.Pixmap(fitz.csRGB, pix)

        page_count += 1
        pix1.writePNG("images/picture_number_%s_from_page_%s.png" % (page_count, i+1))
        print("Image number ", page_count, " writed...")
        pix1 = None
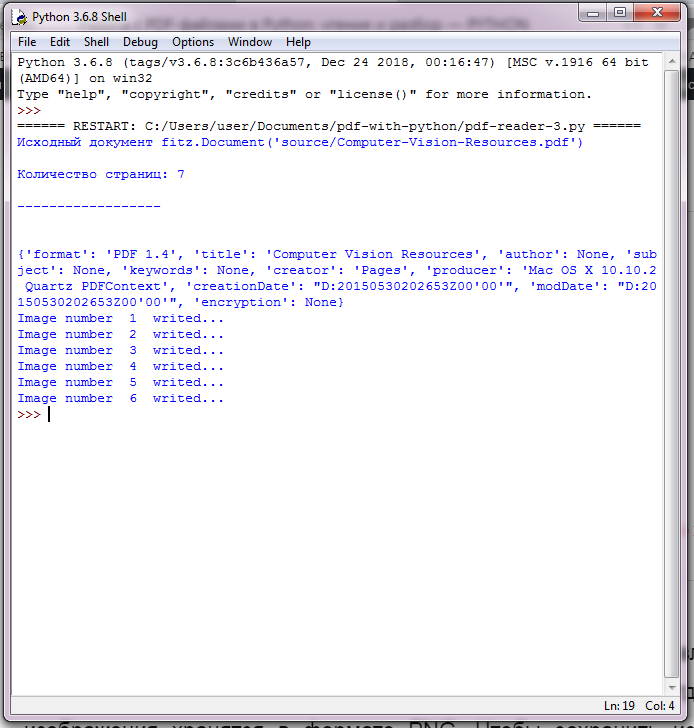 Извлечение изображений
Этот скрипт Python извлёк 773 изображения на 400-страничном PDF, размером полгигабайта менее чем за 3 минуты, что удивительно. Отдельные изображения хранятся в формате PNG. Чтобы сохранить исходный формат и размер изображения вместо преобразования в PNG, взгляните на расширенные версии сценариев в .
Python NumPy
NumPy IntroNumPy Getting StartedNumPy Creating ArraysNumPy Array IndexingNumPy Array SlicingNumPy Data TypesNumPy Copy vs ViewNumPy Array ShapeNumPy Array ReshapeNumPy Array IteratingNumPy Array JoinNumPy Array SplitNumPy Array SearchNumPy Array SortNumPy Array FilterNumPy Random
Random Intro
Data Distribution
Random Permutation
Seaborn Module
Normal Distribution
Binomial Distribution
Poisson Distribution
Uniform Distribution
Logistic Distribution
Multinomial Distribution
Exponential Distribution
Chi Square Distribution
Rayleigh Distribution
Pareto Distribution
Zipf Distribution
NumPy ufunc
ufunc Intro
ufunc Create Function
ufunc Simple Arithmetic
ufunc Rounding Decimals
ufunc Logs
ufunc Summations
ufunc Products
ufunc Differences
ufunc Finding LCM
ufunc Finding GCD
ufunc Trigonometric
ufunc Hyperbolic
ufunc Set Operations
The read() Method
The read() method reads a string from an open file. It is important to note that Python strings can have binary data. apart from text data.
Syntax
fileObject.read()
Here, passed parameter is the number of bytes to be read from the opened file. This method starts reading from the beginning of the file and if count is missing, then it tries to read as much as possible, maybe until the end of file.
Example
Let’s take a file foo.txt, which we created above.
#!/usr/bin/python

# Open a file
fo = open("foo.txt", "r+")
str = fo.read(10);
print "Read String is : ", str
# Close opend file
fo.close()
This produces the following result −
Read String is : Python is


