Звуковой сервер pulseaudio
Содержание:
- module, client, sample
- Включить звук каналов
- Консольные инструменты
- Sink Port: переключение звука на наушники
- Features
- Direct connection
- Changelog
- Приложения
- RTP
- How can I use PulseAudio to stream music from my main PC to my LAN with multiple PCs with speakers?
- How can I use PulseAudio to share a single LINE-IN/MIC jack on the entire LAN?
- How can I use PulseAudio as an RTP based N:N multicast conferencing solution for the LAN?
- Can I have more than one multicast RTP group?
- Troubleshooting
- No sound
- Enable debug mode
- Audio/Video out of sync
- Dummy output
- No guarantees on actual latencies
- In case of buffer under-run latencies are never decreased
- Re-sampling using up a lot of CPU time
- grsec and PulseAudio
- Volume gets randomly louder or reset to 100%
- In pavucontrol, unable to change output device for applications that use OpenALsoft
- Quick Pulse Audio Tip
- Changelog
module, client, sample
В рамках статьи — чисто информационные 🙂
- Module. Загруженный модуль PulseAudio. Например, загрузка module-alsa-sink с заданием пераметров, указывающих на устройство Alsa — создаст Sink, связанный с этим устройством. Существуют и другие модули, создающие объекты PulseAudio, позволяющие управлять им, использовать FIFO для обмена звуковым потоком и многое другое;
- Client. Приложение, подключившееся к PulseAudio. Может создавать потоки Sink-Input и Source-Output и управлять демоном PulseAudio.
Sample. Звуковой сэмпл, загруженный в PulseAudio для быстрого воспроизведения. Может использоваться для проигрывания стандартных звуков. Например, x11 bell. Могут проигрываться по команде от модуля, клиента или из консоли.
Включить звук каналов
В ALSA по умолчанию отключены все каналы, и они все должны быть включены вручную. Этого можно добиться при помощи amixer:
$ amixer sset Master unmute
Так же есть возможность сделать то же самое с alsamixer:
$ alsamixer
Знак снизу канала показывает что канал отключён (muted), а показывает что открыт (open).
Пролистайте до каналов и при помощи клавиш и и включите звук на них, нажав клавишу . Используйте клавишу для увеличения звука и достижения уровня в dB (Децибел). Уровень может быть найден в верхнем левом поле, следующим за .
Примечание: Если уровень выставить более 0 dB может быть слышен хрип из колонок.
Что бы получить полноценный 5.1 или 7.1 surround sound вам скорее всего понадобится включить каналы , , , (сабвуфер) и (это названия каналов, характерные для Intel HD Audio, они могут отличатся на различных устройствах). Стоит отметить, что это не даёт автоматического разложения на каналы стерео звука (каким является большинство музыки). Что бы задействовать такие возможности, смотрите .
Для включения микрофона, переключитесь на вкладку Capture (Устройства захвата) нажав и включите канал, нажав .
Для выхода из alsamixer, нажмите .
Примечание:
- На некоторых картах нужно заглушить цифровой выход, что бы слышать аналоговый звук. Для Soundblaster Audigy LS заглушите канал, подписанный .
- На некоторых машинах, (как Thinkpad T61), есть канал , который должен быть включён и на нём поднят уровень.
- На некоторых машинах, (как Dell E6400) так же потребуется включить и настроить каналы и .
- Если ваши настройки звука пропадают после перезагрузки, попробуйте запустить alsamixer от суперпользователя.
Далее, проверим работу звука:
$ speaker-test -c 2
Измените по количеству колонок. Используйте для 7.1, например:
$ speaker-test -c 8
Если звук выходит через не то устройство, попробуйте в ручную указать их с аргументом .
$ speaker-test -D default -c 8
принимает названия каналов PCM, которые могут быть получены при запуске:
$ aplay -L | grep :CARD
default:CARD=PCH  # 'default' это название канала PCM
sysdefault:CARD=PCH
front:CARD=PCH,DEV=0
surround21:CARD=PCH,DEV=0
surround40:CARD=PCH,DEV=0
surround41:CARD=PCH,DEV=0
surround50:CARD=PCH,DEV=0
surround51:CARD=PCH,DEV=0
surround71:CARD=PCH,DEV=0
Если это не сработало, посмотрите разделы и .
Пакет включает конфигурационные файлы systemd и , которые запускаются при старте системы и перед выключением, соответственно. Их не нужно вручную активировать через .
Напоминаем, ALSA хранит свои настройки в .
Консольные инструменты
pactl
Управление PulseAudio осуществляется с помощью команды pactl, про которую нельзя сказать что она удобная и продвинутая 🙂 однако тренироваться будем с ней.
pacmd
Кроме pactl существует другая утилита для управления PulseAudio: pacmd.
Если к PulseAudio подключен модуль module-cli-protocol — создаётся UNIX-сокет на котором висит PulseAudio-shell. Это во многом похоже на telnet.
Шелл принимает текстовые команды и исполняет их. pacmd help покажет список доступных команд.
Проблема в том, что pactl умеет не всё, а pacmd не так удобен в использовании. В дальнейшем будем придерживаться pactl, однако если его функционала не хватит — используем pacmd.
patricks
Утилита для управления демоном PulseAudio 🙂
Особенности:
- Короткие, интуитивные команды
- Дозированная подача информации командой ls: теперь в терминал не будет вываливаться тонна информации (особенно properties)
- Все объекты — в том числе порты и профайлы — можно задавать как по имени, так и по индексу
- Команда set sink 0 port next — можно не гадать номер порта и просто переключиться на следующий. Удобно для хоткея.
- Наличие команды mv sink 0 all для перемещения всех звуковых потоков в нужный Sink (USB-Колонка)
Пример работы:
Посмотреть список Sink’ов. Текущий Sink выделен символом >:
ootync@rtfm ~ $ patricks ls sinks
>Sink#0 <alsa_output.pci-0000_00_1b.0.analog-stereo>
 Sink#1 <alsa_output.pci-0000_00_2b.0.hdmi-stereo>
Внимательнее присмотретсья к Sink #0:
ootync@rtfm ~ $ patricks ls sink
Sink# <alsa_output.pci-0000_00_1b.0.analog-stereo>
Is Default: yes
Description: Internal Audio Analog Stereo
State: RUNNING
Driver: module-alsa-card.c
Owner Module: Module#4 <module-alsa-card>
Sample Spec: s16le 44100ch 2Hz
Channel Map: front-left, front-right
Mute: no
Volume: 25%
Base Volume: 100
Latency: 199703
Configured Latency: 210000
Flags: HARDWARE, HW_MUTE_CTRL, HW_VOLUME_CTRL, DECIBEL_VOLUME, LATENCY
Ports: analog-output, analog-output-headphones
Active Port: analog-output
Monitor Source: Source#0 <alsa_output.pci-0000_00_1b.0.analog-stereo.monitor>
Id:
Name: alsa_output.pci-0000_00_1b.0.analog-stereo
Proplist: 33 items
Внимательнее посмотреть на список портов Sink #0:
ootync@rtfm ~ $ patricks ls sink  ports
>#0 analog-output: "Analog Output" prio=9900
 #1 analog-output-headphones: "Analog Headphones" prio=9000
Переключить Sink #0 на следующий порт
ootync@rtfm ~ $ patricks set sink  port next
Sink# <alsa_output.pci-0000_00_1b.0.analog-stereo>: analog-output-headphones
Перекинуть все Sink-Input’ы на следующий Sink (например, свежеподключенную USB-колонку)
ootync@rtfm ~ $ patricks mv sink next all
Moving 1 inputs {65} to sink "alsa_output.pci-0000_00_1b.0.analog-stereo"...
Sink# <alsa_output.pci-0000_00_1b.0.analog-stereo>: default sink
Sink Port: переключение звука на наушники
У одного Sink’а может быть несколько звуковых портов. Например, Sink созданный на основе звуковой карты ноутбука, может иметь два порта: встроенные колонки и выход на наушники.
Текущий порт Sink’а можно посмотреть в его поле Active Port: analog-output-speaker.
Глядя на список Ports нужного объекта Sink, назначаем порт:
pactl set-sink-port 'alsa_output.pci-0000_00_1b.0.analog-stereo' 'analog-output'
и звук моментально перебрасывается на наушники, отключая колонки.
Аналогично для Source. Возможно, Ваш микрофон не работает в Skype именно из-за того что выбран не тот порт записи 🙂
Features
The main PulseAudio features include:
- Per-application volume controls.
- An extensible plugin architecture with support for loadable modules.
- Compatibility with many popular audio applications.
- Support for multiple audio sources and sinks.
- Low latency operation and latency measurement.
- A zero-copy memory architecture for processor resource efficiency.
- Ability to discover other computers using PulseAudio on the local network and play sound through their speakers directly.
- Ability to change which output device applications use to play sound through while they are playing sound (Applications do not need to support this, PulseAudio is capable of doing this without applications detecting that it has happened)
- A command-line interface with scripting capabilities.
- A sound daemon with command line reconfiguration capabilities.
- Built-in sample conversion and resampling capabilities.
- The ability to combine multiple sound cards into one.
- The ability to synchronize multiple playback streams.
- Bluetooth audio device support with dynamic detection capabilities.
- The ability to enable system wide equalization.
Direct connection
Just set the environment variable to the host name of the PulseAudio server. Alternatively you can modify or and set . See Server Strings for an explanation of the format. In this FAQ entry all locations you can specify the server to use are listed. All the methods that connect to the daemon over the network using the native protocol need module-native-protocol-tcp loaded. This includes tunnels and Zeroconf setups. With this module loaded, the server listens on port 4713 for incoming client connections.
Authorization
For authentication you need the same auth cookies on all sides. For that copy to all clients that shall be allowed to connect. Alternatively the authorization cookies can be stored in the X11 server. The server must have module-native-protocol-tcp loaded. To enable all audio from all over the network, set the argument. A more secure options is to manage access to these servers with an IP ACL. This can look like this in your or startup script for PulseAudio:
These two modules are not loaded in the default configuration because they might open PulseAudio for remote attackers.
X forwarding
If the variable does not exist or is empty, PulseAudio will then check for X11 properties on the root window. These properties are much like environment variables, but will be available remotely if you SSH to another machine with X11 forwarding. You can see a list of PulseAudio related properties by doing:
The variables names used are the same as those used in the environment, so PulseAudio will look for a property called . Note that only the X11 properties are forwarded over the SSH tunnel, but the pulseaudio client still connects to the server using its own native protocol.
If connecting back to the pulse daemon running on the computer that has the X display is not desired, you can either set from the SSH connection (make sure module-native-protocol-tcp is loaded though) or run before SSHing to the remote computer to remove the properties on the root window.
Changelog
| Version: 1:13.99.1-1ubuntu3.6 | 2020-08-20 11:06:20 UTC | |||
|---|---|---|---|---|
|
pulseaudio (1:13.99.1-1ubuntu3.6) focal; urgency=medium |
||||
|
| Version: *DELETED* | 2020-07-24 10:06:42 UTC |
|---|---|
| No changelog for deleted or moved packages. |
| Version: 1:13.99.1-1ubuntu3.5 | 2020-07-17 13:06:51 UTC | |
|---|---|---|
|
pulseaudio (1:13.99.1-1ubuntu3.5) focal; urgency=medium * d/p/0033-alsa-make-the-unsuspend-more-robust.patch: |
||
| Source diff to previous version | ||
|
| Version: 1:13.99.1-1ubuntu3.4 | 2020-07-14 09:06:51 UTC | |
|---|---|---|
|
pulseaudio (1:13.99.1-1ubuntu3.4) focal; urgency=medium * d/p/0032-alsa-mixer-store-the-ucm_device-with-the-order-of-th.patch |
||
|
| Version: *DELETED* | 2020-06-14 07:06:33 UTC |
|---|---|
| No changelog for deleted or moved packages. |
← Previous 1 Next →
About
—
Send Feedback to @ubuntu_updates
Приложения
QEMU
Эта статья или раздел является кандидатом на объединение с QEMU.
Аудио драйвер, используемый QEMU, установлен с переменной окружения :
$ export QEMU_AUDIO_DRV=pa
Выполните следующую команду для связывания параметров настроек QEMU с PulseAudio:
$ qemu-system-x86_64 -audio-help | awk '/Name: pa/' RS=
Перечисленные опции могут быть экспортированы как переменные окружения, например:
$ export QEMU_PA_SINK=alsa_output.pci-0000_04_01.0.analog-stereo.monitor
$ export QEMU_PA_SOURCE=input
Эта статья или раздел нуждается в улучшении грамматики, форматирования или стиля.
Чтобы получить список поддерживаемых драйверов эмуляции аудио:
$ qemu-system-x86_64 -soundhw help
Для гостевого использования, например, драйвера , команда с QEMU .
Примечание: Эмулирование драйвера видеокарты для гостевой машины может также вызвать проблему с качеством звука. Тестируйте один за другим, чтобы заставить его работать. Вы можете перечислить возможные варианты с поомщью .
AlsaMixer.app
Сделайте AUR dockapp для использования pulseaudio , например:
$ AlsaMixer.app --device pulse
Вот два примера, где первый — для ALSA, и другой — для pulseaudio. Вы можете запустить несколько его экземпляров. Используйте опцию выбора , кнопок управления для привязки к колесику мышки.
# AlsaMixer.app -3 Mic -1 Master -2 PCM --card 0 -w 1
# AlsaMixer.app --device pulse -1 Capture -2 Master -w 2
Примечание: Он может использовать только те устройства вывода, которые устанавлены по умолчанию..
XMMS2
Сделайте переключение на вывод pulseaudio
$ nyxmms2 server config output.plugin pulse
и на alsa
$ nyxmms2 server config output.plugin alsa
Для того, чтобы xmms2 использовал другое устройство вывода, например:
$ nyxmms2 server config pulse.sink alsa_output.pci-0000_04_01.0.analog-stereo.monitor
Рабочая область KDE и Qt4
Если бэкэнд phonon-gstreamer используется для Phonon, GStreamer должен также быть настроен, как описано в #GStreamer.
Audacious
Audacious изначально поддерживает PulseAudio. Для его использования установите Audacious Настройки -> Audio -> Current output plugin to ‘PulseAudio Output Plugin’.
Java/OpenJDK 6
Создайте «обертку» для исполняемой программы Java, использующей padsp, как замечено на странице .
MPlayer
MPlayer изначально поддерживает вывод PulseAudio с опцией . Это также может быть настроено для установки по умолчанию на вывод PulseAudio, в для конкретного пользователя, или для всей системы :
/etc/mplayer/mplayer.conf
ao=pulse
guvcview
при использовании входа PulseAudio от Веб-камеры, аудиовход может быть в «приостановленном» режиме, в результате чего звук не будет записываться. Вы можете проверить это путем выполнения:
$ pactl list sources
Если источник аудиосигналов «suspended» (приостановлен), измените следующую строку в , изменение:
load-module module-suspend-on-idle
на
#load-module module-suspend-on-idle
И затем перезапустите PulseAudio или Ваш компьютер. Теперь аудиовход будет «бездействовать», вметсо того, чтобы находиться в «приостановленном» режиме. Теперь guvcview будет писать звук правильно.
RTP
RTP is the Realtime Transfer Protocol. It is a well-known protocol for transferring audio and video data over IP. Two related protocols are SDP and SAP. SDP is the Session Description Protocol and can be used to describe RTP sessions. SAP is the Session Announcement Protocol and can be used to announce RTP sessions that are described with SDP. (Modern SIP based VoIP phones use RTP/SDP for their sessions, too) All three protocols are defined in IETF RFCs (RFC3550, RFC3551, RFC2327, RFC2327). They can be used in both multicast and unicast fashions. PulseAudio exclusively uses multicast RTP/SDP/SAP containing audio data.
For more information about using these technologies with PulseAudio have a look on the modules documentation.
How can I use PulseAudio to stream music from my main PC to my LAN with multiple PCs with speakers?
On the sender side create an RTP sink:
This will make rtp the default sink, i.e. all applications will write to this virtual RTP device by default.
On the client sides just load the reciever module:
Now you can play your favourite music on the sender side and all clients will output it simultaneously.
BTW: You can have more than one sender machine set up like this. The audio data will be mixed on the client side.
On the sender side simply load the RTP sender module:
On the reciever sides, create an RTP source:
Now the audio data will be available from the default source .
How can I use PulseAudio as an RTP based N:N multicast conferencing solution for the LAN?
After loading all the necessary audio drivers for recording and playback, just load the RTP reciever and sender modules with default parameters:
As long as the PulseAudio daemon runs, the microphone data will be streamed to the network and the data from other hosts is played back locally. Please note that this may cause quite a lot of traffic. Hence consider passing to the sender module to save bandwith while still maintaining good quality for speech transmission.
Can I have more than one multicast RTP group?
Yes! Simply use a new multicast group address. Use the / arguments of the RTP modules to select them. Choose your group addresses from the range 225.0.0.x to make sure the audio data never leaves the LAN.
Troubleshooting
No sound
- After upgrading the system: pulseaudio’s user configuration files can become corrupt. Deleting ~/.pulse* configuration files and forcing fresh ones to be generated by restarting the daemon may fix no sound condition.
Enable debug mode
To get more informations you need to set the following in /etc/pulse/daemon.conf:
FILE
log-level=debug
Afterward restart the daemon:
Audio/Video out of sync
When using PulseAudio over your local network, you can experience out-of-sync problems. Solve this by adding tsched=0:
FILE
load-module module-udev-detect tsched=0
This disables time scheduling. Afterwards restart the daemon:
Dummy output
If the only playback device is the Dummy Output, PulseAudio cannot access your sound devices. Either the user has no permissions (see section or another program blocks the access. Try:
It shows the relevant program. Close the program and reconfigure it to use PulseAudio.
No guarantees on actual latencies
Currently PA provides whatever latency at that moment is possible be it some milliseconds to hundreds of milliseconds without regard to what applications ask for.
In case of buffer under-run latencies are never decreased
Currently, if a buffer under-run occurs, PA buffers for longer increasing latency, but it then never tries to buffer for less until restart.
Re-sampling using up a lot of CPU time
Re-sampling can require quite a lot of computational power, PA defaults are rather conservative but in certain cases can still take a significant toll, in such cases edit /etc/pulse/daemon.conf and consider changing resample-method to something less CPU intensive, default-sample-format and default-sample-rate can also affect CPU utilization with higher bit-depth and larger difference in sample-rate generally needing more resources (e.g. re-sampling 44.1 kHz to 48 kHz is faster than re-sampling either to 192 kHz). Since re-sampling is done per each channel per input, channel configuration and number of applications can affect performance as well.
Starting with version 7.0 there is also soxr resamplers made available by enabling the sox USE flag. In particular resample-method = soxr-mq should provide acceptable quality while even the higher quality and hence slower soxr-hq is still cheaper than the default speex-float-1. But be warned that the soxr resamplers have roughly 5-20 times higher latency than speex-float, in terms of time the worst case for soxr-mq/hq can be as high as 20 ms while soxr-vhq latency can in few specific setups reach over 27 ms. In terms of feeling 20 ms can range from unnoticeable to irritating depending on person and use case (the usual PA latency’s lower bound is around 20-25 ms and more commonly often around 70-90 ms, for comparison).
NoteUsing a version of PA with Orc support can noticeably decrease CPU usage, too. Also PA has the ability, if certain conditions are met, to automatically switch sinks between common sampling rates, this effectively can avoid some re-sampling.
grsec and PulseAudio
Make sure CONFIG_GRKERNSEC_SYSFS_RESTRICT is not enabled if you are using a grsecurity kernel. PulseAudio’s module-udev-detect needs to access /sys to discover what cards are available on the system, and that kernel option disallows this for anyone but root.
Volume gets randomly louder or reset to 100%
This may be caused by misbehaving PulseAudio-enabled programs when PulseAudio has flat volumes feature enabled. Disable it in daemon config:
FILE
flat-volumes = no
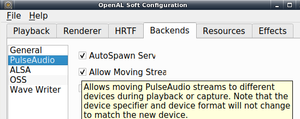
In pavucontrol, unable to change output device for applications that use OpenALsoft
It can happen that you want to change the output device for an application, but trying to change it in pavucontrol has no effect.
If this application use OpenALsoft, this one has a configuration option that inhibits sink changes.
To disable this option, you can create a configuration file for OpenALsoft :
FILE
allow-moves=yes
Or, by running alsoft-config :
Quick Pulse Audio Tip
With the Equalizer installed, the Linux audio system is much better. Still, Pulse Audio is a very confusing tool, and as it stands not many users know how to easily manipulate it. That’s why, in this section, we’re going to talk about a tool anyone can install to easily take control of the complex Linux audio system. It starts by installing the Pavucontrol tool.
It’s a graphical control tool for the Linux audio system. With it, users can do all sorts of things.
Other Linuxes
The Pavucontrol tool is easily found on many Linux distributions under the package name “pavucontrol”. Open your package manager and search for that, or something similar like “pulse audio control”.
Usage

Inside Pavucontrol, there are five tabs; “playback”, “recording”, “output devices”, “input devices”, and “configuration”. To start off, the playback tab represents any program currently using the pulse audio sound system. Control the volume of the playback of each program in this tab.
If you’ve got multiple audio devices, select the audio device label, and click it to swap to a different device.

In the recording tab, things are very much the same. Instead of showing playback, it shows all programs currently recording audio. Use the volume sliders to manage how loud the input volume is. Click the audio device label to switch what device Pulse uses to record with.

The next tab is “input devices”. This tab allows users to manage the volume of each individual microphone, and device set up for recording.

The “output” tab is similar to the “input” tab. Like the input section, output allows the user to easily manage the volume of playback devices individually.

Lastly, the configuration section shows all of the audio equipment. In this section, users can easily turn on and off individual speakers, microphones and etc. To set a device as default, click the “fallback button”. Doing this makes this audio device the default, above all others.
Changelog
| Version: 1:13.99.1-1ubuntu3.6 | 2020-08-31 15:06:59 UTC | |||
|---|---|---|---|---|
|
pulseaudio (1:13.99.1-1ubuntu3.6) focal; urgency=medium |
||||
| Source diff to previous version | ||||
|
| Version: 1:13.99.1-1ubuntu3.5 | 2020-07-23 12:06:40 UTC | |
|---|---|---|
|
pulseaudio (1:13.99.1-1ubuntu3.5) focal; urgency=medium * d/p/0033-alsa-make-the-unsuspend-more-robust.patch: |
||
| Source diff to previous version | ||
|
| Version: 1:13.99.1-1ubuntu3.4 | 2020-07-17 12:06:35 UTC | |
|---|---|---|
|
pulseaudio (1:13.99.1-1ubuntu3.4) focal; urgency=medium * d/p/0032-alsa-mixer-store-the-ucm_device-with-the-order-of-th.patch |
||
| Source diff to previous version | ||
|
| Version: 1:13.99.1-1ubuntu3.3 | 2020-06-09 16:06:31 UTC | |
|---|---|---|
|
pulseaudio (1:13.99.1-1ubuntu3.3) focal; urgency=medium * debian/patches/gitlab_jack_identifier.patch: |
||
| Source diff to previous version | ||
|
| Version: 1:13.99.1-1ubuntu3.2 | 2020-05-12 21:07:20 UTC | |||
|---|---|---|---|---|
|
pulseaudio (1:13.99.1-1ubuntu3.2) focal-security; urgency=medium * SECURITY UPDATE: stop snaps from loading and unloading modules, to |
||||
|
About
—
Send Feedback to @ubuntu_updates


