Архитектуры reactnative, xamarin, phonegap и qt. часть 1
Содержание:
Архитектура iOS/Android и нативные API
Главный принцип, лежащий в основе кроссплатформенных решений — разделение кода на 2 части:
- кроссплатформенную, живущую в виртуальном окружении и имеющую ограниченный доступ к возможностям целевой платформы через специальный мост;
- нативную, которая обеспечивает инициализацию приложения, управление жизненным циклом ключевых объектов и имеющую полный доступ к системным API.
Для того, чтобы связывать между собой мир “нативный” и мир “кроссплатформенный”, необходимо использовать специальный мост (bridge). И как мы увидим в главе 3, именно bridge и определяет возможности и ограничения кроссплатформенных фреймворков.
Итак, все кроссплатформенные приложения обязаны иметь нативную часть, иначе операционная система просто не сможет их запустить. А сами iOS, Android и Windows UWP предоставляют необходимые API для работы кроссплатформенных фреймворков:
- WebView используется в гибридных приложениях на базе PhoneGap или аналогов для запуска приложений и фактически выступает средой выполнения веб-приложений;
- JavaScript-движки используются в ReactNative и аналогах для быстрого выполнения JS-кода и обмена данными между Native и JS;
- OpenGL ES (или DirectX) используется в играх и приложениях на Qt/QML или аналогах для отрисовки интерфейса;
- UI-подсистема отвечает за нативный пользовательский интерфейс приложения, что актуально для ReactNative и Xamarin.
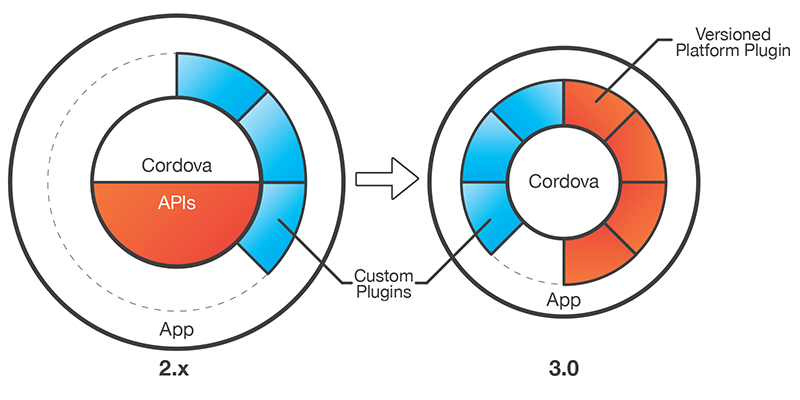
Adobe PhoneGap 3.0 Released at 3rd Annual PhoneGap Day
Popular open source mobile development framework gets upgrades including new plugin architecture, improved tools, new platforms, and new APIs.
Adobe PhoneGap(tm), the popular open source mobile app development framework, released PhoneGap 3.0 today at the 3rd annual PhoneGap Day in Portland, Oregon. PhoneGap allows developers to build cross-platform mobile applications using HTML5, CSS3 and Javascript. With PhoneGap, you can re-use your existing web developer skills and use the PhoneGap API to gain access to native features that aren’t accessible in mobile browsers.
We’re excited to announce the following major new features in PhoneGap 3.0:
- New plugin architecture — Our plugin architecture keeps your app small and fast. You only include the APIs you need and plugins can be automatically installed and removed.
- Better tools — We’ve made it easier to quickly shift between native platforms without learning new vocabularies by aligning the native platform CLI tooling. Don’t have a native platform SDK installed? No problem! Our tools now integrate with PhoneGap/Build.
- New platforms — Earlier this year we welcomed support for iOS6 (with work on iOS7 happening now!), Windows Phone 8, and BlackBerry 10. Firefox OS and Ubuntu are coming soon.
- New APIs — Welcome to two new APIs – InAppBrowser (formerly known as the ChildBrowser plugin) and Globalization API.
With the PhoneGap CLI, users will be able to directly install PhoneGap from the Node Package Manager (NPM). You no longer need to download a ZIP file every time PhoneGap has a new release. This is all part of our effort to improve user workflow and make the process lightning fast.
Here is more information to get you on your way!
- If you are new to PhoneGap, this is the ultimate resource for you. It has many guides for all of the platforms.
- If you are looking to upgrade your existing PhoneGap based projects, take a look at these guides.
- PhoneGap CLI: The PhoneGap CLI is a command line tool to build, deploy and manage PhoneGap based applications and has PhoneGap Build integration. It uses the Cordova-CLI under the hood. Michael Brooks has a great post about getting started with the PhoneGap CLI on his blog.
- Cordova CLI: The Cordova CLI is a command line tool to build, deploy and manage Cordova based applications. Make sure to read our .
- Plugman Usage Guide: This guide has instructions on how to install the core plugins into your project using Plugman. Users can see the repos where the core plugins now live.
- PhoneGap 3.0 sample project with plugins: This is a sample PhoneGap project that comes with all of the plugins installed. It requires either Cordova CLI or PhoneGap CLI to be installed.
- This guide covers the basics of developing a plugin for PhoneGap.
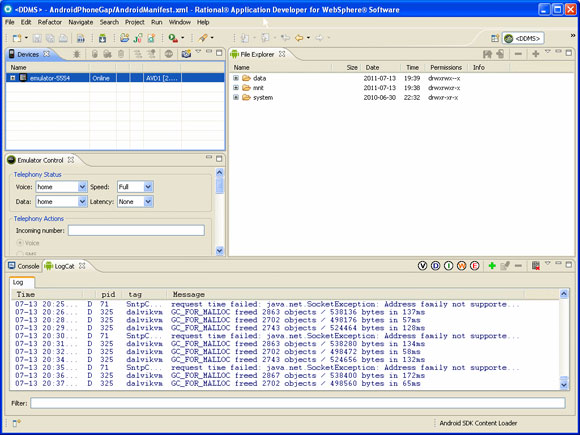
Использование Dalvik Debug Monitor Server (DDMS)
Плагин ADT содержит средство отладки приложений Dalvik Debug Monitor Server (DDMS). DDMS можно использовать для отслеживания и отладки хода выполнения приложения в эмуляторе или на реальном устройстве.
DDMS можно запустить из Eclipse в меню Window > Open Perspective > Other… > DDMS. На показан пример.
Рисунок 15. Окно DDMS в Eclipse
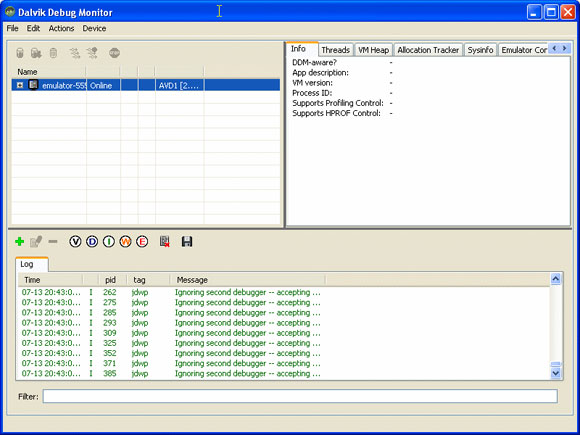
DDMS можно также запустить при помощи командной строки из каталога установки Android SDK.
- В Windows: C:\android-sdk-windows\tools\ddms.bat.
- В OSX: …/android-sdk-mac-86/tools/ddms.
Рисунок 16. Автономный отладчик
В DDMS вы можете:
- Просмотреть консоль регистрации событий.
- Отобразить состояние процессов, выполняющихся на устройстве.
- Исследовать информацию о потоках.
- Просмотреть использование кучи процесса.
- Выполнить сборку мусора.
- Следить за распределением памяти объектов.
- Выполнить профилирование метода.
- Работать с файловой системой устройства.
- Сохранить снимок экрана устройства.
- Эмулировать операции телефона.
Подробная информация приведена в документации по DDMS (см. раздел ).
Working with the Native File System
One of the main benefits of the content sync plugin is that it does not depend on the File or FileTransfer plugins. As a result the end user should not care where the ContentSync plugin stores it’s files as long as it fills the requirements that it is private and removed when it’s associated app is uninstalled.
var sync = ContentSync.sync({
        src: 'https://myserver/app/1',
        id: 'app-1'
});

sync.on('complete', function(data) {
    window.resolveLocalFileSystemURL("file://" + data.localPath, function(entry) {
        // entry is a DirectoryEntry object
    }, function(error) {
        console.log("Error: " + error.code);
    });
});
As of version 1.2.0 of the plugin the location in which the plugin stores the synched content is equivaltent to the path from the package. This is a change from previous versions so please be aware you may need to do a full sync after upgrading to version 1.2.0.
| Platform | Path |
|---|---|
| Android | |
| iOS |
Vue.js
Для работы нам понадобится пакетный менеджер и консольная утилита , как установить можно почитать тут, мы же сразу идём далее:
# устанавливаем vue-cli
$ npm install —global vue-cli
$ cd /hello_world/frontend
# создаём новый проект из шаблона «webpack»
$ vue init webpack-simple ./
# устанавливаем зависимости
$ npm install
|
1 |
# устанавливаем vue-cli $npm install—globalvue-cli $cdhello_worldfrontend $vue init webpack-simple. $npm install |
По ходу установки вам будет задано несколько вопросов (название проекта, описание, автор лицензия и используете ли вы sass), отвечаем на все вопросы и запускаем приложение командой .
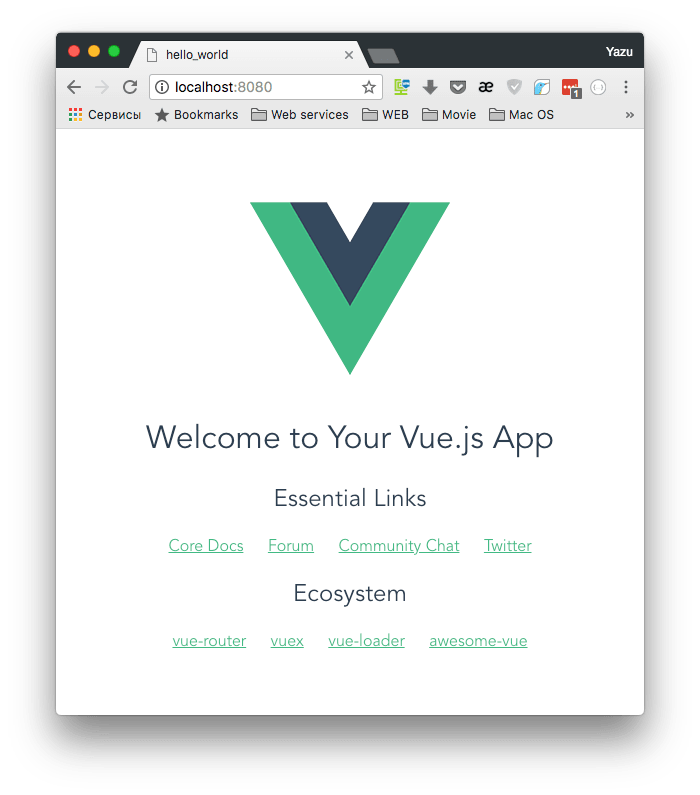
vue.js приложение
Пока можно приостановить оба локальных сервера и приступить к связке vue.js и PhoneGap.
Getting Started
1. Install the PhoneGap CLI
First, you need the latest version of the PhoneGap CLI:
You can read more about the installation details on our installation page.
2. Install the PhoneGap Developer App
Now grab the mobile app, which is globally available in an app store near you:
- iOS from the App Store
- Android from Google Play
- Windows Phone is coming soon!
3. Create an App
The PhoneGap Developer app is compatible with existing PhoneGap and Apache Cordova projects.
You can create a new app:
Or open an existing app:
4. Pair the CLI and Developer App
This is where the magic happens. The CLI starts a tiny web server to serve your project. Then, the PhoneGap Developer App connects to that server.
First, use the CLI to serve your project:
Second, enter the server address into the PhoneGap Developer App. In this example, the address is .

Remember, both the CLI and PhoneGap Developer app must be on the same network in order for the address must to be reachable.
5. Get to Work
Once paired, it’s business as usual. You can freely add, edit, and remove files from your project. Every saved change will automatically update the preview displayed in the PhoneGap Developer App.

You can also use hidden touch gestures for additional control:
- a 3-finger tap will go to the home page
- a 4-finger tap will force the app to update
Support for phonegap.js
Way back in the day, before Apache Cordova, there was only PhoneGap. So naturally, you needed to script include . When we donated the majority of PhoneGap’s source code to Apache as Cordova, we switched to . However, like the stubborn developers that we are, we’ve always had backwards-compatibile support for .
is still supported, but we hope you’re using !
When an app references , the file will be added to your platform project and a deprecation warning will be displayed. In an upcoming release, support for will be dropped!
When an app references , the file will be added, but will not be added. This has virtually no impact on performance, but it’s one less file 🙂
APRIL 2012
EVENTS
- April 2-3, JS Conf US (Scottsdale), Sponsoring
- Brian LeRoux
- Fil Maj
- Michael Brooks
- Andrew Lunny
- Ryan Willoughby
- April 2-4, Where 2.0 (SF), Steve Gill
- April 10-11, ETE (Philly), Brian LeRoux
- April 16-18, Breaking Dev (Orlando), Sponsoring
- April 16-17, Dibi Conf (Newcastle)
- April 20, Motorola Developer Event (DC), Terry Ryan
- April 23, Hackathon with Microsoft (SF)
- Jesse MacFadyen
- Shazron Abdullah
- Steve Gill
- April 24, ESRI Developer Meetup (Denver), Kevin Hoyt
- April 26, HTML5 User Group (SF), Brian LeRoux
- April 26, HTML5 Now (Seoul), Tim Kim
- April 26, Adobe WebUp (Bucharest), Mihai Corlan
- April 30 — May 4, Future Insights Live (Las Vegas), Brian LeRoux
Development
Setup
The repository includes everything required to compile the app. You can get
setup by:
$ git clone https://github.com/phonegap/phonegap-app-developer.git
$ cd phonegap-app-developer/
$ npm install
Compile and Run
The app bundles the npm module as a dependency. This means that
there is no need for a global installation of or .
By editing the , you can specify the exact version of
to compile the project.
Since a global install of the module is not required, we use
scripts to compile and run the application. This allows the app’s
and directories to be removed and rebuilt each time,
ensuring a consistent build using the correct PhoneGap, Cordova, platform,
and plugin versions.
The command structure is:
$ npm run phonegap -- <command>
For example, you can check the version of :
$ npm run phonegap -- --version
You can compile and run iOS or Android:
$ npm run phonegap -- run ios
$ npm run phonegap -- run android
For developers wishing to use the platform SDKs (Xcode, Eclipse, Visual Studio),
please build once with the CLI to correctly populate the platform assets:
$ npm run phonegap -- build <platform>
Due to a Windows npm bug, the does not work. Therefore we have created
run script that will build Windows Phone 8, so it can run in Visual Studio.
$ npm run phonegap-wp8
Running the Tests
There are two types of test targets: the local app and served app.
Test the Local Application
The local application is the PhoneGap Developer App. To test the local
functionality, we build the application with mobile-spec. This allows us to
ensure that each plugin was correctly installed. Eventually, we would like
to add functional tests for the app logic.
You can run the local tests with:
$ npm run phonegap -- run android --test
$ npm run phonegap -- run ios --test
Again for Windows Phone, we have a run script that will build the app so it can run in
Visual Studio.
$ npm run phonegap-wp8-test
Test the Served Application
The served application is the app served by the CLI. To test the server
functionality, we serve an instance of mobile-spec. We can then use the manual
and automatic tests to ensure that the server provided the correct version of
Cordova, the plugins, and the navigation logic.
You can run the served tests with:
$ cd tests/
$ phonegap serve
# now connect with the latest build of the PG App
Updating the Tests
It’s as easy as a copy and paste.
- Copy all content of
- Paste the content into
On your first run of the tests, you may see some modified files. This is expected
because the test runner invoked by modifies certain files to support
our app’s configuration.
Adding Custom Plugins
If you’re a developer interested in creating your own custom build of the
PhoneGap Developer App, then this section is for you!
Since the PhoneGap Developer app bundles as a npm dependency and
treats the and as artifacts, you’ll find that it is very
easy to add your own plugins and alter other aspects of the app.
First, the project on your local system.
Second, edit the to add a custom plugin, change a preference, or
configure the app’s name. You should also change the app’s id to your own
unique app bundle id:
<?xml version='1.0' encoding='utf-8'?>
<widget id="org.mycompany.phonegap.app" version="1.6.2" xmlns="http://www.w3.org/ns/widgets" xmlnsgap="http://phonegap.com/ns/1.0">
Third, follow the section to
get the app onto your device.
If you run into any problems, feel free to submit an issue.
Releases
Releases are also generated using the npm scripts:
$ npm run release-android
$ npm run release-ios
$ npm run release-wp
In order to properly code-sign Android and iOS, you must setup the signing key.
This is accomplished by cloning the signing key repository and sym-linking each
platform directory with the PhoneGap Developer App repository:
# in your development directory
$ git clone https://github.com/phonegap/phonegap-app-developer-keys.git

$ cd path/to/phonegap-app-developer/
$ ln -s /path/to/phonegap-app-developer-keys/keys/ios resources/signing/ios
$ ln -s /path/to/phonegap-app-developer-keys/keys/android resources/signing/android
See the CONTRIBUTING.md file for details.
Что дальше?
Естественно, для разработки на vue.js вы можете использовать любые пакеты, которые вам потребуются в проекте. Однако, следует помнить, если вы используете , то следует его параметр установить в значение , так как вы будете запускать приложение внутри PhoneGap проекта, ему потребуется прямой доступ к файлам на диске для осуществления роутинга, следовательно с настройкой , как в большинстве браузерных приложений на vue.js, работать не будет.
В своих проектах я в основном использую следующие пакеты:
- vue
- vue-onsenui
- vue-resource
- vue-router
- vuex
- onsenui
- sass
- material-design-iconic-font
Вот пример одного из приложений, находящихся в разработке на данный момент:

Пример приложения
comments powered by HyperComments
API
client.auth(options, callback)
PhoneGap Build Authentication.
Authentications with PhoneGap Build and returns an instance of .
The authentication credentials can be a username and password or user-token.
Options:
- is the authentication settings.
- is the phonegap build username.
- is the phonegap build password.
- can be used instead of username and password.
- [] optional server protocol. e.g. ‘https:’.
- [] optional server host. e.g. ‘build.phonegap.com:’.
- [] optional server port. e.g. ‘443’.
- [] optional server path prefix. e.g. ‘/api/v1’.
-
is trigger after the authentication.
- is null unless there is an error.
- is the instance to interact with phonegap build.
api(path, , )
API Request.
Create a RESTful request to the PhoneGap Build API. The function is a
wrapper to request’s interface.
The parameter is a relative path to a PhoneGap Build API response.
For example, to the resource is specified
as the path .
The parameter maps directly to request’s options.
The default request method is . You can specify a specific but you can be changed
in the parameters (e.g. ).
To send form data, you can use the parameter. The key is
assumed to be JSON and all other keys are assumed to be file paths.
Options:
- is a relative resource path (e.g. ).
- is a request options object.
- optional server protocol. e.g. ‘https:’.
- optional server host. e.g. ‘build.phonegap.com:’.
- optional server port. e.g. ‘443’.
- optional server path prefix. e.g. ‘/api/v1’.
-
is trigger after the request
- is null unless there is an error
- is the JSON response.
api.get(path, , )
GET API Request.
A convenience function for , where
uses .
Options:
- is a relative resource path (e.g. ).
- is a request options object.
-
is trigger after the request
- is null unless there is an error
- is the JSON response.
api.post(path, , )
POST API Request.
A convenience function for , where
uses .
Options:
- is a relative resource path (e.g. ).
- is a request options object.
-
is trigger after the request
- is null unless there is an error
- is the JSON response.
api.put(path, , )
PUT API Request.
A convenience function for , where
uses .
Options:
- is a relative resource path (e.g. ).
- is a request options object.
-
is trigger after the request
- is null unless there is an error
- is the JSON response.
api.del(path, , )
DELETE API Request.
A convenience function for , where
uses .
Options:
- is a relative resource path (e.g. ).
- is a request options object.
-
is trigger after the request
- is null unless there is an error
- is the JSON response.
This maps directly to request’s method.
Native Requirements
- There should be no dependency on the existing File or FileTransfer plugins.
- The native cached file path should be uniquely identifiable with the parameter. This will allow the Content Sync plugin to lookup the file path at a later time using the parameter.
- The first version of the plugin assumes that all cached content is downloaded as a compressed ZIP. The native implementation must properly extract content and clean up any temporary files, such as the downloaded zip.
- The locally compiled Cordova web assets should be copied to the cached content. This includes , , and .
- Multiple syncs should be supported at the same time.
PhoneGap + Vue.js = PROFIT!
Для начала нам нужно будет подкорректировать файл :
//меняем это
output: {
path: path.resolve(__dirname, ‘./dist’),
publicPath: ‘/dist/’,
filename: ‘build.js’
},
//на это
output: {
path: path.resolve(__dirname, ‘./../phonegap/hello_world/www/dist’),
publicPath: ‘/dist/’,
filename: ‘build.js’
},
|
1 |
//меняем это output{ pathpath.resolve(__dirname,’./dist’), publicPath’/dist/’, filename’build.js’ }, output{ pathpath.resolve(__dirname,’./../phonegap/hello_world/www/dist’), publicPath’/dist/’, filename’build.js’ }, |
Как видите, мы просто поменяли расположение файла сборки forntend’а на папку внутри PhoneGap проекта.
Далее открываем файл и приводим его к такому виду:
<!DOCTYPE html>
<html>
<head>
<meta charset=»utf-8″ />
<meta name=»format-detection» content=»telephone=no» />
<meta name=»msapplication-tap-highlight» content=»no» />
<meta name=»viewport» content=»user-scalable=no, initial-scale=1, maximum-scale=1, minimum-scale=1, width=device-width» />
<!— This is a wide open CSP declaration. To lock this down for production, see below. —>
<meta http-equiv=»Content-Security-Policy» content=»default-src * ‘unsafe-inline’; style-src ‘self’ ‘unsafe-inline’; media-src *; font-src * data: blob;» />
<title>Hello World</title>
</head>
<body data-dom-cache=»true»>
<div id=»app»></div>
<script type=»text/javascript» src=»dist/build.js»></script>
<script type=»text/javascript» src=»cordova.js»></script>
</body>
</html>
|
1 |
<!DOCTYPE html> <html> <head> <meta charset=»utf-8″> <meta name=»format-detection»content=»telephone=no»> <meta name=»msapplication-tap-highlight»content=»no»> <meta name=»viewport»content=»user-scalable=no, initial-scale=1, maximum-scale=1, minimum-scale=1, width=device-width»> <!—Thisisawide open CSP declaration.Tolock thisdown forproduction,see below.—> <meta http-equiv=»Content-Security-Policy»content=»default-src * ‘unsafe-inline’; style-src ‘self’ ‘unsafe-inline’; media-src *; font-src * data: blob;»> <title>Hello World<title> <head> <body data-dom-cache=»true»> <div id=»app»><div> <script type=»text/javascript»src=»dist/build.js»></script> <script type=»text/javascript»src=»cordova.js»></script> <body> <html> |
В нём мы оставляем только подключение файлов , нашего собранного frontend’а в виде файла и div’а с , в котором и будет работать наше приложение.
Вот и всё, что нам требовалось сделать, теперь выполняем в консоли следующие команды:
# переходим в папку forntend’а
$ cd /hello_world/frontent
# запускаем сборку проекта
$ npm run build
|
1 |
# переходим в папку forntend’а $cdhello_worldfrontent $npm run build |
Сборка может занять от 5-10 секунд до нескольких минут, зависит от мощности вашего компьютера. После, в папке появится папка с файлом — это и есть наш собранный forntend.
Далее открываем утилиту PhoneGap и жмём на серую кнопку «Start» рядом с названием нашего проекта. Переходим по указанному адресу, и видим, что теперь в окне PhoneGap приложения отображается наше vue.js приложение.

PhoneGap + vue.js приложение
Теперь вы можете вести разработку внутри проекта frontend и быстро собирать его внутрь PhoneGap приложения.
Конечно, такой подход больше подходит для приложений, которые не используют нативное API Android и iOS устройств, так как если вы хотите их использовать, вам придётся каждый раз компилировать frontend приложение для визуального тестирования изменений в работе с нативным API в браузере или на вашем устройстве. Как бы то ни было, я считаю данный подход приемлемым, а если вам требуется нативное API, следует использовать нативный язык разработки для выбранной платформы (для Android — Java и Kotlin, для iOS — ObjectiveC и Swift) так как использование JavaScript для этих целей весьма неоднозначное решение и чаще всего недостаточно производительное.
Нативные и кроссплатформенные инструменты разработки
Исторически на рынке компьютеров всегда была конкуренция и каждый производитель предоставлял оптимальный набор так называемых «нативных» (родных) инструментов для разработки приложений под свои операционные системы и устройства. “Нативные” средства разработки обеспечивают оптимальную производительность и доступ к возможностям операционной системы.
Однако часто оказывалось, что эти инструменты были несовместимы друг с другом не только на уровне языка разработки, принятых соглашений и архитектур, но и на уровне механизмов работы с операционной системой и библиотеками. В результате для реализации одних и тех же алгоритмов, пользовательских или бизнес-сценариев требовалось написать приложение для нескольких сред на разных языках программирования. Например, если надо поддерживать 2 платформы, то требуется увеличение трудозатрат и команды в 2 раза. Плюс в 2 раза больше бюджетов на поддержку и развитие. Можно добавить, что во многих компаниях уже скопилась большая база кода, который также хотелось бы унаследовать в новых решениях.
Вторым важным моментом является наличие необходимых компетенций (знаний и опыта) внутри команды – если их нет, то потребуется время на обучение.
Для того, чтобы решить обе этих проблемы, на рынке появились инструменты кроссплатформенной разработки, предлагающие:
— максимизировать общую базу кода на едином языке программирования, чтобы продукт было проще разрабатывать и поддерживать;
— использовать существующие компетенции и специалистов для реализации приложений на новых платформах.
Так как языков программирования (и сред) сейчас наплодилось очень много (и специалистов, владеющих этими языками), то и инструментов для кроссплатформенной разработки существует изрядное количество. В данной книге нас интересуют только инструменты для создания мобильных бизнес-приложений, поэтому в следующих главах мы подробнее разберем как они работают. А пока чуть детальнее каждый из плюсов кроссплатформенной разработки:
Общая база кода. В зависимости от выбранного инструмента разработчик сможет шарить между платформами: ресурсы приложения (картинки, шрифты и прочие файлы), логику работы с данными, бизнес-логику и описание интерфейса. И если с ресурсами и логикой (обработки данных и бизнес-) все довольно просто, то вот с интерфейсом следует быть осторожнее, так как для каждой из платформ есть свои рекомендации и требования.
Использование существующих компетенций и команды. Здесь стоит учитывать не только язык программирования, но и понимание механизмов работы операционных систем iOS/Android/Windows, а также набор дополнительных библиотек и инструментов разработки.
Итак, «нативные» инструменты предоставляются самими владельцами экосистем и позволяют получить максимум из возможностей целевой операционной системы, имеют полный доступ к родным API, оптимальную производительность и требуют отдельной команды разработки под каждую платформу.
Кроссплатформенные фреймворки позволяют сократить трудозатраты и ускорить выпуск приложений в том случае, если требуется поддержка нескольких платформ одновременно, и имеются (или развиваются) необходимые компетенции. В долгосрочной перспективе кроссплатформенные решения помогут сэкономить приличное количество человеко-часов, но для этого стоит учитывать особенности выбранного инструмента.
Запуск приложения на Android-телефоне
Если у вас есть Android-телефон, можно запустить приложение PhoneGap на вашем устройстве. Однако перед использованием телефона для разработки необходимо переключить его в режим USB-отладки:
- Перейдите на экран Home и выберите Menu.
- Выберите Settings > Applications > Development.
- Включите USB-отладку.
- Необходимо также в Android Manifest объявить приложение как debuggable. Измените файл AndroidManifest.xml и добавьте в элемент .
- Подключите Android-телефон к компьютеру, используемому для разработки, при помощи USB-кабеля.
- Для запуска приложения выберите Run As > Android Application.
Появится запрос выбора назначения: эмулятор или реальное устройство. Выберите Android-телефон, как показано на :
После загрузки и установки на телефоне приложение запустится (см. ):
Заключение
В данной статье вы узнали о том, как использовать сочетание PhoneGap и Mobile Dojo для быстрого создания гибридного мобильного Android-приложения, выглядящего и ведущего себя как типичное Android-приложение. Мы написали его быстро, потому что использовали HTML и JavaScript вместо Java. Учитывая, что Web-код остается неизменным для разных мобильных операционных систем, это гибридное приложение можно легко адаптировать для iOS и Blackberry.
Не пропустите вторую часть данной серии, в которой будет рассматриваться создание мобильного приложения для страховой отрасли с использованием Dojo и PhoneGap.
Похожие темы
- Оригинал статьи: Mobile application development, Part 1: PhoneGap and Dojo Mobile on Android (EN).
- Загрузите Eclipse.
- Загрузите Dojo 1.6.
- IBM Rational Application Developer 8.0.3 (ознакомительная версия)..
- Загрузите Java SE JDK.
- Android SDK и руководство по установке.
- .
- В статье Использование DDMS для отладки Android-приложений (EN) рассматривается взаимодействие DDMS с отладчиком.
- Документация по DDMS на сайте для разработчиков Android-приложений.
- Информация о PhoneGap:
- Домашняя страница.
- Поддерживаемые функции.
- Документация.
- Вики-сайт.
- Форум пользователей.
- Форум разработчиков.
- В приведена информация по установке, настройке и развертыванию (EN).
- Информация о возможностях Mobile Dojo.
- Вся документация по Dojo.
- В статье Dojo Mobile 1.6 для начинающих (developerWorks, июнь 2011 года) рассказывается, как подключить и использовать виджеты и компоненты Dojo Mobile в ваших приложениях. Также приведена информация о том, как вложить ваши Web-приложения во встроенные приложения при помощи PhoneGap (EN).


