Ошибка «permission denied» в linux
Содержание:
Пожалуйста, помогите c переводом:
The rival gangs piled into one another with a vengeance — fists flew, knives flashed, clubs struck muscle and bone with sickening smacks
Английский-Русский
Giving a definition of the term “comedy”, one may face some difficulties as it’s one of the most complex categories of aesthetics. Comedy is historically volatile, it depends on the context and has a social nature. The laughter is not always a sight of comedy, and comedy is not always defined by laughter. It is circumstances, sharpening the contradictions and helping to reveal its social nature
Английский-Русский
It slides comfortably into the ‘affordable’ bracket though, considering its supersized display, and when it lands on contract (which should be soon) it won’t carry hefty monthly fees.
Английский-Русский
1. The ENIAC (1943-1946) The first all-electronic computer, the Electronic Numerical Integrator and Calculator (ENIAC) was developed at the Moore School of Electrical Engineering of the University of Pennsylvania. It was developed as a result of a military need. J.Presper Eckert and John Mauchly proposed the machine to solve the problem of calculating firing tables for new weapons. The ENIAC weigh
Английский-Русский
Resolution
Verify that you’re using the correct user name for your AMI
For a list of valid user names, see .
Verify that the permissions are correct on the instance and the correct SSH public key is in the authorized_keys file
There are three methods for performing these tasks:
Method 1: Use AWS Systems Manager Session Manager to log in to the instance and make corrections
This method updates permissions and injects your SSH public key into the authorized_keys file.
Note: Installation of the SSM Agent is required to use this method. For more information on Session Manager and a complete list of prerequisites, see Getting Started with Session Manager.
1. Open the AWS Systems Manager console.
2. Start a session.
3. Use the ls -ld command to make sure the permissions of the files under the home directory are correct. The following is a list of the correct permissions:
- Linux home directory, /home, for example, should be (0755/drwxr-xr-x).
- User’s home directory, /home/ec2-user/, for example, should be (0700/drwx——).
- .ssh directory permission, /home/ec2-user/.ssh, for example, should be (0700/drwx——).
- authorized_keys file permission, /home/ec2-user/.ssh/authorized_keys, for example, should be (0600/-rw——-).
The following is an example of the ls -ld command and the resulting output. In this example, ec2-user is the user name. Change the .
4. On your local computer, .
5. If the signature of the SSH public key isn’t present in the output, update the authorized_keys file to allow your SSH key. In the following example, replace the example key with your SSH public key.
6. To correct permissions, run the following commands on your EC2 instance.
7. Terminate the session.
8. Connect to the instance using SSH.
Method 2: Run the AWSSupport-TroubleshootSSH Automation procedure
AWSSupport-TroubleshootSSH installs the Amazon EC2Rescue tool. After installation, the tool checks for and corrects some issues that cause remote connection errors when connecting to a Linux machine through SSH. For more information, see How can I use the AWSSupport-TroubleshootSSH Automation workflow to troubleshoot SSH connection issues?
Method 3: Use a user data script to repair SSH permissions and add the correct SSH public key to the authorized_keys file
Important
- This procedure requires a stop and start of your EC2 instance. Instance store data is lost when an instance is stopped and started. Be aware that if your instance is instance store-backed or has instance store volumes containing data, the data is lost when the instance is stopped. For more information, see .
- If your instance is part of an Amazon EC2 Auto Scaling group, or if your instance is launched by services that use AWS Auto Scaling, such as Amazon EMR, AWS CloudFormation, AWS Elastic Beanstalk, and so on, then stopping the instance could terminate the instance. Instance termination in this scenario depends on the for your Auto Scaling group. If your instance is part of an Auto Scaling group, temporarily remove the instance from the Auto Scaling group before starting the resolution steps.
- Stopping and starting the instance changes the public IP address of your instance. It’s a best practice to use an Elastic IP address instead of a public IP address when routing external traffic to your instance.
1. Open the Amazon EC2 console.
2. Choose Instances from the navigation pane, and then select the instance you are trying to launch.
3. .
4. Choose Actions, Instance settings, View/Change User Data.
5. Copy the following user data script into the View/Change User Data dialog box, and then choose Save.
6. On your local computer, .
7. If the signature of the SSH public key isn’t present in the output, then append the correct key to the user data script that you created in step 5 (if the signature matches, then you can skip this step). Append the SSH public key to the user data script as shown in the following example. Replace the example key with your SSH public key.
9. .
Note: The preceding user data script is set to run on every reboot of the instance. After regaining access to your instance, remove the user data script.
To remove user data:
- Complete steps 1–4 in this section.
- Delete the user data script in the View/Change User Data dialog box.
Exclude all “permission denied” messages from “find” command on Linux
There is one problem with the following command. It would filter out all error messages created by find command, not just the permission denied ones:
find -name foo 2>/devnull find -type d -name bar 2>/devnull |
To avoid that try the following find command along with grep command on Linux or Unix-like systems:
find -name foo 2>&1 | grep -v "Permission denied" find -type d -name bar 2>&1 | grep -v "Permission denied" |
In short you should use following syntax to skip “permission denied” errors messages when running find in Linux or Unix-based systems:
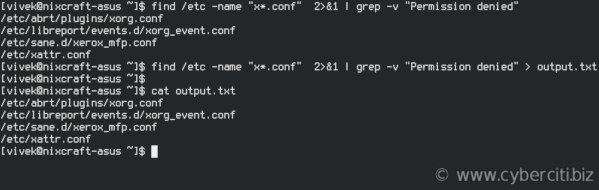
find pathtodir -name "search-patter" 2>&1 | grep -v "Permission denied" find etc -name "x*.conf" 2>&1 | grep -v "Permission denied" |
To store output to a file run:
find pathtodir -name "search-patter" 2>&1 | grep -v "Permission denied" > output-file find etc -name "x*.conf" 2>&1 | grep -v "Permission denied" > output.txt |
Display output.txt using cat command:
Man page for bash or ksh shell.
4 ответа
Нет необходимости выполнять chmod вообще при использовании sudo для редактирования файла, хотя вы не должны использовать sudo gedit (скорее, sudo -H gedit, например)
Поскольку вы
Загрузите живую сессию (например, загрузочный USB-диск Ubuntu, который вы используете для установки, или System Rescue.Если у вас его нет, вы можете сделать это с помощью другого компьютера или даже купить его). Если вы используете Ubuntu live USB, выберите ** Try Ubuntu, не устанавливая «.
В живой среде определите корневой раздел (огорченный) на диске с помощью sudo fdisk -l
It вероятно, самый большой раздел, и он будет помечен как «файловая система Linux». Что-то вроде /dev/sda1 или, возможно, /dev/mmcblk0p2.
Установите корневой раздел, используя собственное имя вместо sdXY
Проверьте, что это был правильный раздел:
Должен выводить что-то, что вы ожидаете увидеть в /, примерно так:
] Если это выглядит правильно:
Затем вы можете размонтировать раздел и перезагрузить его в свою систему как обычно
ответ дан
22 May 2018 в 20:12
Нет необходимости выполнять chmod вообще при использовании sudo для редактирования файла, хотя вы не должны использовать sudo gedit (скорее, sudo -H gedit, например)
Поскольку вы
Загрузите живую сессию (например, загрузочный USB-диск Ubuntu, который вы используете для установки, или System Rescue.Если у вас его нет, вы можете сделать это с помощью другого компьютера или даже купить его). Если вы используете Ubuntu live USB, выберите ** Try Ubuntu, не устанавливая «.
В живой среде определите корневой раздел (огорченный) на диске с помощью sudo fdisk -l
It вероятно, самый большой раздел, и он будет помечен как «файловая система Linux». Что-то вроде /dev/sda1 или, возможно, /dev/mmcblk0p2.
Установите корневой раздел, используя собственное имя вместо sdXY
Проверьте, что это был правильный раздел:
Должен выводить что-то, что вы ожидаете увидеть в /, примерно так:
] Если это выглядит правильно:
Затем вы можете размонтировать раздел и перезагрузить его в свою систему как обычно
ответ дан
18 July 2018 в 09:44
Вы удалили исполняемые права для доступа к каталогу /etc/ другими пользователями. Вот почему они больше не могут обращаться к каталогу.
Возможно, вы захотите попробовать sudo su, а затем chmod 755 /etc.
Однако, если это не работает, вы можете запустить живое изображение, смонтировав свой жесткий диск, а затем выполните команду chmod chmod 755 /mountpoint/etc
ответ дан
22 May 2018 в 20:12
Вы удалили исполняемые права для доступа к каталогу /etc/ другими пользователями. Вот почему они больше не могут обращаться к каталогу.
Возможно, вы захотите попробовать sudo su, а затем chmod 755 /etc.
Однако, если это не работает, вы можете запустить живое изображение, смонтировав свой жесткий диск, а затем выполните команду chmod chmod 755 /mountpoint/etc
ответ дан
18 July 2018 в 09:44
Пожалуйста, помогите c переводом:
(8) 4 ÷ 2 are divided into 5 steps
(a) Correct quotient
(b) Over-quotient by once
(c) Over-quotient by twice or more
(d) Same first digits (2 scenarios)
(e) Both first digits are 1 over-quotient (129, 348, 567, 786, 95)
(f) Line to help memorize returning : minus 1 time, skip a space and add back Mr. Cat
Английский-Русский
It slides comfortably into the ‘affordable’ bracket though, considering its supersized display, and when it lands on contract (which should be soon) it won’t carry hefty monthly fees.
Английский-Русский
The rival gangs piled into one another with a vengeance — fists flew, knives flashed, clubs struck muscle and bone with sickening smacks
Английский-Русский
1. The ENIAC (1943-1946) The first all-electronic computer, the Electronic Numerical Integrator and Calculator (ENIAC) was developed at the Moore School of Electrical Engineering of the University of Pennsylvania. It was developed as a result of a military need. J.Presper Eckert and John Mauchly proposed the machine to solve the problem of calculating firing tables for new weapons. The ENIAC weigh
Английский-Русский


