Nx server using freenx
Содержание:
Настройка менеджеров рабочего стола KDE или Gnome
Перед тем как делать что-нибудь из этого раздела, убедитесь, что сервер работает и подключения к нему разрешены. Далее будут решения проблем связанных с NXClient.
Вот простой пример подключения к сессиям Gnome и KDE, однако,процесс подключения к другим оконными менеджерам, типа fluxbox, xfce и whatever несколько отличается.
Выберите «custom» и используйте команду «startx», далее появится один из двух результатов: на пустом экране после лого !М или клиентская часть сообщит об ошибке, связанной с Х-сервером. Если команда «startx» не сработала, то используйте другую команду для запуска вашего оконного менеджера.
Alternative fix
A simple fix without resorting to the above seems to involve a simple edit to the config file. This should work for fluxbox/openbox/xfce or any other window manager that uses the .xinitrc startup file in a call to startx.
Simply edit the config file (as root):
/opt/NX/etc/node.conf
and change
#USER_X_STARTUP_SCRIPT=.Xclients
to
USER_X_STARTUP_SCRIPT=.xinitrc
Remember to remove the # symbol from the start of the line.
Then in the client under configuration settings, choose Custom as the desktop, and click on settings:
- In the first group select —
- In the second group select —
Installing NX / FreeNX on the server
Currently there is a version of NX and FreeNX in the EPEL + nux-dextop repositories for CentOS 6.
First, install both repositories:
# rpm -Uvh https://dl.fedoraproject.org/pub/epel/6/x86_64/epel-release-6-8.noarch.rpm
# rpm -Uvh http://li.nux.ro/download/nux/dextop/el6/x86_64/nux-dextop-release-0-2.el6.nux.noarch.rpm
To install the stable version of NX / FreeNX, issue this command from the server:
# yum install freenx-server nxagent
A number of other packages will be installed for dependency.
|
Note: Sometimes, there are issues that require the No Machine Client to also be installed on your NX server. If you are having issues such as the inability to close the client, please download the latest No Machine Linux Client RPM (see the Linux link below) and install it on your NX server. These issues are much less prevalent in the current versions of NX ( i.e NX > 3 and freenx > 0.7. ) |
Проблемы[править]
Warning: "/usr/lib/cups/backend/smb" is not executable.
         Users will not be able to enable printing.
и вы планируете использовать проброс принтеров, то вам необходимо поставить пакет samba-client .
Если в выводе service freenx-server check вы видите следующие сообщения
Warning: Invalid permissions on "/sbin/mount.cifs". Valid permissions are "4711". You'll not be able to use SAMBA.
Warning: Invalid permissions on "/sbin/umount.cifs". Valid permission are "4711". You'll not be able to use SAMBA.
и вы планируете использовать проброс CIFS-ресурсов, то вам необходимо выполнить нижеприведенные команды:
# apt-get install samba-client-control
# control cifsmount public
# control cifsumount public
ВНИМАНИЕ: В этом случае монтирование CIFS-ресурсов будет доступно всем пользователям. Проверьте вывод control cifsmount help, возможно, уже появилась возможность задать допуск специальной группе.
- Есть вариант точной выдачи прав простым хаком — создаём группу, задаём эту группу для mount.cifs, выставляем ему SUID и право запуска группе, затем добавляем нужных пользователей в группу:
groupadd mountcifs
chmod 04710 /sbin/mount.cifs
chown :mountcifs /sbin/mount.cifs
for u in user1 user2 ... ; do usermod -a -G mountcifs $u ; done
Если в выводе service freenx-server check вы видите следующее сообщение:
Warning: Invalid value "COMMAND_SMBUMOUNT_CIFS=/sbin/umount.cifs". You'll not be able to use SAMBA.
Исправьте значение COMMAND_SMBUMOUNT_CIFS на /bin/umount.
Если в выводе service freenx-server check вы видите следующее сообщение:
Warning: Invalid permissions on "/usr/sbin/cupsd". Valid permissions are "755".
         Users will not be able to enable printing.
Смените права доступа у /usr/sbin/cupsd на предложенные. По умолчанию там 0700.
На ALT Desktop 4.0 команда lpadmin не понимает имя драйвера в виде
 #lpadmin -p HPLaserJet -m foomatic-ppdfile:HP-LaserJet_9040-hpijs.ppd
 lpadmin: Unable to copy PPD file!
Правильный вид
#lpadmin -p HPLaserJet -m foomatic:HP-LaserJet_9040-hpijs.ppd
Из-за этого на сервере драйвер для принтера не выставляется. Решается в скрипте /usr/bin/nxprint заменой команды у awk
 с
 printf("driver|%s%s|%s|%s|%s\n",$4,A,$6,$2,substr($3,2)) } '
 на
 printf("driver|%s%s|%s|%s|%s\n",$4,A,$6,"foomatic"substr($2,index($2,":")),substr($3,2)) } '
Если клиенты цепляются с ALT Desktop 4.0, то есть проблема с печатью, т.к. существует бага в dbus 1.0.2, из-за которой у процесса cupsd (на стороне клиента) не закрываются pipe’ы и со времен их кол-во переполняет верхний потолок кол-ва разрешенных открытых файлов . Апгрейд у клиента пакетов libdbus и dbus из branch 4.0 решает проблему
NoMachine: Поддержка
К сожалению, NoMachine предлагает только личную поддержку платных подписчиков. Если у вас есть подписка, вы можете получить помощь, отправив запрос через онлайн-центр поддержки клиентов. Те, кто задумывается о покупке программного обеспечения, могут связаться с отделом продаж через онлайн контактную форму.

База знаний NoMachine включает подробную документацию. (Изображение предоставлено: NoMachine)
Тем не менее, все пользователи могут получить доступ к базе знаний NoMachine и форуму сообщества. База знаний содержит подборку учебных пособий и подробную документацию, помогающую устранять распространенные проблемы. Более конкретные вопросы можно задать на активном форуме сообщества.
Problems
Keyboard Mapping problems
Keyboard layout aways falls back to en_US.
After login, run setxkbmap with your layout.
Example:
$ setxkbmap -layout br
or create the file
# touch /usr/share/X11/xkb/keymap.dir
Creating this file will fix the issue for the next logins.
Debug problems
Edit the nxserver config file and change:
#SESSION_LOG_CLEAN=1
to
SESSION_LOG_CLEAN=0
Then you can look/debug the log files in:
$HOME/.nx/T-C-hostname-display-session-id
For succesfull connections and:
$HOME/.nx/F-C-hostname-display-session-id
For failed ones.
Authentication OK, but connection fails
If you are trying to start KDE edit and search for:
COMMAND_START_KDE=startkde
Replace for:
COMMAND_START_KDE=/usr/bin/startkde
Wrong password / No connection possible / Key-based authentication
If you have changed your ssh daemon to run on an alternate port, be sure to modify SSHD_PORT within /etc/nxserver/node.conf.
If you get always wrong password or no connection after authentication was done and you are sure that you typed it correct, check that your server can connect to itself using localhost by ssh.
If you messed up your key files, create new ones or fix the old ones, it’s probably caused by a wrong known_hosts file.
If you get wrong password or login, put ENABLE_PASSDB_AUTHENTICATION=»1″ in /etc/nxserver/node.conf and add a user by
# /usr/bin/nxserver --adduser
# /usr/bin/nxserver --passwd
The above commands are also necessary if you have disabled password authentication in ssh and instead are using key-based authentication.
NX crashes on session startup
If your NX Client shows the NX logo then disappears with a Connection Problem dialog afterwards.
Missing fonts
Then it could be due to missing fonts. Mostly applies if you have installed Arch Linux base and then installed freenx after without the whole X11 set.
Solution until FreeNX Dependencies is fixed is to install on your NX Server and your NX should work.
Note: This does not apply to freenx 0.6.1-3 and above, fix has been incorporated in it and following versions.
If you see the NX logo (!M) then a blank screen.
This problem can be solved by running a login manager- The problem is that X11 is not started, and it appears that «startx» or similar do not work from the freenx client.
Follow these instructions to setup a login manager and load it at startup: Display manager
Blind: If this does not resolve your issues, be aware that freenx and bash_completion do not play well together. I only got things to work after removing bash_completion from the .bashrc.
Problem: A session menu comes up talking about «chooseSessionListWidget.» A window manager never loads.
Double check to see if .xinitrc is executable:
stat -c "%A" ~/.xinitrc
If the file is not executable, simply:
chmod +x ~/.xinitrc
n
Keep in mind this command should be executed along with pertinent instructions on this page about .
Cannot connect because command sessreg not found
If you get the following error while connecting:
 /usr/bin/nxserver: line 941: sessreg: command not found
 NX> 280 Exiting on signal: 15
then you have to install the package .
Broken resume with Cairo 1.12.x
Latest cairo updates broke the render extension. After resuming a session all characters from before suspending won’t get rendered. To fix this add this single line to .
AGENT_EXTRA_OPTIONS_X="-norender"
The program 'Eclipse' received an X Window System error.
This probably reflects a bug in the program.
The error was 'BadValue (integer parameter out of range for operation)'.
(Details: serial 8414 error_code 2 request_code 149 minor_code 26)
Setup
NX uses the ssh protocol to connect to the remote service. If you use a key-based authentication, you need to add your username to the NX userlist as follows:
Ensure that /etc/nxserver/node.conf file contains the following line (make sure that the line is not commented out) :
ENABLE_PASSDB_AUTHENTICATION="1"
Add yourself to the nxserver database. Suppose your username is bob, run this command as the root user:
# /usr/libexec/nx/nxserver --adduser bob
Which should give you something similar to :
NX> 100 NXSERVER - Version 3.2.0-74-SVN OS (GPL, using backend: not detected)
NX> 1000 NXNODE - Version 3.2.0-74-SVN OS (GPL, using backend: not detected)
NX> 716 Public key added to: /home/bob/.ssh/authorized_keys2
NX> 1001 Bye.
NX> 999 Bye
When the above command was run for the first time, you may see a message, «No such file or directory». This is expected, not a problem.
Assign a password for bob:
# /usr/libexec/nx/nxserver --passwd bob
And this should output something like this, asking for the password only once:
NX> 100 NXSERVER - Version 3.2.0-74-SVN OS (GPL, using backend: not detected)
New password:
Password changed.
NX> 999 Bye
Check the /etc/ssh/sshd_config file. If you have previously defined AllowUsers, then you’d need to add users nx and bob to that line :
AllowUsers nx bob
That’s it, all done. Your remote machine is now ready to accept NX clients for your login.
Desktop integration wanted
For those who want to have freenx supported in krfb, krdc, log into bugs.kde.org, and add a comment and vote for the following bugs (wishlist) :
-
: nxserver support in krfb
-
:nx support in krdc (client), it seems that work is already in progress, and there only a few problems left.
The same should be done on gnome side, for vino and vinagre.
-
: vinagre has a plan to support nx
-
vino goals/to-do v2 : no mention of nx; only rdp and vnc
NXLaunch is another solution and could possibly be integrated in other Remote Desktop clients.
-
msg00330, 2007-Sept : committed source
-
msg00404, 2007-Sept : integration
CategoryInternet CategoryNetworking CategoryInstallation CategoryAudio CategorySoftware
Status
Things that work:
- (https://github.com/ottokiksmaler/nx500_nx1_modding/tree/master/video-bitrate-mods/nx-patch)
- (https://github.com/ottokiksmaler/nx500_nx1_modding/tree/master/nx-on-wake)
- Customizing functions of various keys for introduction.
-
Focus stacking
- Focus on near point — press «Near»
- Focus on far point — press «Far»
- Click «Stack» and wait for it to finish
- Files are in the usual place — remember to fix exposure/awb/etc as you normally would
- Precompiled binary is here
-
Command line options are:
- NX500 — Fully electronic shutter — silent
- Shutter count and power on count
- Prefman tool — access to full preferences in usable form
- Collection of small utilities for bash scripting:
- — displays a popup message for a given number of seconds
- — displays a OK / Cancel dialog, returns 0 if OK, 255 if Cancel
- — displays an entry box with OK/Cancel buttons and prefilled sample text, returns entered text and 0 code for OK or just 255 for cancel. If the fifth parameter is «number» then the NUMBERONLY keyboard is shown.
- — Displays a button at given coordinates (default 400 0) of given size (default 120 60) with given label (default REC) and clicks given button (default rec). To dismiss long-click it for at least five seconds. Record — rec, OK — ok, Half-shutter — S1, Full-shutter — S2, Menu — menu, etc.
- — remaps half-shutter and full shutter to user specified keys, for example: will remap half-shutter to AEL and full-shutter to REC so you can start/stop video and lock exposure while camera is in gimbal.
- — remaps half-shutter to OK (video pause) and full shutter to REC (video start/stop)
- — restart video before file corruption, generate lists of selected/displayed files in gallery
- Running scripts without entering factory mode by starting Bluetooth
- Running a FTP server on camera
- Enabling PTP mode on the camera
- Capturing screenshots of LCD
- Running arbitrary shell scripts from SD card
- Running a telnet server for remote access to camera
- Running a fully functional browser on camera (run browser from script or telnet session)
- Controlling the camera over telnet or from scripts (two different ways) including changing modes, exposure parameters, capturing images, setting resolution and quality, etc.
- Not a real 120fps — sorry — NX500 — 1920×1080 video at 120fps and ~40Mbps (already present in NX1)
- Working with key events (detecting and sending) — also covers touch
- Working with generic X — xeyes work, xmessage works, etc.
- Running debugger — gdb on device and gdb server on device
- Description of working with focus from command line
- Description of working with lens
-
Focus buttons — Program that displays series of buttons on top of the screen
- long press (1+s) to save current focus position
- click to restore saved focus position
- Can be used for studio shooting, astrophotography (focus on infinity during day, recall the focus during the night), etc.
- Precompiled binary is here
- Controlling LCD / EVF
- Utility for direct read/write access to RAM of another process — useful for in place patching of already loaded binaries
- Boot process and speeding up the mods
- Compiling against camera library
- Updating the Hibernation Image
- Permanent bitrate mods to hibernation image
Демонстрация работы NxNomachine.
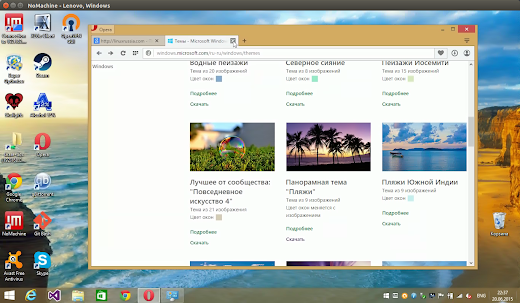
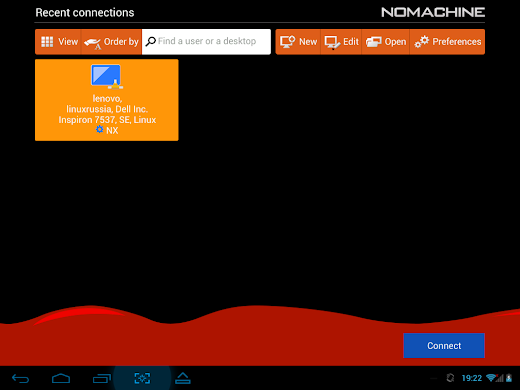
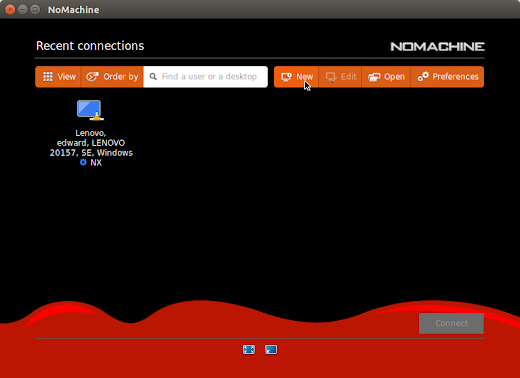
После того, как установили программу, то серверная часть начнет работать. И уже можно подключаться к другому компьютеру в локальной сети. Причем список компьютеров с установленными NX NoMachine отобразится в основном окне клиента программы. Вот так выглядит окно клиента:
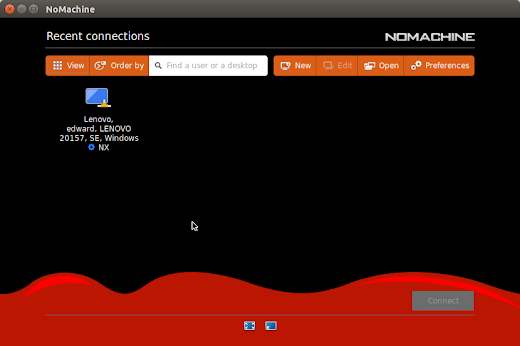
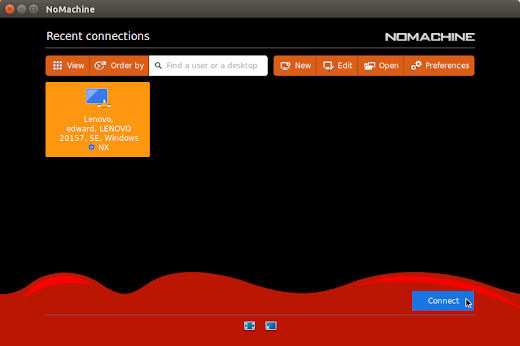
Как видно, уже отобразился компьютер в локальной сети, на котором установлена программа nx NoMachine, и я могу его выбрать и соединиться, не настраивая соединение:
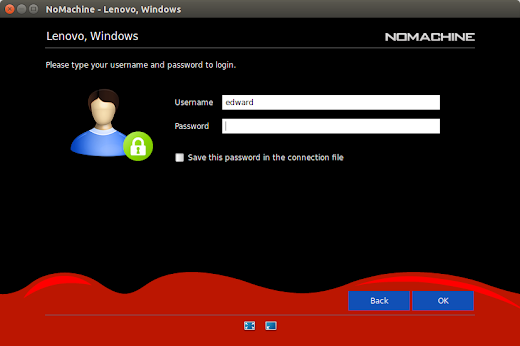
При подключении вводим имя пользователя и пароль:
Будет установлено соединение. Программа постоянно делает вам подсказки по горячим клавишам и меню:
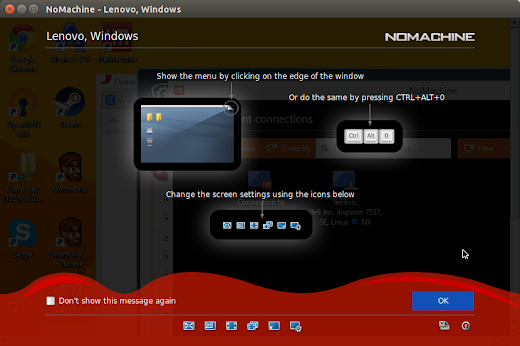
То есть, всё очень интуитивно и понятно. Вот мы и подключились, можем делать всё что угодно:
Как было подсказано в подсказке, можем зайти в меню (навести курсор в правый верхний угол):

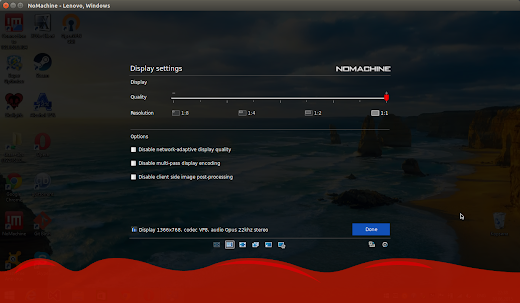
Можем изменить параметры экрана:
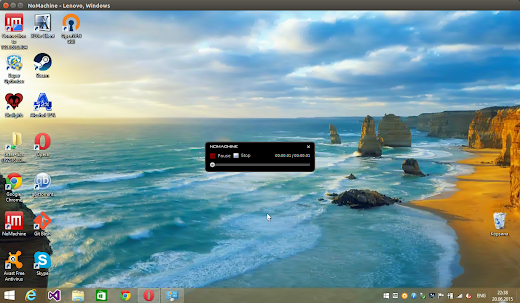
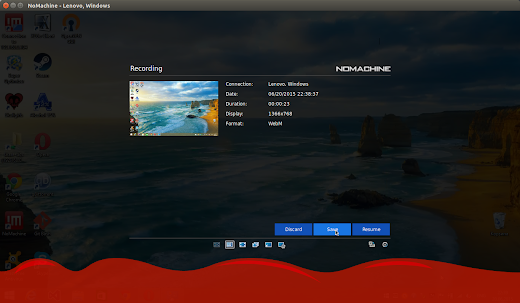
И записать, что мы делаем:
Вот так вот выглядит подключение с помощью NX NoMachine c Ubuntu к Windows. Всё тоже самое аналогично, когда подключаемся с Windows к Ubuntu. С Ubuntu на Ubuntu. Интерфейс программы везде одинаков на любом устройстве. А теперь давайте подключимся с планшета на Android к нашей рабочей машине на Ubuntu. На андроид доступен только клиент. То есть подключиться с компьютера к планшету не выйдет. Открываем программу и нам отобразятся компьютеры в локальной сети:
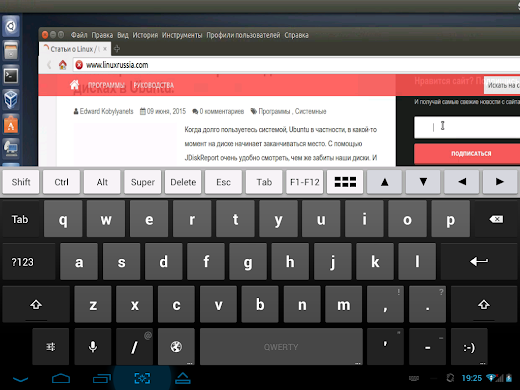
Выбираем, вводим пароль и подключаемся. Нам отобразится наш рабочий стол Ubuntu, который мы сможем масштабировать и делать почти тоже самое что и на компьютере.

Можем печатать:
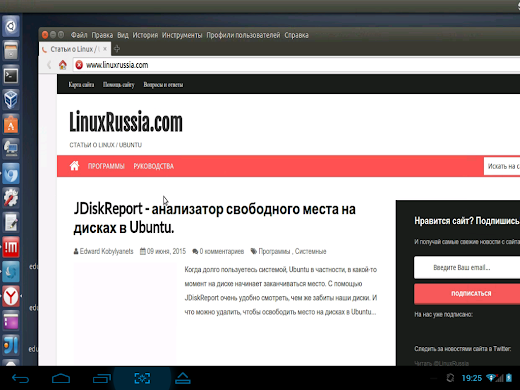
Можем открывать различные приложения:
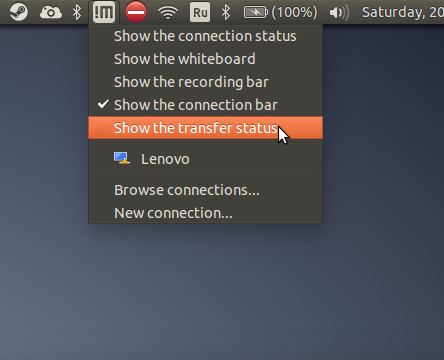
Стоит также упомянуть, что соединение происходит по ssh. Следовательно при первом доступе будет аутентификация и разрешение на внесение хостов в список доверенных.Прочие интересности. На системной панели есть ярлык. С помощью которого можно перейти к главному окну или выбрать какой либо инструмент:
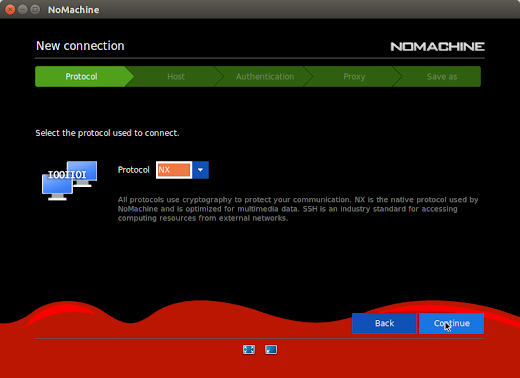
Кроме того, можно самостоятельно настроить соединение к компьютеру, выбрав в главном окне new:
Откроется окно создания нового соединения:
На вкладке host вводим IP (локальный, либо внешний статический):

Выбираем способ аутентификации:

Называем как нравится и можно также выбрать создания ярлыка на рабочем столе:
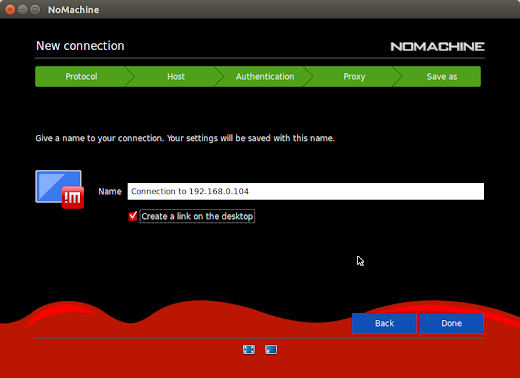
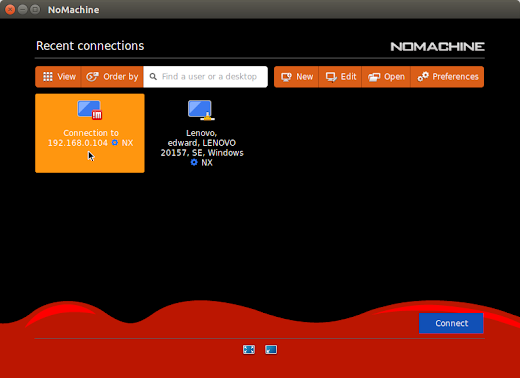
После чего будет создано новое соединение и оно отобразится в главном окне.
Хоть программа и нерусифицирована, но она настолько интуитивно понятная, что справится человек, незнающий английского языка (если еще есть такие).
Troubleshooting
Headless server
If no X server is running on the server, NoMachine starts its own X server () and tries to run a script to get the user into the default DE. This fails in Arch Linux (you get only a black screen) because an script does not exist.
To resolve this issue, edit the key in . E.g. for MATE desktop environment:
DefaultDesktopCommand "/usr/bin/mate-session"
Separate NoMachine X session in parallel with existing X session
In default setup, the Free edition of NoMachine connects the client directly to an existing X session on the remote computer, even if it runs the X Display Manager only. This may be unwanted, because no other user may use the target computer locally at the same moment and because any person with physical access to the target computer can see on the physical display, what the remotely connected user is doing.
However, it is possible to setup NoMachine to check only for a particular DISPLAY, e.g. and it will ignore the existing X session on (standard setup in Arch Linux) and start a new virtual session for the remotely connecting user.
To do so, edit the key in :
PhysicalDisplays :10
Problems with default keyboard in Display Manager
When NoMachine connects to display manager on the target computer and the user tries to login as if sitting at the target computer, the user authentication may fail due to a different keymap. A workaround is to type the user’s password e.g. in a text editor and copy it via clipboard to the NoMachine session.
Once the user is logged in to the remote desktop environment, running (‘cz’ stands for the Czech keyboard as an example) should resolve the problem with key mappings.
Connecting via SSH
The free edition of NoMachine does not allow to use the SSH protocol to connect to the target computer and only NX protocol (listening on port by default) is used.
If it is not preferred to open yet another port on the firewall, a workaround is to create a standard SSH tunnel between client and target computer and connect through it:
On the client computer, for example:
$ ssh -L 4000:localhost:4000 user@targetmachine -fN
Configuring SSH port
By default, nxserver uses port 22 for communicating over SSH. On some machines or networks, port 22 may be blocked; some Internet providers block port 22, for instance. Port 22 is also a common target of people trying to crack into a network. To make the SSH server listen on port 8888, you can do the following:
Edit the file /etc/ssh/sshd_config
gksudo gedit /etc/ssh/sshd_config
Find
Port 22
and change it to
Port 8888
You then need to restart SSHD. Try
/etc/init.d/ssh restart
FreeNX should detect the SSHD port, but otherwise: Edit the file /etc/nxserver/node.conf
gksudo gedit /etc/nxserver/node.conf
Find
# The port number where local 'sshd' is listening.
#SSHD_PORT=22
and change it to:
# The port number where local 'sshd' is listening.
SSHD_PORT=8888
That is, change the port number to the one that sshd is listening to, and uncomment the line.
NoMachine: безопасность
Широкий спектр функций безопасности защищает пользователей NoMachine и их данные. Все коммуникации защищены сертификатами SSL для предотвращения взлома данных. Новые соединения настраиваются за брандмауэром и NAT-маршрутизаторами, а также доступна двухфакторная аутентификация для снижения риска несанкционированного доступа к учетной записи. Кроме того, пользователи могут защитить конфиденциальную информацию на удаленных устройствах, отключив их экраны. В целом, NoMachine предоставляет более чем достаточно функций безопасности для защиты вашей учетной записи.
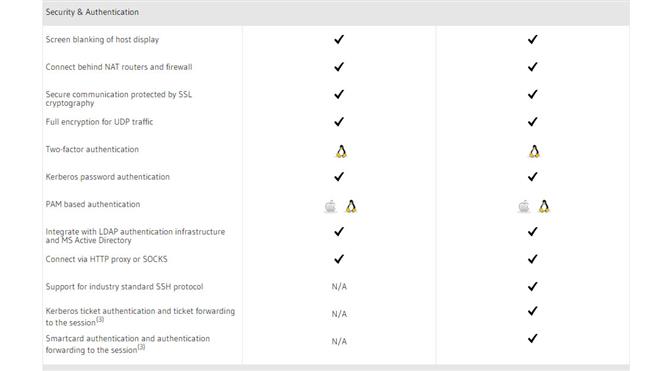
NoMachine предлагает ряд функций безопасности для защиты пользователей. (Изображение предоставлено: NoMachine)
Разное
Если вы устанавливаете FreeNX на удаленном сервере, вам также необходимо установить среду рабочего стола на компьютере для запуска удаленной сессии. Это легко сделать. Для Gnome выполните следующую команду:
yum groupinstall 'GNOME Desktop Environment''X Window System'
FreeNX обычно делает соединение на адрес 127.0.0.1, то есть локальный адрес. Если вы не меняли конфиг по умолчанию sshd_config, то демон sshd будет доступен по этому именно адресу.
Однако, если у вас есть изменения в строке listenAddress в /etc/ssh/sshd_config, это может стать причиной проблем. Убедитесь, что sshd доступен на 127.0.0.1. Это можно проверить командой:
netstat -an |grep 22
Результат должен быть примерно таким:
tcp    0   0 0.0.0.0:22       0.0.0.0:*         LISTEN

tcp    0   0 :::22       0.0.0.0:*              LISTEN
(строки выше предполагают, что вы используете соединение по умолчанию порт 22.) Вывод показывет, что sshd слушает все адреса.
По разным причинам люди иногда меняют запись в sshd_config для конекта только на определенный адрес. Если вы увидите что-то на подобие следующего:
tcp 192.168.1.20:22 0.0.0.0:* LISTEN
это означает, что sshd слушает соединения только по адресу 192.168.1.20. Это приведет к невозможности соединения FreeNX, так как он пытается подключиться к 127.0.0.1
Чтобы это исправить, добавте еще одну строку ListenAddress в /etc/ssh/sshd_config. Как здесь
ListenAddress 127.0.0.1
(Она должна распологатоься на отдельной строчке от остальных ListenAddress записей).
При удаленном подключении, используйте команду screen. Это поможет вам перезагрузить sshd, который оключит в этот момент удаленную ssh сессию. (Есть и другие способы, чтобы перегрузить демон sshd без отключения себя, но screen является одним из самых простых.)
screen
Это откроет вам новую командную строку. Далее перезагрузите sshd.
/etc/init.d/sshd restart
Воспользуйтесь командой netstat -an снова, чтобы проверить трансляцию на 127.0.0.1.
netstat -an
Теперь вы должны увидеть что-то на подобие этого:
tcp      192.168.1.20:22        0.0.0.0:*    LISTEN

tcp      127.0.0.1:22           0.0.0.0:*    LISTEN
FreeNX теперь может подключиться.
Setup
Server
SSHD
For freenx authentication to work, sshd has to be setup properly.
You need to allow RSAauthentication, Password Authentication, and you also need to include nx public keys to Authorizedkeysfile.
If you do not want to allow password login globally, add match block at the end of file like below: :
RSAAuthentication yes
PubkeyAuthentication yes
PasswordAuthentication no
PermitEmptyPasswords yes
AuthorizedKeysFile /usr/NX/home/nx/.ssh/authorized_keys /usr/NX/home/nx/.ssh/authorized_keys2
#
#
#
Match Address 127.0.0.1
  PasswordAuthentication yes
Main configuration
The main configuration file is located at .
If you are running your SSH daemon on a port other than the default port 22, you will need to uncomment and update:
If you use KDE or GNOME desktop environments you do not need to edit this file, as the defaults with the modified MD5SUM command should work in this case. If you use another window manager such as Fluxbox/Openbox or Xfce, you may need to edit this file slightly (see below).
Or if you are not using CDE but Xfce you could simply edit CDE line like below and start cde from the client:
CommandStartCDE = "/usr/bin/startxfce4"
After installing the nx-all package, run for an overview of the install and uninstall procedures.
Note:
- You should also install on the server or you will not see the «suspend/terminate» dialog when you try to close the window or hit .
- Although mostly assumed that you will have it already, is also necessary for some things.
Keys
Keys are used to authenticate the clients with the server by default. You could used the default key created during installation or you could create a new pair.
If you create your own key pair, make sure you add the directory of the public key to authorizedkeyfiles in sshd_config and also SSHAuthorizedKeys in node.cfg. And Don’t forget to send the private key to the client.
The public key can be found here check :
/usr/NX/home/nx/.ssh/authorized_keys2
The private key can be found here:
/usr/NX/share/keys/server.id_dsa.key
Recreation of random keys:
/usr/NX/bin/nxserver --keygen
You can check if the nxserver is running by:
/usr/NX/bin/nxserver --status
You can also check if a desired user can be logged on by:
/usr/NX/bin/nxserver --usercheck USERNAME
Starting the server
As of installation nxserver is set to start up automatically, however, you are likely to need to restart the server after setting up:
/usr/NX/bin/nxserver --restart
Client
Windows
Get the client from nomachine’s homepage: .
Tip: Nomachine tends to remove old clients from their homepage,
If your setup works with a client save it in a safe place.
Configuration
As mentioned above, the client must contain the correct key to connect to the server. If you are using the custom keys generated during install, you need to copy the client key to the following locations:
- Windows:
- Arch Linux:
After moving the keys you may have use the nxclient GUI to import the new keys. From the configuration dialog press the ‘Key…’ button and import the new client key.
Installing the FreeNX server on older Ubuntu Versions
These instructions are for Ubuntu versions prior to Ubuntu Karmic (9.10).
FreeNX is not included in Ubuntu, so we’ll add it from the FreeNX Team PPA.
Add this repository using the in Software Sources. When it asks, Reload the information about available software. Now you can see and install the freenx package in Synaptic Package Manager.
You must edit the configuration files and install by hand:
-
Add this PPA to it’s own list file
sudo bash -c "echo 'deb http://ppa.launchpad.net/freenx-team/ppa/ubuntu VERSION main
deb-src http://ppa.launchpad.net/freenx-team/ppa/ubuntu VERSION main' >> /etc/apt/sources.list.d/freenx.list"
where VERSION can be: dapper, hardy, intrepid or jaunty. More information can be found at FreeNX Team PPA.
-
Add the public key of FreeNX PPA run:
sudo apt-key adv --recv-keys --keyserver keyserver.ubuntu.com F3A662B57D580D3A2E98E5152A8E3034D018A4CE
-
Then Update Apt
sudo apt-get update
-
After you add the repository, then install the freenx package (using Aptitude to install extra needed packages).
sudo aptitude install freenx
-
Now use nxsetup to install necessary files and create the special user «nx»
sudo /usr/lib/nx/nxsetup --install
Коротко о NX Nomachine.
NX является самодостаточным программным комплексом, который предоставляет полный спектр управления удаленным компьютером, включая такие функции, как доступ к общим каталогам и принтерам, поддержку мультимедиа. Есть две категории People (бесплатная) и Enterprise (платная). Стоит отметить, что клиент-сервер доступен для Linux, Windows, Mac OS X. И еще клиенты доступны для IOS и Android. Отличие бесплатной версии от платной является то, что одновременно к серверу может быть установлено только одно сетевое подключение с помощью клиента. Поэтому, если нужно организовать терминальное решение, нужно покупать Enterprise версию. Но бесплатную версию можно использовать для администрирования сети и удаленного доступа между двумя компьютерами. Пример использования бесплатной версии NX NoMachine будет описан ниже.
What is Raspberry Pi
The Raspberry Pi is a credit-card sized computer that plugs into your TV and a keyboard. It’s a capable little PC which can be used for many of the things that your desktop PC does, like spreadsheets, word-processing and games. It also plays high-definition video.
The Raspberry Pi has a Broadcom BCM2835 system on a chip (SoC), which includes an ARM1176JZF-S 700 MHz processor, VideoCore IV GPU, and 256 megabytes of RAM. It does not include a built-in hard disk or solid-state drive, but uses an SD card for booting and long-term storage.
- CPU: 700 MHz ARM1176JZF-S core
- Video: Broadcom VideoCore IV, OpenGL ES 2.0, 1080p30 h.264/MPEG-4 AVC high-profile decoder
- Memory: 256 MB (shared with GPU)
- USB ports: 2 (can be expanded with a usb hub)
- Video Outputs: Composite RCA (PAL & NTSC), HDMI (rev 1.3 & 1.4), raw LCD Panels via DSI, 14 HDMI resolutions from 640×350 to 1920×1200 plus various PAL and NTSC standards.
- Audio Outputs: 3.5 mm jack, HDMI
- Onboard Storage: SD Card Slot ( external USB SSD or HDD can be used)
- Networking: 10/100 Ethernet (RJ45)
- Power Rating: 700 mA, 5 V
- Dimensions: 85.60 × 53.98 mm (3.370 × 2.125 in)
- Weight: 45 g (1.6 oz)
Setting up non-KDE or GNOME desktop managers
Before following anything in this part, make sure the server working setup and accepting connections. This section only deals with problems once NXClient has logged on.
It is quite simple (once the server is setup) to connect to GNOME and KDE sessions, however connecting to other window managers (Fluxbox, Xfce, whatever) is slightly different.
Choosing «custom» and using a command like startx of startfluxbox will either result in a blank screen after the !M logo or the Client to present an error complaining about lack of a X server. A way around this is open a session with the command «startx», and the another with the command to start your window-manager-of-choice.
If you do not want to do this, you can start X by installing a login manager like SLIM or XDM. I would recommend using SLiM because of its small size.
(Authors note: This is how I got fluxbox, xfce and others to work on my arch installation- however, I have now removed slim from inittab and set the run level back to 3, and yet I can still login perfectly with NXClient. Possibly try this if you get your system working this way, if like me you have a low memory machine.)
Note: The above information may not be true anymore. Once connection and authentication were valid (and xterm was installed on mine), startfluxbox was added to the custom command line, new window was selected, and it started right up.
Alternative fix
A simple fix without resorting to the above seems to involve a simple edit to the config file. This should work for Fluxbox/Openbox/XFCE or any other window manager that uses the .xinitrc startup file in a call to startx.
Simply edit the config file as root and change:
#USER_X_STARTUP_SCRIPT=.Xclients
to:
USER_X_STARTUP_SCRIPT=.xinitrc
Remember to remove the # symbol from the start of the line.
Then in the client under configuration settings, choose Custom as the desktop, and click on settings:
- In the first group select —
- In the second group select —
Настройка сервера NX NoMachine.
Откроем Nx NoMachine Service и переходим в Preferneces (настройки). На первой вкладке (Services) дважды щелкаем по нашему сервису:
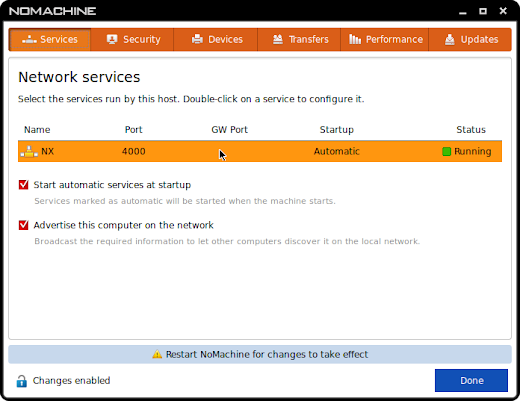
Откроется страница настроек сервиса, где мы можем остановить или перезапустить. А также в Start Mode выбрать, как будет запускаться при старте системы, автоматически (Automatic) или в ручную (Manual):

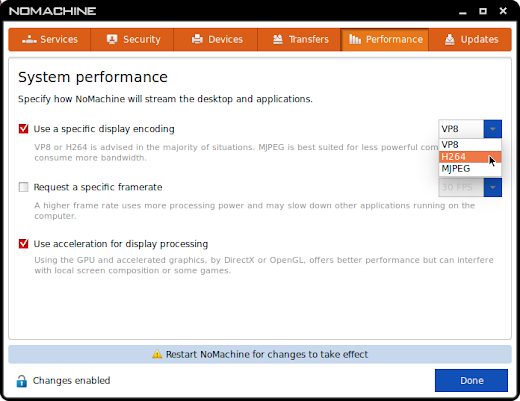
Стоит обратить внимание также на вкладку Perfomance, где можно выбрать кодек для отображения удаленного экрана:
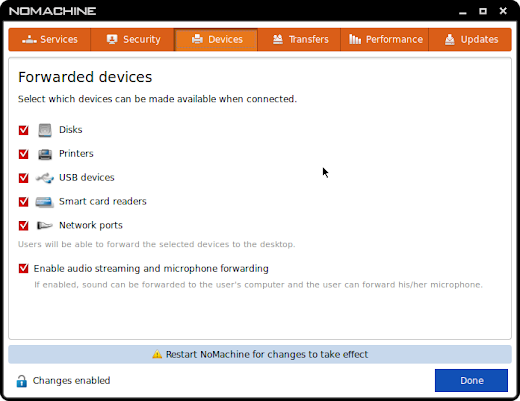
И на вкладке Devices можно отметить какие устройства компьютера будут доступны при подключении к нему:
По остальным настройкам можно пробежаться самостоятельно.
You have no rights to post comments
You must register on the site


