Ошибка no space left on device в linux
Содержание:
- Как исправить no space left on device
- Давайте-ка увеличим shm-size
- Плохие блоки
- Недостаточно Инод (Inode)
- Может докер контейнер имеет маленький лимит для shm?
- Check du and df
- Possible Causes
- 4 Answers 4
- How to check for no space left errors?
- Reproducing the “No space left on device” error on the simulator
- Может у нас закончились inodes?
- Проверьте с du и df
- How To Fix A Full /boot Partition on Linux
Как исправить no space left on device
Первым дело надо понять на каком разделе у вас закончилась память. Для этого можно воспользоваться утилитой df. Она поставляется вместе с системой, поэтому никаких проблем с её запуском быть не должно:

На точки монтирования, начинающиеся со слова snap внимания можно не обращать. Команда отображает общее количество места на диске, занятое и доступное место, а также процент занятого места. В данном случае 100% занято для корневого раздела — /dev/sda5. Конечно, надо разобраться какая программа или файл заняла всё место и устранить эту проблему, но сначала надо вернуть систему в рабочее состояние. Для этого надо освободить немного места. Рассмотрим что можно сделать чтобы экстренно освободить немного памяти.
1. Отключить зарезервированное место для root
Обычно, у всех файловых систем семейства Ext, которые принято использовать чаще всего как для корневого, так и для домашнего раздела используется резервирование 5% памяти для пользователя root на случай если на диске закончится место. Вы можете эту память освободить и использовать. Для этого выполните:

Здесь опция -m указывает процент зарезервированного места, а /dev/sda5 — это ваш диск, который надо настроить. После этого места должно стать больше.
2. Очистить кэш пакетного менеджера
Обычно, пакетный менеджер, будь то apt или yum хранит кэш пакетов, репозиториев и другие временные файлы на диске. Они некоторые из них ненужны, а некоторые нужны, но их можно скачать при необходимости. Если вам срочно надо дисковое пространство этот кэш можно почистить. Для очистки кэша apt выполните:
Для очистки кэша yum используйте команды:
3. Очистить кэш файловой системы
Вы могли удалить некоторые большие файлы, но память после этого так и не освободилась. Эта проблема актуальна для серверов, которые работают долгое время без перезагрузки. Чтобы полностью освободить память надо перезагрузить сервер. Просто перезагрузите его и места на диске станет больше.
4. Найти большие файлы
После выполнения всех перечисленных выше рекомендаций, у вас уже должно быть достаточно свободного места для установки специальных утилит очистки системы. Для начала вы можете попытаться найти самые большие файлы и если они не нужны — удалить их. Возможно какая-либо программа создала огромный лог файл, который занял всю память. Чтобы узнать что занимает место на диске Linux можно использовать утилиту ncdu:
Она сканирует все файлы и отображает их по размеру:

Более подробно про поиск больших файлов читайте в отдельной статье.
5. Найти дубликаты файлов
С помощью утилиты BleachBit вы можете найти и удалить дубликаты файлов. Это тоже поможет сэкономить пространство на диске.
6. Удалите старые ядра
Ядро Linux довольно часто обновляется старые ядра остаются в каталоге /boot и занимают место. Если вы выделили под этот каталог отдельный раздел, то скоро это может стать проблемой и вы получите ошибку при обновлении, поскольку программа просто не сможет записать в этот каталог новое ядро. Решение простое — удалить старые версии ядер, которые больше не нужны.
Давайте-ка увеличим shm-size
- Добавив в ваш app.yml (если всё в одном) или data.yml (если постгрес отдельно) аргумент:
docker_args: “ — shm-size=256m”
2) Пересоздать контейнер с указанием доп аргумента shm-size:
docker run — shm-size=256m — name postgresM -e POSTGRES_PASSWORD=pass -d postgres
3) Если у вас docker-compose, можно добавить shm-size в его docker-compose.yml:
version: ‘3.5’services: your_service: build: context: . shm_size: ‘1gb’ ← для установки размера при билде shm_size: ‘1gb’ ← при запуске
4) Но мы не хотим пересоздавать контейнер! Тогда открываем редактор
sudo nano /var/lib/docker/containers/your-container-id/hostconfig.json
и ищем строку , меняем на 256 мб в байтах, рестартуем контейнер.
5) А можно погорячее? Конечно! Ремаунтим shm file system нашего контейнера:
mount -o remount,size=256m -t tmpfs /var/lib/docker/containers/your-container-id/mounts/shm
Проверяем:
docker exec -it postgresM df -h /dev/shmFilesystem Size Used Avail Use% Mounted onshm 256M 8.0K 256M 1% /dev/shm
Вот это другое дело, теперь-то всё будет хорошо!
Крутим-вертим графану, ошибка больше не вылазит.
Плохие блоки
Ещё одна распространённая проблема — это плохие блоки в файловой системе. Со временем из-за износа дисков, файловые системы повреждаются. Ваша операционная система, скорее всего, увидит эти блоки пригодными для использования, если они не помечены иным образом. Лучший способ найти и пометить эти блоки — использовать fsck с флагом -cc. Помните, что вы не можете использовать fsck из той же файловой системы, которую тестируете. Вам, вероятно, понадобится использовать Live CD.
sudo fsck -vcck /dev/sda2
Очевидно, замените /dev/sda2 на имя того диска и раздела, который вы хотите проверить. Кроме того, имейте в виду, что это, вероятно, займёт много времени.
Надеюсь, одно из этих решений решило вашу проблему. Эту проблему не всегда легко диагностировать в каждом случае. Однако, если повезёт, вы сможете устранить источник проблемы и продолжить пользоваться системой без её переустановки.
Кстати, сообщение “No space left on device” может возникнуть при попытке записать файл размером более 4GB на раздел с файловой системой FAT — данная файловая система не поддерживает файлы таких больших размеров.
Недостаточно Инод (Inode)
Для современных файловых систем Linux есть такое понятие как иноды (“inodes”) — это набор метаданных на файловой системе. Иноды отслеживают информацию о файлах. Многие файловые системы имеют фиксированное количество инод, поэтому очень возможно занять максимальное выделенное количество без заполнения самой файловой системы. Вы можете использовать для проверки команду df:
sudo df -i /
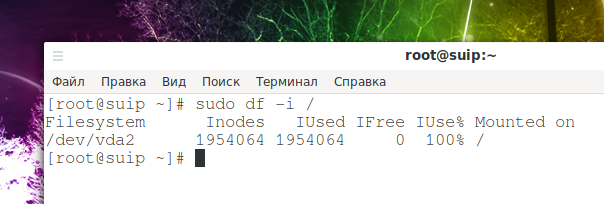
Сравните количество существующих инод с количеством занятых. Если больше нет свободных, к сожалению, вы не можете получить больше. Выход: удалите ненужные или устаревшие файлы для очистки инод.
В нормальных условиях, даже на системах интенсивно использующих постоянное хранилище, редко происходит потребление всех инод. Как правило, исчерпание inodes сигнализирует о другой проблеме. Обычно причиной является неконтролируемое создание огромного количество файлов из-за бага в системе или в программе.
В первую очередь нужно локализовать папку, в которой возникла проблема.
for i in /*; do echo $i; find $i |wc -l; done
Ещё варианты команд, которые делают это же самое (по умолчанию они настроены проверять текущую папку — это можно изменить, для этого вместо точки впишите желаемую для проверки папку:
sudo find . -xdev -type f | cut -d "/" -f 2 | sort | uniq -c | sort -n
Второй вариант:
find . -maxdepth 1 -type d | grep -v '^\.$' | xargs -n 1 -i{} find {} -xdev -type f | cut -d "/" -f 2 | uniq -c | sort -n
Когда найдена папка с наибольшим количеством инод, то проверьте её подпапки — для поиска проблемной. Продолжайте эти действия, пока не найдёте папку с огромным количеством нагенерированных файлов.
Например, использование первой команды для поиска по директории /src/:
for i in /src/*; do echo $i; find $i |wc -l; done
Вариант для поиска по директории /var/cache/:
for i in /var/cache/*; do echo $i; find $i |wc -l; done
# или:
find /var/cache/* -maxdepth 1 -type d | grep -v '^\.$' | xargs -n 1 -i{} find {} -xdev -type f | cut -d "/" -f 2 | uniq -c | sort -n
В разных ситуациях для пользователей проблемными папками оказывались:
- /var/lib/php/sessions/
- /var/cache/fontconfig
- /usr/src/
- /var/cache/eaccelerator/
- /var/log/squid3/
В /usr/src/ накапливалось слишком большое количество файлов, имеющих отношение к предыдущим ядрам. В /var/lib/php/sessions/ — бесконечные сессии phpMyAdmin. В /var/log/squid3/ и вообще в папке /var/log/ может накопиться огромное количество файлов с журналами от неправильно работающей программы или просто за много лет. В папке /var/cache/ может скопиться огромное количество файлов, имеющих отношение к кэшированию.
В моём случае причиной проблемы оказалась папка /var/cache/fontconfig — в этой папке постоянно накапливаются новые файлы (я не знаю, насколько это нормально) и по итогу работы за 4 года из-за этой папки закончились иноды.
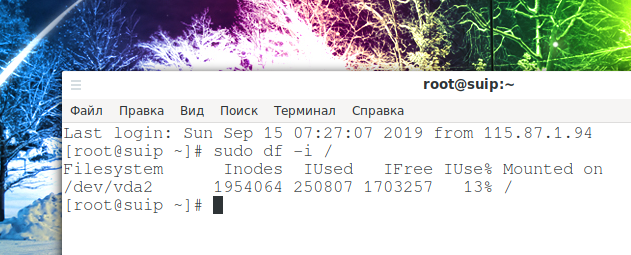
Когда проблемная папка найдена, то нужно её очистить. Скорее всего все файлы в ней не нужны (оцените это исходя из вашей ситуации). Также весьма вероятно, что файлов там астрономическое количество и их обработка может затянуться на часы, поэтому самый быстрый вариант — удалить папку целиком, а затем создать её заново. Даже при таком подходе в моём случае удаление папки /var/cache/fontconfig заняло около 10-20 минут.
Это полностью разрешило мою проблему и снизило количество используемых инод со 100% до 13%:
Может докер контейнер имеет маленький лимит для shm?
Давайте посмотрим:
df –hFilesystem Size Used Avail Use% Mounted onudev 4.9G 0 4.9G 0% /devtmpfs 995M 3.8M 992M 1% /run/dev/mapper/dosp — ub — vg-root 245G 17G 216G 8% /tmpfs 4.9G 0 4.9G 0% /dev/shmtmpfs 5.0M 0 5.0M 0% /run/locktmpfs 4.9G 0 4.9G 0% /sys/fs/cgroup/dev/loop0 89M 89M 0 100% /snap/core/7270/dev/loop2 89M 89M 0 100% /snap/core/6964/dev/loop3 584M 584M 0 100% /snap/intellij-idea-community/158tmpfs 995M 0 995M 0% /run/user/999tmpfs 995M 16K 995M 1% /run/user/125tmpfs 995M 44K 995M 1% /run/user/1000/dev/loop4 584M 584M 0 100% /snap/intellij-idea-community/159overlay 245G 17G 216G 8% /var/lib/docker/overlay2/c301ce8eede6b77ab62ecb2f2f5038025375baf9bb8bad7ef957bf3180ab17e8/mergedshm 64M 0 64M 0% /var/lib/docker/containers/00e0a21d2e010034bc48e8ada44e69335d3ac973a18570bd60cd625b2e532c30/mounts/shmoverlay 245G 17G 216G 8% /var/lib/docker/overlay2/9e1c6aeeef09986c4343861b0ac3f0f99173ecbef88ed6ec63638d89c732cc8a/mergedshm 64M 204K 64M 1% /var/lib/docker/containers/5ff49a01130ce25e5e4b0649cc8a2efd64e4c67e9a8960c5a717c0c0d5d3cefc/mounts/shm
или тоже самое внутри контейнера:
docker exec -it postgresM df -h /dev/shmFilesystem Size Used Avail Use% Mounted onshm 64M 204K 64M 1% /dev/shm
Check du and df
Before you go any further, it’s a good idea to check that there really is space left on the disk. While the tools in your desktop environment are good, it’s much better to use the direct ones from the command line.
Begin with . Point it to the base directory on the drive that’s having the problem. This guide is assuming it’s the partition with root.
It’ll take some time to go through everything. Now, try with .
Add root and the filesystems mounted under it. For example, if you have “/home” on a separate drive, add that in with the reading for root. The total should come out close to what you had with . If not, that might point toward a deleted file being used by a process.
Of course, the main concern here is whether or not the results of these commands come in under the size of the drive. If it did, there’s obviously something wrong.
Possible Causes
There are a couple of main causes here. If you saw a discrepancy between and you can jump down to the first option here. Otherwise, start at the second one.
Deleted File Reserved by Process
Occasionally, a file will be deleted, but a process is still using it. Linux won’t release the storage associated with the file while the process is still running. You just need to find the process and restart it.
Try to locate the process.
The problematic process should be listed, then just restart it.
Not Enough Inodes
There is a set of metadata on filesystems called “inodes.” Inodes track information about files. A lot of filesystems have a fixed amount of inodes, so it’s very possible to fill the max allocation of inodes without filling the filesystem itself. You can use to check.
Compare the inodes used with the total inodes. If there’s no more available, unfortunately, you can’t get more. Delete some useless or out-of-date files to clear up inodes.
Bad Blocks
The last common problem is bad filesystem blocks. Filesystems get corrupt and hard drives die. Your operating system will most likely see those blocks as usable unless they’re otherwise marked. The best way to find and mark those blocks is by using with the flag. Remember that you can’t use from the same filesystem that you’re testing. You’ll probably need to use a live CD.
Obviously, replace the drive location with the drive that you want to check. Also, keep in mind that this will probably take a long time.
Hopefully, one of these solutions solved your problem. This issue isn’t exactly easy to diagnose in every instance. With any luck, though, you can get it cleared up and have your hard drive working again as normal.
If you’re looking for more Linux pointers, see our guide on how to set up Bluetooth in Linux. Or, for something a little different, see how to install Mac’s Safari browser in Linux. Enjoy!
Nick Congleton
Nick is a freelance tech. journalist, Linux enthusiast, and a long time PC gamer.
4 Answers 4
At some point in the past, your root filesystem filled up, and a small, temporary /tmp was created to allow boot to succeed. This small /tmp was never deleted, so now, even though you have room on /, you still are filling up the small /tmp and seeing your problem. Simply unmount it:
and of course, try to ensure your / is as clean as possible.
Normally, /tmp is just a part of the root (/) filesystem, no separate mount is needed, unless there are special circumstances, like running out of root filespace (when some daemon creates the one you see), or maybe you have / on a very slow media (like an USB flash stick) and want /tmp in ram for performance, even with limited space.
If you run into this problem, where you get errors that seem to indicate that the disk is full when it’s not, make sure to also check the inode utilization.
You can use df -i to get a quick report on the used/available inodes for each mount point.
If you see that you are running very low, or out of, inodes then the next step is to identify which folder is holding up most inodes. Since each file and directory uses an inode, you could have a folder with hundreds of thousands of tiny, or empty files that are using up all the inodes. Usual suspects include: temp directory, website cache directories, package cache directories etc.
Use this command to get an ordered list of the subdirectories with the most inodes used:
Run this in your root folder, then drill down until you find your culprit.
How to check for no space left errors?
Before you start diving into fixing this for your app it’s good to know how big of a problem it actually is.
We’ve started looking into our Firebase logs and search for the which has error code . Within Firebase, these errors are logged under non-fatal errors. This only works if you’ve implemented error logging following .

The “No space left on device” error logged in Firebase
Crash reports can also be used to get insights. We found a crash happening in our Diagnostics framework related to a lack of space:

A crash log showing the “No space left on device” error
The non-fatal error combined with the crash had an effect on ~7K users in a period of 7 days. That’s quite a lot for something you might think is not that important nowadays.
Reproducing the “No space left on device” error on the simulator
Once you’ve got the insights it’s time to start fixing the issues. An obvious way to do this would be by finding a test device that already has a low storage. You could also create the scenario yourself by adding a lot of content but that is quite time-consuming.
An easier way is to reproduce this on the simulator by creating a small disk image and using that for your app’s storage.
1. Creating a disk image for your app’s storage
We start by creating a disk image using the command in the terminal which uses the DiskImages framework to manipulate disk images. In this case, we’re creating a disk with a total space of 1mb.
Looking at the disk it shows us that the size indeed is set to 1mb:
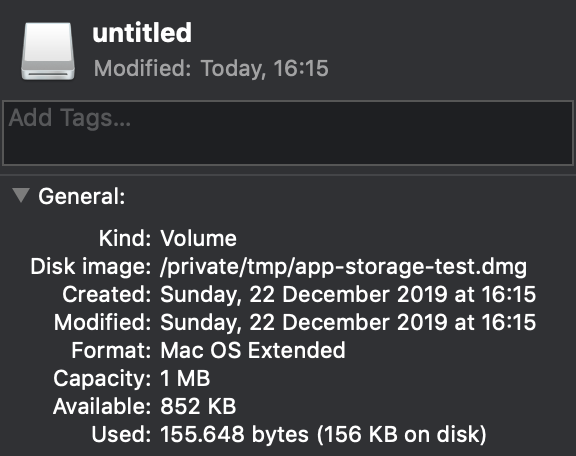
The custom disk created for testing low storage scenarios
2. Using the custom disk as your simulator app’s storage
To reproduce a low storage scenario and to get the “No space left on device” error we need to first get the path to the documents directory on the simulator. We can do this by using the following piece of code:
We can use the command in the terminal to easily open this folder in Finder. Note that we’re using the documents directory in this scenario but you can use any directory relevant to the scenario you’re testing.
We will then use this path as the mount point of our disk:
This basically wraps the documents directory inside the custom volume. The system will use the disk size as it’s reference size to determine how much space is left.
3. Reproduce the scenario by creating content
Everything is now set up to reproduce the scenario. In our case, we created a lot of logs using the Diagnostics framework that caused the crash. Not long after we’ve got the exact same crash and we could start fixing the issue:

The crash related to storage reproduced in Xcode
4. Cleaning up the custom disk
After you’ve reproduced and fixed the issue it’s time to detach the disk and restore original behavior. The detach command will likely fail as the mount point is changed as a result of the simulator that is creating a new app folder for every app launch.
Therefore, we need to get the actual name of the disk by using the command:

Listing the disks in the terminal for detaching
We can then use the identifier to detach our disk and we’re back to where we started!
CI/CD for apps written in SwiftFeaturing all the steps and integrations you’ll ever need, preconfigured for apps built with Swift. From iOS-specific solutions to full cross-platform support, we streamline your development process through one, easy-to-use service.
Может у нас закончились inodes?
Это своего рода таблицы «метаданных» для файлов, и они могут достичь своего максимального количества, если вы нагенерировали толпень малюсеньких файлов, по дефолту — меньше 2Кб. Давайте проверим:
df -ihFilesystem Inodes IUsed IFree IUse% Mounted onudev 1.3M 430 1.3M 1% /devtmpfs 1.3M 943 1.3M 1% /run/dev/mapper/dosp — ub — vg-root 16M 273K 16M 2% /tmpfs 1.3M 1 1.3M 1% /dev/shmtmpfs 1.3M 5 1.3M 1% /run/locktmpfs 1.3M 18 1.3M 1% /sys/fs/cgroup/dev/loop0 13K 13K 0 100% /snap/core/7270/dev/loop2 13K 13K 0 100% /snap/core/6964/dev/loop3 12K 12K 0 100% /snap/intellij-idea-community/158tmpfs 1.3M 11 1.3M 1% /run/user/999tmpfs 1.3M 23 1.3M 1% /run/user/125tmpfs 1.3M 33 1.3M 1% /run/user/1000/dev/loop4 12K 12K 0 100% /snap/intellij-idea-community/159overlay 16M 273K 16M 2% /var/lib/docker/overlay2/9e1c6aeeef09986c4343861b0ac3f0f99173ecbef88ed6ec63638d89c732cc8a/mergedshm 1.3M 2 1.3M 1% /var/lib/docker/containers/5ff49a01130ce25e5e4b0649cc8a2efd64e4c67e9a8960c5a717c0c0d5d3cefc/mounts/shmoverlay 16M 273K 16M 2% /var/lib/docker/overlay2/c301ce8eede6b77ab62ecb2f2f5038025375baf9bb8bad7ef957bf3180ab17e8/mergedshm 1.3M 1 1.3M 1% /var/lib/docker/containers/00e0a21d2e010034bc48e8ada44e69335d3ac973a18570bd60cd625b2e532c30/mounts/shm
Хмм.. каждая shm использует только 1% от максимального количество инод..
Давай-ка почистим старые пакеты за компанию:
apt-get update && apt-get autoclean && apt-get clean && apt-get autoremove
Проверьте с du и df
Перед тем как начать искать проблему, давайте убедимся, что на диске действительно есть свободное место. Хотя инструменты с графическим интерфейсом хорошие, намного лучше использовать программы напрямую из командной строки.
Начнём с du. Укажем ей базовую директорию на диске у которого проблемы. Это руководство подразумевает, что проблемным диском является раздел с рутом.
sudo du -sh /

Для обхода всего дерева директорий потребуется время.
Теперь попробуем с df:
sudo df -h
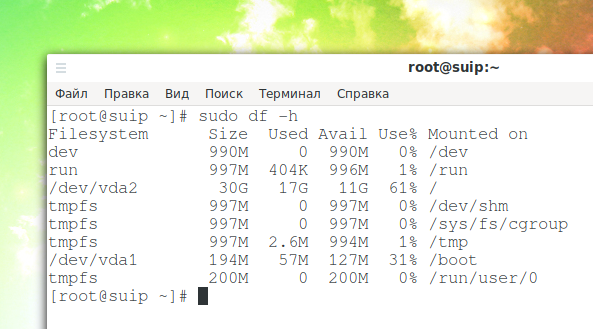
Добавьте корень файловой системы (рут) и файловые системы, смонтированные под ним. Например, если у вас есть «/home» на отдельном диске, добавьте это к показанию для root. Количество занятого и свободного пространства должно получиться близко к тому, что нам показала программа du. Если это не так, это может указывать на то, что удалённые файлы используются процессами.
Главное, на что следует обратить внимание, чтобы вывод этих команд о занятом пространстве соответствовал друг другу и размеру диска. Если это не так, значит имеется проблема.
How To Fix A Full /boot Partition on Linux
Category : How-to
Get Social!
 Utilities such as apt-get generally install kernel updates by adding the new kernel to the Linux boot list and set it as the default. This means that the next time the system boots, the new kernel will be loaded. The problem is that the old kernel is still there (just incase the new one doesn’t work, you’ve got a fall back!), and the kernel before that, and the kernel before that…
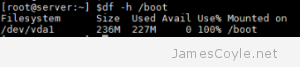
The current 3.x kernel for Ubuntu is around 20MB so it doesn’t take long for the kernel updates to fill a tiny 200-or-so-Mb boot partition where they are stored.
The good news is that it’s easy to clear out the old updates, but it’s important to not remove the latest one that you’re using.
Which Kernel am I Running?
It’s quick and easy to see which kernel version you are running. Use the uname command with the -a switch and pay attention to the version numbers reported.
uname -a
3.19.0-47-generic
This shows that you’re using version 3.19.0-47.
List Currently Installed Kernels
Next you’ll need to list the kernel packages that are currently installed so that you can remove any outdated ones to free up the space on the /boot partition.
Run the below dpkg command to list the installed kernel packages and their versions.
dpkg --list 'linux-image*'
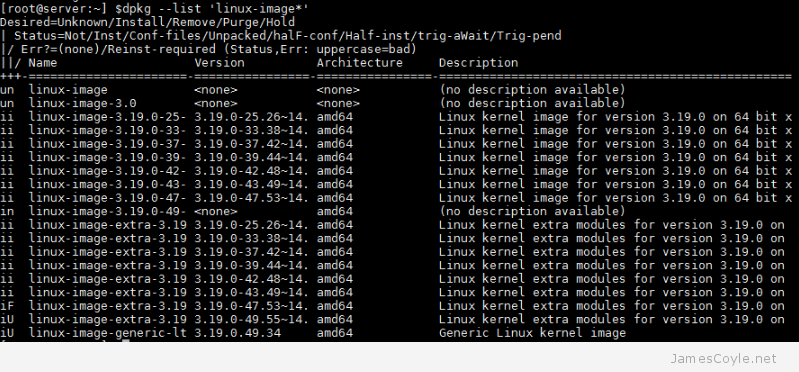 The above output shows several versions of kernel that are all taking up space on the /boot partition however we only really need the current running version given by the above uname -a command. It’s a good idea to keep the last 2 kernels just incase you notice an issue down the line, but the above list is quite excessive.
Remove Unused Kernel Packages to Free Space on /boot
Once you’ve identified your current kernel and the kernel packages you have installed it’s time to remove the ones you don’t need.
Using apt-get enter the package names of the kernel packages to remove.
apt-get remove linux-image-3.19.0-25-generic
If you get an error running this command then see the next section.
note: the above screenshot of the installed packages cropped the full version name – it’s missing the generic part. You can use tab completion with the apt-get command, or use an asterisk after the version number to remove the required package.
Errors Removing Packages
If you get an error warning about dependencies similar to the below then you may need to manually remove a few kernel packages to free up some space.
:~] $apt-get remove linux-image-extra-3.19.0-25-generic
Reading package lists... Done
Building dependency tree
Reading state information... Done
You might want to run 'apt-get -f install' to correct these:
The following packages have unmet dependencies.
 linux-image-generic-lts-vivid : Depends: linux-image-3.19.0-49-generic but it is not going to be installed
                                 Depends: linux-image-extra-3.19.0-49-generic but it is not going to be installed
                                 Recommends: thermald but it is not going to be installed
E: Unmet dependencies. Try 'apt-get -f install' with no packages (or specify a solution).
The problem here is that the original update failed to install the latest version of the kernel (version 3.19.0-49-generic in this case) and apt-get doesn’t like doing anything else until that problem has been resolved.
First we need to free up some space. Carefully delete 2 of the older kernel packages with a command similar to the below, but with old version numbers from your system returned by the above section List Currently Installed Kernels.
rm /boot/*-3.19.0-25*
rm /boot/*-3.19.0-33*
Check and double check this command because there’s no going back once it’s ran! It’s perfectly safe to do as long as you are using old version numbers that you’re no longer using.
You can now run apt-get to complete the original upgrade now that it has the space. This will remove the error when trying to remove the unused kernel packages in the above section.
apt-get install -f
Now go back to the above section and remove the old kernel packages that you no longer need.


