Настройка linux-файрвола iptables: руководство для начинающих
Содержание:
- Step 3: Installing
- Samples
- Passo 10 — Desabilitando ou redefinindo o UFW (opcional)
- Creating Tables
- Step 2: Additional settings
- Step Four — Setting Up a Basic Firewall
- Step 4 — Allowing SSH Connections
- Save and Restore a Ruleset
- Tables
- Allow Connections
- Creating Rules
- Passo 3 — Configurando as políticas padrão
- Step 1: Configuring ports
- Creating IP Address Blacklist with UFW
- Step 6 — Allowing Other Connections
- How to Set Up IP Masquerading with UFW
- nft
- Iptables Rules for IPv6
- Шаг 2 — Настройка политик по умолчанию
- Deleting Rules
Step 3: Installing
If you are using another firewall configuration scripts, such as UFW, you should disable it before proceeding. Iptables rules are automatically removed.
UFW can be disabled by running the following command:
ufw disable
Now it is time to execute the CSF’s installer script.
cd csf
sh install.sh
The firewall is now installed, but you should check if the required iptables modules are available.
perl /usr/local/csf/bin/csftest.pl
The firewall will work if no fatal errors are reported.
Note: Your IP address was added to the whitelist if possible. In addition, the SSH port has been opened automatically, even if it uses custom port. The firewall was also configured to have testing mode enabled, which means that the iptables rules will be automatically removed five minutes after starting CSF. This should be disabled once you know that your configuration works, and you will not be locked out.
Samples
Simple IP/IPv6 firewall
firewall.rules
# A simple firewall

flush ruleset

table inet filter {
	chain input {
		type filter hook input priority 0; policy drop;

		# established/related connections
		ct state established,related accept

		# invalid connections
		ct state invalid drop

		# loopback interface
		iif lo accept

		# ICMP
		# routers may also want: mld-listener-query, nd-router-solicit
		ip6 nexthdr icmpv6 icmpv6 type { destination-unreachable, packet-too-big, time-exceeded, parameter-problem, nd-router-advert, nd-neighbor-solicit, nd-neighbor-advert } accept
		ip protocol icmp icmp type { destination-unreachable, router-advertisement, time-exceeded, parameter-problem } accept

		# SSH (port 22)
		tcp dport ssh accept

		# HTTP (ports 80 & 445)
		tcp dport { http, https } accept
	}
}
Limit rate IP/IPv6 firewall
firewall.2.rules
table inet filter {
	chain input {
		type filter hook input priority 0; policy drop;

		# no ping floods:
		ip6 nexthdr icmpv6 icmpv6 type echo-request limit rate 10/second accept
		ip protocol icmp icmp type echo-request limit rate 10/second accept

		ct state established,related accept
		ct state invalid drop

		iifname lo accept

		# avoid brute force on ssh:
		tcp dport ssh limit rate 15/minute accept

	}
}
Jump
When using jumps in config file, it is necessary to define the target chain first. Otherwise one could end up with .
jump.rules
table inet filter {
    chain web {
        tcp dport http accept
        tcp dport 8080 accept
    }
    chain input {
        type filter hook input priority 0;
        ip saddr 10.0.2.0/24 jump web
        drop
    }
}
Passo 10 — Desabilitando ou redefinindo o UFW (opcional)
Se você decidir que não quer usar o UFW, você pode desabilitá-lo com este comando:
Quaisquer regras que você tenha criado com o UFW já não estarão mais ativas. Você sempre poderá executar se precisar ativá-lo mais tarde.
Se você já tiver regras do UFW configuradas, mas decidir que quer começar novamente, você pode usar o comando de redefinição:
Isso irá desabilitar o UFW e excluir quaisquer regras que tiverem sido definidas anteriormente. Lembre-se de que as políticas padrão não irão voltar para suas configurações originais se, em algum momento, você as tiver alterado. Isso deve dar a você um novo começo com o UFW.
Creating Tables
In nftables you need to manually create tables. Tables need to qualify a family; ip, ip6, inet, arp, bridge, or netdev. inet means the table will process both ipv4 and ipv6 packets. It’s the family we’ll use throughout this post.
Note: For those coming from iptables, the term table may be a bit confusing. In nftables a table is simply a namespace—nothing more, nothing less. It’s a collection of chains, rules, and sets, and other objects.
Let’s create our first table and list the rule set.
# nft add table inet my_table
# nft list ruleset
table inet my_table {
}
So now we have a table, but by itself it won’t do much. Let’s move on to chains.
Step 2: Additional settings
CSF offers a vast number of different options in its configuration files. Some of the most commonly used settings are explained below.
ICMP_IN
Setting ICMP_IN to 1 allows ping to your server and 0 refuses are such requests. If you are hosting any public services, it is recommended to allow ICMP requests, as these can be used to determine whether or not your service is available.
ICMP_IN_LIMIT
Sets the number of ICMP (ping) requests allowed from one IP address within a specified amount of time. There is usually no need to change the default value (1/s)
DENY_IP_LIMIT
Sets the number of blocked IP addresses CSF keeps track of. It is recommended to limit the number of denied IP addresses as having too many blocks may slow down the server performance.
DENY_TEMP_IP_LIMIT
Same as above, but for temporary IP address blocks.
PACKET_FILTER
Filter invalid, unwanted and illegal packets.
SYNFLOOD, SUNFLOOD_RATE and SYNFLOOD_BURST
This offers protection against SYN flood attacks. This slows down the initialization of every connection, so you should enable this only if you know that your server is under attack.
CONNLIMIT
Limits the number of concurrent active connections on port.
Value:
22;5;443;20
would allow 5 concurrent connections on port 22 and 20 concurrent connections on port 443.
PORTFLOOD
Limits the number of connections per time interval that new connections can be made to specific ports.
Value:
22;tcp;5;250
would limit block the IP address if more than 5 connections are established on port 22 using TCP protocol within 250 seconds. The block is removed once 250 seconds have passed after the last packet sent by the client to this port. You may add more ports by separating them by commas like described below.
port1;protocol1;connection_count1;time1,port2;protocol2;connection_count2;time2
More settings
CSF offers a wide range of settings which are not covered in this tutorial. The default values are generally good, and can be used on almost any server. The default settings are configured to prevent most flood attacks, port scans and unauthorized access attempts.
If you would, however, like to adjust the configuration in more detail, please read the comments in /etc/csf/csf.conf and edit them as you like.
Step Four — Setting Up a Basic Firewall
Debian servers can use firewalls to make sure only connections to certain services are allowed. Although the firewall is installed by default, Debian does not strongly recommend any specific firewall. In this guide, we will install and use the UFW firewall to help set policies and manage exceptions.
We can use the package manager to install UFW. Update the local index to retrieve the latest information about available packages and then install the firewall by typing:
Note: If your servers are running on DigitalOcean, you can optionally use DigitalOcean Cloud Firewalls instead of the UFW firewall. We recommend using only one firewall at a time to avoid conflicting rules that may be difficult to debug.
Firewall profiles allow UFW to manage sets of firewall rules for applications by name. Profiles for some common software are bundled with UFW by default and packages can register additional profiles with UFW during the installation process. OpenSSH, the service allowing us to connect to our server now, has a firewall profile that we can use.
You can see this by typing:
We need to make sure that the firewall allows SSH connections so that we can log back in next time. We can allow these connections by typing:
Afterwards, we can enable the firewall by typing:
Type “” and press to proceed. You can see that SSH connections are still allowed by typing:
As the firewall is currently blocking all connections except for SSH, if you install and configure additional services, you will need to adjust the firewall settings to allow acceptable traffic in. You can learn some common UFW operations in this guide.
Step 4 — Allowing SSH Connections
If we enabled our UFW firewall now, it would deny all incoming connections. This means that we will need to create rules that explicitly allow legitimate incoming connections — SSH or HTTP connections, for example — if we want our server to respond to those types of requests. If you’re using a cloud server, you will probably want to allow incoming SSH connections so you can connect to and manage your server.
To configure your server to allow incoming SSH connections, you can use this command:
This will create firewall rules that will allow all connections on port , which is the port that the SSH daemon listens on by default. UFW knows what port means because it’s listed as a service in the file.
However, we can actually write the equivalent rule by specifying the port instead of the service name. For example, this command produces the same result as the one above:
If you configured your SSH daemon to use a different port, you will have to specify the appropriate port. For example, if your SSH server is listening on port , you can use this command to allow connections on that port:
Now that your firewall is configured to allow incoming SSH connections, you can enable it.
Save and Restore a Ruleset
nftables rules can easily be saved and restored. The output of can be fed back into the tool to restore everything. This is exactly how the nftables systemd service works.
To save your ruleset
# nft list ruleset > /root/nftables.conf
To restore your ruleset
# nft -f /root/nftables.conf
Of course, you can enable the systemd service and have your rules restored on reboot. The service reads rules from .
# systemctl enable nftables
# nft list ruleset > /etc/sysconfig/nftables.conf
Note: Some distributions, RHEL-8 included, ship predefined nftables configuration in . These samples often include the setup of tables and chains in a manner similar to iptables. These are often listed in the existing file, but may be commented out.
Tables
The purpose of tables is to hold chains. Unlike tables in iptables, there are no built-in tables in nftables. How many tables one uses, or their naming, is largely a matter of style and personal preference. However, each table has a (network) family and only applies to packets of this family. Tables can have one of five families specified, which unifies the various iptables utilities into one:
| nftables family | iptables utility |
|---|---|
| ip | iptables |
| ip6 | ip6tables |
| inet | iptables and ip6tables |
| arp | arptables |
| bridge | ebtables |
Family
(i.e. IPv4) is the default family and will be used if family is not specified.
IPv6 is specified as .
To create one rule that applies to both IPv4 and IPv6, use . This requires Linux >=3.15. allows for the unification of the and families to make defining rules for both easier.
Listing
You can list the current tables in a family with the command.
# nft list tables
# nft list tables ip6
You can list a full table definition by specifying a table name:
# nft list table foo
# nft list table ip6 foo
Creation
Tables can be added via two commands — one just being a shortcut for the other. Here is an example of how to add an ip table called foo and an ip6 table called foo:
# nft add table foo
# nft table ip6 foo
You can have two tables with the same name as long as they are in different families.
Allow Connections
The syntax is pretty simple. You change the firewall rules by issuing commands in the terminal. If we turned on our firewall now, it would deny all incoming connections. If you’re connected over SSH to your cloud server, that would be a problem because you would be locked out of your server. Let’s enable SSH connections to our server to prevent that from happening:
sudo ufw allow ssh
As you can see, the syntax for adding services is pretty simple. UFW comes with some defaults for common uses. Our SSH command above is one example. It’s basically just shorthand for:
sudo ufw allow 22/tcp
This command allows a connection on port 22 using the TCP protocol. If our SSH server is running on port 2222, we could enable connections with the following command:
sudo ufw allow 2222/tcp
Other Connections We Might Need
Now is a good time to allow some other connections we might need. If we’re securing a web server with FTP access, we might need these commands:
or
or
You mileage will vary on what ports and services you need to open. There will probably be a bit of testing necessary. In addition, you want to make sure you leave your SSH connection allowed.
Port Ranges
You can also specify port ranges with UFW. To allow ports 1000 through 2000, use the command:
sudo ufw allow 1000:2000/tcp
If you want UDP:
sudo ufw allow 1000:2000/udp
IP Addresses
You can also specify IP addresses. For example, if I wanted to allow connections from a specific IP address (say my work or home address), I’d use this command:
sudo ufw allow from 192.168.255.255
Creating Rules
Now that you’ve created a table and a chain you can finally add some firewall rules. Let’s add a rule to accept SSH.
# nft add rule inet my_table my_filter_chain tcp dport ssh accept
One thing to note here is that since we added this to a table of the inet family a single rule will process both IPv4 and IPv6 packets.
The verb will append the rule to the end of the chain. You can also use the verb which will prepend the rule to the head of the chain.
# nft insert rule inet my_table my_filter_chain tcp dport http accept
Having added two rules, let’s look at what the ruleset looks like.
# nft list ruleset
table inet my_table {
    chain my_filter_chain {
    type filter hook input priority 0; policy accept;
    tcp dport http accept
    tcp dport ssh accept
    }
}
Note that the rule occurs before the rule because we used the verb above.
You can also add a rule at an arbitrary location in a chain. There are two ways to do this.
-
Use to specify an index into the list of rules. Using will insert the new rule after the rule at the given index. Using will insert the new rule before the rule at the given index. values start at 0.
# nft insert rule inet my_table my_filter_chain index 1 tcp dport nfs accept
# nft list ruleset
table inet my_table {
    chain my_filter_chain {
    type filter hook input priority 0; policy accept;
    tcp dport http accept
    tcp dport nfs accept
    tcp dport ssh accept
    }
}

# nft add rule inet my_table my_filter_chain index 0 tcp dport 1234 accept
# nft list ruleset
table inet my_table {
    chain my_filter_chain {
    type filter hook input priority 0; policy accept;
    tcp dport http accept
    tcp dport 1234 accept
    tcp dport nfs accept
    tcp dport ssh accept
    }
}
Note: Using with the verb is mostly equivalent to iptables option with an index. The first caveat is nftables index values start at 0. The second caveat is index has to refer to an existing rule. This means «nft insert rule … index 0» on an empty chain in invalid.
-
Use to specify the rule to insert the rule after or before. To insert after use the verb. To insert before use the verb. You can get rule handles with the option when listing rules.
# nft --handle list ruleset
table inet my_table { # handle 21
    chain my_filter_chain { # handle 1
    type filter hook input priority 0; policy accept;
    tcp dport http accept # handle 3
    tcp dport ssh accept # handle 2
    }
}
# nft add rule inet my_table my_filter_chain handle 3 tcp dport 1234 accept
# nft insert rule inet my_table my_filter_chain handle 2 tcp dport nfs accept
# nft --handle list ruleset
table inet my_table { # handle 21
    chain my_filter_chain { # handle 1
    type filter hook input priority 0; policy accept;
    tcp dport http accept # handle 3
    tcp dport 1234 accept # handle 8
    tcp dport nfs accept # handle 7
    tcp dport ssh accept # handle 2
    }
}
In nftables a rule handle is stable and will not change until the rule is deleted. This gives a stable reference to the rule without having to rely on an , which may change if another rule is inserted.
You can also get the rule handle at the time of creation by using both the and options. The rule will be echoed back to the CLI with the handle included.
# nft --echo --handle add rule inet my_table my_filter_chain udp dport 3333 accept
add rule inet my_table my_filter_chain udp dport 3333 accept # handle 4
Note: Older version of nftables used the keyword position. This keyword has since been deprecated in favor of handle.
Passo 3 — Configurando as políticas padrão
Se você estiver apenas começando com seu firewall, as primeiras regras a definir são suas políticas padrão. Essas regras controlam a maneira de lidar com tráfego que não seja claramente compatível com quaisquer outras regras. Por padrão, o UFW é configurado para negar todas as conexões de entrada e permitir todas as conexões de saída. Isso significa que qualquer um que tentasse acessar o seu servidor não conseguiria conectar-se, ao passo que os aplicativos dentro do servidor conseguiriam alcançar o mundo exterior.
Vamos retornar as regras do seu UFW para as configurações padrão, para que possamos ter certeza de que você conseguirá acompanhar este tutorial. Para definir os padrões usados pelo UFW, utilize estes comandos:
Esses comandos configuram os padrões para negar as conexões de entrada e permitir as conexões de saída. Esses padrões do firewall poderiam suprir as necessidades de um computador pessoal Porém, os servidores normalmente precisam responder às solicitações que chegam de usuários externos. Vamos verificar isso a seguir.
Step 1: Configuring ports
The less access there is to your VPS, the more secure your server is. However, not all ports can be closed as the clients must be able to use your services.
The ports opened by default are the following:
TCP_IN = "20,21,22,25,53,80,110,143,443,465,587,993,995"

TCP_OUT = "20,21,22,25,53,80,110,113,443"

UDP_IN = "20,21,53"

UDP_OUT = "20,21,53,113,123"
Services using the open ports:
- Port 20: FTP data transfer
- Port 21: FTP control
- Port 22: Secure shell (SSH)
- Port 25: Simple mail transfer protocol (SMTP)
- Port 53: Domain name system (DNS)
- Port 80: Hypertext transfer protocol (HTTP)
- Port 110: Post office protocol v3 (POP3)
- Port 113: Authentication service/identification protocol
- Port 123: Network time protocol (NTP)
- Port 143: Internet message access protocol (IMAP)
- Port 443: Hypertext transfer protocol over SSL/TLS (HTTPS)
- Port 465: URL Rendesvous Directory for SSM (Cisco)
- Port 587: E-mail message submission (SMTP)
- Port 993: Internet message access protocol over SSL (IMAPS)
- Port 995: Post office protocol 3 over TLS/SSL (POP3S)
It is possible that you are not using all of these services, so you can close the ports that are not used. I would recommend closing all ports (removing port number form the list), and then adding the ports you need.
Below are port sets that should be opened if you are running the listed service:
On any server:
TCP_IN: 22,53
TCP_OUT: 22,53,80,113,443
UPD_IN: 53
UPD_OUT: 53,113,123
Apache:
TCP_IN: 80,443
FTP server:
TCP_IN: 20,21
TCP_OUT: 20,21
UPD_IN: 20,21
UPD_OUT:20,21
Mail server:
TCP_IN: 25,110,143,587,993,995
TCP_OUT: 25,110
MySQL server (if remote access is required)
TCP_IN: 3306
TCP_OUT: 3306
Note: If you are using IPv6 for your services, you should also configure TCP6_IN, TCP6_OUT, UPD6_IN, and UPD6_OUT similarly to how IPv4 ports were configured earlier.
You can find a comprehensive list of TCP and UDP ports on Wikipedia. You should open the ports of all the services you use.
Creating IP Address Blacklist with UFW
Let’s say there’s a spammer who is constantly trying to send spam to your mail server. You can use UFW to block the spammer’s IP address from accessing TCP port 25 of your mail server, with the following command. Replace 12.34.56.78 with the spammer’s IP address.
sudo ufw insert 1 deny in from 12.34.56.78 to any port 25 proto tcp
Note that newly added firewall rules are put in the bottom by default. If you previously allowed access to port 25 from anywhere, then you need to insert the deny rule as the first rule, just like above, so the deny rule will be applied first. You can always insert new deny rule as the first rule.
sudo ufw insert 1 deny in from 78.56.34.12 to any port 25 proto tcp
You can also block an IP address range like below.
sudo ufw insert 1 deny in from 192.168.0.0/24 to any port 25 proto tcp
To block an IP address from accessing all ports on your server, run
sudo ufw insert 1 deny in from 12.34.56.78
Step 6 — Allowing Other Connections
At this point, you should allow all of the other connections that your server needs to function properly. The connections that you should allow depend on your specific needs. Luckily, you already know how to write rules that allow connections based on a service name or port; we already did this for SSH on port . You can also do this for:
- HTTP on port , which is what unencrypted web servers use. To allow this type of traffic, you would type or .
- HTTPS on port , which is what encrypted web servers use. To allow this type of traffic, you would type or .
There are other ways to allow connections, however, aside from specifying a port or known service. We will discuss those next.
Specific Port Ranges
You can specify port ranges with UFW. For example, some applications use multiple ports instead of a single port.
For example, to allow connections, which use ports -, use these commands:
When specifying port ranges with UFW, you must specify the protocol ( or ) that the rules should apply to. We haven’t mentioned this before because not specifying the protocol automatically allows both protocols, which is OK in most cases.
Specific IP Addresses
When working with UFW, you can also specify IP addresses. For example, if you want to allow connections from a specific IP address, such as a work or home IP address of , you need to specify and then the IP address:
You can also specify a specific port that the IP address is allowed to connect to by adding followed by the port number. For example, if you want to allow to connect to port (SSH), use this command:
Subnets
If you want to allow a subnet of IP addresses, you can do so using CIDR notation to specify a netmask. For example, if you want to allow all of the IP addresses ranging from to you can use this command:
Likewise, you may also specify the destination port that the subnet is allowed to connect to. Again, we’ll use port (SSH) as an example:
Connections to a Specific Network Interface
If you want to create a firewall rule that only applies to a specific network interface, you can do so by specifying , followed by the name of the network interface.
You may want to look up your network interfaces before continuing. To do so, use this command:
The highlighted output indicates the network interface names. They are typically named something like or .
If your server has a public network interface called , for example, you could allow HTTP traffic to it with this command:
Doing so would allow your server to receive HTTP requests from the public internet.
Or, if you want your MySQL database server (port ) to listen for connections on the private network interface , you could use this command:
This would allow other servers on your private network to connect to your MySQL database.
How to Set Up IP Masquerading with UFW
Sometimes you want to set up your own VPN server, then you will need to set up IP masquerading on your VPN server so that it becomes a virtual router for VPN clients. Unfortunately, UFW doesn’t provide a convenient way to do this. We have to add iptables command in a UFW configuration file.
sudo nano /etc/ufw/before.rules
By default, there are some rules for the table. Add the following lines at the end of this file.
# NAT table rules
*nat
:POSTROUTING ACCEPT
# Forward traffic through eth0 - Change eth0 to match your network interface
-A POSTROUTING -o eth0 -j MASQUERADE

# End each table with the 'COMMIT' line or these rules won't be processed
COMMIT
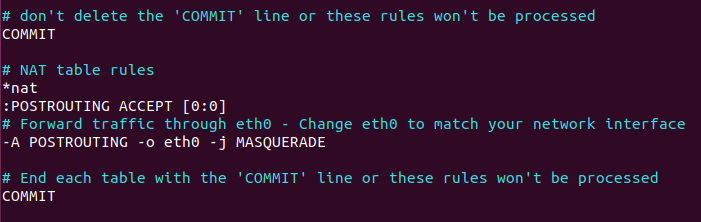
Notice that if your main network interface isn’t , you need to change to your network interface name, which can be obtained with the command. And because we are adding firewall rules to a new table, namely the table, we need to add the ‘COMMIT’ line.
Save and close the file. Then edit file.
sudo nano /etc/default/ufw
Change the default forward policy from “DROP” to “ACCEPT”.
DEFAULT_FORWARD_POLICY="ACCEPT"
Save and close the file. Then restart UFW.
sudo ufw disable

sudo ufw enable
or simply
sudo systemctl restart ufw
Although this is not related to UFW configuration, but in order to route packet, you also need to set up IP forwarding. This can be done by setting the following at the end of file.
net.ipv4.ip_forward = 1
Then apply the changes with the following command.
sudo sysctl -p
nft
nftables’ user-space utility now performs most of the rule-set evaluation before handing rule-sets to the kernel. Because of this, nftables provides no default tables or chains; although, a user can emulate an iptables-like setup.
It works in a fashion similar to ifconfig or iproute2. The commands are a long, structured sequence rather than using argument switches like in iptables. For example:
nft add rule ip6 filter input ip6 saddr ::1 accept
is the command. is a subcommand of . is an argument of , telling it to use the ip6 family. and are arguments of specifying the table and chain to use, respectively. The rest that follows is a rule definition, which includes matches (), their parameters (), parameter arguments (), and jumps ().
The following is an incomplete list of the commands available in nft:
list
  tables
  table  <name>
  chain  <table> <name>

add
  table  <name>
  chain  <table> <name>
  rule  <table> <chain> <rule definition>

table  <name> (shortcut for `add table`)

insert
  rule  <table> <chain> <rule definition>

delete
  table  <name>
  chain  <table> <name>
  rule  <table> <handle>

flush
  table  <name>
  chain  <table> <name>
is optional, see below.
Iptables Rules for IPv6
These are my rules for IPv6 (which my ISP does not currently use). Simply. Drop. Everything.
# cat /etc/ip6tables.up.rules
*filter
##############################
# FLUSH EXISTING CHAIN RULES #
##############################

-F INPUT
-F OUTPUT
-F FORWARD

##############################
# SET DEFAULT CHAIN POLICIES #
##############################

-P INPUT DROP
-P FORWARD DROP
-P OUTPUT DROP

COMMIT
In this case it is also worth disabling IPv6 in the :
net.ipv6.conf.lo.disable_ipv6 = 0
net.ipv6.conf.all.disable_ipv6 = 1
net.ipv6.conf.default.disable_ipv6 = 1
However, I suggest to leave IPv6 on for loopback.
Шаг 2 — Настройка политик по умолчанию
Если вы только начинаете работать с брандмауэром, прежде всего нужно настроить политики по умолчанию. Эти правила определяют обработку трафика, который явно не соответствует каким-либо другим правилам. По умолчанию UFW настроен так, чтобы запрещать все входящие соединения и разрешать все исходящие соединения. Это означает, что любые попытки связаться с вашим сервером будут заблокированы, но любые приложения на вашем сервере будут иметь связь с внешним миром.
Восстановим правила UFW по умолчанию, чтобы продолжить выполнение этого обучающего модуля. Для восстановления настроек по умолчанию для UFW необходимо использовать следующие команды:
Эти команды задают значения по умолчанию, запрещая входящие соединения и разрешая исходящие. Такие параметры брандмауэра по умолчанию достаточны для персонального компьютера, но серверам обычно нужно отвечать на поступающие запросы внешних пользователей. Мы рассмотрим это чуть позже.
Deleting Rules
Deleting rules is done by using the rule handle similar to the add and insert commands above.
The first step is to find the handle of the rule you want to delete.
# nft --handle list ruleset
table inet my_table { # handle 21
    chain my_filter_chain { # handle 1
    type filter hook input priority 0; policy accept;
    tcp dport http accept # handle 3
    tcp dport 1234 accept # handle 8
    tcp dport nfs accept # handle 7
    tcp dport ssh accept # handle 2
    }
}
Then use the to delete the rule.
# nft delete rule inet my_table my_filter_chain handle 8
# nft --handle list ruleset
table inet my_table { # handle 21
    chain my_filter_chain { # handle 1
    type filter hook input priority 0; policy accept;
    tcp dport http accept # handle 3
    tcp dport nfs accept # handle 7
    tcp dport ssh accept # handle 2
    }
}


