Wal-g: бэкапы и восстановление субд postgresql
Содержание:
- Что такое Oracle Data Pump?
- Performance and scalability considerations
- Replication options
- Filtering options
- Option groups
- MySQLdump примеры
- Утилита automysqlbackup
- Restrictions
- Репликация или создание зеркала из бэкапа MySQL
- Технологии бэкапа MySQL
- Импорт данных в БД
- Как выполнить репликацию или зеркалирование с помощью бэкапа базы MySQL?
- Un simple script para respaldos automГЎticos por medio de cron
- DDL options
- Format options
- Репликация баз данных
- Как установить mysqldump?
- Examples
- Создание бэкапов и вывод данных из MySQL базы с помощью запросов
Что такое Oracle Data Pump?

Oracle Data Pump – это технология позволяющая экспортировать и импортировать данные и метаданные в СУБД Oracle Database в специальный формат файлов дампа.
Данная технология впервые появилась в версии 10g и включается во все последующие версии Oracle Database. Для экспорта и импорта данных до Oracle Data Pump, т.е. до версии 10g, использовались традиционные утилиты exp и imp, возможности которых в 10 и выше версиях сохранены в целях совместимости. Особенностью Oracle Data Pump является то, что экспорт и импорт данных происходит на стороне сервера, dmp-файл формируется на файловой системе сервера, а также главным преимуществом Oracle Data Pump перед традиционным способом экспорта и импорта данных является более быстрая выгрузка и загрузка данных.
В Oracle Data Pump для экспорта и импорта данных созданы новые серверные утилиты expdp и impdp. Формат файлов дампа (dmp) используемый в этих утилитах, несовместим с форматом, который используется в exp и imp.
Expdp – утилита для экспорта данных в СУБД Oracle Database в дамп.
Impdp – утилита для импорта данных в СУБД Oracle Database из дампа.
Утилиты expdp и impdp поддерживают несколько режимов работы:
- Full – экспорт и импорт всей БД;
- Schema — экспорт и импорт выбранных схем;
- Table — экспорт и импорт выбранных таблиц;
- Tablespace — экспорт и импорт выбранных табличных пространств;
- Transportable Tablespace — экспорт и импорт табличных пространств для переноса на другой сервер.
Для того чтобы посмотреть подробную справку (описание параметров) по этим утилитам запустите их с параметром help=y, например
expdp help=y
impdp help=y
Примечание! Запуск утилит в операционной системе Windows запускается из командной строки. В случае если системный каталог bin СУБД Oracle не добавлен в переменную среды Path, то запускать утилиты нужно из данного каталога, т.е. предварительно перейдя в него (например, с помощью команды cd). Для демонстрации примеров ниже я использую Oracle Database Express Edition 11g Release 2 установленный на операционной системе Windows 7.
Performance and scalability considerations
mysqldump advantages include the convenience and flexibility of viewing or even editing the output before restoring. You can clone databases for development and DBA work, or produce slight variations of an existing database for testing. It is not intended as a fast or scalable solution for backing up substantial amounts of data. With large data sizes, even if the backup step takes a reasonable time, restoring the data can be very slow because replaying the SQL statements involves disk I/O for insertion, index creation, etc.
For large-scale backup and restore, a physical backup is more appropriate, to copy the data files in their original format that can be restored quickly:
- If your tables are primarily InnoDB tables, or if you have a mix of InnoDB and MyISAM tables, a better tool may be the mysqlbackup command of the MySQL Enterprise Backup product (which is not free). It provides the best performance for InnoDB backups, and can also back up tables from MyISAM and other storage engines; and it provides many convenient options to accommodate different backup scenarios.
- If your tables are primarily MyISAM tables, consider using the mysqlhotcopy instead, for better performance than mysqldump of backup and restore operations.
mysqldump can retrieve and dump table contents row by row, or it can retrieve the entire content from a table and buffer it in memory before dumping it. Buffering in memory can be a problem if you are dumping large tables. To dump tables row by row, use the —quick option (or —opt, which enables —quick). The —opt option (and hence —quick) is enabled by default, so to enable memory buffering, use —skip-quick.
If you are using a recent version of mysqldump to generate a dump to be reloaded into a very old MySQL server, use the —skip-opt option instead of the —opt or —extended-insert option.
Replication options
The mysqldump command is frequently used to create an empty instance, or an instance including data, on a slave server in a replication configuration. The following options apply to dumping and restoring data on replication master and slave servers.
--apply-slave-statements |
For a slave dump produced with the —dump-slave option, add a STOP SLAVE statement before the CHANGE MASTER TO statement and a START SLAVE statement at the end of the output. |
||||||||
--delete-master-logs |
On a master replication server, delete the binary logs by sending a PURGE BINARY LOGS statement to the server after performing the dump operation. This option automatically enables —master-data. |
||||||||
--dump-slave[=value] |
This option is similar to —master-data except that it is used to dump a replication slave server to produce a dump file that can be used to set up another server as a slave that has the same master as the dumped server. It causes the dump output to include a CHANGE MASTER TO statement that indicates the binary log coordinates (file name and position) of the dumped slave’s master. These are the master server coordinates from which the slave should start replicating. —dump-slave causes the coordinates from the master to be used rather than those of the dumped server, as is done by the —master-data option. Also, specifying this option causes the —master-data option to be overridden, if used, and effectively ignored. The option value is handled the same way as for —master-data (setting no value or 1 causes a CHANGE MASTER TO statement to be written to the dump, setting 2 causes the statement to be written but encased in SQL comments) and has the same effect as —master-data in terms of enabling or disabling other options and in how locking is handled. This option causes mysqldump to stop the slave SQL thread before the dump and restart it again after. In conjunction with —dump-slave, the —apply-slave-statements and —include-master-host-port options can also be used. |
||||||||
--include-master-host-port |
For the CHANGE MASTER TO statement in a slave dump produced with the —dump-slave option, add MASTER_HOST and MASTER_PORT options for the hostname and TCP/IP port number of the slave’s master. |
||||||||
--master-data[=value] |
Use this option to dump a master replication server to produce a dump file that can be used to set up another server as a slave of the master. It causes the dump output to include a CHANGE MASTER TO statement that indicates the binary log coordinates (file name and position) of the dumped server. These are the master server coordinates from which the slave should start replicating after you load the dump file into the slave. If the option value is 2, the CHANGE MASTER TO statement is written as an SQL comment, and thus is informative only; it has no effect when the dump file is reloaded. If the option value is 1, the statement is not written as a comment and takes effect when the dump file is reloaded. If no option value is specified, the default value is 1. This option requires the RELOAD privilege and the binary log must be enabled. The —master-data option automatically turns off —lock-tables. It also turns on —lock-all-tables, unless —single-transaction also is specified, in which case, a global read lock is acquired only for a short time at the beginning of the dump (see the description for —single-transaction). In all cases, any action on logs happens at the exact moment of the dump. It is also possible to set up a slave by dumping an existing slave of the master, using the —dump-slave option, which overrides —master-data and causes it to be ignored if both options are used. Before MySQL 5.6.4, this option was required for dumping the replication log tables. |
||||||||
--set-gtid-purged=value |
This option enables control over GTID (global transaction ID) information written to the dump file, by indicating whether to add a SET @@global.gtid_purged statement to the output. The following table shows the permitted option values. The default value is AUTO.
This option was added in MySQL 5.6.9. |
Filtering options
The following options control which kinds of schema objects are written to the dump file: by category, such as triggers or events; by name, for example, choosing which databases and tables to dump; or even filtering rows from the table data using a WHERE clause.
--all-databases-A |
Dump all tables in all databases. This is the same as using the —databases option and naming all the databases on the command line. Before MySQL 5.6.4, the slave_master_info and slave_relay_log_info tables (see Section 16.2.2, «Replication Relay and Status Logs») were not included by this option. |
--databases-B |
Dump several databases. Normally, mysqldump treats the first name argument on the command line as a database name and following names as table names. With this option, it treats all name arguments as database names. CREATE DATABASE and USE statements are included in the output before each new database. |
--events-E |
Include Event Scheduler events for the dumped databases in the output. |
--ignore-table=db_name.tbl_name |
Do not dump the given table, which must be specified using both the database and table names. To ignore multiple tables, use this option multiple times. This option also can be used to ignore views. |
--no-data-d |
Do not write any table row information (that is, do not dump table contents). This is useful if you want to dump only the CREATE TABLE statement for the table (for example, to create an empty copy of the table by loading the dump file). |
--routines-R |
Include stored routines (procedures and functions) for the dumped databases in the output. Use of this option requires the SELECT privilege for the mysql.proc table. The output generated by using —routines contains CREATE PROCEDURE and CREATE FUNCTION statements to re-create the routines. However, these statements do not include attributes such as the routine creation and modification timestamps. This means that when the routines are reloaded, they will be created with the timestamps equal to the reload time. If you require routines to be re-created with their original timestamp attributes, do not use —routines. Instead, dump and reload the contents of the mysql.proc table directly, using a MySQL account that has appropriate privileges for the mysql database. Before MySQL 5.6.5, this option had no effect when used together with the —xml option. |
--tables |
Override the —databases or -B option. mysqldump regards all name arguments following the option as table names. |
--triggers |
Include triggers for each dumped table in the output. This option is enabled by default; disable it with —skip-triggers. |
--where='where_condition'-w 'where_condition' |
Dump only rows selected by the given WHERE condition. Quotes around the condition are mandatory if it contains spaces or other characters that are special to your command interpreter. Examples: --where="user='jimf'" -w"userid>1" -w"userid<1" |
Option groups
- The —opt option turns on several settings that work together to perform a fast dump operation. All these settings are on by default, because —opt is on by default. Thus you rarely if ever specify —opt. Instead, you can turn these settings off as a group by specifying —skip-opt, then optionally re-enable certain settings by specifying the associated options later on the command line.
- The —compact option turns off several settings that control whether optional statements and comments appear in the output. Again, you can follow this option with other options that re-enable certain settings, or turn all the settings on by using the —skip-compact form.
When you selectively enable or disable the effect of a group option, order is important because options are processed first to last. For example, —disable-keys —lock-tables —skip-opt would not have the intended effect; it is the same as —skip-opt by itself.
MySQLdump примеры
Ниже предоставлены наиболее используемые примеры
использования mysqldump.
С помощью которых можно не только делать бэкап, но и добавлять некоторые
параметры резервного копирования: сжатие с помощью gzip, добавление даты бэкапа, делать
дамп только нескольких таблиц или структуры БД, использовать гибкие настройки.
Эти параметры позволяют увеличить скорость выполнения дампа и экономно
использовать место дискового пространства.
Создание дампа
mysqldump –uUSER -h82.82.82.82 -pPASSWORD DATABASE > /path/to/file/dump.sql
где:
-u или —user=… — имя пользователя
-h или —host=… — удаленный хост (для
локального хоста можно опустить этот параметр)
-p или —password — запросить пароль
database — имя
экспортируемой базы данных
/path/to/file/dump.sql— путь и файл для
дампа
Делаем дамп нескольких баз данных, для этого используем
атрибут —databases или
сокращенно –B, смотрите
на примере ниже:
mysqldump -uroot -h82.82.82.82 -p -B database1 database2 database3 > databases.sql
Если вы желаете создать дамп всех баз данных, необходимо использовать
параметр –all-databases или
–А в сокращенном виде, смотрим пример:
mysqldump -uroot -h82.82.82.82 -p -A > all-databases.sql
Создаем структуру
базы без данных
Для этого необходимо использовать параметр —no-data как
показано на примере ниже:
mysqldump --no-data - uUSER -pPASSWORD DATABASE > /path/to/file/schema.sql
Создаем дамп только
одной или нескольких таблиц БД
Создаем дамп и
архивируем его в gzip
Создаем дамп с
указанием даты в имени файла
Используем
дополнительные атрибуты
mysqldump -Q -c -e -uUSER -pPASSWORD DATABASE > /path/to/file/dump.sql
Как уже упоминалось раньше, эти атрибуты уменьшают итоговый
размер файла и ускоряют процесс резервного копирования. А точнее:
-Q оборачивает
имена обратными кавычками
-c делает полную
вставку, включая имена колонок
-e делает
расширенную вставку.
Утилита automysqlbackup
Утилита automysqlbackup доступна в стандартных репозиториях Ubuntu. Она позволяет выполнять бэкап БД автоматически на регулярной основе.
Чтобы установить эту программу, введите в терминал:
Запустите программу:
Главный конфигурационный файл утилиты находится в /etc/default/automysqlbackup; откройте его с правами администратора:
Как видите, данный файл по умолчанию присваивает множество переменных из файла /etc/mysql/debian.cnf, который содержит данные для авторизации. Из этого файла automysqlbackup считывает пользователя, пароль и БД, резервные копии которых нужно создать.
Стандартное место хранения резервных копий — /var/lib/automysqlbackup. Найдите этот каталог и ознакомьтесь со структурой бэкапов:
Каталог daily содержит подкаталог для каждой БД, в котором хранится сжатый sql дамп, полученный в результате последнего запуска команды:
Для настройки автоматического запуска резервного копирования система Ubuntu устанавливает вместе с этой программой демона cron.
Restrictions
- mysqldump does not dump the INFORMATION_SCHEMA database by default. To dump INFORMATION_SCHEMA, name it explicitly on the command line and also use the —skip-lock-tables option.
- mysqldump never dumps the performance_schema database.
- mysqldump also does not dump the MySQL Cluster ndbinfo information database.
- Before MySQL 5.6.6, mysqldump does not dump the general_log or slow_query_log tables for dumps of the mysql database. As of 5.6.6, the dump includes statements to recreate those tables so that they are not missing after reloading the dump file. Log table contents are not dumped.
Репликация или создание зеркала из бэкапа MySQL
Репликация и зеркалирование из бэкапа базы данных MySQL – это автоматизированые операции по созданию и использованию копий данных MySQL на нескольких серверах одновременно. Такие задачи часто приходится решать при создании информационных кластеров и распределённых БД.
Репликация – это создание несколько синхронизированных копий БД на разных серверах — основном (master) и подчинённых (slave), с целью распараллеливания доступа к информации, повышения производительности и надёжности всей системы.
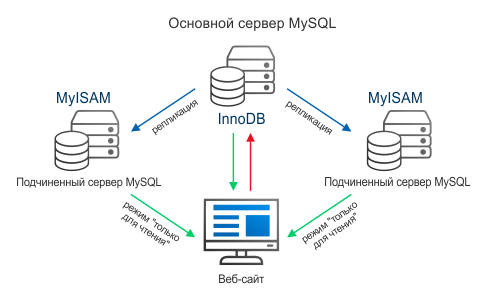
Репликация напоминает создание кластеров MySQL; если один из узлов останавливает работу, это не отражается на надёжности всей системы.
Зеркалирование баз данных MySQL — процесс, который может рассматриваться в общем случае как форма репликации одного основного узла на другой (master-master replication).
Технологии бэкапа MySQL
Существуют два основных способа бэкапа базы данных MySQL:
- Холодный бэкап MySQL выполняется при остановленном сервере с прекращением всех транзакций и сохранением данных на рабочий носитель базы перед бэкапом MySQL. Этот способ имеет недостатки, в частности, относится длительное время простоя сервера.
- Горячий бэкап MySQL не требует остановки и последующего перезапуска сервера MySQL. Это позволяет сократить простои и повысить комфортность работы.
Handy Backup по умолчанию использует технологию горячего бэкапа для баз MySQL, которая отличается высокой скоростью работы и позволяет создавать копии отдельных таблиц, пространств и целых баз данных MySQL.
Импорт данных в БД
Если вы переносите сайт с локального компьютера или другого хостинга, вам будет необходимо импортировать дамп используемой им БД в пустую базу на нашем хостинге. После создания новой БД через Панель управления совершить импорт дампа можно тремя способами:
- через Панель управления хостингом: «Базы данных» → имя БД → кнопка «Загрузить резервную копию». Дамп должен быть запакован в архив .gz или .zip;
- в веб-интерфейсе phpMyAdmin, вкладка «Импорт»;
- утилитой mysql в командной строке.
Зайдя в интерфейс phpMyAdmin и выбрав в левом столбце БД, в которую нужно загрузить дамп, в правой части окна выберите вкладку «Импорт».

В стандартном диалоговом окне, которое появится после нажатия кнопки «Обзор», выберите дамп, хранящийся на вашем компьютере. Укажите требуемую кодировку (по умолчанию наши серверы MySQL используют UTF-8) и нажмите «Ок» — начнется процесс загрузки дампа на сервер и импорта его содержимого в созданную вами БД.
В случае успешного импорта слева вы увидите список таблиц загруженной БД, а справа — сообщение об успешном завершении процесса импорта и о количестве совершенных запросов к БД.
Теперь вы можете начинать использование этой базы вашим сайтом или иным программным обеспечением.
Для импорта дампа в БД необходимо загрузить его файл на сервер, соединиться с сервером по SSH, перейти в директорию, куда загружен дамп, и в интерфейсе командной строки выполнить команду:
где user — имя пользователя для работы с вашей БД, dbname — имя вашей БД, dump.sql — имя файла дампа, который нужно импортировать в БД.
Если утилита mysql завершила работу без ошибок, дамп корректно загружен в БД.
Об ошибках следует сообщить службе технической поддержки, описав подробно действия, которые вы проделали, и указать данные, необходимые для загрузки дампа в БД.
Как выполнить репликацию или зеркалирование с помощью бэкапа базы MySQL?
Репликация БД требует бэкап MySQL с основного сервера на дополнительные и последующего установления отношений master-slave (основной-дополнительный) между серверами MySQL. Ниже приведён сценарий репликации:
- Скачайте и установите Handy Backup.
- Используя плагин для бэкапа MySQL, создайте копию базы, которую необходимо реплицировать.
- В каждом файле резервного копирования MySQL смените тип размещения на MyISAM. Так как сохранение файлов осуществляется в доступной для прочтения и понимания форме, используйте любой текстовый редактор, чтобы изменить содержание операторов CREATE TABLE в начале каждого файла.
Внимание: Изменение способа хранения файлов (storage engine) – универсальная общая рекомендация для любой репликации master-to-slave. Серверы MySQL Slave предназначены только для чтения, и изменение способа хранения их БД на MyISAM способно серьёзно повысить их производительность
- Восстановите изменённые файлы БД на серверах MySQL Slave.
- Для каждого сервера Slave выставьте уникальный параметр server-id, после чего используйте оператор CHANGE MASTER TO, чтобы установить связь с основным сервером (MySQL Master).
Чтобы узнать больше о процессе репликации MySQL, прочите, пожалуйста, соответствующую статью.
Un simple script para respaldos automГЎticos por medio de cron
El siguiente es un ejemplo de un script muy simple para respaldar todas las bases de datos con las opciones mГЎs comppletas de manera autГіmatica, ademГЎs se comprime. El archivo que se genera contiene la fecha y la hora al momento del respaldo, por medio de se programa su ejecuciГіn a las 11:00 de la noche todos los dГas.
Solo si la ejecuciГіn del comando fue correcta y termina, anexa un pequeГ±o mensaje al final de un archivo de bГtacora, asi podemos consultarlo y observar que todos los dГas terminГі correctamente
Guardar el respaldo como respaldoMySQL.sh y cambia sus permisos de ejecuciГіn que permita ejecuciГіn (ver artГculos relacionados mГЎs abajo para enlace de este comando)
#!/bin/bash ################################################################################################## Copyright 2005-2020 Sergio GonzГЎlez DurГЎn (sergio.gonzalez.duran@gmail.com) # Se concede permiso para copiar, distribuir y/o modificar este programa siempre # y cuando se cite al autor y la fuente de linuxtotal.com.mx y segГєn los tГrminos # de la GNU General Public License, # VersiГіn 3 o cualquiera O Posterior publicada por la Free Software Foundation. ################################################################################################# # fecha y hora, ejemplo 20110920_2300 # archivo termina como 'mysql_20110920_2300.sql.gz' fecha=`date +%Y%m%d_%H%M` archivo="mysql_$fecha.sql.gz" # elimina la opciГіn --master-data si tu servidor no es maestro en replicaciГіn mysqldump --user=root --password=xyz --all-databases --opt --routines \ --add-drop-database --add-drop-table --complete-insert --create-options \ --master-data | gzip > /ruta/a/respaldos/$archivo && \ echo "Respaldo realizado exitosamente el `date`" >> /ruta/a/bitacora.txt #adicionalmente si se tiene otro servidor linux, copiamos el archivo ya #generado de respaldo por medio de scp de ssh y asi aseguramos que el #respaldo este en otra locaciГіn, logrando redundancia (en los artГculos #relacionados chГcate "AutentifiaciГіn SSH con llave privada") # El usuario que ejecuta el comando es 'userdba' que existe en ambos servidores su -c "scp -pq /ruta/a/respaldos/$archivo 192.168.1.100:/ruta/a/respaldosmysql/." userdba \ && echo "Copia a servidor remoto se completo con exito el `date`" >> /ruta/a/bitacora.txt
La lГnea correspondiente para su ejecuciГіn programada quedarГa de la siguiente manera en /etc/crontab
0 23 * * * root /ruta/a/respaldoMySQL.sh
DDL options
Usage scenarios for mysqldump include setting up an entire new MySQL instance (including database tables), and replacing data inside an existing instance with existing databases and tables.
The following options let you specify which things to tear down and set up when restoring a dump, by encoding various DDL statements in the dump file.
--add-drop-database |
Add a DROP DATABASE statement before each CREATE DATABASE statement. This option is used in conjunction with the —all-databases or —databases option because no CREATE DATABASE statements are written unless one of those options is specified. |
--add-drop-table |
Add a DROP TABLE statement before each CREATE TABLE statement. |
--add-drop-trigger |
Add a DROP TRIGGER statement before each CREATE TRIGGER statement. |
--all-tablespaces-Y |
Adds to a table dump all SQL statements needed to create any tablespaces used by an NDB table. This information is not otherwise included in the output from mysqldump. This option is currently relevant only to MySQL Cluster tables. |
--no-create-db-n |
This option suppresses the CREATE DATABASE statements that are otherwise included in the output if the —databases or —all-databases option is given. |
--no-create-info-t |
Do not write CREATE TABLE statements that re-create each dumped table. Note: This option does not exclude statements creating log file groups or tablespaces from mysqldump output; however, you can use the —no-tablespaces option for this purpose. |
--no-tablespaces-y |
This option suppresses all CREATE LOGFILE GROUP and CREATE TABLESPACE statements in the output of mysqldump. |
--replace |
Write REPLACE statements rather than INSERT statements. |
Format options
The following options specify how to represent the entire dump file or certain kinds of data in the dump file. They also control whether certain optional information is written to the dump file.
--compact |
Produce more compact output. This option enables the —skip-add-drop-table, —skip-add-locks, —skip-comments, —skip-disable-keys, and —skip-set-charset options. |
||||||||
--compatible=name |
Produce output that is more compatible with other database systems or with older MySQL servers. The value of name can be ansi, mysql323, mysql40, postgresql, oracle, mssql, db2, maxdb, no_key_options, no_table_options, or no_field_options. To use several values, separate them by commas. These values have the same meaning as the corresponding options for setting the server SQL mode. This option does not guarantee compatibility with other servers. It only enables those SQL mode values that are currently available for making dump output more compatible. For example, —compatible=oracle does not map data types to Oracle types or use Oracle comment syntax. This option requires a server version of 4.1.0 or higher. With older servers, it does nothing. |
||||||||
--complete-insert-c |
Use complete INSERT statements that include column names. |
||||||||
--create-options |
Include all MySQL-specific table options in the CREATE TABLE statements. |
||||||||
--fields-terminated-by=...--fields-enclosed-by=...--fields-optionally-enclosed-by=...--fields-escaped-by=... |
These options are used with the —tab option and have the same meaning as the corresponding FIELDS clauses for LOAD DATA INFILE. |
||||||||
--hex-blob |
Dump binary columns using hexadecimal notation (for example, ‘abc‘ becomes 0x616263). The affected data types are BINARY, VARBINARY, the BLOB types, and BIT. |
||||||||
--lines-terminated-by=... |
This option is used with the —tab option and has the same meaning as the corresponding LINES clause for LOAD DATA INFILE. |
||||||||
--quote-names-Q |
Quote identifiers (such as database, table, and column names) within «`» (backtick) characters. If the ANSI_QUOTES SQL mode is enabled, identifiers are quoted within ««» (double-quote) characters. This option is enabled by default. It can be disabled with —skip-quote-names, but this option should be given after any option such as —compatible that may enable —quote-names. |
||||||||
--result-file=file_name-r file_name |
Direct output to a given file. This option should be used on Windows to prevent newline «\n» characters from being converted to «\r\n» carriage return/newline sequences. The result file is created and its previous contents overwritten, even if an error occurs while generating the dump. |
||||||||
--tab=path-T path |
Produce tab-separated text-format data files. For each dumped table, mysqldump creates a tbl_name.sql file that contains the CREATE TABLE statement that creates the table, and the server writes a tbl_name.txt file that contains its data. The option value is the directory in which to write the files. Note: This option should be used only when mysqldump is run on the same machine as the mysqld server. You must have the FILE privilege, and the server must have permission to write files in the directory that you specify. By default, the .txt data files are formatted using tab characters between column values and a newline at the end of each line. The format can be specified explicitly using the —fields-xxx and —lines-terminated-by options. Column values are converted to the character set specified by the —default-character-set option. |
||||||||
--tz-utc |
This option enables TIMESTAMP columns to be dumped and reloaded between servers in different time zones. mysqldump sets its connection time zone to UTC and adds SET TIME_ZONE=’+00:00′ to the dump file. Without this option, TIMESTAMP columns are dumped and reloaded in the time zones local to the source and destination servers, which can cause the values to change if the servers are in different time zones. —tz-utc also protects against changes due to daylight saving time. —tz-utc is enabled by default. To disable it, use —skip-tz-utc. |
||||||||
--xml-X |
Write dump output as well-formed XML. NULL, ‘NULL‘, and Empty Values: For a column named column_name, the NULL value, an empty string, and the string value ‘NULL‘ are distinguished from one another in the output generated by this option as follows.
The output from the mysql client when run using the —xml option also follows the preceding rules. |
Репликация баз данных
Для резервного копирования данных можно также использовать репликацию MySQL в связке с любым из перечисленных выше методов.
Репликация — это процесс зеркалирования данных с ведущего сервера на другие (тип master-slave) или с любого сервера связки на остальные серверы (тип master-master).
Но поскольку репликация постоянно фиксирует изменения динамической системы, она может пострадать от резервного копирования, потому что при этом фиксируется определенный момент времени.
Чтобы устранить эту проблему, можно:
- Временно отключить репликацию
- Или временно сделать сервер резервного копирования доступным только для чтения.
Временное отключение репликации
Чтобы временно отключить репликацию на slave-сервере, введите:
Есть ещё один метод, который не отключает репликацию полностью, а просто ставит её на паузу:
Остановив репликацию, можно выполнить бэкап при помощи любого из вышеперечисленных методов. При этом не нужно останавливать master-сервер.
После этого просто возобновите репликацию:
Как установить mysqldump?
Устанавливать будем на локальный сервер Denwer. Установить приложение легко и
просто, для этого следуйте ниже предоставленным инструкциям и скриншотам.
1.Копируем файл mysqldump.exe
в папку с денвером:
D:\WebServers\usr\local\mysql5\bin\При этом у вас может быть немного другое название папки mysql5, например mysql-5.1 или немного
видоизмененное. Поэтому, для большей ясности, ниже предоставлен скриншот: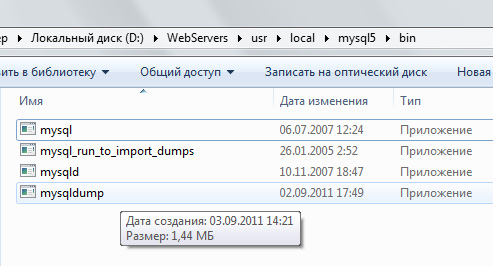
Наверняка вы и сами знаете как запустить Denwer.
4.Тестируем:
С помощью команд в консоле, переходим на
виртуальных диск денвера (у меня W:\) и в папку с приложением mysqldump. Для подтверждения выполнения команды жмем Enter.
Вводим команды:
W: — заходим на
виртуальный диск денвера
cdusr\local\mysql5\bin– заходим в папку с приложением
mysqldump
-uroot имя_вашей_бд>имя_файла.sql – тестируем, делаем дамп произвольной
базы данных в файл, который сохранится в папку bin.
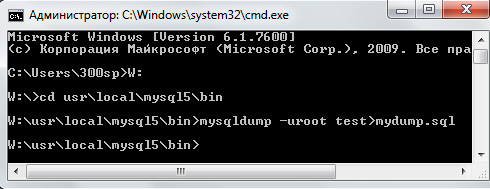
У меня установка выполнена успешно, надеюсь у вас тоже. В
папке bin находим файл резервной копии БД. Чтобы научится более широко
использовать программу, читайте следующие разделы статьи.
Examples
mysqldump db_name > backup-file.sql
Back up the entire database db_name to the file backup-file.sql.
mysql db_name < backup-file.sql
Load the backup file backup-file.sql into the database db_name.
mysql -e "source /path-to-backup/backup-file.sql" db_name
This is another way to do the same thing as the previous example (load the backup file into the database).
mysqldump --opt db_name | mysql --host=remote_host -C db_name
Populate a remote mysql server’s database db_name with local database db_name.
mysqldump --databases db_name1 > my_databases.sql
The above command dumps multiple databases (db_name1, db_name2…) to the single backup file my_databases.sql.
mysqldump --all-databases > all_databases.sql
Dumps all databases to the backup file all_databases.sql.
Создание бэкапов и вывод данных из MySQL базы с помощью запросов
О том, как сделать дамп базы данных MySQL — одной и нескольких, а также отдельных их таблиц, мы поговорили. Но иногда на практике бывают случаи, когда нужно экспортировать набор данных, не ограниченный одной таблицей. Либо нужно выбрать лишь некоторые данные из таблицы.
Особенно часто с таким сталкиваются разработчики корпоративных проектов, когда менеджеры просят их предоставить всякие статистические данные. Либо когда нужно сделать бэкап определённой части таблицы для её быстрого восстановления.
Для бэкапа нам понадобится всё та же утилита mysqldump
, которую нужно будет вызвать в таком виде:
Mysqldump -u имя_пользователя -p имя_базы_данных имя_таблицы —where «уточняющий_запрос» > путь_и_имя_файла_дампа
В результате мы получим файл с SQL командами для создания таблицы со всей его структурой, которая после создания будет наполняться информацией, выбираемой с помощью уточняющего запроса.
Если нам будет нужно просто получить данные, хранящиеся в одной или нескольких таблицах, то нам потребуется модификация команды, используемой в предыдущем случае при выборке всех данных таблицы, только с некоторыми уточнениями:
Mysql -u имя_пользователя -p -e «SELECT * FROM имя_таблицы WHERE уточняющий_запрос» > путь_и_имя_файла
Как вы понимаете, помимо различных уточнений, указываемых в запросе с помощью директивы WHERE
, можно использовать и прочие SQL конструкции: JOIN
, UNION
и т.д.
Статистику собрать получится какую угодно
То же самое действие возможно произвести также при работе в командной строке MySQL с помощью следующей команды:
SELECT * FROM таблица_базы_данных WHERE уточняющий_запрос INTO OUTFILE «путь_и_имя_файла»;
Данная команда как раз и предназначена для создания файлов с результатами выборки. Причём, результаты можно не только экспортировать в файлы, но и записывать в переменные, а также выводимые данные можно форматировать различными способами.
Если перечисленное — ваш случай, то с полным списком параметров и вариантов вызова данной команды вы можете ознакомиться здесь — https://dev.mysql.com/doc/refman/5.7/en/select-into.html
В завершение своего краткого экскурса по mysqldump хочу привести вариант вызова команды со списком параметров для создания оптимизированного дампа базы MySQL и таблиц, восстановление БД и отдельных таблиц из которого будет занимать меньше времени, чем при обычном вызове:
Mysqldump -u имя_пользователя -h хост_или_IP_сервера_MySQL -p —no-autocommit —opt имя_базы_данных > путь_и_имя_файла_дампа;
Ради эксперимента я использовал данный вариант для того, чтобы сделать дамп базы MySQL размером в 143 Мб. Последующее восстановление заняло 59 секунд времени против 1 минуты и 3 секунд, когда БД восстанавливалась из дампа, сделанного вызовом mysqldump без специальных параметров.
Согласен, что это мелочь. Но это только в случае данного объёма данных. Если использовать данную методику при создании дампа размером более 1Гб, то разница будет более существенной.
Если вы столкнётесь с такой ситуацией, то не забудьте ещё предварительно запаковать дамп базы MySQL в архив. Лучше всего tar.gz. Тогда восстановление займёт ещё меньше времени.


