Создание пользователя mysql
Содержание:
Шаг 1 — Перемещение директории Data MySQL
Подготавливаясь для перемещения директории MySQL data, давайте проверим текущее расположения, для этого запустите интерактивную сессию MySQL с учётными данными администратора.
mysql -u root -p
Когда появится запрос, введите пароль рута MySQL. Затем в приглашении MySQL выполните запрос для показа текущего расположения директории data:
select @@datadir;
+-----------------+
| @@datadir       |
+-----------------+
| /var/lib/mysql/ |
+-----------------+
1 row in set (0.00 sec)
Этот вывод подтверждает, что MySQL настроена на использование директории data по умолчанию, /var/lib/mysql/, т.е. эту директорию нам и нужно перемещать. После подтверждения этого, напечатайте exit; для выхода.
Чтобы быть уверенными в целостности данных, вы отключим MySQL перед тем, как начнём делать наши изменения:
sudo systemctl stop mysql
systemctl не показывает результат выполнения команды управления сервисом, поэтому если вы хотите убедиться, что всё прошло успешно, используйте следующую команду:
sudo systemctl status mysql
Теперь, когда сервер отключён, мы скопируем с rsync существующую директорию с базой данных в новое расположение. Использование флага -a сохраняет права доступа и другие свойства каталога, -v обеспечивает вербальный вывод, поэтому вы можете следить за прогрессом.
Внимание: убедитесь, что отсутствуют завершающие слеши после имён директорий, они могут появиться при использовании автозавершения по tab. Когда присутствует завершающий слеш, rsync сбросит содержимое директории в точку монтирования вместо перенесения директории mysql.
sudo rsync -av /var/lib/mysql /home/mial
Когда rsync закончит, переименуйте текущую папку, добавив к её имени расширение .bak и сохраните её до тех пор, пока не подтвердится, что перемещение было успешным. Переименовывая папку, мы с одной стороны убедимся, что сервер точно работает с новым расположением, при этом мы сохраним резервную копию на случай, если что-то пошло не так:
sudo mv /var/lib/mysql /var/lib/mysql.bak
Теперь мы готовы переключиться на настройку.
Как узнать настройки директорий в MySQL/MariaDB
Чтобы показать информацию о всех настройках директорий СУБД сервера, выполнит команду:
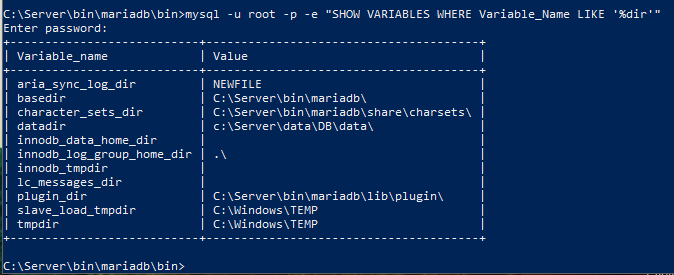
mysql -u root -p -e "SHOW VARIABLES WHERE Variable_Name LIKE '%dir'"
Пример вывода в Windows для MariaDB:
+---------------------------+---------------------------------------+
| Variable_name             | Value                                 |
+---------------------------+---------------------------------------+
| aria_sync_log_dir         | NEWFILE                               |
| basedir                   | C:\Server\bin\mariadb\                |
| character_sets_dir        | C:\Server\bin\mariadb\share\charsets\ |
| datadir                   | c:\Server\data\DB\data\               |
| innodb_data_home_dir      |                                       |
| innodb_log_group_home_dir | .\                                    |
| innodb_tmpdir             |                                       |
| lc_messages_dir           |                                       |
| plugin_dir                | C:\Server\bin\mariadb\lib\plugin\     |
| slave_load_tmpdir         | C:\Windows\TEMP                       |
| tmpdir                    | C:\Windows\TEMP                       |
+---------------------------+---------------------------------------+
Чтобы вывести только datadir выполните команду:
mysql -u root -p -e "SHOW VARIABLES WHERE Variable_Name = 'datadir'"
Binary logs[edit]
Binary logs are a mechanism to keep track of everything that happens on the MySQL server (forensics), allowing to replay the same sequence of commands on a different computer (master/slave replication), or at a later time (crash recovery).
On Debian they are stored in .
To view the SQL commands in a binary log, you use the command:
mysqlbinlog /var/log/mysql/mysql-bin.000001
For the crash recovery to be useful, binary logs are usually stored on a different computer (via a NFS mount, for example). Note that it is meant to recover the full mysql server, not just one database. You could attempt to filter the log by database, but this isn’t straightforward.
So in order use binary logs as a recovery plan, you usually combine them with a full standard backup:
mysqldump -A | gzip > all.sql.gz
To flush/reset the logs at the same time (TODO: test):
mysqldump -A --master-data --flush-logs | gzip > all.sql.gz
To recover you’ll just combine the two sources (preferably, disable binary logging in the server configuration during the recovery, and re-enable it right after.):
(zcat all.sql.gz && mysqlbinlog /var/log/mysql/mysql-bin.0*) | mysql
Essential MySQL admin tool: tcprstat
tcprstat is probably the most esoteric tool on this list. tcprstat monitors TCP requests and prints statistics about low-level response times. When you become familiar with the response time way of thinking about performance, the payoff of tcprstat is significant.
Parallel processing and other low-level factors play a significant part here, but the simplified upshot is that there are 28,800 seconds in an eight-hour workday, so reducing response times by just four-tenths of a second (from 0.5 to 0.1 second) results in 230,400 more requests served each day. tcprstat helps you achieve this.
I have only enough space in this article to pique your curiosity, so I’ll finish this tool’s introduction by telling you the first step toward getting started with MySQL response time optimization: read Optimizing Oracle Performance. Then start using tcprstat.
The shutdown Command and the —wait-for-all-slaves Option
MariaDB starting with 10.4.4
The option was first added in MariaDB 10.4.4.
When a master server is shutdown and it goes through the normal shutdown process, the master kills client threads in random order. By default, the master also considers its binary log dump threads to be regular client threads. As a consequence, the binary log dump threads can be killed while client threads still exist, and this means that data can be written on the master during a normal shutdown that won’t be replicated. This is true even if semi-synchronous replication is being used.
In MariaDB 10.4 and later, this problem can be solved by shutting down the server with the utility and by providing the option to the utility and by executing the command with the utility. For example:
mysqladmin --wait-for-all-slaves shutdown
When the option is provided, the server only kills its binary log dump threads after all client threads have been killed, and it only completes the shutdown after the last binary log has been sent to all connected slaves.
See for more information.
Configuration[edit]
Configure /etc/mysql/my.cnf — for heavily loaded databases, for fat databases…; different kinds of connections (Unix sockets, TCP/IP w/ or w/o SSL, MySQL+SSL licensing issues)
$ mysql -u root
mysql> SET PASSWORD = PASSWORD('PassRoot');
For more information, see the section.
Network configurationedit
--bind-address=127.0.0.1 # localhost only
--bind-address=0.0.0.0 # listen on all interfaces
--bind-address=192.168.1.120 # listen on that IP only
skip-networkingedit
When you specify in the configuration, then MySQL will not listen on any port, not even on localhost (127.0.0.1). This means that only programs running on the same machine than the MySQL server will be able to connect to it. This is a common setup on dedicated servers.
The only way to contact MySQL will be to use the local Unix socket, such as (Debian) or (FC5). You can specify where the socket is located using the parameter in the section of the configuration:
...
socket=/var/lib/mysql/mysql.sock
Detailed info
SQL Maestro for MySQL is the premier tool for MySQL and MariaDB database management, control and development. It provides a rich set of GUI tools for anyone who uses MySQL and/or MariaDB including database developers, DBAs, and data analysts. Key features include:
- Support for all the MySQL server versions from 3.23
- Direct support for MariaDB-specific features
- Easy database object management
- Database Designer
- Comfortable access to MySQL security features
- Data management and data analysis tools
- Handy SQL Editor with code folding and multi-threading
- Visual Query Builder with support for subqueries and UNIONS
- Data export/import to/from the most popular formats
- Database schema refactoring tools
- Powerful BLOB Viewer/Editor
- Working with remote MySQL servers via SSH or HTTP tunnel
All these features and intuitive interface make SQL Maestro for MySQL an irreplaceable tool for MySQL and MariaDB on the web or at your local desktop.
Top 10 reasons to use SQL Maestro for MySQL


|
Latest MySQL/MariaDB versions support SQL Maestro for MySQL supports all the latest versions of MySQL and MariaDB |
|
Powerful security management MySQL security system is easy and clear in SQL Maestro for MySQL |
|
Easy database objects management SQL Maestro for MySQL is incredibly easy in database objects management |
|
Clear in use Even a newbie can use SQL Maestro for MySQL |
|
Advanced SQL Editor SQL Maestro for MySQL allows you to create and execute queries in the most convenient way |
|
Powerful data export and import SQL Maestro for MySQL provides you with advanced data export and import abilities |
|
Full support for BLOB fields SQL Maestro for MySQL has an ability to view BLOB data in various ways |
|
Viewing data as diagrams SQL Maestro for MySQL allows you to build diagrams based on MySQL data |
|
The fastest way for building queries SQL Maestro for MySQL allows you to create the SELECT statements visually |
Comandi mysqladmin
I comandi disponibili sono i seguenti: (possono essere abbreviati)
| Comandi | Spiegazione |
|---|---|
| Crea un nuovo database | |
| Dice al server di scrivere informazioni di debug nel log | |
| Cancella un database e tutte le sue tabelle | |
| Mostra un messaggio di stato esteso del server | |
| Svuota tutte le tabelle delle statistiche | |
| Svuota lo stato e le statistiche | |
| Svuota le statistiche sui client | |
| Svuota la cache dei nomi host | |
| Svuota le statistiche degli indici | |
| Svuota tutti i log | |
| Ricarica le tabelle grant (identico a reload) | |
| Svuota lo slow query log | |
| Pulisce le variabili di stato | |
| Pulisce le statistiche sulle tabelle | |
| Effettua un flush delle tabelle | |
| Svuota la cache dei thread | |
| Pulisce le statistiche sugli utenti | |
| Termina i thread mysql | |
| Cambia la password in new-password nel nuovo formato, l’hashing di MySQL 4.1. | |
| Cambia la vecchia password in new-password, nel vecchio formato. | |
| Controlla se mysqld è attivo | |
| Mostra un elenco dei thread attivi | |
| Ricarica le tabelle grant | |
| Flush di tutte le tabelle, chiude e riapre i file di log | |
| Arresta il server | |
| Mostra un piccolo messaggio di stato del server | |
| Avvia lo slave | |
| Arresta lo slave | |
| Stampa le variabili disponibili | |
| Stampa il numero di versione del server |
Examples
Quick check of what the server is doing:
shell> mysqladmin status
Uptime: 8023 Threads: 1 Questions: 14 Slow queries: 0 Opens: 15 Flush tables: 1 Open tables: 8 Queries per second avg: 0.1
shell> mysqladmin processlist
+----+-------+-----------+----+---------+------+-------+------------------+
| Id | User | Host | db | Command | Time | State | Info |
+----+-------+-----------+----+---------+------+-------+------------------+
....
+----+-------+-----------+----+---------+------+-------+------------------+
More extensive information of what is happening ‘just now’ changing
(great for troubleshooting a slow server):
shell> mysqladmin --relative --sleep=1 extended-status | grep -v " 0 "
Check the variables for a running server:
shell> mysqladmin variables | grep datadir
| datadir | /my/data/ |
Using a shortened prefix for the command:
shell> mysqladmin ver
mysqladmin Ver 9.1 Distrib 10.1.6-MariaDB, for debian-linux-gnu on x86_64
Copyright (c) 2000, 2015, Oracle, MariaDB Corporation Ab and others.

Server version		10.1.6-MariaDB-1~trusty-log
Protocol version	10
Connection		Localhost via UNIX socket
UNIX socket		/var/run/mysqld/mysqld.sock
Uptime:			1 hour 33 min 33 sec

Threads: 1 Questions: 281 Slow queries: 0 Opens: 64 Flush tables: 1 Open tables: 76 Queries per second avg: 0.050
Other Ways To Stop mysqld (Unix)
If you get the error:
mysqladmin: shutdown failed; error: 'Access denied; you need (at least one of) the SHUTDOWN privilege(s) for this operation'
It means that you didn’t use with a user that has the SUPER or SHUTDOWN privilege.
If you don’t know the user password, you can still take the mysqld process down with a system command:
kill -SIGTERM pid-of-mysqld-process
The above is identical to .
On windows you should use:
NET STOP MySQL
With MariaDB 10.0 and newer you can use the SHUTDOWN command from any client.
Essential MySQL admin tool: mydumper
Also known as MySQL Data Dumper, this tool does not manage backup sets, differentials, or other parts of a complete backup plan. It just dumps data from MySQL as quickly as possible, enabling you to complete backups under tight time constraints, such as overnight, while employees are offline, or to perform backups more frequently than you would with mysqldump.
One technical point to know about mydumper is that it locks tables, so it is not the ideal tool for performing backups during operating hours. Then again, professional data recovery costs hundreds of dollars per hour, and you always get a bill even if the data isn’t recoverable. mydumper is free and well worth exploring for even basic backups.
mydumper also comes in handy when cloning servers. Other tools perform complete hard drive duplications, but when all you need is MySQL data, mydumper is the fastest way to get it. Servers provisioned in a cloud are particularly suited to cloning using mydumper. Just dump your MySQL data from an existing server and copy it to the new instance.
Cloning is worthwhile for creating slave servers, benchmarking, and profiling, but nowhere is it more vital than in testing and development. Being able to spin up a replica for quick testing before going live is essential for dynamic MySQL environments. With mydumper, you can quickly create a server that is nearly identical to your production server, enabling your test results to better mimic production results.
Backup[edit]
Backup/recovery and import/export techniques.
mysqldumpedit
mysqldump --opt -h 192.168.2.105 -u john -p'****' mybase | gzip > mybase-`date +%Y%m%d`.sql.gz
This creates the file.
is the magical option that uses all the options that are generally useful. In recent versions of mysqldump, it is even enabled by default, so you need not type it. means — so it will lock tables during the backup for consistency, add DROP TABLE statements so the dump can be applied without cleaning the target database, will use the most efficient ways to perform the INSERTs and specify the charset (latin1, Unicode/UTF-8…) used.
If you don’t provide a database to mysqldump, you’ll get a backup containing all databases — which is less easy to use for restoring a single database later on.
Daily rotated mysqldump with logrotateedit
We’re using logrotate in a slightly non-standard way to keep a batch of dumps. Each day, logrotate will cycle the dumps to keep the last N dumps, removing old backups automatically, and generating the new one immediately through a postrotate hook.
The following configuration keeps 2 months of daily backups:
/dumps/mybase.sql.gz {
        rotate 60
        dateext
        daily
        nocompress
        nocopytruncate
        postrotate
          HOME=/root mysqldump --opt mybase | gzip > /dumps/mybase.sql.gz
        endscript
}
Cf. logrotate(8) in the GNU/Linux man pages for more information.
Variant to backup all databases at once:
/dumps/*/*.sql.gz {
        daily
        rotate 20
        dateext
        nocompress
        sharedscripts
        create
        postrotate
                export HOME=/root
                for i in $(mysql --batch --skip-column-names -e 'SHOW DATABASES' | grep -vE '^information_schema|performance_schema$'); do
                        if [ ! -e /dumps/$i ]; then mkdir -m 700 /dumps/$i; fi
                        mysqldump --events $i | gzip -c > /dumps/$i/$i.sql.gz
                done
        endscript
}
Setup:
- Create your for password-less database access
- Place the logrotate configuration file above in the directory
- Bootstrap the first dump:
- Check the dump using .
Comments on the code: is needed for systems (such as FC5) that set in their cron, which prevents mysqldump from finding the configuration. We also use instead of logrotate’s option for disk I/O efficiency (single-step).
In production, you’ll get something like this:
# ls -lt /dumps
total 16520
-rw-r----- 1 root clisscom 2819533 mar  2 06:25 clisscom.sql.gz
-rw-r----- 1 root clisscom 2815193 mar  1 06:25 clisscom.sql.gz-20100302
-rw-r----- 1 root clisscom 2813579 fév 28 06:26 clisscom.sql.gz-20100301
-rw-r----- 1 root clisscom 2812251 fév 27 06:25 clisscom.sql.gz-20100228
-rw-r----- 1 root clisscom 2810803 fév 26 06:25 clisscom.sql.gz-20100227
-rw-r----- 1 root clisscom 2808785 fév 25 06:25 clisscom.sql.gz-20100226
...
Beware that the date in the filename is the date of the rotation, not the date of the dump.
Using helps with remote backups, because filenames don’t change daily, not you avoid re-downloading all of each time.
Remote mysqldump using CGIedit
mysqldump can be found sometimes in shared-hosting facilities. You can use a simple CGI script to get a direct dump:
#!/bin/sh

echo "Content-Type: application/x-tar"
echo "Content-Encoding: x-gzip"
echo ""

mysqldump --host=mysql.hosting.com --user=john --password=XXXXX my_base | gzip 2>&1
You can then get it with your browser or wget:
You can even re-inject it on-the-fly in your local test database:
Protect the script with a , write a for wget to use, and you’ll have a simple, unattended way to grap a backup even without command-line access. This allows to gain time when grabing a dump (compared to using phpMyAdmin) and to setup remote automated backups (no interaction is needed).
Something similar should be feasible in PHP provided you have access to exec().
Processes[edit]
MySQL provides a Unix-like way to show the current server threads and kill them.
SHOW PROCESSLISTedit
Here is a peaceful MySQL server:
mysql> SHOW PROCESSLIST;
+----+-----------+-----------+-----------+---------+------+-------+------------------+
| Id | User      | Host      | db        | Command | Time | State | Info             |
+----+-----------+-----------+-----------+---------+------+-------+------------------+
| 34 | monddprod | localhost | monddprod | Sleep   | 1328 |       | NULL             |
| 43 | root      | localhost | NULL      | Query   |    0 | NULL  | SHOW PROCESSLIST |
+----+-----------+-----------+-----------+---------+------+-------+------------------+
2 rows in set (0.00 sec)
provides a command-line synonym:
$ mysqladmin processlist
+----+-----------+-----------+-----------+---------+------+-------+------------------+
| Id | User      | Host      | db        | Command | Time | State | Info             |
+----+-----------+-----------+-----------+---------+------+-------+------------------+
| 34 | monddprod | localhost | monddprod | Sleep   | 1368 |       |                  |
| 44 | root      | localhost |           | Query   | 0    |       | show processlist |
+----+-----------+-----------+-----------+---------+------+-------+------------------+
KILLedit
If a heavy, nasty query is consuming too many resources on your server, you need to shut it down.
TODO: Add a sample SHOW PROCESSLIST output here
The brute force way is to restart the server:
/etc/init.d/mysql restart
A more subtle way is to use SHOW PROCESSLIST to identify the nasty query and kill it independently of other server threads.
mysql> KILL 342;
Query OK, 0 rows affected (0.00 sec)
There is also a command-line synonym:
$ mysqladmin kill 342


