Настраиваем бесплатную сборку для написания и отладки программ под микроконтроллеры на основе ядра arm под windows 10
Содержание:
- C++14 Language Features
- Environment
- Установка MinGW
- Full description
- Ставим Eclipse Neon 3
- Contents of MinGW Packages
- Install Cygwin
- Quick Start: Manifests
- Tab-Completion/Auto-Completion
- Examples
- Contributing
- Telemetry
- Using vcpkg with CMake
- Qt-builds
- Обзор
- 3- Installing MSYS2 on your PC
- Цель данной статьи:
- Required Prerequisites
- Test the New Compiler
- Building
C++14 Language Features
The following table lists new language features that are part of
the C++14 standard. The «Proposal» column
provides a link to the ISO C++ committee proposal that describes the
feature, while the «Available in GCC?» column indicates the first
version of GCC that contains an implementation of this feature.
| Language Feature | Proposal | Available in GCC? | SD-6 Feature Test |
|---|---|---|---|
| Tweak to certain C++ contextual conversions | N3323 | ||
| Binary literals | N3472 |
(GNU) (N3472) |
__cpp_binary_literals >= 201304 |
| Return type deduction for normal functions | N3638 |
(N3386) (N3638) |
__cpp_decltype_auto >= 201304 |
| Generalized lambda capture (init-capture) | N3648 |
(partial) (N3648) |
__cpp_init_captures >= 201304 |
| Generic (polymorphic) lambda expressions | N3649 | __cpp_generic_lambdas >= 201304 | |
| Variable templates | N3651 | __cpp_variable_templates >= 201304 | |
| Relaxing requirements on constexpr functions | N3652 | __cpp_constexpr >= 201304 | |
| Member initializers and aggregates | N3653 | __cpp_aggregate_nsdmi >= 201304 | |
| Clarifying memory allocation | N3664 | N/A | |
| Sized deallocation | N3778 | __cpp_sized_deallocation >= 201309 | |
| ] attribute | N3760 | (N3797) | __has_cpp_attribute(deprecated) >= 201309 |
| Single-quotation-mark as a digit separator | N3781 | (N3797) | __cpp_digit_separator >= 201309 |
This feature was briefly part of the C++14 working paper, but was not
part of the published standard; as a result, it has been removed from
the compiler.
| Language Feature | Proposal | Available in GCC? | SD-6 Feature Test |
|---|---|---|---|
| Runtime-sized arrays with automatic storage duration (Removed from the standard) |
N3639 | ?.? (GNU VLAs) (N3639) (GNU VLAs) |
__cpp_runtime_arrays >= 198712 |
Environment
All prerequisite tools should be in the PATH environment variable.
The console emulation in Cygwin and MSYS has a known problem that causes it to lose some output information from GCC, which can cause build failures to be rather mysterious. RXVT, for example, has this problem. For this reason, the Microsoft console should be used. Alternately, a console emulator that does not have this problem can be used, such as Console 2 from http://sourceforge.net/projects/console/.
Sometimes CRLF issues are a problem. Cygwin bash has a feature that can mitigate some of these problems, which can be activated in the following way: set -o igncr export SHELLOPTS
Including \r in the IFS environment variable may also be helpful in avoiding these problems.
Установка MinGW
Для установки требуется подключение к сети интернет.
Запустите установщик, он скачает и установит все необходимые файлы.
Жмите «Next».
Диалог сообщает нам, что программа запущена администратором компьютера и будет установлена для всех пользователей.
На этом этапе укажем загружать последнюю версию программного обеспечения.
Соглашаемся с условиями лицензионного соглашения и жмём «Next».
Укажем путь для установки. Не рекомендуется устанавливать в директорию или субдиректорию имеющюю в своём имени пробелы.
Рзмещайте все файлы по стандартному пути, например, «C:\MinGW».
Настройка ярлыков, можно оставить как есть и нажать «Next».
Выбор компонентов для установки.
В данном случае выбраны компилятор С и С++, инструменты для разработки и комплект утилит командной строки — MSYS.
Подтверждение настроек.
Если всё выбрано правильно, жмём «Install».
Начало установки — ожидаем начала загрузки компонентов.
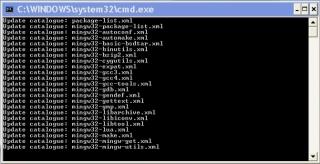
Автоматически запускается консольное окно, в котором отражается весь ход процесса — в данный момент загружаются списки пакетов.

В следующем окне мы можем наблюдать за прогрессом загрузки.
Установка окончена, если вы не хотите читать подробный отчёт о процессе установки, снимите галочку.
Закройте окно установщика — нажмите «Finish».
Проверим, готова ли операционная система для полноценной работы с MinGW. В свойствах компьютера на вкладке «Дополнительно» кликните по кнопке «Переменные среды».
Нам потребуется значение переменной PATH, там должны быть прописаны пути к папкам с исполняемыми файлами MinGW и MSYS, в данном случае это директории «C:\MinGW\bin» и «C:\MinGW\msys\1.0\bin».
Если эти значения не были автоматически добавлены в переменную в процессе установки, допишите их вручную, добавте в начало строку «C:\MinGW\bin;C:\MinGW\msys\1.0\bin;», только без кавычек.
Если в вашей операционной системе отсутствует переменная PATH, то создайте её самостоятельно.
Теперь, когда все инструменты установлены, можно использовать GCC компиляторы в режиме командной строки или настроить их использование в своей IDE.
Full description
MinGW refers to a set of runtime headers, used in building a compiler system based on the GNU GCC and binutils projects. It compiles and links code to be run on Win32 platforms… providing C, C++ and Fortran compilers plus other related tools. If you see references to «mingw32» instead of «MinGW», they are referring to the same compiler system. The project’s name changed from mingw32 to MinGW is to prevent the implication that MinGW will only works on 32 bit systems (as 64 and higher bit machines become more common, MinGW will evolve to work with them). MinGW uses the Microsoft runtime libraries, distributed with the Windows operating system. Unlike other ports of GCC to Windows, the runtime libraries are not distributed using GNU’s General Public License (GPL). You, therefore, do not have to distribute your source code with your programs unless, of course, you use a GPL library in your programs.
Initially, MinGW was an assortment of individual packages… the MinGW runtime, various applications built using that runtime (gcc, ld, etc.), and other useful components (the w32api headers needed to code for the Win32 API). Developers «rolled their own» MinGW environments by downloading the latest versions of each individual package needed. This was necessary given the dynamic nature of early package versions (updates being posted constantly)… but was oftentimes confusing for newbies, and made it difficult for application/library vendors to design products that build with a «standard» MinGW environment.
Therefore, around mid-2001 when development had matured and updates were not being packaged as rapidly, the decision was made to create a single-file distribution of the standard MinGW environment. This single archive contains the files from each component package, bundled and ready to extract. The individual component packages are still available for download… if a particular package is updated in between releases of the overall distribution, it’s possible to simply drop the newer package in place over a distribution install.
Ставим Eclipse Neon 3
Устанавливаем JRE
- Запускаем скаченный нами установщик. Получаем ошибку о том, что отсутствует JRE.
- Нажимаем «нет» и ждем перехода на сайт.
- На сайте выбираем пункт «Oracle JRE 1.8.0».
- Выбираем «Accept License Agreement».
- Скачиваем Offline версию, согласно разрядности вашей Windows.
- Запускаем скаченный файл. Дальнейшая установка проблем не вызывает.
Устанавливаем Eclipse
- Запускаем скаченный нами установщик.
- Выбираем версию для C/C++.
- Указываем путь установки (я оставил по умолчанию, и вам советую).
- Принимаем соглашение.
- Ждем окончания установки.
- Нажимаем «LAUNCH», чтобы запустить среду.
- Указываем путь, который будет использовать Eclipse для ваших проектов по умолчанию (я оставил по умолчанию), а так же ставим галочку, чтобы данное окно больше не появлялось.
- Убеждаемся, что IDE запустилась, закрываем.
- Во время закрытия можем поставить галочку, чтобы окно предупреждения о закрытии более не появлялось.
Патчим JRE (если в пункте выше произошла ошибка)
- Переходим на сайт с патчем.
- Выбираем пункт «Accept License Agreement».
- Скачиваем «.zip» архив.
- Распаковываем. В архиве 2 файла («local_policy.jar» и «US_export_policy.jar») патча и текстовый файл. Копируем эти 2 файла с разрешением «.jar» и заменяем ими файлы по адресу установленной java. В случае 64-х битной windows 10, это путь
Путь может быть другим в случае, если выйдет новая версия jre или у вас ОС с другой разрядностью. Главное, что вы должны зайти в папку «\lib\security» и туда скопировать с заменой эти 2 файла. На этом патч можно считать завершенным. Можно снова запустить eclipse и установить плагин.
Устанавливаем GNU ARM Eclipse Windows Build Tools
- Переходим в официальный репозиторий.
- Скачиваем «.exe» файл под свою платформу. На момент написания статьи самая актуальная версия «gnuarmeclipse-build-tools-win64-2.8-201611221915-setup.exe».
- Запускаем скаченный файл и просто жмем «Next», «A Agree», «Next», «Install», «Finish».
Contents of MinGW Packages
- binutils: A native port of the GNU binutils. Amongst other tools, this package contains the assembler and linker, which will transform the output of the compiler into a binary executable. You must install this package, together with gcc-core, to obtain a correctly functioning compiler suite.
- mingw-runtime: Header files and import libraries for the default C runtime library, (also known as msvcrt), which is required by MinGW compiled programs running on the Microsoft Windows operating system. You must install this package, together with gcc-core, to obtain a correctly functioning compiler suite.
- w32api: Header files and import libraries for the Microsoft Windows operating system; this provides the Application Programming Interface (API) required to access the essential operating system service functions, which are required by any working native Windows application. You must install this package, together with gcc-core, to obtain a correctly functioning compiler suite.
- gcc: A native port of the GNU gcc compiler. This is the application which parses source files, translating them to linkable object code. Note that the gcc package set is subdivided into a gcc-core package, which provides only a C compiler, with additional supplementary packages for additional programming languages. You must get at least the gcc-core package; if you also wish to add any supplementary languages, please ensure that you get the appropriate packages, with the same version number as the gcc-core package.
- mingw-gdb: A native port of GNU debugger.
- mingw32-make: A native port of GNU make. This application parses makefiles to create a project by following the rules expressed in the makefile.
- mingw-utils: Miscellaneous utilities.
Install Cygwin
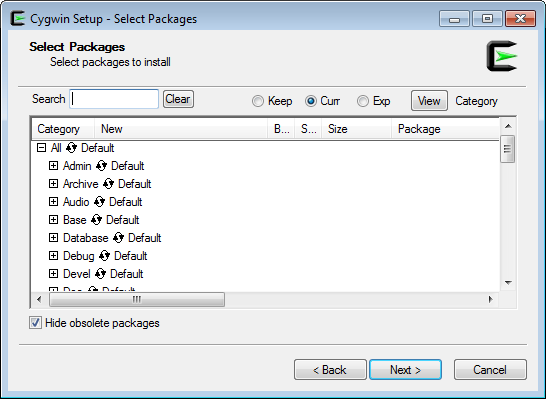
First, download and run either the 32- or 64-bit version of the Cygwin installer, depending on your version of Windows. Cygwin’s setup wizard will walk you through a series of steps. If your machine is located behind a proxy server, make sure to check “Use Internet Explorer Proxy Settings” when you get to the “Select Your Internet Connection” step.
When you reach the “Select Packages” step (shown below), don’t bother selecting any packages yet. Just go ahead and click Next. We’ll add additional packages from the command line later.
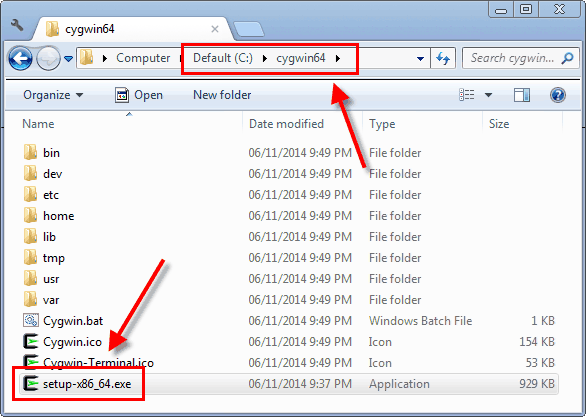
After the Cygwin installer completes, it’s very important to keep the installer around. The installer is an executable named either or , and you’ll need it to add or remove Cygwin packages in the future. I suggest moving the installer to the same folder where you installed Cygwin itself; typically or .
If you already have Cygwin installed, it’s a good idea to re-run the installer to make sure it has the latest available packages. Alternatively, you can install a new instance of Cygwin in a different folder.
Quick Start: Manifests
So, you want to look at what the future of vcpkg is going to be like!
We really appreciate it . First, though, a warning:
manifest support in vcpkg is still in beta! Mostly, it should just work,
but there are no guarantees and it’s likely you’ll hit at least a bug or two
while you’re using vcpkg in this mode. Additionally,
we will likely break behavior before stabilizing, so be forewarned.
Please open issues if you hit any bugs!
First, install vcpkg as normal for or
.
You may wish to install vcpkg in a central place,
as the installed directory exists locally,
and it’s fine to run multiple vcpkg commands from the same
vcpkg directory at the same time.
Then, we must turn on the vcpkg feature flag by adding
to the comma-separated option,
or by adding it to the comma-separated
environment variable.
You may also want to add vcpkg to the .
Then, all one has to do is create a manifest;
create a file called , and type the following:
{
  "name": "<name of your project>",
  "version-string": "<version of your project>",
  "dependencies":
}
The libraries will be installed into the
directory, in the same directory as your .
If you can use the regular CMake toolchain,
or the Visual Studio/MSBuild integration,
it will install the dependencies automatically,
although you will need to set to for MSBuild.
If you wish to install your dependencies without using either CMake or MSBuild,
you may use a simple
For more information, check out the manifest
specification.
Tab-Completion/Auto-Completion
supports auto-completion of commands, package names,
and options in both powershell and bash.
To enable tab-completion in the shell of your choice, run:
> .\vcpkg integrate powershell
or
$ ./vcpkg integrate bash
depending on the shell you use, then restart your console.
Examples
See the documentation for specific walkthroughs,
including installing and using a package,
adding a new package from a zipfile,
and adding a new package from a GitHub repo.
Contributing
Vcpkg is an open source project, and is thus built with your contributions.
Here are some ways you can contribute:
- Submit Issues in vcpkg or existing packages
- Submit Fixes and New Packages
Please refer to our Contributing Guide for more details.
Telemetry
vcpkg collects usage data in order to help us improve your experience.
The data collected by Microsoft is anonymous.
You can opt-out of telemetry by re-running the bootstrap-vcpkg script with -disableMetrics,
passing —disable-metrics to vcpkg on the command line,
or by setting the VCPKG_DISABLE_METRICS environment variable.
Read more about vcpkg telemetry at docs/about/privacy.md
Using vcpkg with CMake
If you’re using vcpkg with CMake, the following may help!
Visual Studio Code with CMake Tools
Adding the following to your workspace will make
CMake Tools automatically use vcpkg for libraries:
{
  "cmake.configureSettings": {
    "CMAKE_TOOLCHAIN_FILE": "/scripts/buildsystems/vcpkg.cmake"
  }
}
Vcpkg with CLion
Open the Toolchains settings
(File > Settings on Windows and Linux, CLion > Preferences on macOS),
and go to the CMake settings (Build, Execution, Deployment > CMake).
Finally, in , add the following line:
Unfortunately, you’ll have to add this to each profile.
Vcpkg as a Submodule
When using vcpkg as a submodule of your project,
you can add the following to your CMakeLists.txt before the first call,
instead of passing to the cmake invocation.
set(CMAKE_TOOLCHAIN_FILE ${CMAKE_CURRENT_SOURCE_DIR}/vcpkg/scripts/buildsystems/vcpkg.cmake
  CACHE STRING "Vcpkg toolchain file")
This will still allow people to not use vcpkg,
by passing the directly,
but it will make the configure-build step slightly easier.
Qt-builds
Notes
This is the set of scripts to build Qt : either with «MinGW-builds» based toolchains under MSYS, or, to build Qt : with
MSYS2 repo (also based on «MinGW-builds») based toolchains under MSYS2.
- If you want to use pre-compiled or pre-built Qt & QtCreator binary files, then follow one of these:
- The «MSYS2» based Qt binary builds (pre-built) can be downloaded from
pacman -S mingw-w64-i686-qt-creator mingw-w64-x86_64-qt-creator
If you also need+want static binary builds, for compiling & releasing opensource projects, then use below command:
pacman -S mingw-w64-i686-qt5-static mingw-w64-x86_64-qt5-static
Prerequisites
To build Qt, these are required:
- Internet connection
- Either use MSYS or MSYS2. Do not use both, (unless you know what you are doing).
pacman -S base-devel git mercurial cvs wget p7zip
Initial Setup
- Either use MSYS, or MSYS2. Do not use both, (unless you know what you are doing).
- If you are going to use MSYS: extract or install MSYS into C:directory
- If you are going to use MSYS2: extract or install MSYS2 into C:2 directory
- Prepare MSYS or MSYS2 for development environment: pre-install build related required dependencies & components.
- Run MSYS (or MSYS2)
- run git checkout scripts:
mkdir -p /c/QtSDK
cd /c/QtSDK
git clone https://github.com/Alexpux/Qt-builds.git Qt-build
Building Qt
Now scripts provide building Qt-4.8.4, Qt-5.0.0, Qt-5.0.1, Qt-5.0.2, Qt5 from git with latest release of QtCreator, qbs(from git). Buildinq Qt is simple by run:
.buildall <x32|x64> —qt-version=<version>
For example,
./buildall x32 —qt-version=5.0.0
build 32-bit Qt-5.0.0 with QtCreator-2.7.0 and install them into C:/QtSDK/Qt32-5.0.0, Qt dependencies and prerequisites will be installed into C:/QtSDK/ported32.
For building Qt5 from git you need specify branch what you want to build. If you don’t specify branch then by default building stable branch.
./buildall x32 —qt-version=git —qt-git-branch=stable
This command download qt5 from git stable branch and try to build 32-bit version of Qt5.
Note: If you want to move Qt directory elsewhere than after moving you need to execute from QTDIR:
qtbinpatcher —nobackups
Other useful options are:
—opengl-desktop
 Use option "-opengl desktop" instead of "-angle" during configure Qt5 sources.
—no-qtcreator
 Tell build script to exclude Qt-Creator from building.
—qtquickcontrols
 Tell build script to build qtquickcontrols.
—static-qt
 Build Qt as static libraries. Qt5 now has many issues with static build and now I possible to build it without
Webkit, ANGLE, ICU.
—extra-stuff
 Build some 3rdparty apps (poppler, cmake) with dependencies
Notes: Do not use (or try to avoid using) different type of toolchains for building different sub-components for the same/main project, when targeted for same platform/OS. If you are using MinGW-w64 based toolchains from MSYS2\mingw32 or MSYS2\mingw64, then for all sub-components build and for main project build, use same MSYS2 toolchains. If you are using MinGW toolchain, then for all of your sub-components & main project build, use same MinGW toolchain. If you are using MinGW-w64 toolchains from «MinGW-builds», then for all sub-components and for main project build, use same MinGW-builds toolchains.
Обзор
Начало GCC было положено Ричардом Столлманом, который реализовал первый вариант GCC в 1985 году на нестандартном и непереносимом диалекте языка Паскаль; позднее компилятор был переписан на языке Си Леонардом Тауэром (англ. Leonard H. Tower Jr.) и Ричардом Столлманом и выпущен в 1987 году как компилятор для проекта GNU, который сам по себе являлся свободным программным обеспечением. Разработка GCC курируется Free Software Foundation.
В настоящее время GCC поддерживается группой программистов со всего мира. GCC является лидером по количеству процессоров и операционных систем, которые он поддерживает.
Будучи официальным компилятором системы GNU, GCC также является главным компилятором для сборки ряда других операционных систем; среди них — различные варианты Linux и BSD, а также ReactOS, Mac OS X, OpenSolaris, NeXTSTEP, BeOS и Haiku.
GCC часто выбирается для разработки программного обеспечения, которое должно работать на большом числе различных аппаратных платформ. Различия между «родными» для каждой из аппаратных платформ компиляторами приводят к трудностям при разработке кода, который бы корректно компилировался разными компиляторами, а кроме того, при использовании различных компиляторов сильно усложняются сборочные скрипты, которые должны собирать ПО для всех аппаратных платформ. При использовании GCC для компиляции кода под разные платформы будет использован один и тот же синтаксический анализатор. Поэтому если удалось собрать программу для одной из целевых платформ, то велика вероятность, что программа нормально соберётся и для других платформ.
3- Installing MSYS2 on your PC
What is MSYS2?
According to their website, MSYS2 is a software distribution and building platform for Windows
The Website: https://www.msys2.org/
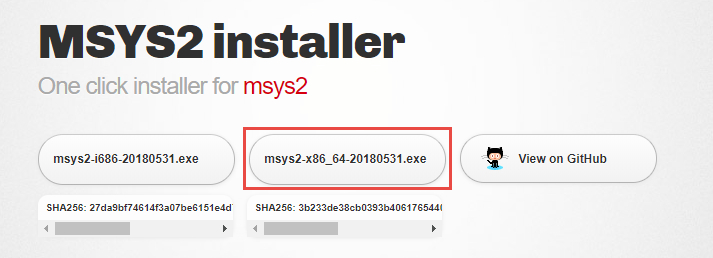
Installing it is actually a peace of cake
Just download the correct installer and launch it with admin rights and you are good to go
Expected something more complex?
Sorry about that
Once you installed it, you will see 3 programs appear in your list of programs:
- MSYS2 MinGW 32-bit
- MSYS2 MinGW 64-bit
- MSYS2 MSYS
Run the 3rd one MSYS2 MSYS to open a special command window in which you can input commands and start to install programs
The package management system which is equivalent to apt-get on linux is called pacman
When you install MSYS2 for the first time, you have to update pacman using the following command:
pacman -Syu
Цель данной статьи:
В данной статье я хочу рассказать о том, как происходит компиляция программ, написанных на языке C++, и описать каждый этап компиляции. Я не преследую цель рассказать обо всем подробно в деталях, а только дать общее видение. Также данная статья — это необходимое введение перед следующей статьей про статические и динамические библиотеки, так как процесс компиляции крайне важен для понимания перед дальнейшим повествованием о библиотеках.
Все действия будут производиться на Ubuntu версии 16.04.
Используя компилятор g++ версии:
Состав компилятора g++
- cpp — препроцессор
- as — ассемблер
- g++ — сам компилятор
- ld — линкер
Мы не будем вызывать данные компоненты напрямую, так как для того, чтобы работать с C++ кодом, требуются дополнительные библиотеки, позволив все необходимые подгрузки делать основному компоненту компилятора — g++.
Зачем нужно компилировать исходные файлы?
Исходный C++ файл — это всего лишь код, но его невозможно запустить как программу или использовать как библиотеку. Поэтому каждый исходный файл требуется скомпилировать в исполняемый файл, динамическую или статическую библиотеки (данные библиотеки будут рассмотрены в следующей статье).
Required Prerequisites
MinGW toolchain
You must have the MinGW toolchain installed to build GCC. The toolchain is composed of two parts, the host libraries and tools, and the host compiler. A complete toolchain which satisfies the requirements below can be installed using the installer from http://www.mingw.org.
These notes only discuss MinGW-specific prerequisite issues. Please see http://gcc.gnu.org/install/prerequisites.html for a complete list of prerequisites.
mingw-runtime (version 3.12 or higher): This is the equivalent of libc on Unix which provides an interface to Microsoft’s C runtime that is shipped with Windows.
Host Tools and Libraries
-
w32api: This is a free implementation of the Windows API, equivalent to the Windows SDK, which provides the system-level interface needed by mingw-runtime and some parts of GCC. It is possible, with some modifications, to use Microsoft’s Platform SDK instead.
-
binutils (version 2.15 or higher): The GCC build needs an assembler and linker.
Host Compiler
gcc: You must have GCC 2.95 or better installed. At this time, building with other Windows compilers probably will not work.
Host Tools
Tools: A set of Unix-like tools must be present to build GCC. There are at least three different ways to get the set of required tools.
MSYS: MSYS is an environment available at <http://www.mingw.org> that is designed to work with MinGW, and it should work seamlessly. MSYS is a stripped-down and specialized fork of Cygwin. Unfortunately, in the past, MSYS has suffered from various bugs that have made building GCC difficult.
Cygwin: The Cygwin environment available at http://www.cygwin.com can provide the host tools. An advantage of using Cygwin is that it comes with almost all of the tools needed for developing and testing GCC. If Cygwin is used, two modifications must be made:
ln that does not create Cygwin-style symbolic links must be placed in the path before Cygwin. The ln from MSYS should work here. This script can be used:
##!/bin/sh
exec cp -p `echo $* | sed -r 's/(^| )-*//g'`
uname must be modified to report MINGW32_NT-5.1 instead of CYGWIN_NT-5.1 so config.guess guesses correctly. The easiest way is to just use the uname from MSYS. Alternately, you can pass —build=i386-pc-mingw32 to configure to override config.guess.
UnxUtils: UnxUtils from http://unxutils.sourceforge.net/ can provide the set of tools needed. Some manual adjustment will be necessary to get this to work correctly.
Test the New Compiler
All right, let’s compile some code that uses generic lambdas! Generic lambdas are part of the C++14 standard. They let you pass arguments to lambda functions as (or any templated type), like the one highlighted below. Create a file named with the following contents:
#include <iostream>

int main()
{
    auto lambda = [](auto x){ return x; };
    std::cout << lambda("Hello generic lambda!\n");
    return 0;
}
You can add files to your home directory in Cygwin using any Windows-based text editor; just save them to the folder (or similar) in Windows.
First, let’s see what happens when we try to compile it using the system GCC compiler provided by Cygwin:
If the system compiler version is less than 4.9, compilation will fail:
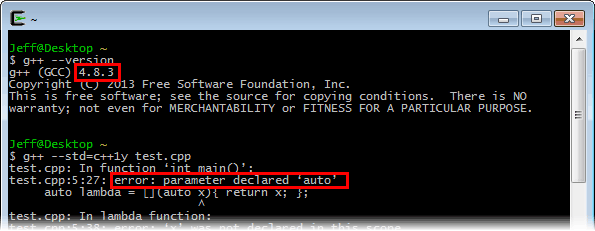
Now, let’s try it again using our freshly built GCC compiler. The new compiler is already configured to locate its include files in and its static libraries in . All we need to do is run it:

It works!
Building
Please see the GCC installation instructions for complete details.
GCC must be configured using a relative path.
Building MinGW is typically quite slow, apparently due to slow Makefile and shell script execution. Using multiple processors with make -jN can substantially speed up the process.
To enable all languages and all directories (except mudflap), a command similar to the following example can be used. Note that you will need to specify your own paths to configure, libiconv, gmp, and mpfr.
../gccsrc/configure —enable-languages=c,ada,c++,fortran,java,objc,obj-c++ —disable-sjlj-exceptions —enable-libgcj —enable-libgomp —with-dwarf2 —disable-win32-registry —enable-libstdcxx-debug —enable-concept-checks —enable-version-specific-runtime-libs —prefix=/mingw —with-gmp=/mingw/src/gcc/gmp-mpfr-root —with-mpfr=/mingw/src/gcc/gmp-mpfr-root —with-libiconv-prefix=/mingw/src/gcc/libiconv-root


