Что такое material design и как делать анимацию в стиле google
Содержание:
- Material motion system, Sliders, ShapeableImageView, and more
- What’s new in 1.2.0?
- Bold and Graphic, when the context calls for it
- ShapeableImageView
- 「 Elevation Anim 」
- COMPONENT
- Licence
- Color correct
- Material Design: Constricting or Supporting?
- The Latest Developments in Material Design
- Accessibility improvements
- What’s next for MDC?
- Installing icons from npm
- Icon font for the web
- RTL icons on iOS
- Picture your pages
- Styling icons in material design
- Using the icons in HTML
- Go deep & move with meaning
- Material Theming
- I could (and probably should), wait a couple of weeks until Google I/O before publishing this post where I anticipate we’ll be hearing a lot about MD 2.0. However, that wouldn’t be fun, would it?
- Final Thoughts
- RTL icons on Android
- Key navigation and action elements move to the bottom
- Slider
- Соединение элементов с помощью форм
- Отображение состояния
- Узнаваемость бренда
- Применение
- Dark theme support
Material motion system, Sliders, ShapeableImageView, and more
Nick RoutFollow
Aug 4 · 5 min read
We’re excited to announce the release of Material Components for Android (MDC-Android) ! A host of exciting new features have been added along with many bug fixes and accessibility improvements. Get the rundown below.
Be sure to check out the release notes. If you’re using MDC for the first time, also take a look at our getting started guide.
What’s new in 1.2.0?
A fair bit has changed since we launched in February — we added the motion system, slider component, a widget for image shape theming, and more. The things you loved from the alpha, beta, and RC releases of are now officially stable. If you haven’t yet started using version of MDC, there’s never been a better time to update.
Bold and Graphic, when the context calls for it
The final thing I’d like to highlight is the whitespace, since pretty much everyone seems to have taken note of it already. “Bold, graphic and intentional” was one of behind Material Design right from it’s launch.
While the apps looked great with their bright colors and animations originally, there’s been a trend away from such designs for some time now called Complexion Reduction. The purpose of this trend has been to ensure that the use of colors on the screen don’t take away from the content and actions itself.
Material Design 2.0 doesn’t seem to go entirely into the realm of Complexion Reduction, but instead seems to emphasize a part of the original principle: Bold, Graphic, and Intentional.
Let’s break down the Google I/O app into three states to study this: the home screen with all sessions listed out, the home screen with a filter applied, and the session details screen.
Without a filter, it can be argued that there is an information overload on the user. This is the filter button is promoted, and so is the bottom navigation.
Once a filter is applied, however, we are now aware that the user is more interested in seeing the sessions with the applied filter. This means we can take away the filter button and the bottom navigation, and focus on the session list itself.
As for the Session detail page, while the option to favorite a session and share it are helpful, the user is more likely to be interested in consuming the written description. This is why the screen is mostly white, much like Medium and other reader apps. The share and favorite buttons are easily reachable, but blend in.¹
ShapeableImageView
The new widget is an extension of which understands shape theming. A common use case is to apply circular clips to rectangular source images. However, it also supports varying corner sizes, cut corners, as well as different stroke widths and colors.
<!-- res/values/shape.xml --><style name=”ShapeAppearanceOverlay.App.CornerSize50Percent” parent=””><!-- Sets size of corners to be 50% of min(width, height) of widget --> <item name=”cornerSize”>50%</item></style><!-- res/values/styles.xml --><style name=”Widget.App.ShapeableImageView” parent=”Widget.MaterialComponents.ShapeableImageView”> <item name=”shapeAppearance”> ?attr/shapeAppearanceSmallComponent </item> <item name=”shapeAppearanceOverlay”> @style/ShapeAppearanceOverlay.App.CornerSize50Percent </item> <item name=”strokeWidth”>1dp</item> <item name=”strokeColor”>?attr/colorPrimary</item></style><!-- In layout --><com.google.android.material.imageview.ShapeableImageView ... style=”@style/Widget.App.ShapeableImageView” app:srcCompat=”@drawable/image” />
「 Elevation Anim 」
Usage example
<View
    ...
    androidlayout_width="wrap_content"
    androidlayout_height="wrap_content"
    androidclickable="true"
    androidstateListAnimator="@drawable/md_selector_anim_cardview_elevation"
    ... />
Drawable names
R.drawable.md_selector_anim_button_elevation
R.drawable.md_selector_anim_cardview_elevation

Icon
Most icons will fit into these three groups of recommended durations:
- Simple icon animations:
- Average icon animations:
- Complex icon animations:
| INTEGER NAMES | Integer (millisecond) |
|---|---|
| md_anim_duration_icon_simple | 100 |
| md_anim_duration_icon_average | 200 |
| md_anim_duration_icon_complex | 500 |
COMPONENT
TOOLBAR
| DIMEN NAMES | VALUE |
|---|---|
| md_toolbar_height | 56dp or 64dp (tablet) |
If you want to get status bar or SystemUI height we recommend you to use listener like this.
SystemUISpaceView
This view will size equal SystemUI in your applciation for example status bar and navigation bar. You can consume insets or not.
<com.thekhaeng.systemui.view.SystemUISpaceView
	 ...
    style="@style/SystemUISpace.Top|Bottom|Left|Right"
    androidlayout_gravity="top|bottom|left|right"
    appisConsumeInsets="true|false"
    ...
    />
Licence
Copyright 2017 TheKhaeng
Licensed under the Apache License, Version 2.0 (the «License»); you may not use this work except in compliance with the License. You may obtain a copy of the License in the LICENSE file, or at:
Unless required by applicable law or agreed to in writing, software distributed under the License is distributed on an «AS IS» BASIS, WITHOUT WARRANTIES OR CONDITIONS OF ANY KIND, either express or implied. See the License for the specific language governing permissions and limitations under the License.
Color correct
Color is one of the most important elements of your brand identity. Just think of the blue in Facebook or the black and white theme in UBER. If you’ve developed a strong color story for your brand, stick with it. There is nothing more disorienting to a user then suddenly feeling like he or she has entered a different product space in the UI. Material Design provides a simple, smart approach to building harmonious color stories, regardless of whether you use the palette or apply your own color story to the system. The key is the way in which color is applied to the UI.
The Material Design palette, for example, starts with the primary 500s and scales from light to dark, offering a variety of carefully chosen values. The 500s are perfect for describing the dominant theme for your brand and are great for large areas of color, like backgrounds and status bars. From there, you can choose a supporting value, scaling up to a 700 for system bars, for example, or down to a 300 for secondary information. Accent colors are brighter and more saturated. They encourage user interaction by popping off the screen and contrasting with the rest of the palette. They are perfect for fabs, buttons, switches, and sliders.
Material Design: Constricting or Supporting?
The paradigm behind material design is nice. The idea that interfaces should behave like real-world objects with layers and depth has changed the way we think about digital interactions and makes much more sense in an IoT-friendly era. However, as a Google-created language, material design naturally looks and feels like a Google-subsidiary. This general approach can hinder brands from differentiating themselves and creating a positive digital experience for customers.
When you look at an Android app or a website influenced by the material design concept, you may experience something that flows and looks nice but is essentially a cookie cutter site. It may remind you of something that you have seen before because you have seen something similar on any number of other websites and applications.
To avoid the pitfalls of commonality, designers do not need to completely abandon the concepts and details of material design. They do, however, need to take steps to differentiate the brand from the same look and feel that so many other brands have adopted. Material design can become a supportive tool when designers use it as a launching pad rather than relying on a material design-supported framework.
The Latest Developments in Material Design
Interestingly, one of the latest design recommendations under the material design guidelines asks web designers to to bottom-of-screen navigation – something that Apple has embraced for years. In one of its latest brand transitions, Google is updating the YouTube interface to be flatter and more streamlined.
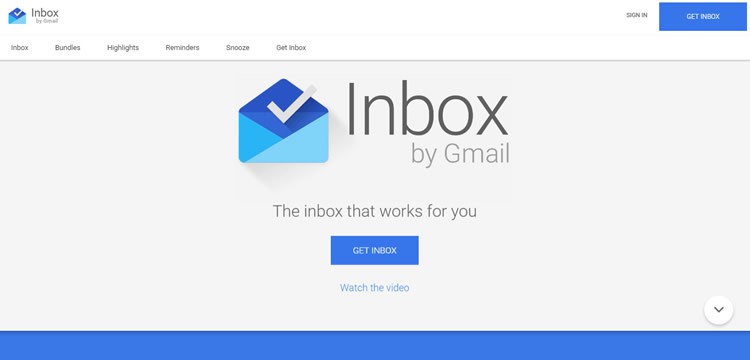 Image source: (screenshot) Inbox by Gmail
On the Inbox by Gmail interface, users can see the tell-tale features of Google’s material design. The flat buttons, font, and graphics are distinctly branded. If you go to the site, you will also see the material design-specific animations.
Another material design-inspired website, Nimbus9 clearly displays the hallmarks of the design on the homepage. The downward arrow is exactly the same as the arrow on the Inbox by Gmail interface. The two products are distinct, but the design approach is familiar.
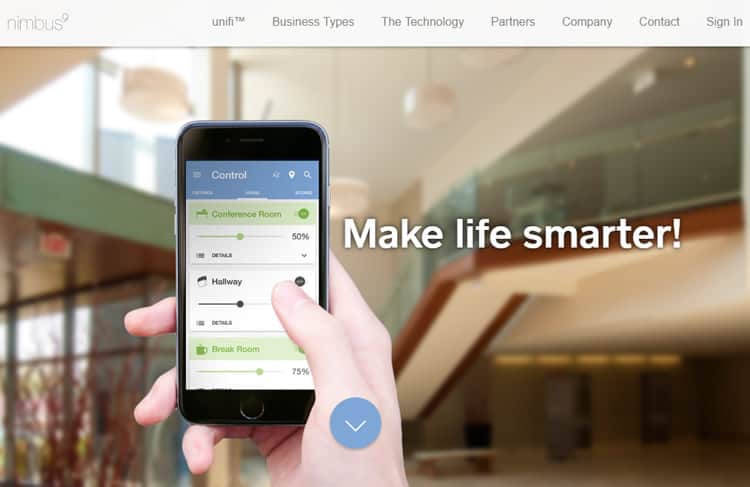 Image source: (screenshot) Nimbus9
Accessibility improvements
A lot of accessibility improvements have made their way into MDC components. This mostly comprises better support for TalkBack in the form of helpful content descriptions, focusability, and the order in which the various “parts” of a component are described to a screen reader user. For example, now reads its hint, input, and helper or error text in the correct order.
What’s next for MDC?
We’ve heard your feedback about the cadence of MDC releases and the rate of response to issues. We’re committed to shipping more regularly and incorporating your important contributions. The next feature release of MDC — — is well underway with multiple alpha releases out at the time of writing. Exciting new updates include and components. As always, we encourage you to file bug reports and feature requests on GitHub. Also be sure to check out our Android example apps and Build a Material Theme.
Installing icons from npm
Install the icons using npm package manager.
Icon font for the web
The material icon font is the easiest way to incorporate material icons with
web projects. We have packaged all the material icons into a single font that
takes advantage of the typographic rendering capabilities of modern browsers so
that web developers can easily incorporate these icons with only a few lines of
code.
Using the font is not only the most convenient method, but it is efficient and
looks great:
- 900+ icons all from a single, small file.
- Served from Google Web Font servers or can be self hosted.
- Supported by all modern web browsers.
- Colored, sized and positioned entirely with CSS.
- Vector-based: Looks great at any scale, retina displays, low-dpi display
screens.
The icon font weighs in at only 42KB in its smallest woff2 format and 56KB in standard woff format.
By comparison, the SVG files compressed with gzip will generally be around 62KB in size, but this
can be reduced considerably by compiling only the icons you need into a single SVG file with symbol
sprites.
RTL icons on iOS
iOS has the concept of a UISemanticContentAttribute that is attached to each view. This can be , , , or . iOS uses this value and the (left-to-right (LTR)/RTL setting of the device presenting the interface to determine the effectiveLayoutDirection of the view. This effectiveLayoutDirection determines whether or not to mirror an image when it is displayed.
By default, images’ semantic content is set to . This causes them to be mirrored in RTL mode. If you do not want an icon to ever be mirrored, you need to explicitly set it to be . Apple calls out some exceptions that should not be mirrored, such as media playback (Fast Forward, rewind, etc.), musical notes, images indicating the passage of time, etc.
Objective-C example:
Swift example:
For more in-depth documentation on how to implement RTL on iOS and macOS, please review Apple’s RTL documentation.
Semantic content was added in iOS 9. If you are supporting earlier versions of iOS, the material internationalization framework backports some of the functionality to iOS 8.
Picture your pages
Whether it’s photography, illustration, or graphic treatments, how you apply (or don’t apply) imagery in your brand makes a difference.
If you have the opportunity, create an identifiable language within your product. Imagery, graphic elements, and iconography should ideally family together—whether they’re stylistically similar, or intentionally diverse. For example, if you have bold, saturated graphics and iconography throughout your UI, consider using imagery that shares these qualities. If you use diverse imagery throughout your application, consider how the surrounding design elements like typography and the grid can help create visual unity. When it comes to imagery the most important thing is to create a cohesive style and place it judiciously throughout your UI.
Styling icons in material design
These icons were designed to follow the material design guidelines and they look best when using the recommended icon sizes and colors. The styles below make it easy to apply our recommended sizes, colors, and activity states.
Sizing
Although the icons in the font can be scaled to any size, in accordance with , we recommend them to be shown in either 18, 24, 36 or 48px. The default being
24px.
CSS rules for the standard material design sizing guidelines:
Material icons look best at 24px, but if an icon needs to be displayed in an
alternative size, using the above CSS rules can help:
face18px
face24px
face36px
face48px
Coloring
Using the icon font allows for easy styling of an icon in any color.
In accordance with , for active icons we recommend using either black at 54% opacity or white at
100% opacity when displaying these on light or dark backgrounds, respectively.
If an icon is disabled or inactive, using black at 26% or white at 30% for
light and dark backgrounds, respectively.
Here are some examples, using the material CSS styles described above:
Example for drawing an icon on a light background with a dark foreground color:
faceNormal
faceDisabled
Example for drawing an icon on a dark background with a light foreground color:
faceNormal
faceDisabled
To set a custom icon color, define a CSS rule specifying the desired color for
the font:
and then use the class when referring to the icon:
faceNormal
Material icons are also available as regular images, both in PNG and SVG
formats.
Using the icons in HTML
It’s easy to incorporate icons into your web page. Here’s a small example:
face
This example uses a typographic feature called
ligatures, which allows
rendering of an icon glyph simply by using its textual name. The replacement is
done automatically by the web browser and provides more readable code than the
equivalent numeric character reference.
This feature is supported in most modern browsers on both desktop and mobile
devices.
| Browser | Version supporting ligatures |
| Google Chrome | 11 |
| Mozilla Firefox | 3.5 |
| Apple Safari | 5 |
| Microsoft IE | 10 |
| Opera | 15 |
| Apple MobileSafari | iOS 4.2 |
| Android Browser | 3.0 |
For browsers that do not support ligatures, fall back to specifying the icons
using numeric character references like the example below:
Find both the icon names and codepoints on the material icons library by selecting any icon and opening the icon font panel. A codepoints index is also available on our git repository which shows the complete set of names
and character codes.
Go deep & move with meaning
In Material Design, we advocate looking at the UI in three dimensions because it provides a clear system for rationalizing information on the screen. It also helps users intuitively understand how to interact with a product. Designing for an x, y, and z space (three dimensions) can be intimidating at first, but considering how information moves early on in the process will give you room to fully flesh out unique interaction patterns and ensure optimal usability. Interaction patterns should also be considered a strong part of your brand identity. Users learn to associate motions and gestures with your brand—they become inextricable to the experience of your product, for example: “swiping right” meaning yes and “swiping left” meaning no.
Material Theming
allows you to customize Material Design to better reflect your brand. Color, typography and shape choices provide common properties between design and development enabling near-infinite design expression.
MDC enables Material Theming in your Android app. All components support adjusting their color, typography, and shape through themes, styles, new attributes, and custom classes (such as ).
<style name="Theme.MyApp" parent="Theme.MaterialComponents.*"> <!-- Color attributes --><item name="colorPrimary">@color/green_500</item> <item name="colorPrimaryVariant">@color/green_700</item> <item name="colorOnPrimary">@color/black</item> <item name="colorSecondary">@color/orange_500</item> <item name="colorSecondaryVariant">@color/orange_300</item> <item name="colorOnSecondary">@color/black</item> <item name="colorError">@color/red_700</item> <item name="colorOnError">@color/white</item> <item name="colorSurface">@color/white</item> <item name="colorOnSurface">@color/black</item> <item name="android:colorBackground">@color/white</item> <item name="colorOnBackground">@color/black</item> <!-- Type attributes --><item name="textAppearanceHeadline1"> @style/TextAppearance.MyApp.Headline1 </item> <item name="textAppearanceHeadline2"> @style/TextAppearance.MyApp.Headline2 </item> <item name="textAppearanceHeadline3"> @style/TextAppearance.MyApp.Headline3 </item> <item name="textAppearanceHeadline4"> @style/TextAppearance.MyApp.Headline4 </item> <item name="textAppearanceHeadline5"> @style/TextAppearance.MyApp.Headline5 </item> <item name="textAppearanceHeadline6"> @style/TextAppearance.MyApp.Headline6 </item> <item name="textAppearanceSubtitle1"> @style/TextAppearance.MyApp.Subtitle1 </item> <item name="textAppearanceSubtitle2"> @style/TextAppearance.MyApp.Subtitle2 </item> <item name="textAppearanceBody1"> @style/TextAppearance.MyApp.Body1 </item> <item name="textAppearanceBody2"> @style/TextAppearance.MyApp.Body2 </item> <item name="textAppearanceCaption"> @style/TextAppearance.MyApp.Caption </item> <item name="textAppearanceButton"> @style/TextAppearance.MyApp.Button </item> <item name="textAppearanceOverline"> @style/TextAppearance.MyApp.Overline </item> <!-- Shape attributes --><item name="shapeAppearanceSmallComponent"> @style/ShapeAppearance.MyApp.SmallComponent </item> <item name="shapeAppearanceMediumComponent"> @style/ShapeAppearance.MyApp.MediumComponent </item> <item name="shapeAppearanceLargeComponent"> @style/ShapeAppearance.MyApp.LargeComponent </item></style>
Learn more about how to implement theming here.
I could (and probably should), wait a couple of weeks until Google I/O before publishing this post where I anticipate we’ll be hearing a lot about MD 2.0. However, that wouldn’t be fun, would it?
Raveesh BhallaFollow
Apr 26, 2018 · 6 min read
As someone who’s in the process of redesigning an Android app, I’ve been keeping a very close eye on various different apps and websites Google’s launched ever since the first rumors of Material Design 2.0 emerged a few months ago.
First, a quick summary of products Google has either released or revamped in the last six months which I have been studying for pointers:
- Google Play Games
- Google Pay
- Gmail
- Google Tasks mobile apps
- Google I/O Schedule
- Bulletin (early preview)
- Android P (Developer Preview)
This list isn’t exhaustive, but gives a good foundation for the rest of the post. But before jumping right in, it’s important to understand how design teams at Google are structured, and clarify a common misconception: the Material Design team is not in charge of all of design at Google.
Instead, the Material Design team’s focus is purely on the guidelines, which constantly evolve. Individual products have their own design teams that use these guidelines. They might choose to not follow certain specifics if they felt the need to break away, such as the use of bottom tabs before they were “made official” by the Material team. This allows individual products to have their own character and ethos while living inside the general constraints recommended by the Material team.
Final Thoughts
Material design only becomes constricting when designers fail to push the boundaries and stay true to their own brands. Use the concepts to enhance your own unique design style to get the most benefit from this widely-used, modern and effective digital design philosophy.
Want to learn more?
If you’re interested in the intersection between UX and UI Design, then consider to take the online course UI Design Patterns for Successful Software and alternatively Design Thinking: The Beginner’s Guide. If, on the other hand, you want to brush up on the basics of UX and Usability, you might take the online course on User Experience (or another design topic). Good luck on your learning journey!
(Lead image source: Ingo Joseph – Creative Commons)
RTL icons on Android
describes in-depth how to implement RTL user interfaces. By default on Android, icons are not mirrored when the layout direction is mirrored. You need to specifically mirror the appropriate icons when needed, either by providing specialized assets for RTL languages, or using framework functionality to mirror the assets.
To provide specialized assets for RTL languages, you can use the qualifier on resource directories, such as . Resources inside such directories will only be used for RTL languages. For devices running Android API 19 or newer, the framework also provides the for Drawables. When this attribute is set to true, the drawable will be automatically mirrored on RTL languages.
Using autoMirrored:
If using autoMirrored or providing alternate Drawable resources isn’t an option, the ImageView scaleX attribute can also be used to mirror drawables (for instance, by providing a RTL-specific layout in a directory).
Mirroring within the layout file:
Lastly, drawables can be mirrored programmatically.
Manually check for layout direction using :
Mirroring ImageView contents programmatically:
When the Material Design team gave their official blessing to the bottom navigation, there was an outcry from the community who had argued with their teams for a long time that they were iOS-y. The rationale behind them, though, is simple: as devices get bigger, primary navigation needs to move down to make it easier for one-handed use.
The problem has only gotten compounded since as devices are now getting taller as bezels become a thing of the past. We’re now seeing a lot more 2:1 aspect ratio devices as a result. The 2.0 refresh seems to encourage bringing down even the actions that traditionally were part of the app’s toolbar to the bottom.
Google Tasks and the I/O Schedule app show these in practice. Additionally, the new Material Components library has a which you can preview in this excellent post by Joe Birch. They have gone the extra length to create patterns by which these action items and the floating action button can co-exist.
Slider
Sliders allow users to make selections from a range of values. They are ideal for adjusting settings such as volume, brightness, or applying image filters.
MDC allows you to use sliders in your Android app with the and widgets. They’re similar to but have additional features and support Material Theming.
<!-- In layout --><com.google.android.material.slider.Slider android:id=”@+id/slider” ... android:valueFrom="0.0" android:valueTo="100.0" android:stepSize="10.0" /> ...<com.google.android.material.slider.RangeSlider android:id=”@+id/rangeSlider” ... android:valueFrom="0.0" android:valueTo="100.0" android:stepSize="10.0" app:values="@array/initial_slider_values" /><!-- In res/values/arrays.xml --><resources> ... <array name="initial_slider_values"> <item>20.0</item> <item>70.0</item> </array></resources>// In codeslider.addOnChangeListener { slider, value, fromUser -> // Respond to change in slider's value}...val values = rangeSlider.values
Learn more about how to implement sliders.

Соединение элементов с помощью форм
| Как нужно делать Закругленные углы белого элемента подчеркивают что он не связан с фиолетовым. |
Как нужно делать Здесь форма кнопки в нижнем правом углу указывает что она не связана с элементом позади. |
Как нужно делатьКак делать не стоит
Отображение состояния
Отсутствие интерактивности
Как нужно делать
| Как делать не стоит Если вы хотите отобразить состояние элемента, то не делайте это с помощью слишком маленьких форм индикаторов. |
Как делать не стоит Но не стоит и перебарщивать с размерами. Здесь используется слишком большая форма индикатор. |
Аккуратно
- привяжите изменение угла карточки к конкретному действию пользователя, выделению или добавлению в избранное
- уберите имитацию загибания вообще, но оставьте скругление угла если хотите использовать это как фишку
| Как нужно делать Используйте одну форму чтобы отображать одно состояние. Закругленные углы здесь отображают выделение карточек. |
Аккуратно Здесь используются разные формы для отображения одного состояния, что затрудняет восприятие пользователем. |
Узнаваемость бренда
Злоупотребление использованием
Как нужно делатьКак нужно делать
| Аккуратно Слишком частое использование одной формы отрицательно влияет на ее восприятие. |
Как делать не стоит Не используйте формы, не входящие в набор форм вашего приложения. |
Применение
прим. переводчика: например добавление карточек в лист
- Элемент не помещается на экране
- Нарушенная эргономика
- Изменение смысла элемента
- Несоответствие стилю приложения
- Привязка/отношение к другому элементу
| Как нужно делать Форма может меняться в ответ на другие изменения в интерфейсе. На нижней панели динамически появляется вырез для кнопки. |
Как нужно делать Элемент может отражать изменения состояния. В этом приложении форма динамически расширяется по мере выделения карточек, сохраняя при этом закругление угла. |
Dark theme support
System wide dark theme support was introduced in Android 10. Along with Material Design guidance, MDC enables Material dark theme out-of-the-box. It builds upon existing AppCompat DayNight functionality, so you don’t have to implement it from scratch:
- Themes: All MDC themes now come in variants. These automatically switch between and resource qualifiers depending on the device configuration.
- New colors: The default palette has been extended for dark theme. You should tweak and for your brand to be less saturated in dark themes. By default and use dark grey instead of black to reduce eye strain, make elevation shadows more visible, and ensure an appropriate contrast with text and other elements.
- Elevation surface lightening: All relevant MDC components (and anything backed by a for that matter) support in dark theme. The white overlay transparencies from the guidelines map to elevation levels set on components.
- Accessibility: MDC employs the Material Design concept of “on” colors — used to tint text, icons, and other content displayed on colors (eg. and ). An important aspect of dark theme is to ensure there is sufficient contrast between a color and its corresponding “on” color. MDC now uses the recommended colors and opacities to ensure this is the case.
- Primary and surface color switching: MDC components adhere to the guidance to make less use of the primary color in dark theme. This can be seen in app bars, for example, which use (instead of ) as their background tint in dark mode. This is backed by a new color attribute — — which switches between and depending on the mode, and a number of widget styles.


