Распределенное логирование и трассировка для микросервисов
Содержание:
Логирование исключений
Чтобы перехватывала трассировку, установите в . Ниже пример с включенным и отключенным параметром:
# lowermodule.pylogging.config.fileConfig('/path/to/logging.ini', disable_existing_loggers=False)logger = logging.getLogger(__name__)def word_count(myfile): try: # считаем слова, логируем результат. except OSError as e: logger.error(e) logger.error(e, exc_info=True)
Вывод для несуществующего файла:
2019-03-27 21:01:58,191 lowermodule - ERROR: No such file or directory: 'nonexistentfile.txt'2019-03-27 21:01:58,191 lowermodule - ERROR: No such file or directory: 'nonexistentfile.txt'Traceback (most recent call last): File "/home/emily/logstest/lowermodule.py", line 14, in word_count with open(myfile, 'r') as f:FileNotFoundError: No such file or directory: 'nonexistentfile.txt'
Первая строка — вывод без трассировки, вторая и далее — с трассировкой. Кроме того, с помощью вы можете логировать определённое исключение без дополнительных вмешательств в код.
The Logging Module#
The logging module in Python is a ready-to-use and powerful module that is designed to meet the needs of beginners as well as enterprise teams. It is used by most of the third-party Python libraries, so you can integrate your log messages with the ones from those libraries to produce a homogeneous log for your application.
Adding logging to your Python program is as easy as this:
With the logging module imported, you can use something called a “logger” to log messages that you want to see. By default, there are 5 standard levels indicating the severity of events. Each has a corresponding method that can be used to log events at that level of severity. The defined levels, in order of increasing severity, are the following:
- DEBUG
- INFO
- WARNING
- ERROR
- CRITICAL
The logging module provides you with a default logger that allows you to get started without needing to do much configuration. The corresponding methods for each level can be called as shown in the following example:
The output of the above program would look like this:
The output shows the severity level before each message along with , which is the name the logging module gives to its default logger. (Loggers are discussed in detail in later sections.) This format, which shows the level, name, and message separated by a colon (), is the default output format that can be configured to include things like timestamp, line number, and other details.
Сколько должно быть логов?
Существует очевидное соотношение между объемом логов и их полезностью. Чем более содержательные логи, тем легче реконструировать переходы состояний. Вы можете воспользоваться двумя способами контроля количества логов:
Установите соотношение между логами и рабочей нагрузкой
Для контроля объема логов сначала важно его правильно измерить. Большинство программ имеют 2 типа рабочей нагрузки:
- получение рабочих элементов (запросов) и последующая реакция на них;
- запрос рабочих элементов откуда-либо и последующее выполнение действий.
В большинстве случаев процесс логирования запускается рабочей нагрузкой: чем больше ее у программы, тем больше логов она записывает. Могут быть и другие логи, не связанные с рабочей нагрузкой, но они становятся малозначимыми, когда программа начинает работу. Разработчики должны сохранять соотношение # логов и # рабочих элементов линейным. Иначе говоря:
# логов = X * # рабочих элементов+ константы
где X можно определить, изучив код. Разработчики должны иметь хорошее представление об X-факторах для своих программ и приводить их в соответствие с возможностями логирования и бюджетом. Вот еще несколько типичных случаев X:
- 0 < X < 1. Это значит, что логи отбираются выборочно, и не у всех рабочих элементов они есть, например ведётся запись только ошибок или используются другие алгоритмы отбора логов. Это способствует снижению объемов лога, но при этом может ограничить возможности поиска проблемы.
- X ~ 1. Это значит, что в среднем каждый рабочий элемент производит примерно одну запись. И это целесообразно до тех пор, пока один лог содержит достаточно информации (подробно в разделе “Что записывать в лог?”).
- X >> 1. У разработчиков должна быть весомая причина для того, чтобы X был существенно больше, чем 1. Когда рабочая нагрузка возрастает, например в случае с сервером, на который обрушивается внезапный шквал HTTP-запросов, то X лишь усиливает ее и чрезмерно нагружает инфраструктуру логирования, что обычно вызывает проблемы.
Используйте уровни логов
Что, если X все еще слишком большой даже после оптимизации? На помощь приходят уровни логов. Если X намного больше, чем 1, то можно поместить логи на уровень DEBUG, тем самым снизив X уровня INFO. В процессе устранения неполадок программа может временно выполняться на этом уровне для предоставления дополнительной информации.
Configuring our loggers
It’s easy to instrument our software, and we need to configure the logging stack and specify how those records will be emitted.
There are multiple ways to configure the logging stack.
BasicConfig
This is by far the simplest way to configure logging. Just doing logging.basicConfig(level=»INFO») sets up a basic StreamHandler that will log everything on the INFO and above levels to the console. There are arguments to customize this basic configuration. Some of them are:
| Format | Description | Example |
| filename | Specifies that a FileHandler should be created, using the specified filename, rather than a StreamHandler | /var/logs/logs.txt |
| format | Use the specified format string for the handler | «‘%(asctime)s %(message)s'» |
| datefmt | Use the specified date/time format | «%H:%M:%S» |
| level | Set the root logger level to the specified level | «INFO» |
This is a simple and practical way to configure small scripts.
Note, basicConfig only works the first time it is called in a runtime. If you have already configured your root logger, calling basicConfig will have no effect.
DictConfig
The configuration for all elements and how to connect them can be specified as a dictionary. This dictionary should have different sections for loggers, handlers, formatters, and some basic global parameters.
Here’s an example:
config = {
    'disable_existing_loggers': False,
    'version': 1,
    'formatters': {
        'short': {
            'format': '%(asctime)s %(levelname)s %(name)s: %(message)s'
        },
    },
    'handlers': {
        'console': {
            'level': 'INFO',
            'formatter': 'short',
            'class': 'logging.StreamHandler',
        },
    },
    'loggers': {
        '': {
            'handlers': 'console',
            'level': 'ERROR',
        },
        'plugins': {
            'handlers': 'console',
            'level': 'INFO',
            'propagate': False
        }
    },}import logging.configlogging.config.dictConfig(config)
When invoked, dictConfig will disable all existing loggers, unless disable_existing_loggers is set to false. This is usually desired, as many modules declare a global logger that will be instantiated at import time, before dictConfig is called.
You can see the . Often, this configuration is stored in a YAML file and configured from there. Many developers often prefer this over using , as it offers better support for customization.
How to use logging
Now that we’ve looked at the logging module’s parts and design, it’s time to examine how a developer interacts with it. Here is a code example:
import loggingdef sample_function(secret_parameter):
    logger = logging.getLogger(__name__)  # __name__=projectA.moduleB
    logger.debug("Going to perform magic with '%s'",  secret_parameter)
    ...
    try:
        result = do_magic(secret_parameter)
    except IndexError:
        logger.exception("OMG it happened again, someone please tell Laszlo")
    except:
        logger.info("Unexpected exception", exc_info=True)
        raise
    else:
        logger.info("Magic with '%s' resulted in '%s'", secret_parameter, result, stack_info=True)
This creates a logger using the module __name__. It will create channels and hierarchies based on the project structure, as Python modules are concatenated with dots.
The logger variable references the logger «module,» having «projectA» as a parent, which has «root» as its parent.
On line 5, we see how to perform calls to emit logs. We can use one of the methods debug, info, error, or critical to log using the appropriate level.
When logging a message, in addition to the template arguments, we can pass keyword arguments with specific meaning. The most interesting are exc_info and stack_info. These will add information about the current exception and the stack frame, respectively. For convenience, a method exception is available in the logger objects, which is the same as calling error with exc_info=True.
These are the basics of how to use the logger module. ʘ‿ʘ. But it is also worth mentioning some uses that are usually considered bad practices.
Greedy string formatting
Using loggger.info(«string template {}».format(argument)) should be avoided whenever possible in favor of logger.info(«string template %s», argument). This is a better practice, as the actual string interpolation will be used only if the log will be emitted. Not doing so can lead to wasted cycles when we are logging on a level over INFO, as the interpolation will still occur.
Capturing and formatting exceptions
Quite often, we want to log information about the exception in a catch block, and it might feel intuitive to use:
try:
    ...except Exception as error:
    logger.info("Something bad happened: %s", error)
But that code can give us log lines like Something bad happened: «secret_key.» This is not that useful. If we use exc_info as illustrated previously, it will produce the following:
try:
    ...except Exception:
    logger.info("Something bad happened", exc_info=True)
Something bad happened
Traceback (most recent call last):
  File "sample_project.py", line 10, in code
    inner_code()
  File "sample_project.py", line 6, in inner_code
    x = data"secret_key"KeyError: 'secret_key'
This not only contains the exact source of the exception, but also the type.
Logging Messages to a File
The primary purpose of the module is to log messages to a file rather than to a console. Keeping a file of messages provides you with data over time that you can consult and quantify so that you can see what changes need to be made to your code.
To start logging to a file, we can modify the method to include a parameter. In this case, let’s call the filename :
pizza.py
The code above is the same as it was in the previous section, except that now we added the filename for the log to print to. Once we run the code with the command, we should have a new file in our directory called .
Let’s open the file with nano (or the text editor of your choice):
When the file opens, we’ll see the following:
test.log
This is similar to the console output that we encountered in the previous section, except now it is in the file.
Let’s close the file with + and move back into the file so that we can modify the code.
We’ll keep much of the code the same, but modify the parameters in the two pizza instances, and :
pizza.py
With these changes, let’s run the program again with the command.
Once the program has run, we can open our file again with nano:
When we look at the file, we’ll see that several new lines were added, and that the previous lines from the last time that the program ran were retained:
test.log
While this information is certainly useful, we can make the log more informative by adding additional . Primarily, we would like to add a human-readable time stamp that tells us when the LogRecord was created.
We can add that attribute to a parameter called , referencing it as shown in the table with the string . Additionally, to keep the level name, we’ll need to include the string and to keep the string message that we ask the logger to print out we’ll include . Each of these attributes will be separated by a , as shown in the code added below.
pizza.py
When we run the code above with the added attributes with the command, we’ll get new lines added to our file that include the human-readable time stamp in addition to the level name of and the associated messages that are passed into the logger as strings.
Depending on your needs, you may want to make use of additional in your code in order to make your program files’ logs relevant to you.
Logging debugging and other messages into separate files provides you with a holistic understanding of your Python program over time, giving you the opportunity to troubleshoot and modify your code in a manner that is informed by the historical work put into the program, as well as the events and transactions that occur.
Выполнить вход, отвязать страницу и установить ловушку на аск фм через ВКонтакте
На данный момент появляется все больше различных социальных сетей, мессенджеров и других приложений. И практически во всех необходимо проходить процесс регистрации, что само по себе довольно нудное занятие. Гораздо эффективнее использовать один аккаунт, где и так хранится вся необходимая информация. Например, чтобы не корпеть над заполнением формы с вводом всех данных, можно выполнить в аск фм вход через ВКонтакте. Согласитесь, так будет гораздо удобнее.
Как выполнить вход в Аск фм через аккаунт ВКонтакте:
-
Зайти на сайт ask.fm
-
Выбрать для удобства язык (если он переключен) внизу главной страницы, нажав на ссылку Chooselanguage.
-
После этого нажать на кнопку «Зарегистрироваться»
-
В первой же строчке вы увидите кнопку vk – нажмите на нее
-
Далее вы будете автоматически перенаправлены на страницу ВКонтакте, где вам будет предложено установить приложение Askfm и разрешить использовать некоторые ваши данные. Для этого нажмите кнопку «Разрешить»
-
После этого вы снова будете перенаправлены на страницу аска, где необходимо будет нажать кнопку «Вход»
Итак, теперь у вас появилась собственная страница в аск фм со входом через ВКонтакте.
Ловушка на Аск фм через ВК
 Все же главным вопросом при работе с социальной сетью аск фм остается возможность открыть анонимов. Это может быть связано, как с простым интересом, так и с безопасностью (в том случае, если на страницу приходят угрозы или что-то подобное). В любом поисковике вы найдете множество предложений открыть анонимов с помощью различных программ. Но практически во всех случаях – это просто мошенничество и, как только вы установите подобную программу, ваше устройство может быть тут же подвержено вирусной атаке. Так что же может помочь в вопросе обнаружения анонимов? Для этого необходимо создать ловушку на аск через ВК. Давайте разберем, как это сделать:
-
Для начала войдите в свой аккаунт ВКонтакте
-
После этого откройте пункт меню, расположенного слева, «Приложения»
-
Далее через поиск найдите одно из приложений: «ПоискВС» или «Ловушка гостей». Установите приложение
-
После того, как приложение будет запущено нажмите на ссылку «Поймать больше гостей»
-
После этого на странице сгенерируется ссылка для вас – скопируйте ее
-
Далее необходимо перейти на сайт goo.gl
-
В пустую строку вставьте ссылку и нажмите кнопку «Shortenurl»
-
После этого у вас сгенерируется новая ссылка. Это нужно для того, чтобы ссылка не выглядела, как «контактовская». Скопируйте новую ссылку
-
Теперь отправляйтесь в свой аккаунт на аск фм
-
Нажмите кнопку в виде шестеренки и выберите пункт «Настройки»
-
Далее на первой вкладке найдите строчку «Веб-сайт» и вставьте полученную ссылку в пустую строку
-
Теперь, каждый, кто перейдет по данной ссылке будет отображаться в приложении ВКонтакте. Эту же ссылку вы можете вставлять в свой ответ на вопрос анонима. Например, в предложении «А я узнал(а) тебя! Твой профиль /ссылка/?»
Таким образом, вопрос с выявлением анонимов будет решен с помощью ловушки на аск через ВК. На нашем сайте Вы можете привлечь тысачи живых подписчиков и лайков на вопросы и ответы в Аск
Как отвязать аск от ВКонтакте
Если вы не хотите пользоваться какой-либо из социальных сетей (аск или вк) или вас просто не устраивает привязка двух аккаунтов, то появляется необходимость отвязать профиль. Соответственно, возникает следующий вопрос: «Как отвязать аск от ВКонтакте?». Сделать это, на самом деле, достаточно просто. Давайте разберем все шаги:
-
Зайдите в свой профиль на аск фм
-
Нажмите на кнопку в виде шестеренки и выберите раздел «настройки»
-
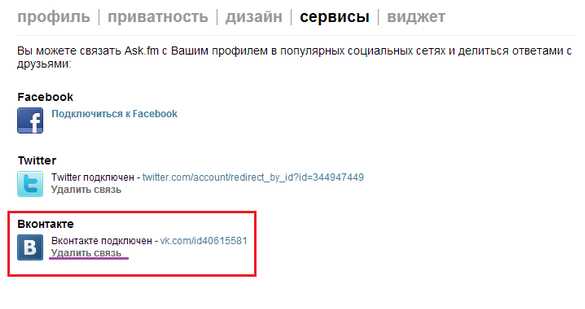
Перейдите на вкладку «Социальные сети»
-
Здесь рядом с логотипом ВК будет находиться ссылка «Отключть» — щелкните по ней
-
После обновления страницы здесь же возникнет слово «Подключить». Это означает, что ваша страница отвязана.
Выполнив эти пять простых шагов, вы решите проблему, как отвязать аск от ВКонтакте.


