Как выбрать и как изменить дисплей-менеджер в linux
Содержание:
- Use Intel graphics only
- Updates
- Tips
- Troubleshooting
- Loading the display manager
- User Account
- Не хочу $(_DM)! или Как сменить Desktop Manager за 5 минут (HowTO)
- Troubleshooting
- Changing the Wallpaper
- Help, I can’t see my Desktop!
- Some Common Display Managers for Ubuntu
- Setting a keymap
- Adding System Hooks
- Changing the Wallpaper
- Help, I can’t see my Desktop!
- Adding System Hooks
- Запуск приложений без оконного менеджера
- KDM
Use Intel graphics only
If you only care to use a certain GPU without switching, check the options in your system’s BIOS. There should be an option to disable one of the cards. Some laptops only allow disabling of the discrete card, or vice-versa, but it is worth checking if you only plan to use just one of the cards.
If your BIOS does not allow to disable Nvidia graphics, you can disable it from the Linux kernel itself. See .
Use CUDA without switching the rendering provider
You can use CUDA without switching rendering to the Nvidia graphics. All you need to do is ensure that the Nvidia card is powered on before starting a CUDA application, see for details.
Now when you start a CUDA application, it will automatically load all necessary kernel modules. Before turning off the Nvidia card after using CUDA, the kernel modules have to be unloaded first:
# rmmod nvidia_uvm
# rmmod nvidia
Updates
After installation, the first thing you should do on your new void system is update your remote repository information and update your installed packages. This is especially important if you used the Local source during installation – it is highly likely that at least some of your packages will be out of date. To update all packages to the most recent version, run:
# xbps-install -Suv
Repeat this command until there are no more updates. After updating your system, you may want to reboot depending on the updates installed (such as kernel updates).
In the event that there is no network connection e.g. need to set up wireless, proceed to the and return.
Tips
Running commands at log-in
A user can run some programs automatically when logging in using LightDM by adding commands in ~/.xprofile, which will be sourced by LightDM. For example:
FILE
# Starting redshift, setting the dpi with xrandr and set the brightness to 50% with xbacklight
xrandr --dpi 192 &
redshift-gtk &
xbacklight -set 50 &
Unlock GNOME Keyring
FILE
auth	   include	system-local-login
auth       optional	pam_gnome_keyring.so #keyring
account    include	system-local-login
session	   include	system-local-login
session    optional	pam_gnome_keyring.so auto_start #keyring
Locking your Screen with elogind After Suspend-Sleep
Sometimes you want to lock your screen after elogin triggers suspend or sleep. This can be done easily by doing the following:
Install light-locker:
Start light-locker once you startup X by putting light-locker & into ~/.xprofile or ~/.xinitrc.
FILE
# Starting light-lock with X session
light-locker &
Create lock.sh under /lib64/elogind/system-sleep/ and be sure to add execute permissions to the file.
Troubleshooting
Hangs after login
Try removing and logging in again without rebooting. Rebooting without logging in creates the file again and the problem will persist.
/etc/sddm.conf.d/tty.conf
MinimumVT=7
One or more users do not show up on the greeter
SDDM only displays users with a UID in the range of 1000 to 60000 by default (the values are taken from at compile time). If the UIDs of the desired users are outside this range then you will have to modify the range.
For example, for a UID of 501, decrease the minimum UID and hide those with shells used by system users:
/etc/sddm.conf.d/uid.conf
HideShells=/usr/bin/nologin,/sbin/nologin,/bin/false,/usr/bin/git-shell
MinimumUid=500
For users with a higher UIDs, like those used by systemd-homed, increase the maximum UID:
/etc/sddm.conf.d/uid.conf
MaximumUid=60513
User avatars do not show up on the greeter
User avatars are not shown on the greeter if the number of users exceeds DisableAvatarsThreshold parameter or if avatars are not enabled at all as controlled by EnableAvatars parameter. To circumvent this add the following lines to your sddm configuration:
/etc/sddm.conf.d/avatars.conf
EnableAvatars=true # enable avatars
DisableAvatarsThreshold=7 # set the threshold for the number of users. Avatars are not shown if this threshold is exceeded.
SDDM loads only US keyboard layout
SDDM loads the keyboard layout specified in . You can generate this configuration file by command. See Keyboard configuration in Xorg for more information.
An alternative way of setting the keyboard layout that will only set it in SDDM and not subsequent sessions is to invoke a setxkbmap command in the startup script of SDDM, located at . See for examples.
Screen resolution is too low
If even the above fails, you can try setting your screen size in a Xorg configuration file:
/etc/X11/xorg.conf.d/90-monitor.conf
Section "Monitor"
        Identifier      "<default monitor>"
        DisplaySize     345 194 # in millimeters
EndSection
Long load time on autofs home directory
SDDM by default tries to display avatars of users by accessing file. If your home directory is an autofs, for example if you use dm-crypt, this will make it wait for 60 seconds, until autofs reports that the directory cannot be mounted.
You can disable avatars by creating the following configuration file:
/etc/sddm.conf.d/avatar.conf
Loading the display manager
To enable graphical login, enable the appropriate systemd service. For example, for SDDM, enable .
This should work out of the box. If not, you might have to reset a custom symlink to point to the default . See .
After enabling SDDM a symlink should be set in . You may need to use to override old symlinks.
$ file /etc/systemd/system/display-manager.service
/etc/systemd/system/display-manager.service: symbolic link to /usr/lib/systemd/system/sddm.service
Using systemd-logind
In order to check the status of your user session, you can use loginctl. All polkit actions like suspending the system or mounting external drives will work out of the box.
$ loginctl show-session $XDG_SESSION_ID
User Account
The next step, if only the root account exists, is to create an additional user account, put it into all the appropriate groups and set a password for it.
First, create a user using the command. The below example creates a user named voiduser, sets the user’s default shell to , and adds the user to the wheel, users, audio, video, cdrom, and input groups:
# useradd -m -s /bin/bash -U -G wheel,users,audio,video,cdrom,input voiduser
Note: The ‘wheel’ user group allows the user to escalate to root if they have the root password. It is also generally used to allow privileges (see below).
Next, set the user’s password using :
# passwd voiduser
Note: Use your own shell instead of bash if you want, but you may need to install it first since only bash and are installed by default.
To allow this user (and other administrators) system access via the command, you need to configure that behaviour. Edit /etc/sudoers by running
# visudo
and uncomment this line:
# %wheel ALL=(ALL) ALL
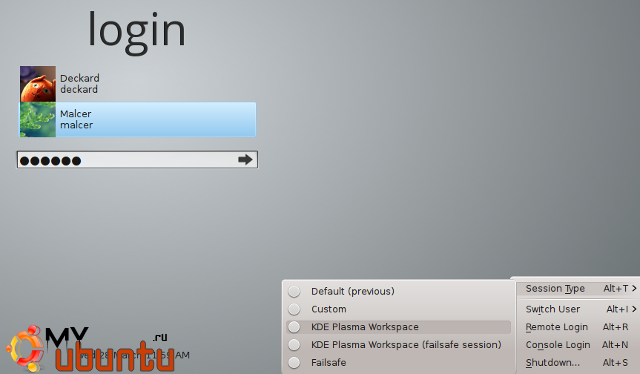
Не хочу $(_DM)! или Как сменить Desktop Manager за 5 минут (HowTO)
системное,
linux,
ubuntu
Translate this articleEnglishGermanFrenchSpanishPortugueseItalianChineseArabicKoreanJapanese
В названии данной статьи фигурирует переменная $(_DM). На её место необходимо поставить тот Desktop Manager, который используется в Вашей системе. Менеджер рабочего окружения обычно ставится «бонусным подарком» к оболочке рабочего стола. Ниже я расскажу о том, как безопасно сменить DM или удалить его без неожиданных последствий.
Итак, приступим…
Самые популярные десктоп-менеджеры — это, пожалуй, GDM (GNOME Desktop Manager), KDM (KDE Desktop Manager), XDM (Xfce Desktop Manager). Одно время данная тройка оставалась лидирующей, с главарём в виде gdm, но после выхода LXDE и его официального признания стал набирать популярность LXDM (LXDE Desktop Manager). Есть и другие менеджеры, но они малопопулярны и нестабильны.
При установке нового окружения Вас спросят, что загружать автоматически: используемый менеджер или предлагаемый новым окружением.UPD: начиная с Ubuntu 11.10 по-умолчанию стал использоваться LightDM. Приведённые ниже инструкции применимы и к нему.
Как изменить выбор после установки?
Первое, что приходит на ум, это переустановка требуемого пакета для получения меню выбора DM’а. Но это не так. Здесь нужно действовать немного по-другому.
Способ 1 — графический
Открываем Synaptic, выбираем установленный пакет с dm, жмём «Пакет» — «Настроить». Получаем диалоговое окно с предложением выбора требуемого менеджера рабочего стола.
Способ 2 — консоль
Вводим в терминале:
Далее получаем псевдо-окошко с предложением выбора.
Примечание: и в первом, и во втором случаях Ваш выбор будет записан в файл «/etc/X11/default-display-manager». Конечно, никто не запрещает прикинутся root-пользователем и изменить данный объект вручную, но так поступать я не советую. Местонахождение конфига было найдено методом научного тыка, и вполне возможно, что он где-то может дублироваться.
Способ 3 — снос DM
Радикальный метод, но тем не менее он имеет право на существование.
Примечание: При удалении одного десктоп-менеджера предложится на выбор другой, а если он единственный, то вход будет производится через консоль. На всякий случай скажу, что иксы запускаются командой:
а менеджер рабочего стола так:
Настоятельно рекоммендую запускать именно с «sudo«, ибо данный вариант работы стандартен и более привычен, да и глюков неожиданных скорее всего не будет.
Troubleshooting
If you encounter consistent screen flashing and ultimately no LightDM on boot, ensure that you have defined the greeter correctly in LightDM’s config file. And if you have correctly defined the GTK greeter, make sure the (default: ) exists and contains at least one .desktop file.
The same error can happen on lightdm startup if the last used session is not available anymore (eg. you last used gnome and then removed the gnome-session package): the easiest workaround is to temporarily restore the removed package. Another solution might be:
# dbus-send --system --type=method_call --print-reply --dest=org.freedesktop.Accounts /org/freedesktop/Accounts/User1000 org.freedesktop.Accounts.User.SetXSession string:xfce
This example sets the session «xfce» as default for the user 1000.
Wrong locale displayed
In case of your locale not being displayed correctly in Lightdm add your locale to
LANG=pt_PT.utf8
Alternatively if you want LightDM and its greeters to be in a language other than your set system locale, you can use the option in .
Missing icons with GTK greeter
If you are using as a greeter and it shows placeholder images as icons, make sure valid icon themes and themes are installed and configured. Check the following file:
/etc/lightdm/lightdm-gtk-greeter.conf
theme-name=mate      # this should be the name of a directory under /usr/share/themes/
icon-theme-name=mate # this should be the name of a fully featured icons set directory under /usr/share/icons/
LightDM displaying in wrong monitor
If you are using multiple monitors, LightDM may display in the wrong one (e.g. if your primary monitor is on the right). To force the LightDM login screen to display on a specific monitor, edit and change the display-setup-script parameter like this:
/etc/lightdm/lightdm.conf
display-setup-script=xrandr --output HDMI1 --primary
Replace HDMI1 with your real monitor ID, which you can find from xrandr command output.
LightDM does not appear
It may happen that your system boots so fast that LightDM service is started before your graphics drivers are properly loaded. If this is your case, you will want to add the following config to your lightdm.conf file:
logind-check-graphical=true
This setting will tell LightDM to wait until graphics devices are ready before spawning greeters/autostarting sessions on them.
Changing the Wallpaper
LightDM does not configure the look of greeters; to do this configure the appropriate greeter.
Unity Greeter by default shows the currently selected users background. To set the default background and stop the switching edit /usr/share/glib-2.0/schemas/10_unity_greeter_background.gschema.override
draw-user-backgrounds=false
background='/foo/wallpaper.png'
And run sudo glib-compile-schemas /usr/share/glib-2.0/schemas/ to apply these settings.
For LightDM GTK+ greeter edit /etc/lightdm/lightdm-gtk-greeter.conf:
background=/usr/share/lubuntu/wallpapers/lubuntu-default-wallpaper.png
Help, I can’t see my Desktop!
Many things can go wrong in a graphics stack. If you can’t see any graphics or see corrupt graphics the following might help:
- You can get to a text terminal using alt-ctrl-F1.
- Check the LightDM logs in /var/log/lightdm.
-
Stop LightDM with sudo stop lightdm.
-
You can try LightDM again with sudo start lightdm.
-
If you have another display manager you want to try (e.g. gdm) start that: sudo start gdm.
-
You can set the default display manager by running sudo dpkg-reconfigure lightdm.
- Check your system is up to date, especially video drivers.
- File a bug. If you’re not sure where the cause is (lightdm / unity-greeter / unity / X / kernel) file against lightdm and the bug will be triaged and reassigned.
Some Common Display Managers for Ubuntu
Here are some popular Ubuntu display managers that you may wish to choose from:
GDM
GDM, the Gnome Display Manager is the default display manager for the popular Gnome desktop environment. It supports the windowing systems X11 and Wayland. You can easily customize it to allow passwordless login, hide list of other users and for configuring themes, custom sessions and login screens. Basic configurations to GDM can be done through the UI through System Settings. For advanced configurations, you need to edit GDM configuration files as an authorized user. Here is a list of some of the files that let you configure your login session and display settings:
/etc/X11/gdm/gdm.conf
/etc/gdm/gdm.conf
/etc/dconf/db/gdm.d(for advanced tweaking)
GDM3
GDM3 is the default display manager that comes with the latest versions of Ubuntu, for example, Ubuntu 18. It is a redesigned version of GDM; though its look & feel is almost the same as GDM, it is pretty different in the background. It is lighter and faster but lacks a few features that you could use in the legacy GDM. For example, most of the configurable features are accessible through the conf files rather than the user interface Settings utility. You can make changes in the following file in order to customize your Login UI and sessions tackling:
/etc/gdm3/greeter.gconf
LightDM
LightDM is also an alternate display manager for the older GDM. It has various greeter themes available for configuration. It supports Canonical server and X.org, therefore, it is a good choice for Ubuntu. Through LightDM, you can customize login greeter sessions, disable guest account and show/hide the list of other users on login. Here is a list of the files that let you configure your login session and display settings in Ubuntu:
/etc/lightdm/(includes various configuration files)
/etc/lightdm/lightdm.conf.d/
KDM
KDM is the default display manager for KDE. It comes with a lot of customizable functionality through the UI module: System Settings. You can customize minute details in your greeter such as welcome message, font, and background wallpaper. A powerful feature of KDM is that it prevents shutting down at the login screen so only logged in users can shut down the computer system. Other customization options include root shutdown, logging a user and auto-login feature.
After reading this article, you are hopefully familiar with the concept of a Linux Display manager and what is the need of choosing one over the other. You can download and switch between different display Manager installed on your system with the help of the simple commands we described in this article.
Some Common Ubuntu Display Managers and How to Switch Between Them
Setting a keymap
Note: The following information may be irrelevant/innecessary for you if your Void installation includes a DE with a suitable keyboard config editor. The MATE flavour of Void Linux comes with such an editor, whereby you can easily pick your keymap with a GUI based application instead of editing config files directly.
To see all available keymaps on your system, run:
$ find /usr/share/kbd/keymaps/ -type f
To configure the console keymap, modify /etc/rc.conf with your keymap code. Using the results from the above command, remove the .map.gz suffix and assign it like this (for example, using the «Español» keymap):
# sed -i -e "s|#\?KEYMAP=.*|KEYMAP=us|" /etc/rc.conf
which becomes active after the next reboot. If you just want to change the keymap ad hoc, the loadkeys utility can be used:
$ loadkeys us
Xorg keymap (Optional)
If you , then that has its own settings for keyboard layout.
While the default keyboard layout can be overriden by running setxkbmap in a user’s .xinitrc, or during session startup (depending on DE/WM used), this can be globally set by adding configuration snippets to /etc/X11/xorg.conf.d/ (thus should work regardless of whether one uses a login manager or starts X from a logged-in console).
# cat /etc/X11/xorg.conf.d/10-keyboard.conf
Section "InputClass"
	Identifier "any value works here"
	MatchIsKeyboard "on"	# Limit these settings to keyboards
#	Driver "libinput"
	# Keyboard layout - comma-separated list for multiple layouts
	Option "XkbLayout" "es"
	# Keyboard variant - comma-separated list matching XkbLayout line
# 	Option "XkbVariant" "dvorak"
EndSection
A note on the Driver option: In recent Xorg versions, it seems that this is not necessary. If a driver is listed, then Xorg will use it if it exists, otherwise it will use whatever module is available for keyboards. The layout settings will still be applied. (Previously, incorrectly selecting the driver could leave you without keyboard input in Xorg).
Also note that if multiple keyboard layouts are to be switched between, the line
Option "XkbOptions" "grp:shift_toggle"
will allow you to switch between multiple layouts by pressing both Left Shift and Right Shift keys simultaneously.
Keyboard layouts are defined in /usr/share/X11/xkb/symbols/ and multiple variants of a language/layout are defined in one file.
Adding System Hooks
If you need some special behaviour when X servers and user sessions start/stop you can set commands to be run with the following configuration:
display-setup-script=command
display-stopped-script=command (Not in Ubuntu 12.04 LTS)
greeter-setup-script=command
session-setup-script=command
session-cleanup-script=command
session-wrapper=command
greeter-wrapper=command (Not in Ubuntu 12.04 LTS)
display-setup-script is run after the X server starts but before the user session / greeter is run. Set this if you need to configure anything special in the X server. It is run as root. If this command returns an error code the X server is stopped.
display-stopped-script is run after an X server exits. It is run as root.
greeter-setup-script is run before a greeter starts. It is run as root. If this command returns an error code the greeter fails to start (which will cause LightDM to stop).
session-setup-script is run before a user session starts. If this command returns an error the session will not start (user is returned to a greeter).
session-cleanup-script is run after a greeter or user session stops. It is run as root.
session-wrapper is a the command to run for a session. This command is run as the user and needs to exec the command passed in the arguments to complete running the session. Use this if you need to do special setup for a user session. Note the default is ‘lightdm-session’ so you should chain to this if you need to override this setting.
greeter-wrapper is a the command to run a greeter. It is the equivalent of session-wrapper for greeters.
Changing the Wallpaper
LightDM does not configure the look of greeters; to do this configure the appropriate greeter.
Unity Greeter by default shows the currently selected users background. To set the default background and stop the switching edit /usr/share/glib-2.0/schemas/10_unity_greeter_background.gschema.override
draw-user-backgrounds=false
background='/foo/wallpaper.png'
And run sudo glib-compile-schemas /usr/share/glib-2.0/schemas/ to apply these settings.
For LightDM GTK+ greeter edit /etc/lightdm/lightdm-gtk-greeter.conf:
background=/usr/share/lubuntu/wallpapers/lubuntu-default-wallpaper.png
Help, I can’t see my Desktop!
Many things can go wrong in a graphics stack. If you can’t see any graphics or see corrupt graphics the following might help:
- You can get to a text terminal using alt-ctrl-F1.
- Check the LightDM logs in /var/log/lightdm.
-
Stop LightDM with sudo stop lightdm.
-
You can try LightDM again with sudo start lightdm.
-
If you have another display manager you want to try (e.g. gdm) start that: sudo start gdm.
-
You can set the default display manager by running sudo dpkg-reconfigure lightdm.
- Check your system is up to date, especially video drivers.
- File a bug. If you’re not sure where the cause is (lightdm / unity-greeter / unity / X / kernel) file against lightdm and the bug will be triaged and reassigned.
Adding System Hooks
If you need some special behaviour when X servers and user sessions start/stop you can set commands to be run with the following configuration:
display-setup-script=command
display-stopped-script=command (Not in Ubuntu 12.04 LTS)
greeter-setup-script=command
session-setup-script=command
session-cleanup-script=command
session-wrapper=command
greeter-wrapper=command (Not in Ubuntu 12.04 LTS)
display-setup-script is run after the X server starts but before the user session / greeter is run. Set this if you need to configure anything special in the X server. It is run as root. If this command returns an error code the X server is stopped.
display-stopped-script is run after an X server exits. It is run as root.
greeter-setup-script is run before a greeter starts. It is run as root. If this command returns an error code the greeter fails to start (which will cause LightDM to stop).
session-setup-script is run before a user session starts. If this command returns an error the session will not start (user is returned to a greeter).
session-cleanup-script is run after a greeter or user session stops. It is run as root.
session-wrapper is a the command to run for a session. This command is run as the user and needs to exec the command passed in the arguments to complete running the session. Use this if you need to do special setup for a user session. Note the default is ‘lightdm-session’ so you should chain to this if you need to override this setting.
greeter-wrapper is a the command to run a greeter. It is the equivalent of session-wrapper for greeters.
Запуск приложений без оконного менеджера
Вы также можете запускать приложения без какого-либо оформления. Например, для запуска AUR создайте файл в :
Name=Web Browser
Comment=Use a web browser as your session
Exec=/usr/bin/google-chrome --auto-launch-at-startup
TryExec=/usr/bin/google-chrome --auto-launch-at-startup
Icon=google-chrome
Type=Application
При этом, сразу после входа будет запущено приложение, указанное в опции . Когда вы закроете приложение, вы будете возвращены к экранному менеджеру (точно так же, как если бы вы вышли из среды рабочего стола/оконного менеджера).
Важно помнить, что большинство графических приложений не рассчитаны на запуск в таком режиме и вы можете столкнуться с определенными ограничениями в их работе (например, диалоговые окна будут отображены без рамки и вы не сможете их перемещать по экрану; вы не сможете управлять никаким окном обычным способом — для установки размеров и положения вам, вероятно, придется вносить изменения в файлы настроек приложения).
KDM
Как и все в KDE, KDM предоставляет вам большое количество возможностей и опций для тонкой настройки. Вы можете легко настраивать его через модуль управления в системных настройках. Там вы можете выбрать, какую тему в KDM использовать, или переключиться на простой экран привествия, где вы можете настроить фоновое изображение, приветственное сообщение и используемые шрифты.Вы можете включить быстрое переключение пользователей, отображать список пользователей, позволить выключать систему через root, поэтому только вошедшие пользователи смогут выключать компьютер. Если ваше оборудование поддерживает различные методы авторизации, такие как сканирование отпечатков пальцев, KDM может определить и управлять этой возможностью. Он автоматически определяет установленные окружения рабочего стола и менеджеры окон и предлагает их в виде списка сессий, поэтому вы можете выбрать, какую из них запустить, когда вы вводите свое имя пользователя и пароль.
KDM поддерживает и x.org, и Wayland, но в KDE Plasma 5 он заменен на SDDM, поэтому вы найдете его как стандартный менеджер дисплеев только в более старых версиях KDE. Конечно, вы можете установить его везде, но знайте о том, что у него достаточно много зависимостей, связанных с KDE (например, kde-runtime, который сам по себе запрашивает достаточно много зависимостей).Хотя некоторые его возможности могут ввести новичка в смятение, на самом деле KDM достаточно просто настраивается благодаря понятному графическому диалогу. Вам не нужно редактировать какие-либо конфигурационные файлы и понимать, за что отвечает каждая их строчка. Если вам не нравятся KDM-темы на KDE-Look.org, создать новую с нуля на самом деле достаточно просто – вам лишь необходимо следовать официальной документации.


