Tuples / кортежи в python
Содержание:
- Access Tuple Elements
- Exception To The Rule
- Delete Tuple Elements
- Конкатенация строк
- Introspection Issues
- Slicing Tuples
- Access Tuple Items
- Python NumPy
- Concatenating and Multiplying Tuples
- Other Tuple Operations
- Access Tuple Items
- Python. Урок 8. Кортежи (tuple)
- Словари
- Python NumPy
- Множества
- Python NumPy
- Работа с кортежами
- Tuple Functions
- Кортежи
Access Tuple Elements
There are various ways in which we can access the elements of a tuple.
1. Indexing
We can use the index operator to access an item in a tuple, where the index starts from 0.
So, a tuple having 6 elements will have indices from 0 to 5. Trying to access an index outside of the tuple index range(6,7,… in this example) will raise an .
The index must be an integer, so we cannot use float or other types. This will result in .
Likewise, nested tuples are accessed using nested indexing, as shown in the example below.
Output
p
t
s
4
2. Negative Indexing
Python allows negative indexing for its sequences.
The index of -1 refers to the last item, -2 to the second last item and so on.
Output
t
p
3. Slicing
We can access a range of items in a tuple by using the slicing operator colon .
Output
('r', 'o', 'g')
('p', 'r')
('i', 'z')
('p', 'r', 'o', 'g', 'r', 'a', 'm', 'i', 'z')
Slicing can be best visualized by considering the index to be between the elements as shown below. So if we want to access a range, we need the index that will slice the portion from the tuple.
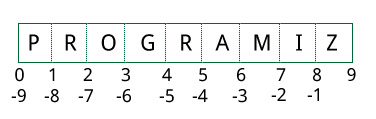 Element Slicing in Python
Exception To The Rule
When looking at the various types of parameters that a Python function
can have, one will notice that tuple parameters tend to be an
exception rather than the rule.
Consider PEP 3102 (keyword-only arguments) and PEP 3107 (function
annotations) . Both PEPs have been accepted and
introduce new functionality within a function’s signature. And yet
for both PEPs the new feature cannot be applied to tuple parameters as
a whole. PEP 3102 has no support for tuple parameters at all (which
makes sense as there is no way to reference a tuple parameter by
name). PEP 3107 allows annotations for each item within the tuple
(e.g., (x:int, y:int)), but not the whole tuple (e.g.,
(x, y):int).
Delete Tuple Elements
Removing individual tuple elements is not possible. There is, of course, nothing wrong with putting together another tuple with the undesired elements discarded.
To explicitly remove an entire tuple, just use the del statement. For example −
#!/usr/bin/python3

tup = ('physics', 'chemistry', 1997, 2000);

print (tup)
del tup;
print ("After deleting tup : ")
print (tup)
This produces the following result.
Note − An exception is raised. This is because after del tup, tuple does not exist any more.
('physics', 'chemistry', 1997, 2000)
After deleting tup :
Traceback (most recent call last):
   File "test.py", line 9, in <module>
      print tup;
NameError: name 'tup' is not defined
Конкатенация строк
Конкатенация – это операция объединения строк, в результате которой получается новая строка. Для этого используется оператор +.
Важно! При работе с числами + является оператором сложения, а при работе со строками – оператором объединения. Для примера попробуйте объединить строки “8host” и “Blog”, а затем вывести их с помощью функции print()
Для примера попробуйте объединить строки “8host” и “Blog”, а затем вывести их с помощью функции print().
Чтобы разделить строки пробелом, нужно просто добавить пробел в кавычки, например:
Не используйте оператор + между двумя разными типами данных. Объединять строки с числами нельзя. Для примера попробуйте объединить такие данные:
Это выдаст ошибку:
Чтобы создать строку “Blog27”, нужно взять число 27 в двойные кавычки, после чего оно больше не будет восприниматься как число и станет строкой. Преобразование чисел в строки для объединения полезно при работе с индексами или телефонными номерами (к примеру, код страны и код города выражаются в числах, но эти данные не нужно складывать, потому их преобразовывают в строки, чтобы объединить в одну строку).
Introspection Issues
Python has very powerful introspection capabilities. These extend to
function signatures. There are no hidden details as to what a
function’s call signature is. In general it is fairly easy to figure
out various details about a function’s signature by viewing the
function object and various attributes on it (including the function’s
func_code attribute).
But there is great difficulty when it comes to tuple parameters. The
existence of a tuple parameter is denoted by its name being made of a
. and a number in the co_varnames attribute of the function’s
code object. This allows the tuple argument to be bound to a name
that only the bytecode is aware of and cannot be typed in Python
source. But this does not specify the format of the tuple: its
length, whether there are nested tuples, etc.
In order to get all of the details about the tuple from the function
one must analyse the bytecode of the function. This is because the
first bytecode in the function literally translates into the tuple
argument being unpacked. Assuming the tuple parameter is
named .1 and is expected to unpack to variables spam and
monty (meaning it is the tuple (spam, monty)), the first
bytecode in the function will be for the statement
spam, monty = .1. This means that to know all of the details of
the tuple parameter one must look at the initial bytecode of the
function to detect tuple unpacking for parameters formatted as
\.\d+ and deduce any and all information about the expected
argument. Bytecode analysis is how the inspect.getargspec
function is able to provide information on tuple parameters. This is
not easy to do and is burdensome on introspection tools as they must
know how Python bytecode works (an otherwise unneeded burden as all
other types of parameters do not require knowledge of Python
bytecode).
Slicing Tuples
We can use indexing to call out a few items from the tuple. Slices allow us to call multiple values by creating a range of index numbers separated by a colon .
Let’s say we would like to just print the middle items of , we can do so by creating a slice.
When creating a slice, as in , the first index number is where the slice starts (inclusive), and the second index number is where the slice ends (exclusive), which is why in our example above the items at position, and are the items that print out.
If we want to include either end of the list, we can omit one of the numbers in the syntax. For example, if we want to print the first 3 items of the tuple — which would be , , — we can do so by typing:
This printed the beginning of the tuple, stopping right before index .
To include all the items at the end of a tuple, we would reverse the syntax:
We can also use negative index numbers when slicing tuples, just like with positive index numbers:
One last parameter that we can use with slicing is called stride, which refers to how many items to move forward after the first item is retrieved from the tuple.
So far, we have omitted the stride parameter, and Python defaults to the stride of 1, so that every item between two index numbers is retrieved.
The syntax for this construction is , with referring to stride. Let’s make a larger list, then slice it, and give the stride a value of 2:
Our construction prints the values between index numbers inclusive of and exclusive of , then the stride value of tells the program to print out only every other item.
We can omit the first two parameters and use stride alone as a parameter with the syntax :
By printing out the tuple with the stride set to , only every third item is printed:
, 1, 2, 3, 4, 5, 6, 7, 8, 9, 10, 11, 12
Slicing tuples with both positive and negative index numbers and indicating stride provides us with the control to receive the output we’re trying to achieve.
Access Tuple Items
You can access tuple items by referring to the index number, inside square
brackets:
Example
Print the second item in the tuple:
thistuple = («apple», «banana», «cherry»)
print(thistuple)
Example
Print the last item of the tuple:
thistuple = («apple», «banana», «cherry»)
print(thistuple)
Range of Indexes
You can specify a range of indexes by specifying where to start and where to
end the range.
When specifying a range, the return value will be a new tuple with the
specified items.
Example
Return the third, fourth, and fifth item:
thistuple = («apple», «banana», «cherry», «orange», «kiwi», «melon», «mango»)
print(thistuple)
Note: The search will start at index 2 (included) and end at index 5 (not included).
Remember that the first item has index 0.
Example
This example returns the items from index -4 (included) to index -1 (excluded)
thistuple = («apple», «banana», «cherry», «orange», «kiwi», «melon», «mango»)
print(thistuple)
Python NumPy
NumPy IntroNumPy Getting StartedNumPy Creating ArraysNumPy Array IndexingNumPy Array SlicingNumPy Data TypesNumPy Copy vs ViewNumPy Array ShapeNumPy Array ReshapeNumPy Array IteratingNumPy Array JoinNumPy Array SplitNumPy Array SearchNumPy Array SortNumPy Array FilterNumPy Random
Random Intro
Data Distribution
Random Permutation
Seaborn Module
Normal Distribution
Binomial Distribution
Poisson Distribution
Uniform Distribution
Logistic Distribution
Multinomial Distribution
Exponential Distribution
Chi Square Distribution
Rayleigh Distribution
Pareto Distribution
Zipf Distribution
NumPy ufunc
ufunc Intro
ufunc Create Function
ufunc Simple Arithmetic
ufunc Rounding Decimals
ufunc Logs
ufunc Summations
ufunc Products
ufunc Differences
ufunc Finding LCM
ufunc Finding GCD
ufunc Trigonometric
ufunc Hyperbolic
ufunc Set Operations
Concatenating and Multiplying Tuples
Operators can be used to concatenate or multiply tuples. Concatenation is done with the operator, and multiplication is done with the operator.
The operator can be used to concatenate two or more tuples together. We can assign the values of two existing tuples to a new tuple:
Because the operator can concatenate, it can be used to combine tuples to form a new tuple, though it cannot modify an existing tuple.
The operator can be used to multiply tuples. Perhaps you need to make copies of all the files in a directory onto a server or share a playlist with friends — in these cases you would need to multiply collections of data.
Let’s multiply the tuple by 2 and the tuple by 3, and assign those to new tuples:
By using the operator we can replicate our tuples by the number of times we specify, creating new tuples based on the original data sequence.
Existing tuples can be concatenated or multiplied to form new tuples through using the and operators.
Other Tuple Operations
We can test if an item exists in a tuple or not, using the keyword .
Output
True
False
True
We can use a loop to iterate through each item in a tuple.
Output
Hello John
Hello Kate
Advantages of Tuple over List
Since tuples are quite similar to lists, both of them are used in similar situations. However, there are certain advantages of implementing a tuple over a list. Below listed are some of the main advantages:
- We generally use tuples for heterogeneous (different) data types and lists for homogeneous (similar) data types.
- Since tuples are immutable, iterating through a tuple is faster than with list. So there is a slight performance boost.
- Tuples that contain immutable elements can be used as a key for a dictionary. With lists, this is not possible.
- If you have data that doesn’t change, implementing it as tuple will guarantee that it remains write-protected.
Access Tuple Items
You can access tuple items by referring to the index number, inside square
brackets:
Example
Print the second item in the tuple:
thistuple = («apple», «banana», «cherry»)
print(thistuple)
Example
Print the last item of the tuple:
thistuple = («apple», «banana», «cherry»)
print(thistuple)
Range of Indexes
You can specify a range of indexes by specifying where to start and where to
end the range.
When specifying a range, the return value will be a new tuple with the
specified items.
Example
Return the third, fourth, and fifth item:
thistuple = («apple», «banana», «cherry», «orange», «kiwi», «melon», «mango»)
print(thistuple)
Note: The search will start at index 2 (included) and end at index 5 (not included).
Remember that the first item has index 0.
Example
This example returns the items from index -4 (included) to index -1 (excluded)
thistuple = («apple», «banana», «cherry», «orange», «kiwi», «melon», «mango»)
print(thistuple)
Python Tuples Tutorial
Tuple
Change Tuple Item
Loop List Items
Check if Tuple Item Exists
Tuple Length
Tuple With One Item
Remove Tuple Items
Join Two Tuples
Python. Урок 8. Кортежи (tuple)
Данный урок посвящен кортежам (tuple) в Python
Основное внимание уделено вопросу использования кортежей, почему иногда лучше применять их, а не списки, рассмотрены способы создания и основные приемы работы с кортежами. Также затронем тему преобразования кортежа в список и обратно
Что такое кортеж (tuple) в Python?
Кортеж (tuple) – это неизменяемая структура данных, которая по своему подобию очень похожа на список. Как вы наверное знаете, а если нет, то, пожалуйста, ознакомьтесь с седьмым уроком, список – это изменяемый тип данных. Т.е. если у нас есть список a = и мы хотим заменить второй элемент с 2 на 15, то мы может это сделать, напрямую обратившись к элементу списка.
>>> a =
>>> print(a)

>>> a = 15
>>> print(a)
С кортежем мы не можем производить такие операции, т.к. элементы его изменять нельзя.
>>> b = (1, 2, 3)
>>> print(b)
(1, 2, 3)
>>> b = 15
Traceback (most recent call last):
  File "<pyshell#6>", line 1, in <module>
    b = 15
TypeError: 'tuple' object does not support item assignment
Зачем нужны кортежи в Python?
Существует несколько причин, по которым стоит использовать кортежи вместо списков. Одна из них – это обезопасить данные от случайного изменения. Если мы получили откуда-то массив данных, и у нас есть желание поработать с ним, но при этом непосредственно менять данные мы не собираемся, тогда, это как раз тот случай, когда кортежи придутся как нельзя кстати. Используя их в данной задаче, мы дополнительно получаем сразу несколько бонусов – во-первых, это экономия места. Дело в том, что кортежи в памяти занимают меньший объем по сравнению со списками.
>>> lst =
>>> tpl = (10, 20, 30)
>>> print(lst.__sizeof__())
32
>>> print(tpl.__sizeof__())
24
Во-вторых – прирост производительности, который связан с тем, что кортежи работают быстрее, чем списки (т.е. на операции перебора элементов и т.п
будет тратиться меньше времени). Важно также отметить, что кортежи можно использовать в качестве ключа у словаря
Создание, удаление кортежей и работа с его элементами
Создание кортежей
Для создания пустого кортежа можно воспользоваться одной из следующих команд.
>>> a = ()
>>> print(type(a))
<class 'tuple'>
>>> b = tuple()
>>> print(type(b))
<class 'tuple'>
Кортеж с заданным содержанием создается также как список, только вместо квадратных скобок используются круглые.
>>> a = (1, 2, 3, 4, 5)
>>> print(type(a))
<class 'tuple'>
>>> print(a)
(1, 2, 3, 4, 5)
При желании можно воспользоваться функцией tuple().
>>> a = tuple((1, 2, 3, 4))
>>> print(a)
(1, 2, 3, 4)
Доступ к элементам кортежа
Доступ к элементам кортежа осуществляется также как к элементам списка – через указание индекса. Но, как уже было сказано – изменять элементы кортежа нельзя!
>>> a = (1, 2, 3, 4, 5)
>>> print(a)
1
>>> print(a)
(2, 3)
>>> a = 3
Traceback (most recent call last):
  File "<pyshell#24>", line 1, in <module>
    a = 3
TypeError: 'tuple' object does not support item assignment
Удаление кортежей
Удалить отдельные элементы из кортежа невозможно.
>>> a = (1, 2, 3, 4, 5)
>>> del a
Traceback (most recent call last):
  File "<pyshell#26>", line 1, in <module>
    del a
TypeError: 'tuple' object doesn't support item deletion
Но можно удалить кортеж целиком.
>>> del a
>>> print(a)
Traceback (most recent call last):
  File "<pyshell#28>", line 1, in <module>
    print(a)
NameError: name 'a' is not defined
Преобразование кортежа в список и обратно
На базе кортежа можно создать список, верно и обратное утверждение. Для превращения списка в кортеж достаточно передать его в качестве аргумента функции tuple().
>>> lst =
>>> print(type(lst))
<class 'list'>
>>> print(lst)

>>> tpl = tuple(lst)
>>> print(type(tpl))
<class 'tuple'>
>>> print(tpl)
(1, 2, 3, 4, 5)
Обратная операция также является корректной.
>>> tpl = (2, 4, 6, 8, 10)
>>> print(type(tpl))
<class 'tuple'>
>>> print(tpl)
(2, 4, 6, 8, 10)
>>> lst = list(tpl)
>>> print(type(lst))
<class 'list'>
>>> print(lst)
P.S.
Если вам интересна тема анализа данных, то мы рекомендуем ознакомиться с библиотекой Pandas. На нашем сайте вы можете найти вводные уроки по этой теме. Все уроки по библиотеке Pandas собраны в книге “Pandas. Работа с данными”.
<<< Python. Урок 7. Работа со списками (list) Python. Урок 9. Словари (dict)>>>
Словари
Словарь Python, по большей части, представляет собой хэш-таблицу. В некоторых языках, словари могут упоминаться как ассоциативная память, или ассоциативные массивы. Они индексируются при помощи ключей, которые могут быть любого неизменяемого типа. Например, строка или число могут быть ключом. Вам обязательно стоит запомнить тот факт, что словарь – это неупорядоченный набор пар ключ:значение, и ключи обязательно должны быть уникальными.
Вы можете получить список ключей путем вызова метода keys() в том или ином словаря. Чтобы проверить, присутствует ли ключ в словаре, вы можете использовать ключ in в Python. В некоторых старых версиях Python (с 2.3 и более ранних, если быть точным), вы увидите ключевое слово has_key, которое используется для проверки наличия ключа в словаре. Данный ключ является устаревшим в Python 2.X, и был удален, начиная с версии 3.Х. Давайте попробуем создать наш первый словарь:
Python
my_dict = {}
another_dict = dict()
my_other_dict = {«one»:1, «two»:2, «three»:3}
print(my_other_dict) # {‘three’: 3, ‘two’: 2, ‘one’: 1}
|
1 |
my_dict={} another_dict=dict() my_other_dict={«one»1,»two»2,»three»3} print(my_other_dict)# {‘three’: 3, ‘two’: 2, ‘one’: 1} |
Первые два примера показывают, как создавать пустой словарь. Все словари находятся в фигурных скобках. Последняя строчка показывает, что мы имеем в виду, когда говорим «неупорядоченный словарь». Теперь настало время узнать, как принимаются значения в словаре.
Python
my_other_dict = {«one»:1, «two»:2, «three»:3}
print(my_other_dict) # 1
my_dict = {«name»:»Mike», «address»:»123 Happy Way»}
print(my_dict) # ‘Mike’
|
1 |
my_other_dict={«one»1,»two»2,»three»3} print(my_other_dict»one»)# 1 my_dict={«name»»Mike»,»address»»123 Happy Way»} print(my_dict»name»)# ‘Mike’ |
В первом примере, мы использовали словарь из предыдущего примере, и вытащили значение, связанное с ключом под названием one. Второй пример демонстрирует, как задавать значение ключу name. Теперь попробуем узнать, находится ли ключ в словаре или нет:
Python
print(«name» in my_dict) # True
print(«state» in my_dict) # False
|
1 |
print(«name»inmy_dict)# True print(«state»inmy_dict)# False |
Что-ж, если ключ в словаре, Python выдает нам Boolean True. В противном случае, мы получаем Boolean False. Если вам нужно получить список ключей в словаре, вам нужно сделать следующее:
Python
print(my_dict.keys()) # dict_keys()
| 1 | print(my_dict.keys())# dict_keys() |
В Python 2, метод keys дает нам список. Но в Python 3 он дает объект view. Это дает разработчику возможность обновлять словарь, так что view также обновится
Обратите внимание на то, что когда мы используем ключевое слово in для текста содержимого словаря, лучше будет сделать это в словаре, а не в списке, выдаваемом методом keys. Смотрим ниже:
Python
if «name» in my_dict # Такая конструкция правильная
if «name» in my_dict.keys() # Работает но медленее
|
1 |
if»name»inmy_dict# Такая конструкция правильная if»name»inmy_dict.keys()# Работает но медленее |
Пока это, возможно, не говорит вам о многом, во время реальной работы ситуация будет другая и каждая секунда будет важна. При создании тысячи файлов для обработки, эти маленькие хитрости могут уберечь вас от бесполезной траты времени.
Python NumPy
NumPy IntroNumPy Getting StartedNumPy Creating ArraysNumPy Array IndexingNumPy Array SlicingNumPy Data TypesNumPy Copy vs ViewNumPy Array ShapeNumPy Array ReshapeNumPy Array IteratingNumPy Array JoinNumPy Array SplitNumPy Array SearchNumPy Array SortNumPy Array FilterNumPy Random
Random Intro
Data Distribution
Random Permutation
Seaborn Module
Normal Distribution
Binomial Distribution
Poisson Distribution
Uniform Distribution
Logistic Distribution
Multinomial Distribution
Exponential Distribution
Chi Square Distribution
Rayleigh Distribution
Pareto Distribution
Zipf Distribution
NumPy ufunc
ufunc Intro
ufunc Create Function
ufunc Simple Arithmetic
ufunc Rounding Decimals
ufunc Logs
ufunc Summations
ufunc Products
ufunc Differences
ufunc Finding LCM
ufunc Finding GCD
ufunc Trigonometric
ufunc Hyperbolic
ufunc Set Operations
Множества
Множества это неупорядоченные коллекции объектов не содержащие дубликатов. Пустое множество создаётся функцией или круглыми скобками . Множества неупорядоченны поэтому к элементам множества нельзя обратится по индексу. Множества, за исключением frozen set, изменяемы.
>>> basket =
>>> basket_set = set()
>>> basket_set
set()
>>> basket_set.update(basket)
>>> basket_set
{‘pear’, ‘orange’, ‘apple’, ‘banana’}
>>> basket_set.add(«clementine»)
>>> basket_set
{‘pear’, ‘orange’, ‘apple’, ‘banana’, ‘clementine’}
>>> basket_set.remove(«apple»)
>>> basket_set
{‘pear’, ‘orange’, ‘banana’, ‘clementine’}
|
1 |
>>>basket=’apple’,’orange’,’apple’,’pear’,’orange’,’banana’ >>>basket_set=set() >>>basket_set set() >>>basket_set.update(basket) >>>basket_set {‘pear’,’orange’,’apple’,’banana’} >>>basket_set.add(«clementine») >>>basket_set {‘pear’,’orange’,’apple’,’banana’,’clementine’} >>>basket_set.remove(«apple») >>>basket_set {‘pear’,’orange’,’banana’,’clementine’} |
Python NumPy
NumPy IntroNumPy Getting StartedNumPy Creating ArraysNumPy Array IndexingNumPy Array SlicingNumPy Data TypesNumPy Copy vs ViewNumPy Array ShapeNumPy Array ReshapeNumPy Array IteratingNumPy Array JoinNumPy Array SplitNumPy Array SearchNumPy Array SortNumPy Array FilterNumPy Random
Random Intro
Data Distribution
Random Permutation
Seaborn Module
Normal Distribution
Binomial Distribution
Poisson Distribution
Uniform Distribution
Logistic Distribution
Multinomial Distribution
Exponential Distribution
Chi Square Distribution
Rayleigh Distribution
Pareto Distribution
Zipf Distribution
NumPy ufunc
ufunc Intro
ufunc Create Function
ufunc Simple Arithmetic
ufunc Rounding Decimals
ufunc Logs
ufunc Summations
ufunc Products
ufunc Differences
ufunc Finding LCM
ufunc Finding GCD
ufunc Trigonometric
ufunc Hyperbolic
ufunc Set Operations
Работа с кортежами
Создание
Как и другие коллекции языка Питон, кортеж можно создать двумя способами.
Способ №1: Литеральное объявление:
Способ №2: Через функцию
Важно, чтобы аргумент, передаваемый в был итерируемым объектом:
Упаковка
Упаковкой кортежа называют присваивание его какой-то переменной, что, по сути, совпадает с операцией объявления.
Стоит обратить внимание 2 момента:
- Выражения и тождественны.
- Для объявления кортежа, включающего один единственный элемент, нужно использовать завершающую запятую:
Распаковка
Обратная операция, смысл которой в том, чтобы присвоить значения элементов кортежа отдельным переменным.
Количество переменных должно совпадать с числом элементов tuple
Однако, если необходимо получить лишь какие-то отдельные значения, то в качестве «ненужных» переменных позволено использовать символ нижнего подчеркивания «_»:
Обращение к элементу и поиск в кортеже
Обратиться к элементу кортежа можно по номеру его позиции. Причём как с начала, так и с конца:
Если элемент кортежа есть вложенный кортеж, то применяются дополнительные квадратные скобки (в зависимости от уровня вложенности). Например, чтобы обратиться ко второму элементу второго элемента, следует поступить так:
Узнать, присутствует ли объект среди элементов кортежа, можно с помощью оператора in:
Наиболее простым и очевидным способом перебрать элементы кортежа является обход его в цикле
Нет ничего проще, чем отсортировать готовый кортеж. В этом наш друг и помощник – прекрасная функция
Удаление
Добавить или удалить элемент содержащийся в tuple нельзя, по причине всё той же неизменяемости. Однако сам кортеж стереть с цифрового лица Земли возможно. Оператор к нашим услугам:
Tuple Functions
There are a few built-in functions that you can use to work with tuples. Let’s look at a few of them.
len()
Like with strings and lists, we can calculate the length of a tuple by using , where we pass the tuple as a parameter, as in:
This function is useful for when you need to enforce minimum or maximum collection lengths, for example, or to compare sequenced data.
If we print out the length for our tuples and , we’ll receive the following output:
We receive the above output because the tuple has 4 items:
And the tuple has 13 items:
Although these examples have relatively few items, the function provides us with the opportunity to see how many items are in large tuples.
max() and min()
When we work with tuples composed of numeric items, (including and ) we can use the and functions to find the highest and lowest values contained in the respective tuple.
These functions allow us to find out information about quantitative data, such as test scores, temperatures, prices, etc.
Let’s look at a tuple comprised of floats:
To get the , we would pass the tuple into the function, as in . We’ll combine this with the function so that we can output our results:
The function returned the highest value in our tuple.
Similarly, we can use the function:
Here, the smallest float was found in the tuple and printed out.
Just like with the function, the and functions can be very useful when working with tuples that contain many values.
Кортежи
Кортеж тоже является последовательностью и создается элементами разделёнными запятыми:
>>> companies = «Google», «Microsoft», «Tesla»
>>> companies
(‘Google’, ‘Microsoft’, ‘Tesla’)
|
1 |
>>>companies=»Google»,»Microsoft»,»Tesla» >>>companies (‘Google’,’Microsoft’,’Tesla’) |
При определении непустого кортежа скобки не обязательны, но они становятся обязательными когда кортеж является частью большего выражения. Пустой кортеж создаётся пустой парой скобок:
>>> companies = ()
>>> type(companies)
<class ‘tuple’>
|
1 |
>>>companies=() >>>type(companies) <class’tuple’> |
При определении кортежа с одним элементом запятая за ним обязательна.
>>> company = «Google»,
>>> type(company)
<class ‘tuple’>
>>> company = («Google»,)
>>> type(company)
<class ‘tuple’>
|
1 |
>>>company=»Google», >>>type(company) <class’tuple’> >>>company=(«Google»,) >>>type(company) <class’tuple’> |
Пропуск запятой означает что задано обычное значение, не кортеж.
>>> company = («Google»)
>>> company
‘Google’
>>> type(company)
<class ‘str’>
|
1 |
>>>company=(«Google») >>>company ‘Google’ >>>type(company) <class’str’> |
Кортежи индексируются как списки, но неизменямы.
>>> companies = («Google», «Microsoft», «Palantir»)
>>> companies
‘Google’
>>> companies = «Boeing»
Traceback (most recent call last):
File «<stdin>», line 1, in <module>
TypeError: ‘tuple’ object does not support item assignment
|
1 |
>>>companies=(«Google»,»Microsoft»,»Palantir») >>>companies ‘Google’ >>>companies=»Boeing» Traceback(most recent call last) File»<stdin>»,line1,in<module> TypeError’tuple’objectdoes notsupport item assignment |
В тоже время, если элементом кортежа является изменяемые объект, такой как список, то он может быть изменен.
>>> companies = (, )
>>> companies
(, )
>>> companies.append(«SpaceX»)
>>> companies
(, )
|
1 |
>>>companies=(«lockheedMartin»,»Boeing»,»Google»,»Microsoft») >>>companies (‘lockheedMartin’,’Boeing’,’Google’,’Microsoft’) >>>companies.append(«SpaceX») >>>companies (‘lockheedMartin’,’Boeing’,’SpaceX’,’Google’,’Microsoft’) |


