8 лучших альтернатив zoom для видеоконференций и вебинаров
Содержание:
Jitsi Meet
Edit the file, add/set the following properties:
fileRecordingsEnabled: true, // If you want to enable file recording
liveStreamingEnabled: true, // If you want to enable live streaming
hiddenDomain: 'recorder.yourdomain.com',
Also make sure that in your interface config ( by default), the array contains the value if you want to show the file recording button and the value if you want to show the live streaming button.
Once recording is enabled in , the recording button will become available in the user interface. However, until a valid jibri is seen by Jicofo, the mesage «Recording currently unavailable» will be displayed when it is pressed. Once a jibri connects successfully, the user will instead be prompted to enter a stream key.
Note: Make sure to update Jibri’s appropriately to match any config done above.
Known issues
macOS
On macOS Catalina a warning will be displayed on first install. The app won’t open unless «open» is pressed. This dialog is only shown once.
Builtin auto-updates are not yet handled in macOS due to unsigned build.
GNU/Linux
There is a known issue which prevents the app from starting on some Linux distributions: #231
If after downloading it, you can’t execute the file directly, try running
The workaround for now is to launch the app like so:
NOTE for old GNU/Linux distributions
You might get the following error:
If you do, please install NSS (example for Debian / Ubuntu):
sudo apt-get install libnss3
Tips and tricks
The following ports need to be forwarded to your server:
HTTPS:
TCP/443
Jitsi Videobridge:
- TCP/4443
- UDP/10000
Jitsi gateway to SIP (Jigasi)
To interface the Jitsi-meet meetings with traditional SIP install AUR or AUR and edit the prosody config:
/etc/prosody/prosody.cfg.lua
Component "callcontrol.JITSIFQDN"
    component_secret = "SECRET4"
fill the SIP access credentials ( and )
/opt/jigasi/jigasi-home/sip-communicator.properties
net.java.sip.communicator.impl.protocol.sip.acc1403273890647.ACCOUNT_UID=SIP\:"SIPUSER@SIPSERVER"
net.java.sip.communicator.impl.protocol.sip.acc1403273890647.PASSWORD=SIPPASSWORD
net.java.sip.communicator.impl.protocol.sip.acc1403273890647.SERVER_ADDRESS=SIPSERVER
net.java.sip.communicator.impl.protocol.sip.acc1403273890647.USER_ID=SIPUSER
To change the default room name SIP is connecting to, change in the above config.
Then edit the jigasi configuration
/etc/jitsi/jigasi/config
JIGASI_HOST=callcontrol.JITSIFQDN
JIGASI_HOSTNAME=jitsi-videobridge.JITSIFQDN
JIGASI_SECRET=SECRET4
JIGASI_OPTS=""
LOGFILE=/var/log/jitsi/jigasi.log
/opt/jitsi-meet/config.js
hosts.call_control = 'callcontrol.meet.jit.si'
and then start/enable .
Access restrictions for room creation
Note: The paths in this section refer to the stable or -git packages and might differ for the -bin packages.
To restrict video conference room creation to authenticated users, you can do the following steps.
Note that participants to the meeting are still not authenticated!
Add authentication to the jitsi domain in prosody and add a new virtual host for guests:
/etc/prosody/prosody.cfg.lua
...
VirtualHost "JITSIFQDN"
    ...
    authentication = "internal_plain"

VirtualHost "guest.JITSIFQDN"
    authentication = "anonymous"
    c2s_require_encryption = false
...
Edit the config file for :
/opt/config.js
var config = {
    hosts: {
            domain: 'JITSIFQDN',
            anonymousdomain: 'guest.JITSIFQDN',
            ...
        },
        ...
}
Add authentication for argument string:
/etc/jitsi/jicofo/jicofo.conf
-Dorg.jitsi.jicofo.auth.URL=XMPP:jitsi-meet.example.com
Then create the desired users via
prosodyctl register <username> JITSIFQDN <password>
Only if you are using (if you do not know, you do not) edit the SIP interface to not allow anonymouse authentication:
/etc/jitsi/jigasi/sip-communicator.properties
org.jitsi.jigasi.xmpp.acc.ANONYMOUS_AUTH=false
Log evaluation
For a publicly available IP address the above config leads to a public video conference server.
To monitor server use one can use systemd logging to get an at least vague idea of the usage:
journalctl --unit jicofo.service | grep "Created new focus" | cut -d" " -f7,8,16
shows all events of new chat room creation and
journalctl --unit jicofo.service | grep "Disposed conference for room" | cut -d" " -f7,8,16
shows all events of chat room destruction.
Grepping for ‘member’ also gives you (anonymous!) information on the participants.
Running own STUN server
By default, Jitsi Meet uses STUN servers from jitsi.org. You can easily run your own STUN server using and setting it in jitsi-meet’s config.
Prosody
Create the internal MUC component entry. This is required so that the jibri clients can be discovered by Jicofo in a MUC that’s not externally accessible by jitsi meet users. Add the following in :
-- internal muc component, meant to enable pools of jibri and jigasi clients
Component "internal.auth.yourdomain.com" "muc"
    modules_enabled = {
      "ping";
    }
    storage = "null"
    muc_room_cache_size = 1000
Create the recorder virtual host entry, to hold the user account for the jibri chrome session. This is used to restrict only authenticated jibri chrome sessions to be hidden participants in the conference being recordered. Add the following in :
VirtualHost "recorder.yourdomain.com"
  modules_enabled = {
    "ping";
  }
  authentication = "internal_plain"
Setup the two accounts jibri will use.
prosodyctl register jibri auth.yourdomain.com jibriauthpass
prosodyctl register recorder recorder.yourdomain.com jibrirecorderpass
The first account is the one Jibri will use to log into the control MUC (where Jibri will send its status and await commands). The second account is the one Jibri will use as a client in selenium when it joins the call so that it can be treated in a special way by the Jitsi Meet web UI.
Fully secure you say… What does this mean exactly?
In many respects Jitsi meetings are simply private by design. To begin with, all meeting rooms are ephemeral: they only exist while the meeting is actually taking place. They get created when the first participant joins and they are destroyed when the last one leaves. If someone joins the same room again, a brand new meeting is created with the same name and there is no connection to any previous meeting that might have been held with the same name.
This is all very important. Some of the systems that let people “pre-create” rooms, have subtle indications that let a potential attacker distinguish reserved from unreserved meetings which then makes the reserved meetings easier to identify and target.
That said, since a name is all that one needs to actually access a room, we have to be really careful about how we choose and advertise them. We don’t want others accidentally stumbling into our meetings, just as we want to keep pranksters and snoopers away.
This is generally not much of a problem for small size deployments (remember you can host your own Jitsi Meet) or low profile meetings but it may be a problem if you are using a large and public deployment such as meet.jit.si or if there is significant interest in your meeting.
One has to really keep in mind that the name of a meeting is sensitive and needs to be protected. You shouldn’t send it to anyone you do not want in your meeting. Advertising this name publicly, for example on social media, is something you should only ever do if you truly are comfortable with maximum exposure and the possibility of unwelcome visitors.
Then there’s the matter of choosing the name. If you start a meeting with the name “Test”, “Yoga” or “FamilyMeeting” for example, chances of having some random uninvited people joining are very, very high. How does one pick a good room name then? Our random meeting name generator is a great start. It offers names that are easy to remember and read out loud on a phone call, and come from a set of over a trillion possible combinations. Picking out one of the auto-generated names is therefore quite safe.
 If you don’t like the funky way the auto-generated names sound and you don’t want to use a long and uninviting UUID (which you totally could), then go ahead and pick a name by yourself but make sure it is long enough. For example, next time you’d like to have a coffee with someone over video, rather than going for meet.jit.si/coffee, try something with more of a twist.

We are also working on a “bad meeting name detector”. You’ll see a warning if your meeting name has a high chance of collision, so stay tuned!
We also give people the option to set a meeting password. A few important things to keep in mind: if you do set a password, it is your responsibility to communicate it to your peers.

More importantly, keep in mind that your password, just as chat and speaker stats, will be reset once the last person leaves the room. So you have to make sure that you set the password again, if you find yourself ending the meeting and then rejoining.
A similar approach you might consider would be to append a random character sequence at the end of your room name.
Overview
Conference focus is mandatory component of Jitsi Meet conferencing system next to the videobridge. It is responsible for managing media sessions between each of the participants and the videobridge. Whenever new conference is about to start an IQ is sent to the component to allocate new focus instance. After that special focus participant joins Multi User Chat room. It will be creating Jingle session between Jitsi videobridge and the participant. Although the session in terms of XMPP is between focus user and participant the media will flow between participant and the videobridge. That’s because focus user will allocate Colibri channels on the bridge and use them as it’s own Jingle transport.
Demo: end-to-end encrypted calls in Jitsi Meet
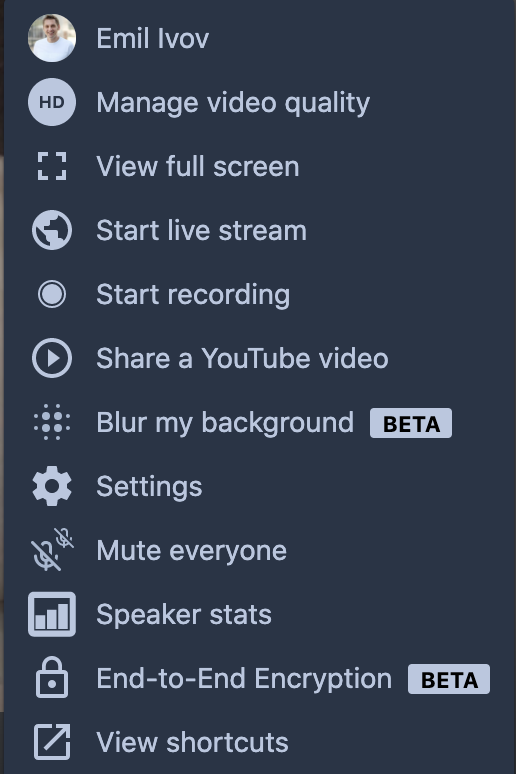
In order to try the feature, you can use the End-to-End Encryption option in the overflow menu (bottom right corner of your Jitsi Meeting):
This is already enabled on meet.jit.si and people can try it out if they are using a browser based on Chromium 83 and above (such as the corresponding versions of Edge, Chrome, Opera and Brave).
Now, let’s see exactly how the demo works. In this case, Yana, Fippo and Saúl are having an end-to-end encrypted conversation using the new e2eekey param. At a glance, other than the amazing people on the call, nothing about it seems noteworthy:
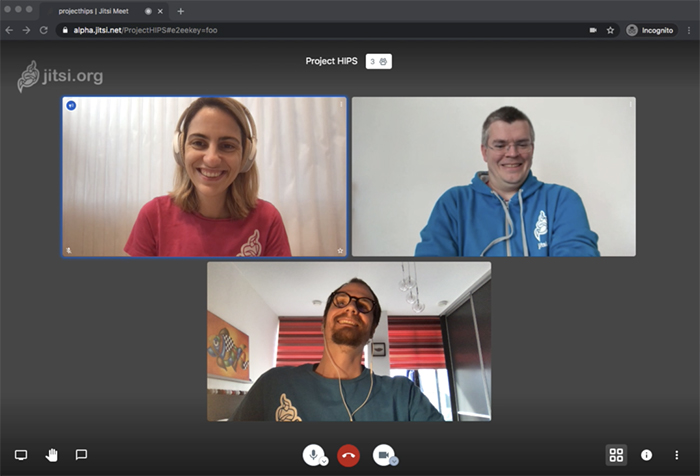
Things get interesting when Emil decides to join the call. What he sees in there is just … an endless stream of rubbish:

If Emil was a rogue service provider running the bridge for the meeting, he would no longer be able to eavesdrop on it and an attempt to do so would only yield, well we already said that: an endless stream of rubbish.
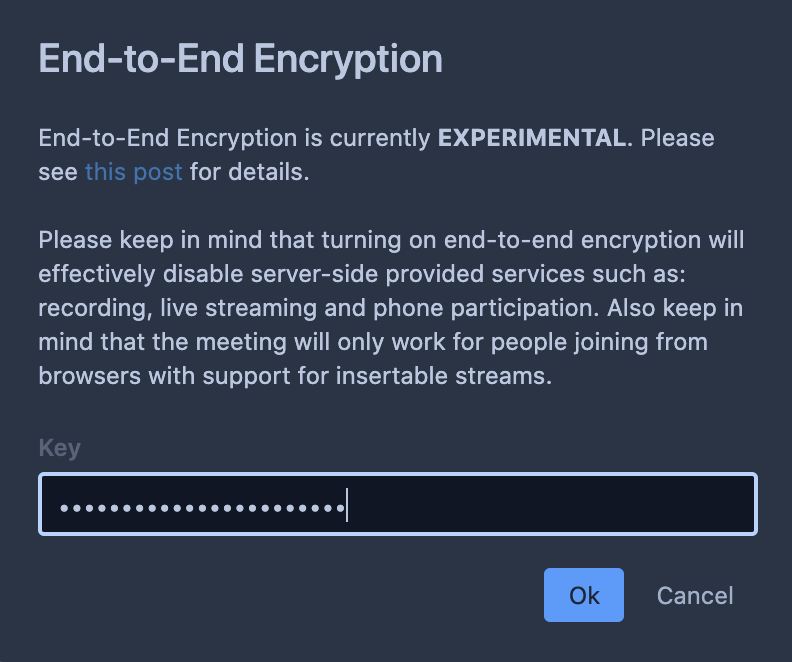
The only way for Emil to actually participate in the meeting would be if he was made privy to the e2ee key. In this case he was and once he enters it, everything goes back to normal:

And that’s it! Now everyone sees everyone else and the conversation can continue in full trust and privacy.
So how does all of this work?
Let’s take a step back. We would very likely all agree that we need our meetings to be protected and secure.
Deciding how to protect them, who to protect them from and how exactly to do this is a significantly more complex topic, that we believe everyone in our community should be informed about. We have already discussed how Jitsi Meet gives you protection by using ephemeral rooms and passwords, so no one undesirable can join your meetings, and how all information sent on the network is strongly encrypted using DTLS-SRTP, so that no one who happens to intercept it can actually understand it.
The final piece missing in this puzzle comes from the fact that DTLS-SRTP in WebRTC is strictly tied to a PeerConnection which means that, when using a video router (like Jitsi Videobridge) is involved, WebRTC and DTLS-SRTP can only provide hop-by-hop encryption. In such scenarios Jitsi Videobridge (JVB) ends up establishing as many encrypted channels as there are participants. This is what protects all data on the network. In order for media from one participant to reach another however, it needs to be extracted from the sender’s crypto context and re-encrypted with the receiver’s.

The need to decrypt information while it traverses Jitsi Videobridge, technically provides whoever controls the JVB machine with an opportunity to access the data. They are hence in a position to hear and see everyone on the meeting.
So far, our only answer to this has been that people who feel they cannot trust existing service providers not to eavesdrop on their meetings, can run their own bridges. We spend considerable effort to make sure this is very easy to do, but however much work we throw at streamlining the deployment process it will never be as simple or as hassle-free as a single click on a link.
Insertable Streams in WebRTC
Around three years ago, IETF’s PERC working group (Privacy Enhanced RTP Conferencing) settled on a transport design that could allow a reasonable path to end-to-end encryption (e2ee) in WebRTC conferences. The idea is that rather than try and tweak the existing DTLS-SRTP implementation, conferences can simply add the additional layer of e2e protection on top of the existing one.

The great news is that the approach just became implementable! The Google WebRTC team is currently in the process of adding a brand new feature to the Chromium ecosystem known as Insertable Streams. The feature provides WebRTC apps with access to audio and video frames after they have been encoded but before they have been sent on the network.
Fippo has just published a brilliant description of how insertable streams work in a webrtcHacks post. Do give it a read!
And this, friends, is all we were waiting for! So, we rolled our sleeves and got started.
What’s next: authentication and key management
As we already pointed out, passing keys as URL parameters is a demo thing only. Aside from being impractical it also carries risks given that URL params are stored in browser history.
Our next step is therefore to work out exactly how key management and exchange would work. We expect we will be using The Double Ratchet Algorithm through libolm but the details are still to be ironed out.
The important part is: end-to-end encryption is on its way to protect your Jitsi Meetings. So, stay tuned!
Love,
Your Personal Jitsi Team
Pre-requisites
ALSA and Loopback Device
- First make sure the ALSA loopback module is available. The extra modules (including ALSA loopback) can be installed on Ubuntu 16.04 using package name
- Perform the following tasks as the root user
- Set up the module to be loaded on boot:
- Load the module into the running kernel:
- Check to see that the module is already loaded:
- If the output shows the snd-aloop module loaded, then the ALSA loopback configuration step is complete.
Ffmpeg with X11 capture support
- Jibri requires a relatively modern ffmpeg install with x11 capture compiled in. This comes by default in Ubuntu 16.04, by installing the ffmpeg package.
- If building Jibri for Ubuntu 14.04 (trusty), the mc3man repo provides packages. They can be used by the following in Ubuntu 14.04:
sudo add-apt-repository ppa:mc3man/trusty-media
sudo apt-get update
sudo apt-get install ffmpeg
Google Chrome stable & Chromedriver
The latest Google Chrome stable build should be used. It may be able to be installed direclty via apt, but the manual instructions for installing it are as follows:
curl -sS -o - https://dl-ssl.google.com/linux/linux_signing_key.pub | apt-key add
echo "deb  http://dl.google.com/linux/chrome/deb/ stable main" > /etc/apt/sources.list.d/google-chrome.list
apt-get -y update
apt-get -y install google-chrome-stable
Add chrome managed policies file and set to . It will hide warnings in Chrome.
You can set it like so:
mkdir -p /etc/opt/chrome/policies/managed
echo '{ "CommandLineFlagSecurityWarningsEnabled": false }' >>/etc/opt/chrome/policies/managed/managed_policies.json
Chromedriver is also required and can be installed like so:
CHROME_DRIVER_VERSION=`curl -sS chromedriver.storage.googleapis.com/LATEST_RELEASE`
wget -N http://chromedriver.storage.googleapis.com/$CHROME_DRIVER_VERSION/chromedriver_linux64.zip -P ~/
unzip ~/chromedriver_linux64.zip -d ~/
rm ~/chromedriver_linux64.zip
sudo mv -f ~/chromedriver /usr/local/bin/chromedriver
sudo chown root:root /usr/local/bin/chromedriver
sudo chmod 0755 /usr/local/bin/chromedriver
Jitsi Debian Repository
The Jibri packages can be found in the stable repository on downloads.jitsi.org.
First install the Jitsi repository key onto your system:
wget -qO - https://download.jitsi.org/jitsi-key.gpg.key | sudo apt-key add -
Create a sources.list.d file with the repository:
sudo sh -c "echo 'deb https://download.jitsi.org stable/' > /etc/apt/sources.list.d/jitsi-stable.list"
Update your package list:
sudo apt-get update
Install the latest jibri
sudo apt-get install jibri
User, group
- Jibri is currently meant to be run as a regular system user. This example creatively uses username ‘jibri’ and group name ‘jibri’, but any user will do. This has not been tested with the root user.
- Ensure that the jibri user is in the correct groups to make full access of the audio and video devices. The example jibri account in Ubuntu 16.04 are: «adm»,»audio»,»video»,»plugdev».
sudo usermod -aG adm,audio,video,plugdev jibri
Config files
Edit the jibri.conf file (installed to /etc/jitsi/jibri/jibri.conf by default) appropriately. You can look at
reference.conf for the default values and an example of how to set up jibri.conf. Only
override the values you want to change from their defaults in jibri.conf.
Logging
By default, Jibri logs to . If you don’t install via the debian package, you’ll need to make sure this directory exists (or change the location to which Jibri logs by editing the log config
Jibri requires some settings to be enabled within a Jitsi Meet configuration. These changes include virtualhosts and accounts in Prosody, settings for the jitsi meet web (within config.js) as well as .
Installation
consists of 4 main components:
- : the files for the webinterface, accessed via files served by a webserver
- : the video bridging service providing video streams to all participants
- : the Jitsi conference focus determining who is speaking
- Prosody: a free XMPP server serving as the base of the setup
You can either use the git versions or the stable versions, you should not mix and match between them, the sets are as listed here:
- stable packages: AUR, AUR, and AUR,
- stable packages built from deb binaries: AUR, AUR, and AUR.
- git packages: AUR, AUR, and AUR,
Note: Configuration paths and services in AUR, AUR, and AUR packages differ and are explained in a separate section.
Bonjour provisioning
To configure provisioning via Bonjour, go to options => advanced => provisioning, check
“Enable provisioning”, and then select “Bonjour”.
In order to get the provisioning URI via Bonjour, you would need to make sure that an mDNS server is running somewhere on your network and that it is configured to advertise the provisioning URI.
On Unix/Linux:
-
Install avahi-daemon if not already installed.
- Create a file in /etc/avahi/services/provisioning.service
<?xml version="1.0" standalone='no'?>
<!DOCTYPE service-group SYSTEM "avahi-service.dtd">
<service-group>
  <name>Provisioning URL</name>
  <service protocol="any">
    <host-name>provisioning.local</host-name>
    <type>_https._tcp</type>
    <port>443</port>
    <txt-record>path=https://www.example.org/provisioning.php</txt-record>
    <txt-record>username=${username}</txt-record>
    <txt-record>password=${password}</txt-record>
    <txt-record>osname=${osname}</txt-record>
    <txt-record>build=${build}</txt-record>
    <txt-record>ipaddr=${ipaddr}</txt-record>
    <txt-record>hwaddr=${hwaddr}</txt-record>
    <txt-record>uuid=${uuid}</txt-record>
    <txt-record>arch=${arch}</txt-record>
  </service>
</service-group>
Note that name MUST not be changed since Jitsi will look for the service name
“Provisioning URL”. The host-name is not a FQDN and has to be suffixed by “.local”, next step
will tell avahi about the IP address of this host name. The URL parameters is added in this way
.
Add in /etc/avahi/hosts file the IP address of the provisioning server. The server name must
match the one in <host-name> parameter of provisioning.service file.
# enter the IP address of the provisioning server
192.168.0.254 provisioning.local
Restart avahi
Development
If you want to hack on this project, here is how you do it.
Show building instructions
Install Node.js 12 first (or if you use nvm, switch to Node.js 12 by running ).
npm install
Starting in development mode
npm start
The debugger tools are available when running in dev mode and can be activated with keyboard shortcuts as defined here .
It can also be displayed automatically from the environment variable such as:
SHOW_DEV_TOOLS=true npm start
or from the application command line flag.
Working with jitsi-meet-electron-utils
jitsi-meet-electron-utils is a helper package which implements many features
such as remote control and the always-on-top window. If new features are to be
added / tested, running with a local version of these utils is very handy, here
is how to do that.
By default the jitsi-meet-electron-utils is build from its git repository
sources. The default dependency path in package.json is:
"jitsi-meet-electron-utils": "jitsi/jitsi-meet-electron-utils"
To work with local copy you must change the path to:
"jitsi-meet-electron-utils": "file:///Users/name/jitsi-meet-electron-utils-copy",
To build the project you must force it to take the sources as will
not do it.
npm install jitsi-meet-electron-utils --force
NOTE: Also check the jitsi-meet-electron-utils README to see how to configure
your environment.
Выводы
Самые прогрессивные и надежные сервера ВКС сегодня – это программные решения, реализованные на базе серверов стандартной архитектуры. Они дают оптимальное соотношение технологичность-качество-надежность-стоимость. Такие платформы максимально гибкие – легко кастомизируются и адаптируются под нужды любых организаций
При выборе среди программных платформ обращаем внимание на технические характеристики аппаратной части, совместимость платформы с решениями, которые уже установлены у вас или в организациях, с которыми вы будете общаться по видео. Поддержка WebRTC при этом также не будет лишней
Добавлю, что программные сервера российского производства, при прочих равных, и стоят дешевле, и, в сложившихся политических и экономических условиях, дают больше уверенности в завтрашнем дне. Надеюсь, эти рекомендации окажутся полезными и упростят многим жизнь! С удовольствием отвечу на все возникшие при прочтении вопросы.


