Set java_home on windows 7, 8, 10, mac os x, linux
Содержание:
- Установка Java 8 в Ubuntu 18.04
- JDK Installation Instructions for Windows
- Installing the Oracle JDK
- Установка Java JDK (Java Development Kit) в Windows 10
- Managing Java
- Setting the JAVA_HOME Environment Variable
- Status: Deprecated
- Exploring Other Versions of JDKs
- Instalando o JRE/JDK padrão
- JRE Installation Instructions for Windows
- Installation de Oracle JDK
- Overview
Установка Java 8 в Ubuntu 18.04
1. Как установить OpenJDK в Ubuntu
Если вы хотите установить OpenJDK в Ubutnu, то никаких сторонних репозиториев вам не нужно. Восьмая версия платформы есть в официальном репозитории Ubuntu 18.04. Чтобы установить jdk на Ubuntu используйте:

Для установки JRE в Ubuntu выполните:
После этого вы можете проверить версию Java:

2. Как установить Oracle Java в Ubuntu

Затем вас перенаправит на страницу входа, необходимо войти в свою учетную запись Oracle или создать новую, только после этого начнется загрузка выбранной версии. После завершения загрузки создайте папку /usr/lib/jvm/:
Затем распакуйте в неё полученный архив:
Добавьте исполняемый файл java к списку утилиты управления версиями:
Затем активируйте эту версию:

Некоторым приложениям нужен путь к исполняемым файлам Java в переменных окружения. Создайте файл /etc/profile.d/javajdk.sh со следующим содержимым:
Чтобы загрузить эти переменные выполните:
После этого проверьте правильность установки, посмотрев версию:

JDK Installation Instructions for Windows
You run a self-installing executable file to unpack and install the JDK on Windows computers.
Install JDK on Windows computers by performing the actions described in the following topics:
Downloading the JDK Installer
In a browser, go to the Java SE Development Kit 10 Downloads page and click Accept License Agreement. Under the Download menu, click the Download link that corresponds to the for your version of Windows.
Download the file .
Note:
Verify the successful completion of file download by comparing the file size on the download page and your local drive.
Running the JDK Installer
You must have administrator privilage to install the JDK on Microsoft Windows.
To run the JDK installer:
- Start the JDK 10 installer by double-clicking the installer’s icon or file name in the download location.
-
Follow the instructions provided by the Installation wizard.
The JDK includes the JavaFX SDK, a private JRE, and the Java Mission Control tools suite. The installer integrates the JavaFX SDK into the JDK installation directory. - After the installation is complete, delete the downloaded file to recover the disk space.
Installing the JDK Silently
Instead of double-clicking or opening the JDK installer, you can perform a silent, noninteractive, JDK installation by using command-line arguments.
The following table lists example installation scenarios and the commands required to perform them. The notation jdk stands for the downloaded installer file base name, such as .
Installing the Oracle JDK
If you want to install the Oracle JDK, which is the official version distributed by Oracle, you will need to follow a few more steps.
First, add Oracle’s PPA, then update your package repository.
Then, depending on the version you want to install, execute one of the following commands:
Oracle JDK 8
This is the latest stable version of Java at time of writing, and the recommended version to install. You can do so using the following command:
Oracle JDK 9
This is a developer preview and the general release is scheduled for March 2017. It’s not recommended that you use this version because there may still be security issues and bugs. There is more information about Java 9 on the official JDK 9 website.
To install JDK 9, use the following command:
Установка Java JDK (Java Development Kit) в Windows 10
Java Development Kit (сокр. JDK) – комплект разработки приложений для работы с языком программирования java. Включает в себя: интерпретатор, облегченный интерпретатор jre, компилятор, отладчик, java библиотеки классов, программу сбора документации, диcассемблер, программу архивации и сжатия jar.
Устанавливать Java JDK будем в 3 этапа:
- Загрузка с сайта пакета JDK (Java Development Kit)
- Установка JDK (Java Development Kit)
- Настройка переменных окружения
1. Загрузка с сайта пакета JDK (Java Development Kit)
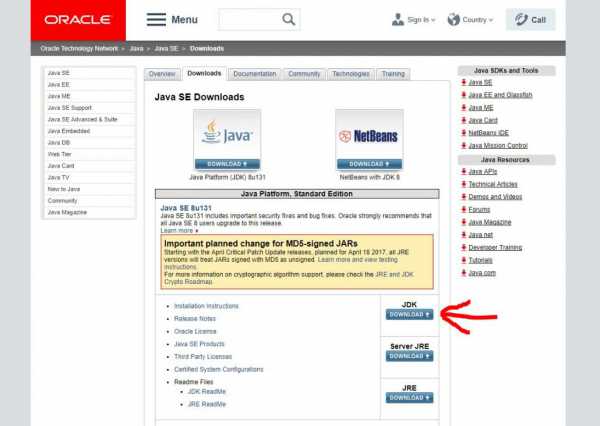
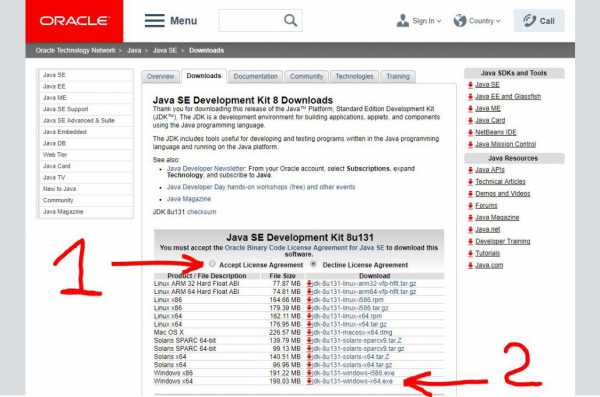
На следующей странице нужно согласится с условиями и загрузить пакет соответствующий нашей ОС. В моём случае это 64-разрядная Windows 10.
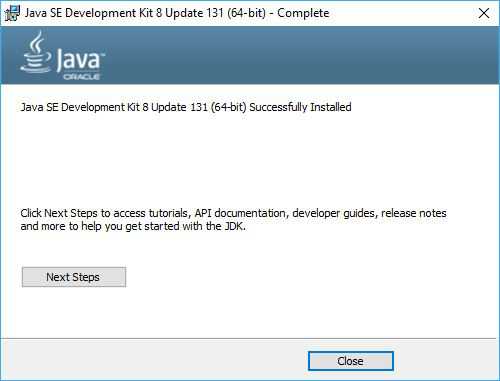
Запускаем установщик с правами администратора и устанавливаем всё по умолчанию, ничего не меняя в процессе.
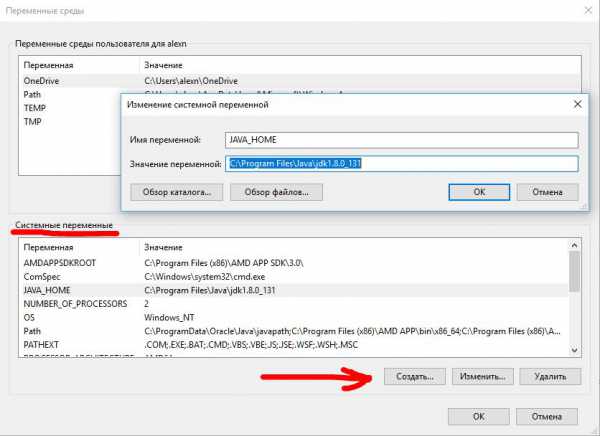
3. Настройка переменных окружения
Инсталлятор Java не выполняет настройку переменных окружения, поэтому придётся нам это делать вручную после установки.
JAVA_HOME — переменная, указывающая на директорию, в которую установлена Java. Программы её используют чтобы определить, где установлена Java.
Для этого комбинацией клавиш Win+R открываем окно «Выполнить«. Набираем команду: «control /name microsoft.system« без кавычек.
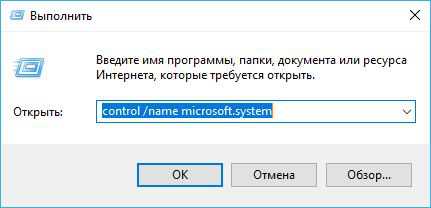
Затем нужно выбрать «Дополнительные параметры системы» и в открывшемся окне «Свойства системы» нажимаем кнопку «Переменные среды«. Если Вы ничего не меняли при установке JDK, то путь будет таким: «C:\Program Files\Java\jdkНомерВерсии».
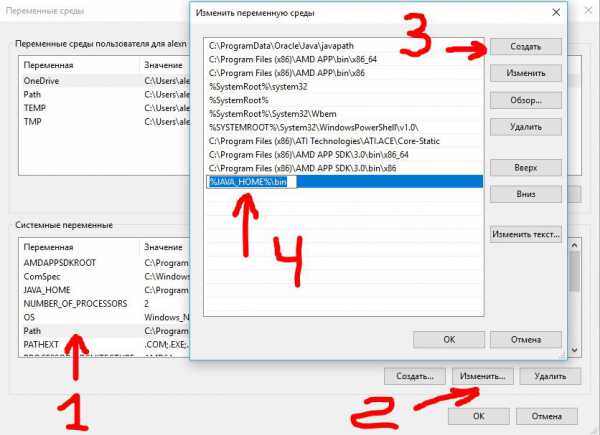
Далее необходимо отредактировать значение переменной PATH, добавив туда путь к директории, где находятся исполняемые файлы Java, то есть
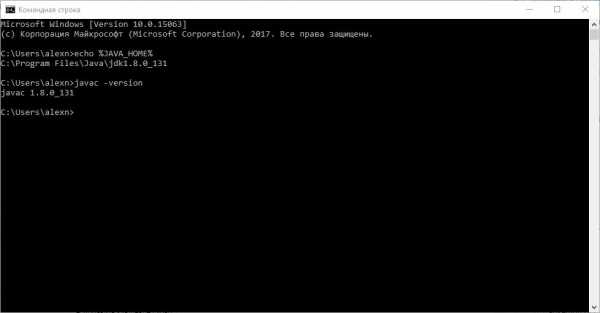
4. Тест конфигурации
Открываем командную строку и вводим:
Выводит директорию где установлено Java JDK.
Выведет версию java-компилятора, если переменная PATH установлена правильно.
Managing Java
There can be multiple Java installations on one server. You can configure which version is the default for use in the command line by using , which manages which symbolic links are used for different commands.
The output will look something like the following. In this case, this is what the output will look like with all Java versions mentioned above installed.
Output
You can now choose the number to use as a default. This can also be done for other Java commands, such as the compiler (), the documentation generator (), the JAR signing tool (), and more. You can use the following command, filling in the command you want to customize.
Setting the JAVA_HOME Environment Variable
Many programs, such as Java servers, use the environment variable to determine the Java installation location. To set this environment variable, we will first need to find out where Java is installed. You can do this by executing the same command as in the previous section:
Copy the path from your preferred installation and then open using or your favorite text editor.
At the end of this file, add the following line, making sure to replace the highlighted path with your own copied path.
/etc/environment
Save and exit the file, and reload it.
You can now test whether the environment variable has been set by executing the following command:
This will return the path you just set.
Status: Deprecated
This article is deprecated and no longer maintained.
See Instead
This article may still be useful as a reference, but may not follow best practices or work on this or other Ubuntu releases. We strongly recommend using a recent article written for the version of Ubuntu you are using.
- How To Install Java with Apt-Get on Ubuntu 16.04
- How To Install Java with Apt-Get on Debian 8
If you are currently operating a server running Ubuntu 12.04, we highly recommend upgrading or migrating to a supported version of Ubuntu:
- How to upgrade from Ubuntu 12.04 to Ubuntu 14.04.
- How to upgrade from Ubuntu 14.04 to Ubuntu 16.04
- How to migrate server data to a supported version
Exploring Other Versions of JDKs
The examples in sections 2 and 3 reflect the current status on Ubuntu 18.04 LTS. Keep in mind that the JDKs and the corresponding packages are updated regularly. Thus it’s useful to know how to explore our current possibilities.
In this section, we’ll focus on surveying the OpenJDK packages in the “Main” repository. If we’ve already added a PPA with add-apt-repository, we can explore it in a similar manner with apt list and apt show.
To discover which PPAs are available, we can head to https://launchpad.net/. If we don’t find what we’re looking for in the “Main” repository and in the PPAs, we’ll have to fall back to manual installation.
If we’d like to use an unsupported version, even that can be difficult. As of this writing, we didn’t find any packages for Java 9 or Java 10 on the OpenJDK and Oracle websites.
Let’s see which other JDK packages exist in the “Main” repository:
On Ubuntu 18.04 LTS, we can choose between the two current LTS Java versions:
It’s also worth noting that although the package is called openjdk-11-jdk, as of this writing, it actually installs version 10.0.2. This is likely to change soon. We can see that if we inspect the package:
Let’s have a look at the “Depends” section of the output. Note that these packages (e.g. a JRE) also get installed alongside openjdk-11-jdk:
Let’s explore which other packages we have at our disposal besides the default jdk package:
We may find some of these packages useful. For example, openjdk-11-source contains source files for the classes of the Java core API, while openjdk-11-dbg contains the debugging symbols.
Besides the openjdk-* family, there’s the default-jdk package, that is worth exploring:
At the end of the output, the description says:
In the case of Ubuntu 18.04 LTS, it’s the package openjdk-11-jdk at the moment.
Instalando o JRE/JDK padrão
A opção mais fácil de instalação do Java é utilizar a versão empacotada com o Ubuntu. Especificamente, isso irá instalar o OpenJDK 8, a versão mais recente e recomendada.
Primeiro, atualize o índice de pacotes.
Depois, instale o Java. Especificamente, esse comando irá instalar o Java Runtime Environment (JRE).
Existe uma outra instalação padrão do Java chamada de JDK (Java Development Kit). O JDK é normalmente necessário somente se você vai compilar programas em Java ou se o software que usa o Java o requerer especificamente.
O JDK contém o JRE, portanto, não há desvantagens se você instalar o JDK em vez do JRE, exceto pelo tamanho maior de arquivo.
Você pode instalar o JDK com o seguinte comando:
JRE Installation Instructions for Windows
When installing JRE on Windows computers, you must select the JRE installer that is appropriate for your Windows system.
The 64-bit Windows operating systems come with a 64-bit Internet Explorer (IE) browser as the standard (default) for viewing web pages.
Install JRE on Windows computers by performing the actions described in the following topics:
JRE Proxy Settings and Authentication
To use the Windows Online Installer, you must be connected to the internet.
If you are running behind a proxy server, then you must have your proxy settings correctly configured. If they are not configured, or are incorrectly configured, then the installer will terminate with the following message:
The installer cannot proceed with the current Internet Connection settings.
Please visit the following website for more information.
If you see this message, check your proxy settings:
In the Control Panel , double-click Internet Options, select the Connections tab, and click the LAN Settings.
If you do not know what the correct settings should be, check with your internet provider or system administrator.
Downloading the JRE Installer
The JRE Installer is located on the Java SE Runtime Environment 10 Downloads page.
-
In a browser, go to the Java SE Runtime Environment 10 Downloads page.
The following JRE installers are available for you to download:
-
Windows Offline:
-
Windows Tar:
-
-
Download the JRE installer according to your requirement.
Note:
The Windows Offline installer and Windows installer contains everything that is required to install the JRE.
The Microsoft Windows Installer (MSI) Enterprise JRE Installer is also available, which enables you to install the JRE across your enterprise. It requires a commercial license for use in production.
- Click Accept License Agreement, and then, under the Download menu, click the link that corresponds to the installer for your version of Windows.
- Note the file size specified on the download page and, after the download has completed, verify that you have downloaded the complete file.
Installation de Oracle JDK
Si vous souhaitez installer Oracle JDK, la version officielle distribuée par Oracle, vous devrez ajouter un nouveau référentiel de packages pour la version que vous souhaitez utiliser.
Pour installer Java 8, la dernière version LTS, il faut d’abord ajouter son référentiel de packages :
Lorsque vous ajoutez le référentiel, vous verrez un message comme celui-ci :
Appuyez sur (ENTRÉE) pour continuer. Mettez ensuite à jour votre liste de packages :
Une fois la liste des packages mise à jour, installez Java 8 :
Votre système téléchargera le JDK depuis Oracle et vous demandera d’accepter le contrat de licence. Acceptez le contrat et le JDK s’installera.
Voyons maintenant comment sélectionner la version de Java que vous souhaitez utiliser.
Overview
In this tutorial, we’ll introduce different methods for installing a JDK on Ubuntu. Then, we’ll briefly compare the methods. Finally, we’ll show how to manage multiple Java installations on an Ubuntu system.
As a prerequisite to each method, we need
- an Ubuntu system
- to be logged in as a non-root user with sudo privileges
The instructions described below have been tested on Ubuntu 18.10, 18.04 LTS, 16.04 LTS, and 14.04 LTS. For Ubuntu 14.04 LTS, there’re some differences, which are mentioned in the text.
Please note that both the packages you can download from OpenJDK and Oracle and the packages available in repositories are updated regularly. The exact package names will probably change within some months, but the basic methods of installation will remain the same.


