If you’re still using ifconfig, you’re living in the past
Содержание:
Technical description
ifconfig is used to configure the system’s kernel-resident network interfaces. It is used at boot time to set up interfaces as necessary. After that, it is usually only needed when debugging, or when system tuning is needed.
If no arguments are given, ifconfig displays the status of the system’s active interfaces.
If a single interface argument is given, it displays the status of the given interface only.
If a single -a argument is given, it displays the status of all interfaces, even those that are «down» (inactive).
In all other cases, ifconfig configures an interface according to the options provided.
About address families
If the first argument after the interface name is recognized as the name of a supported address family, that address family is used for decoding and displaying all protocol addresses. Currently supported address families include inet (TCP/IP; this is the default), inet6 (IPv6), ax25 (AMPR Packet Radio), ddp (Appletalk Phase 2), ipx (Novell IPX) and netrom (AMPR Packet Radio).
Network init script config
Into /etc/modules add line:
8021q
In /etc/network/interfaces to section iface add parameter:
vlan-raw-device eth0
The interface name should be the raw interface name (the same as specified by vlan-raw-device), then a dot, then the VLAN ID, for example eth0.100. It can instead be «vlan» then the VLAN ID, for example vlan100. In either case, the VLAN ID is on the end, and this is the only place that it is configured.
Note: If you name your VLAN interfaces ethX.YYY, then there is no need to specify the vlan-raw-device, as the raw device can be retrieved from the interface name.
Eg:
auto eth0.222
iface eth0.222 inet static
        address 10.10.10.1/24
        vlan-raw-device eth0
Примеры использования
В каждой ОС утилита ifconfig может иметь свои особенности, прежде чем ее использовать нужно ознакомиться с документацией по вашей ОС. Выполнив команду:
# man 8 ifconfig
Запуск без ключей — выводит информацию по всем сетевым интерфейсам.
Linux:
# ifconfig eth0 -выведет информацию только для интерфейса eth0
BSD-UNIX-UNIX:
# ifconfig rl0 -выведет информацию только для интерфейса rl0
Поднять/опустить интерфейс
Linux: Интерфейс исчезает. Команда ifconfig перестает его показывать.
# ifup eth0 - поднять интерфейс eth0
# ifdown eth0 - опустить интерфейс eth0
BSD-UNIX-UNIX:
Переключается флаг UP.
# ifconfig rl0 up - поднять интерфейс rl0
# ifconfig rl0 down - опустить интерфейс rl0
- ifconfig em0 delete — удаляет все IP с интерфейса em0
- Задание скорости и дуплекса для сетевых интерфейсов, например для em0. media – задает скорость mediaopt – задает дуплекс
> ifconfig em0 media 1000baseTX mediaopt full-duplex # ручной режим из командной строки. Принудительно поставим 100baseTX и full-duplex на сетевой карте с именем em0
ifconfig_em0="media 100baseTX mediaopt full-duplex" # тоже, но только через rc.conf
> ifconfig em0 media 1000baseTX mediaopt full-duplex # ручной режим. Принудительно поставим 1000baseTX (гигабит) и full-duplex
Изменить hostname (имя хоста)
Во время установки debian вы указывали имя хоста. Посмотреть его текущее значение можно в консоли:
Это значение записано в файле /etc/hostname. Есть 2 способа изменить hostname в debian:
- Простой и быстрый с помощью консольной команды. Результат работает только до перезагрузки компьютера. Потом вернется старое имя.
- С помощью изменения конфигурационного файла результат сохраняется и после перезагрузки. Чтобы сразу применить изменение, потребуется выполнить системный скрипт.
Для первого способа достаточно в консоли ввести команду:
Теперь проверим, что получилось:
Имя хоста изменилось, но в файле /etc/hostname по-прежнему указано прошлое значение. После перезагрузки hostname снова примет старое значение debian. Чтобы сделать постоянное изменение, необходимо ввести новое значение в файл вручную:
Изменение вступит в силу после перезагрузки. Если воспользоваться командой:
то изменения применятся сразу же. Этот способ более правильный, рекомендую использовать именно его. Теперь проверьте текущее значение имени хоста. Оно изменится на то, что вы указали в команде.
Options
A
number of options can be specified with the ifconfig
command to change its behavior:
- -aThis
option tells ifconfig to show
information about all interfaces, both active and inactive. On erebus, ifconfig
-a
returns results for eth0, lo, and sit0. - -sThis is the
«short listing» option, which shows a one-line summarized
listing of data about each interface. The information returned is about
interface activity, and not configuration. The output will be identical to
what is returned by the netstat -i command. - -vThis
«verbose» option returns extra information when there are
certain types of error conditions to help with troubleshooting. - Simply
follow up your ifconfig command
with the name of an interface to get only information about that interface.
For instance, you could issue the command ifconfig eth0 if you only wanted information about the eth0
interface, and not the loopback interface. Additionally, there are several
options that require specifying the interface you wish to configure or get
information about. - upThis
activates an interface if it is not already active. For instance, ifconfig eth0 up causes eth0 to be activated. - downThe
counterpart to up, this deactivates the specified interface. Thus, ifconfig eth0 down causes eth0 to be deactivated if it is currently
active. - netmask Using the
«netmask» option allows you to set the
network mask for a given interface. For instance, setting the network mask
for eth0 could be done by entering ifconfig eth0 netmask 255.255.255.0. - broadcast When the
«broadcast» option is accompanied by an address argument, as in ifconfig eth0 broadcast 192.168.2.255, then the broadcast address
for the specified interface will be set. - Simply
specifying an address with an interface name, as in ifconfig eth0 192.168.2.103, will set that interface’s IP
address.
Как отключить IPv6 в CentOS?
На время написания статьи активного использования ipv6 в России нет, да и зачастую если таковая возможность имеется, администраторы предпочитают протокол ipv4. Поэтому если вы все же не используете данный протокол, его нужно отключить на сервере. Если вы точно уверены, что ни один из сервисов не настроен под работу с ipv6, можете сразу перейти к настройке сетевого интерфейса, если же нет, то начните с проверки. Нам нужно проверить, какие сервисы используют ipv6 и отключить данный протокол в конфигурации сервиса. Запустим команду:

У меня сервер тестовый, поэтому ipv6 используется только для sshd и cronyd. Это можно определить по “:::”.
Чтобы не возникало проблем после отключения ipv6 в конфигурации сети, отключите данный протокол в сервисах, в которых они используются на вашем сервере. Например для sshd, нужно открыть конфигурационный файл:
И раскомментируйте строки:
#AddressFamily any
#ListenAddress 0.0.0.0
После чего перезапустите сервис:

Как видим, для sshd протокол ipv6 теперь недоступен. Проделайте аналогичные настройки со всеми сервисами.
Перейдем к отключению протокола ipv6 в настройках сети. Откройте файл /etc/sysctl.conf:
И добавьте туда следующие строки:
net.ipv6.conf.all.disable_ipv6 = 1
net.ipv6.conf.default.disable_ipv6 = 1
Сохраните файл и примените через:
net.ipv6.conf.all.disable_ipv6 = 1
net.ipv6.conf.default.disable_ipv6 = 1
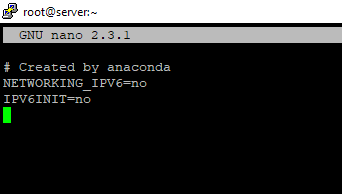
Перейдем к файлу /etc/sysconfig/network. Добавьте в него следующую конфигурацию:
NETWORKING_IPV6=no
IPV6INIT=no
Из файла конфигурации сетевого интерфейса /etc/sysconfig/network-scripts/ifcfg-eth0 удалите строку:
IPV6INIT="yes"
И наконец добавим запрет на работу ipv6 в grub:
В конец строки GRUB_CMDLINE_LINUX, добавляем:
ipv6.disable=1

После всех настроек, сохраните файл и обновите grub:
Выполните перезагрузку сервера и проверьте конфигурацию сети:
eth0: flags=4163<UP,BROADCAST,RUNNING,MULTICAST> mtu 1500
inet 185.*.*.* netmask 255.255.255.0 broadcast 185.*.*.255
ether 52:54:00:d3:1c:3e txqueuelen 1000 (Ethernet)
RX packets 10068 bytes 613092 (598.7 KiB)
RX errors 0 dropped 0 overruns 0 frame 0
TX packets 32 bytes 5399 (5.2 KiB)
TX errors 0 dropped 0 overruns 0 carrier 0 collisions 0
lo: flags=73<UP,LOOPBACK,RUNNING> mtu 65536
inet 127.0.0.1 netmask 255.0.0.0
loop txqueuelen 1000 (Local Loopback)
RX packets 0 bytes 0 (0.0 B)
RX errors 0 dropped 0 overruns 0 frame 0
TX packets 0 bytes 0 (0.0 B)
TX errors 0 dropped 0 overruns 0 carrier 0 collisions 0
Протокол ipv6 на сервере отключен.
How to set the MTU (Max transfer unit / packet size) with VLANS over a bonded interface
MTU needs to be configured on the bonding interface and slave interfaces after the reset of the configuration has been applied to the bonding interfaces. This is done using a post-up line in the bonding interface configuration.
auto bond0
iface bond0 inet manual
        up ifconfig lacptrunk0 0.0.0.0 up
        slaves eth0 eth1
# bond-mode 4 = 802.3ad
        bond-mode 4
        bond-miimon 100
        bond-downdelay 200
        bond-updelay 200
        bond-lacp-rate 1
        bond-xmit-hash-policy layer2+3
        post-up ifconfig eth0 mtu 9000 && ifconfig eth1 mtu 9000 && ifconfig bond0 mtu 9000

#vlan devices will use the MTU set on bond0 device
auto vlan101
iface vlan101 inet static

        address 10.101.60.123/24
        gateway 10.155.60.1
        vlan-raw-device bond0

auto vlan151
iface vlan151 inet static

        address 192.168.1.1/24
        vlan-raw-device bond0
Multiple IP addresses on one Interface
Interface aliasing allows one interface to have multiple IP addresses. This is useful when more than one server is to be visible via the Internet. Note that virtual hosts can support multiple Apache servers with a single IP address. Apache responds to the domain name supplied by the client in the HTTP header. In many other situations, one external IP is needed for each server using a port.
Базовая настройка сети
Смотрим все установленные сетевые адаптеры в системе:
ip a
В результате получаем что-то подобное:
1: lo: <LOOPBACK,UP,LOWER_UP> mtu 65536 qdisc noqueue state UNKNOWN
link/loopback 00:00:00:00:00:00 brd 00:00:00:00:00:00
inet 127.0.0.1/8 scope host lo
valid_lft forever preferred_lft forever
2: ens32: <BROADCAST,MULTICAST,UP,LOWER_UP> mtu 1500 qdisc pfifo_fast state UP qlen 1000
link/ether 00:50:56:81:28:3c brd ff:ff:ff:ff:ff:ff
inet 192.168.156.22/22 brd 192.168.159.255 scope global ens32
valid_lft forever preferred_lft forever
3: ens34: <BROADCAST,MULTICAST,UP,LOWER_UP> mtu 1500 qdisc pfifo_fast state UP qlen 1000
link/ether 00:50:56:81:3f:22 brd ff:ff:ff:ff:ff:ff
inet 10.243.254.68/26 brd 10.243.254.127 scope global ens34
valid_lft forever preferred_lft forever
* Из примера видно, что в моем CentOS есть 3 сетевых карты — lo (локальная петля), ens32 и ens34 — сетевые Ethernet адаптеры.
Если нужно настроить сеть для адаптера ens32, открываем на редактирование следующий конфигурационный файл:
vi /etc/sysconfig/network-scripts/ifcfg-ens32
И приводим его к следующему виду:
DEVICE=ens32
BOOTPROTO=static
IPADDR=192.168.0.155
NETMASK=255.255.255.0
GATEWAY=192.168.0.1
DNS1=192.168.0.54
DNS2=192.168.0.11
ONBOOT=yes
… а также для CentOS 8 добавим:
NM_CONTROLLED=yes
Основные опции
| Опция | Описание | Возможные значения |
|---|---|---|
| DEVICE | Имя сетевого адаптера | Должно совпадать с именем в системе. В данном примере ens32 |
| BOOTPROTO | способ назначения IP-адреса | static: ручное назначение IP, dhcp: автоматическое получение IP |
| IPADDR | IP-адрес | адрес, соответствующий вашей сети |
| NETMASK | Сетевая маска | должна соответствовать вашей сети |
| GATEWAY | Шлюз по умолчанию | IP-адрес сетевого шлюза |
| DNS1 | Основной DNS-сервер | IP-адрес сервера имен |
| DNS2 | Альтернативный DNS-сервер | IP-адрес сервера имен |
| ONBOOT | Способ запуска сетевого интерфейса | yes: автоматически при старте сервера, no: запускать вручную командой |
| NM_CONTROLLED | Указываем, должен ли интерфейс управляться с помощью NetworkManager | yes: управляется NetworkManager, no: не может управляться NetworkManager |
Чтобы настройки применились, перезапускаем сетевую службу.
а) для CentOS 7:
systemctl restart network
б) для CentOS 8 вводим 2 команды:
systemctl restart NetworkManager
nmcli networking off; nmcli networking on
* в большей степени, это основное отличие версий 7 и 8. Чтобы команды смогли поменять настройки, для интерфейсов необходима настройка NM_CONTROLLED=yes.
Дополнительные опции (не обязательны для работы сети)
| Опция | Описание | Возможные значения |
|---|---|---|
| IPV4_FAILURE_FATAL | Отключение сетевого интерфейса, если IP-адрес (v4) имеет неверную конфигурацию | yes: отключать, no: не отключать |
| IPV6_FAILURE_FATAL | Отключение сетевого интерфейса, если IP-адрес (v6) имеет неверную конфигурацию | yes: отключать, no: не отключать |
| IPV6_AUTOCONF | Разрешает или запрещает автоконфигурирование IPv6 с помощью протокола Neighbor Discovery | yes: разрешить автоконфигурирование, no: запретить |
| IPV6INIT | Говорит о возможности использовать сетевой интерфейс для адресации IPv6 | yes: адресация может использоваться, no: не используется |
| PEERROUTES | Задает приоритет настройки шлюза по умолчанию, полученного от DHCP | yes: маршрут от DHCP важнее, чем назначенный вручную, no: важнее маршрут, заданный вручную |
| IPV6_PEERROUTES | Задает приоритет настройки шлюза по умолчанию, полученного от DHCP (для IPv6) | |
| UUID | Уникальный идентификатор сетевого интерфейса. Его можно сгенерировать самостоятельно командой uuidgen | Строка из 32-х символов в формате 8-4-4-4-12. Например: fca8cc84-6f21-4bac-9ccb-36f281321ba4 |
Примеры
# ifconfig eth0 inet 192.168.10.15 netmask 255.255.255.0
# ifconfig eth0 up
# ifconfig
eth0      Link encap:Ethernet  HWaddr 00:18:F3:BE:18:1E
          inet addr:192.168.10.15  Bcast:192.168.10.255  Mask:255.255.255.0
          inet6 addr: fe80::218:f3ff:febe:181e/64 Scope:Link
          UP BROADCAST RUNNING MULTICAST  MTU:1500  Metric:1
          RX packets:39456 errors:0 dropped:0 overruns:0 frame:0
          TX packets:45730 errors:0 dropped:0 overruns:0 carrier:0
          collisions:0 txqueuelen:1000
          RX bytes:25457904 (24.2 Mb)  TX bytes:6540945 (6.2 Mb)
          Interrupt:20

lo        Link encap:Local Loopback
          inet addr:127.0.0.1  Mask:255.0.0.0
          inet6 addr: ::1/128 Scope:Host
          UP LOOPBACK RUNNING  MTU:16436  Metric:1
          RX packets:182 errors:0 dropped:0 overruns:0 frame:0
          TX packets:182 errors:0 dropped:0 overruns:0 carrier:0
          collisions:0 txqueuelen:0
          RX bytes:12812 (12.5 Kb)  TX bytes:12812 (12.5 Kb)

#
Настройка сети из консоли (командами)
Настройка из консоли будет работать только до перезагрузки системы. Ее удобно применять для временного конфигурирования или проведения тестов.
Назначение IP-адреса или добавление дополнительного к имеющемуся:
ip a add 192.168.0.156/24 dev ens32
* в данном примере к сетевому интерфейсу ens32 будет добавлен IP 192.168.0.156.
Изменение IP-адреса:
ip a change 192.168.0.157/24 dev ens32
* однако, по факту, команда отработает также, как add.
Удаление адреса:
ip a del 192.168.163.157/24 dev ens32
Добавление маршрута по умолчанию:
ip r add default via 192.168.0.1
Добавление статического маршрута:
ip r add 192.168.1.0/24 via 192.168.0.18
Удаление маршрутов:
ip r del default via 192.168.160.1
ip r del 192.168.1.0/24 via 192.168.0.18
Подробнее про управление маршрутами в CentOS.
DNS configuration for NetworkManager
NetworkManager will override dhcp settings, overwriting resolv.conf even if you’ve configured DNS in /etc/dhcp/dhclient.conf, e.g. causing DNS to first search the local domain, which may have to time out before DNS resolution continues causing lengthy DNS resolution times. You can get an idea of what NetworkManager thinks the settings should be by executing nm-tool at the command line.
You may configure these settings using a GUI by launching nm-connection-editor which currently (13.11.23) isn’t to be found in System Tools → Administration menu, rather it must be launched by hand from the command line. After launching:
- Choose a connection (from the Wired or Wireless tab) and click Edit.
- Click on the IPv4 Settings tab
- Choose ‘Automatic (DHCP) addresses only’ instead of just ‘Automatic (DHCP)’.
- Enter the DNS servers in the “DNS servers” field, separated by spaces (e.g. 208.67.222.222 for OpenDNS).
- Click “Apply.”
NetworkManager saves these settings in /etc/NetworkManager/system-connections/name-of-connection. Example /etc/NetworkManager/system-connections/Wired connection 1 :
duplex=full
mac-address=XX:XX:XX:XX:XX:XX


id=Wired connection 1
uuid=xxx-xxxxxx-xxxxxx-xxxxxx-xxx
type=802-3-ethernet
timestamp=1385213042


method=auto


method=auto
dns=208.67.222.222;
ignore-auto-dns=true
Running nm-tool again should show that NetworkManager now has the right idea of how your DNS should be resolved.
Parameters
Tip
For an extended description of these parameters and examples of each, see the .
|
essid |
Set the ESSID (or Network Name — in some products it may also be called Domain ID). |
|
nwid |
Set the Network ID. |
|
nick |
Set the nickname, or the station name. |
|
mode |
Set the operating mode of the device, which depends on the network topology. |
|
freq/channel |
Set the operating frequency or channel in the device. |
|
ap |
Force the card to register to the access point given by the address, if it is possible. |
|
rate/bit |
For cards supporting multiple bit rates, set the bitrate in b/s. |
|
txpower |
For cards supporting multiple transmit powers, sets the transmit power in dBm. |
|
sens |
Set the sensitivity threshold. This defines how sensitive is the card to poor operating conditions (low signal, interference). |
|
retry |
Set the maximum number of times the MAC can retry transmission. |
|
rts |
RTS/CTS adds a handshake before each packet transmission to make sure that the channel is clear. |
|
frag |
Sets the maximum fragment size, which is always lower than the maximum packet size. |
|
key/enc |
Used to manipulate encryption or scrambling keys and security mode. |
|
power |
Used to manipulate power management scheme parameters and mode. |
|
modu |
Force the card to use a specific set of modulations. |
|
commit |
Forces the card to apply all pending changes. |
Настройка vlan в Debian
Для настройки vlan в Debian первым делом необходимо установить пакет vlan:
Теперь нужно разобраться с необходимым модулем ядра для vlan — 8021q. Проверим, загружено ли оно в системе:
Если в выводе пусто, а по-умолчанию там будет пусто, модуль не загружен. Загрузим его и проверим:
Все в порядке, vlan модуль загрузился. Добавим его в автозагрузку:
Теперь этот модуль будет загружаться при старте сервера. Создадим виртуальный интерфейс с vlan с id 1500:
Назначим адрес новому интерфейсу и запустим его:
Можно в одну команду, с помощью ifconfig:
Смотрим, что получилось:

Мы выполнили настройку vlan интерфейса в Debian. Теперь сделаем так, чтобы после перезагрузки настройки сохранились. Для этого добавляем свойства vlan интерфейса в файл конфигурации сети, оставляя и не трогая то, что там уже есть:
Перезагрузите сервер и проверьте, что получилось. Можно выполнить перезапуск сети, но если вы до этого все вручную через консоль сделали, то не поймете, сработали настройки из файла или нет. Таким образом очень просто и быстро настроить vlan на сервере с Debian.
The resolvconf program
The resolvconf program keeps track of system information about the currently available nameservers. It should not be confused with the configuration file resolv.conf, which unfortunately has a nearly identical name. The resolvconf program is optional on a Debian system.
The configuration file resolv.conf contains information about the nameservers to be used by the system. However, when multiple programs need to dynamically modify the resolv.conf configuration file they can step on each other and the file can become out-of-sync. The resolvconf program addresses this problem. It acts as an intermediary between programs that supply nameserver information (e.g. dhcp clients) and programs that use nameserver information (e.g. resolver).
When resolvconf is properly installed, the resolv.conf configuration file at /etc/resolv.conf is replaced by a symbolic link to /etc/resolvconf/run/resolv.conf and the resolver instead uses the configuration file that is dynamically generated by resolvconf at /etc/resolvconf/run/resolv.conf.
The resolvconf program is generally only necessary when a system has multiple programs that need to dynamically modify the nameserver information. In a simple system where the nameservers do not change often or are only changed by one program, the resolv.conf configuration file is adequate.
If the resolvconf program is installed, you should not edit the resolv.conf configuration file manually as it will be dynamically changed by programs in the system. If you need to manually define the nameservers (as with a static interface), add a line something like the following to the interfaces configuration file at /etc/network/interfaces:
dns-nameservers 12.34.56.78 12.34.56.79
Place the line indented within an iface stanza, e.g., right after the gateway line. Enter the IP addresses of the nameservers you need to use after dns-nameservers. Put all of them on one line separated by spaces. Don’t forget the «s» on the end of dns-nameservers.
The resolvconf program is a fairly new addition to Debian and many older programs need to be updated or reconfigured to work properly with it. If you have problems, see /usr/share/doc/resolvconf/README. It has lots of information on making other programs get along with resolvconf.
OPTIONS
| interface | The name of the interface. This is usually a driver name followed by a unit number, for example eth0 for the first Ethernet interface. |
| down |
This flag causes the driver for this interface to be shut down. |
| arp | Enable or disable the use of the ARP protocol on this interface. |
| promisc | Enable or disable the promiscuous mode of the interface. If selected, all packets on the network will be received by the interface. |
| allmulti | Enable or disable all-multicast mode. If selected, all multicast packets on the network will be received by the interface. |
| metric N | This parameter sets the interface metric. It is not available under GNU/Linux. |
| mtu N | This parameter sets the Maximum Transfer Unit (MTU) of an interface. |
| dstaddr addr | Set the remote IP address for a point-to-point link (such as PPP). This keyword is now obsolete; use the pointopoint keyword instead. |
| netmask addr | Set the IP network mask for this interface. This value defaults to the usual class A, B or C network mask (as derived from the interface IP address), but it can be set to any value. . |
| add addr/prefixlen | Add an IPv6 address to an interface. |
| del addr/prefixlen | Remove an IPv6 address from an interface. |
| tunnel ::aa.bb.cc.dd | Create a new SIT (IPv6-in-IPv4) device, tunnelling to the given destination. |
| irq addr | Set the interrupt line used by this device. Not all devices can dynamically change their IRQ setting.. |
| io_addr addr | Set the start address in I/O space for this device.. |
| mem_start addr | TSet the start address for shared memory used by this device. Only a few devices need this.. |
| broadcast | If the address argument is given, set the protocol broadcast address for this interface. Otherwise, set (or clear) the IFF_BROADCAST flag for the interface.. |
| pointopoint | This keyword enables the point-to-point mode of an interface, meaning that it is a direct link between two machines with nobody else listening on it. |
| hw class address | Set the hardware address of this interface, if the device driver supports this operation. The keyword must be followed by the name of the hardware class and the printable ASCII equivalent of the hardware address. Hardware classes currently supported include ether (Ethernet), ax25 (AMPR AX.25), ARCnet and netrom (AMPR NET/ROM). |
| multicast | Set the multicast flag on the interface. This should not normally be needed as the drivers set the flag correctly themselves.. |
| address | The IP address to be assigned to this interface. |
| txqueuelen length | Set the length of the transmit queue of the device. It is useful to set this to small values for slower devices with a high latency (modem links, ISDN) to prevent fast bulk transfers from disturbing interactive traffic like telnet too much |
Примеры
# ifconfig eth0 inet 192.168.10.15 netmask 255.255.255.0
# ifconfig eth0 up
# ifconfig
eth0      Link encap:Ethernet  HWaddr 00:18:F3:BE:18:1E
          inet addr:192.168.10.15  Bcast:192.168.10.255  Mask:255.255.255.0
          inet6 addr: fe80::218:f3ff:febe:181e/64 Scope:Link
          UP BROADCAST RUNNING MULTICAST  MTU:1500  Metric:1
          RX packets:39456 errors:0 dropped:0 overruns:0 frame:0
          TX packets:45730 errors:0 dropped:0 overruns:0 carrier:0
          collisions:0 txqueuelen:1000
          RX bytes:25457904 (24.2 Mb)  TX bytes:6540945 (6.2 Mb)
          Interrupt:20

lo        Link encap:Local Loopback
          inet addr:127.0.0.1  Mask:255.0.0.0
          inet6 addr: ::1/128 Scope:Host
          UP LOOPBACK RUNNING  MTU:16436  Metric:1
          RX packets:182 errors:0 dropped:0 overruns:0 frame:0
          TX packets:182 errors:0 dropped:0 overruns:0 carrier:0
          collisions:0 txqueuelen:0
          RX bytes:12812 (12.5 Kb)  TX bytes:12812 (12.5 Kb)

#


