Все доступные на этом сайте плагины с кратким описанием
Содержание:
- SDR-RADIO V2 Setup Up Guide (Tested on Win XP and above)
- Aviation Band 8.33 Calculator.
- Server: Setting up SpyServer on Linux
- Next Steps
- Frequency and Bandwidth Hack
- SDR-приемник своими руками
- Next Steps
- Equipment Guide
- What dongle should I buy?
- Equipment Guide
- Программы для работы с SDR-приемниками
- Port Forwarding
- Server: Setting up SpyServer on Windows
- Other SDR Windows Software Compatible with RTL-SDR
- Getting Started on Linux
- Getting Started on OSX
- Conclusion
SDR-RADIO V2 Setup Up Guide (Tested on Win XP and above)
To install SDR-RADIO for the RTL-SDR follow the steps below
- Purchase an RTL-SDR dongle. The cheapest and best for most applications is the R820T/R820T2 dongle. Information on purchasing one can be found here.
- Plug in your dongle and do not install any of the software that it came with, but ensure you let plug and play finish trying to install it. If you’ve already installed the software drivers it came with previously, uninstall them first.
- Go to http://zadig.akeo.ie/ and download Zadig.
- In Zadig, go to Options->List All Devices and make sure this option is checked.
- Select «Bulk-In, Interface (Interface 0)» from the drop down list. Ensure that WinUSB is selected in the box next to where it says Driver. (Note on some PCs you may see something like RTL2832UHIDIR or RTL2832U instead of the bulk in interface. This is also a valid selection). (Do not select «USB Receiver (Interface 0)» however).
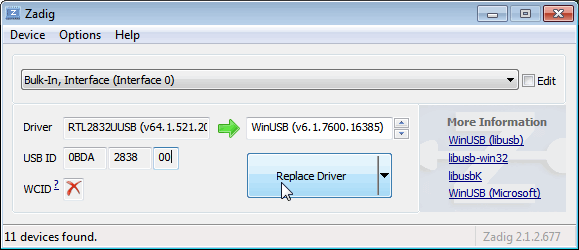
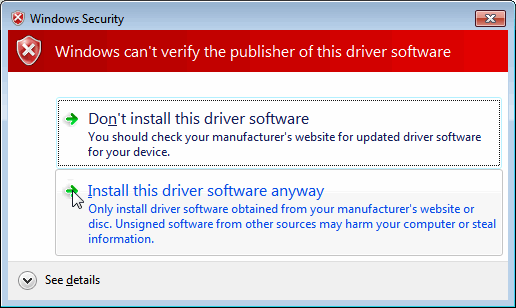
- Click Install Driver. You might get a warning that the publisher cannot be verified, but just accept it by clicking on Install this driver software anyway. This will install the drivers necessary to run the dongle as a software defined radio. Note that you may need to run zadig.exe again if you move the dongle to another USB port, or want to use two or more dongles together.
- Download the SDR-RADIO installer from http://v2.sdr-radio.com/Software/Download1.
- Use the installer to install SDR-RADIO.
- Download the RTL-SDR support package from the link at http://m3ghe.blogspot.com.au/p/adding-support-for-rtl-sdr-usb-dongles.html ().
- Extract the SDRSourceRTL2832U.dll, rtlsdr.dll and libusb-1.0.dll files from the x64 folder into the C:\Program Files\SDR-RADIO-PRO.com folder. Or if you have a 32-bit PC extract the files from the x32 folder into C:\Program Files (x86)\SDR-RADIO-PRO.com folder.
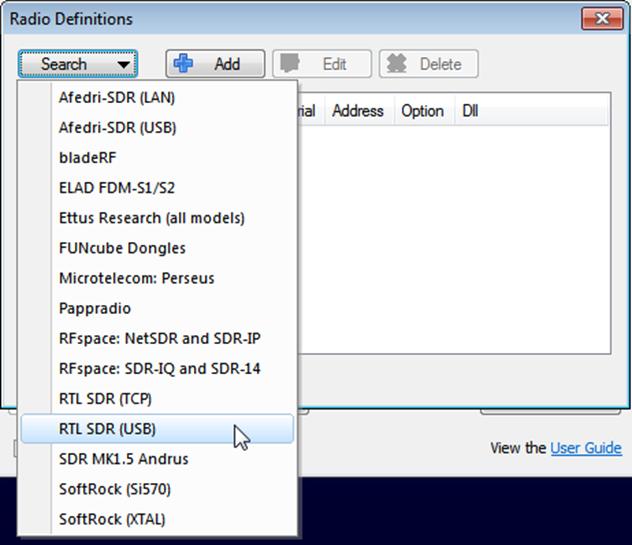
- Open SDR-RADIO. Upon opening it you will be greeted with the Select Radio screen and a prompt saying “List is empty – add radio definition now?” Click Yes. If this prompt does not display, click the + Definitions button.
- In the new window open the Search drop down menu and select RTL SDR (USB). After clicking it the RTL-SDR will be added to the Radio Definitions list. Click OK.

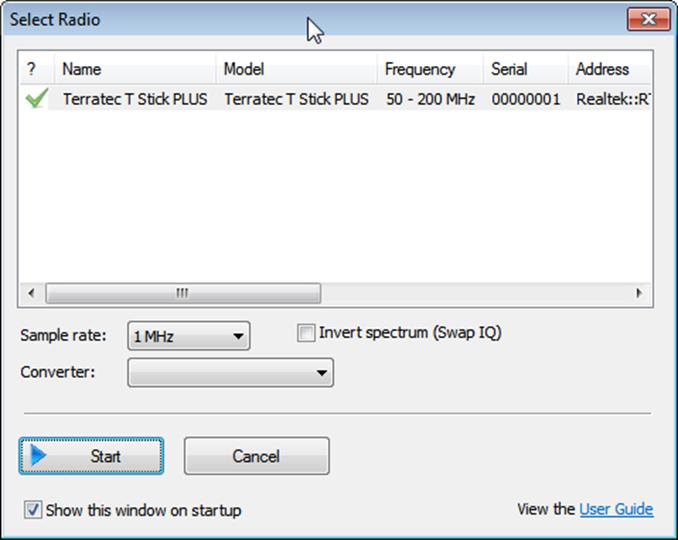
- Click on the RTL-SDR click to select it, choose your desired sample rate then click Start.
- Click on the Span button and adjust the span to the sample rate bandwidth you chose in the last step. This will let you see the whole spectrum.

- To change the receive mode use the left menu under the frequency tab. You can also change the signal bandwidth here. NFM signals are typically around 12 kHz wide and broadcast FM is typically around 192 kHz wide.
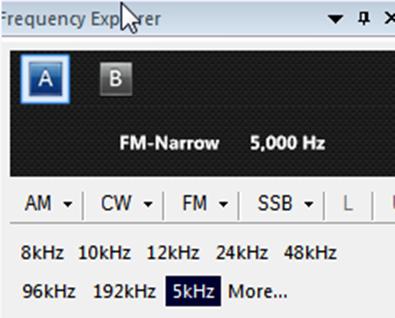
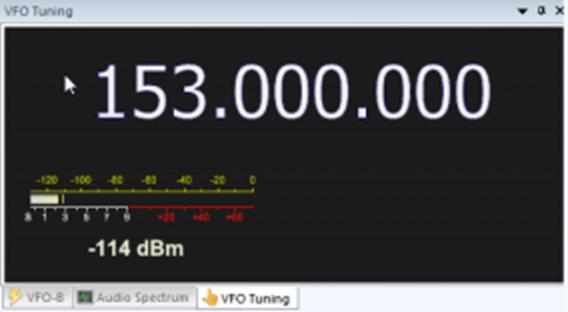
- To adjust the frequency, use the VFO tuning box on the right side. If you don’t see it you may need to click on the VFO tuning tab. Also if the screen is too small you may need to expand it’s size to show it. You can also click on the waterfall to instantly tune to the clicked frequency.
- Be sure to adjust the gain settings using the RF gain button in the top which is under the Home tab. By default it is set to automatic.
- Also to adjust the waterfall colors so that signals are more clearly seen go to the Display tab up the top and then click on the Automatic Calibration button on the very top right.
Aviation Band 8.33 Calculator.
При изменении настройки частоты передвижением спектра мышью влево / вправо … после остановки плагин автоматически калькулирует значение частоты … и, через секунду, заменяет текущее значение — на соответствующую авиационному стандарту, с интервалом между каналами 8,33 кГц … Если честно, то я ничего не слышал об этом интервале, да и побоку это как-то … Смущает другое … Автоподстройка не позволяет точно настроиться на частоту приема … Можно сказать, что это проблема подстройки приемника … Зашел, проверил на 105,0 FM — тютя в тютю … Так, что никакой полезности в этом плагине я не обнаружил … В интернете сообщают : » начиная с 1 января 2018 года разнос каналов 8,33 кГц (код оборудования Y) является обязательным в Европе для всех планов полетов » …

Server: Setting up SpyServer on Linux
- Log into the Linux device that you are using for the server, and open a terminal window if needed.
-
First install prerequisites such as the RTL-SDR drivers and librtlsdr.
sudo apt install rtl-sdr librtlsdr-dev
-
Create a new folder for the spyserver and navigate into it.
mkdir spyserver
cd spyserver
- Download the latest SpyServer and extract it using the commands below. NOTE: That you will need to download the correct version for the platform that you are using (e.g. 32 or 64-bit, ARM or x86). Go to airspy.com/download, and find the links for the SpyServer download that matches your platform. Replace the link below with it. The link used in this example is for the 32-bit ARM version which is what Raspberry Pi’s and most other single board PCsww like Odroids and Orange Pi’s use.
wget -O spyserver.tgz http://airspy.com/?ddownload=4247
tar xvzf spyserver.tgz
-
Use a text editor like nano to edit the spyserver.config file. Change the «device_type» to «device_type = RTL-SDR» (without quotes).
If you are unfamiliar with Nano, then note that you cannot use the mouse. You will need to use the arrow keys to move the cursor. Editing is done with the bakspace/del keys and keyboard keys as usual. To save and exit, Press «Ctrl + X», and then the «y» key.nano spyserver.config
- Find your device’s IP address using the «ifconfig» command. Note NOT «ipconfig» from windows, notice the «f». Write this IP address down as it is the address you’ll use to connect to the SpyServer.
-
Now you can run SpyServer
./spyserver
Note that if you get the error ‘./spyserver: /usr/lib/arm-linux-gnueabihf/libstdc++.so.6: version `GLIBCXX_3.4.21′ not found (required by ./spyserver)’, then you’ll need to install the newer GCC-5 or GCC-6.
To do this use the following steps:
- Type ‘sudo nano /etc/apt/sources.list’ and change the word ‘jessie’ to ‘stretch’. Save and close the file (Ctrl+X, Y)
- Type ‘sudo apt-get update’
- Type ‘sudo apt-get install gcc-5’ or if that is not found ‘sudo apt-get install gcc-6’
If you get error ‘W: There is no public key available for the following key IDs:EF0F382A1A7B6500’ after running ‘sudo apt-get update’, then first install the following with ‘sudo apt-get install debian-keyring debian-archive-keyring’
You’ll be asked a few questions during the install and all the defaults are fine. Installation will take about 20 minutes. Once upgraded you should be able to run ./spyserver.
Tip: Setting up a headless Raspberry Pi
If you’re setting up a Raspberry Pi as a server then you’re probably not going to be connecting it to a monitor. This is called a headless setup. You’ll also probably be using WiFi. This tip shows you how to enable SSH and enter the WiFi credentials on a Raspberry Pi without any monitor, keyboard or mouse. If you want you still can of course initially connect a monitor keyboard and mouse and set it up via the Raspbian GUI, or connect a network cable.
After writing the Raspbian image to the SD card, put it into a PC and open the boot drive partition in file explorer.
To enable SSH simply create an empty text file with the name ‘SSH’ in the root of the partition.
To allow a WiFi connection create a text file called ‘wpa_supplicant.conf’ in the root of the partition and fill it with the following text. NOTE: Make sure that it is not wpa_supplicant.conf.txt. You must set Windows to display the full file extension so you can change it to just wpa_supplicant.conf. This will set up a WiFi connection on boot and automatically connect it. (Only good for WPA2 secured systems)
Finally you’ll need to look in your routers status page to find the IP address of the Raspberry Pi. Usually the routers access page can be accessed at http://192.168.1.1 or 192.168.1.254, but this address is entirely dependent on your router set up. Consult your router manual or ISP for these details if you do not know them.
Next Steps
After getting your RTL-SDR set up with SDR# we recommend investigating the following:
- If you are using a RTL-SDR.com V3 dongle, view our V3 users guide to learn how to use the special features like HF direct sampling and the bias tee.
- Read our SDR# Users Guide to learn what each setting in SDR# does.
- Check out all our featured articles on this blog for various RTL-SDR related projects and tutorials.
- Upgrade from the stock antenna. For optimal reception you should use an outdoor roof mounted antenna. The optimal antenna will depend on the frequency and project you are interested in, but for a general all purpose antenna we recommend a Discone or planar disk antenna (pdf).
- If you are using your RTL-SDR for HF with direct sampling mode or an upconverter then we recommended using SDR# with the special decimation drivers. This will allow you to zoom in on the small bandwidth signals used on HF without loosing resolution.
- Check out our store for various RF accessories such as filters, LNA’s and antennas.
Frequency and Bandwidth Hack
Thanks to ‘rlwsdr’ and Alexandru Csete for bringing attention to this hack.
It seems that the current shipping version of the PlutoSDR uses the AD9363 chip which is restricted to a frequency range of 325 – 3800 MHz and bandwidth of 20 MHz. However, the higher end AD9364 chip which can support 70 MHz to 6000 MHz and 56 MHz of bandwidth is supposedly nearly identical to the AD9363 chip. The PlutoSDR can be tricked into seeing a AD9364 chip simply by changing a device string on the unit, but it’s not guaranteed to give the full tuning range and bandwidth for every single unit. It’s possible that the AD9363 chips are actually AD9364 chips that failed performance QC checks and have just been rebranded as a lower end model, or that a cheaper silicon process is used with the lower end chip.
The instructions for performing this hack are actually detailed by the official Analog.com PlutoSDR wiki on the customization page. Just search for the heading “Updating to the AD9364”. The instructions state that this is only for older PlutoSDR units which actually came with the AD9364 chip, but it seems to work with the newer PlutoSDR units that have the AD9363 chips as well.
Simply plug the PlutoSDR in, and connect to it via a serial connection. On Windows you can use a program like PuTTY for this purpose. First search in device manager for the COM port assigned to your PlutoSDR, and then input this into PuTTY leaving the speed at 9600. You can then log in and set the environment variables using the lines provided in the wiki. Now in GNU Radio, GQRX etc you should be able to tune down to 70 MHz and up to 6 GHz and set the bandwidth to 56 MHz.
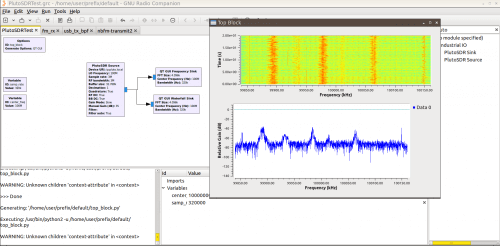
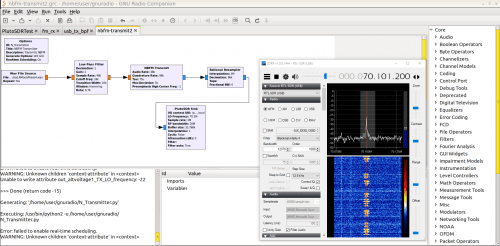
 PlutoSDR Upgrade instructions
The images below show the PlutoSDR serial connection screen and the commands you need to type, the PlutoSDR tuning down to broadcast FM frequencies at 100 MHz, and a TX test at 70.1 MHz. It was found that the strength of the TX is a bit lower outside the official range, but can be increased by turning off the attenuation setting.


SDR-приемник своими руками
Один из самых популярных SDR сегодня — это китайский RTL-SDR. Он обладает огромными возможностями для своей небольшой цены.
Схема RTL2832 + RT820 выглядит вот так.
Сигнал поступает на вход радиотракта, реализованного на RT820, где выполняется первое преобразование частоты в промежуточную, здесь 3,57 МГц. Зеркальный канал при этом подавляется фильтрами, насколько это возможно.
Такое решение позволяет покрыть огромный диапазон частот от нескольких десятков мегагерц до пары гигагерц. Не весь сразу, конечно, а только кусочками по несколько мегагерц (судя по документации, RTL2832 способен оцифровать и сигнал частотой в несколько десятков мегагерц, однако упирается в пропускную способность USB). На самом деле зачастую достаточно и этого.
Полученный сигнал ПЧ оцифровывается в RTL2832, после чего подвергается второму программному преобразованию частоты. Здесь уже используется квадратурный гетеродин, реализованный программно как скалярное произведение входящего сигнала на опорный. А в случае квадратурного гетеродина в качестве опорных использованы два сигнала с одной и той же частотой, но сдвинутые по фазе на π/2. На выходе смесителей стоят фильтры низкой частоты, которые фильтруют сигнал с удвоенной опорной частотой. В результате на выходе тоже имеем два сигнала: синфазный (I) и квадратурный (Q). Впрочем, названия до некоторой степени условны.
Сигналы в виде потока данных передаются по USB. Собственно, перед отправкой и происходит ресемплирование, когда скорость передачи понижается до примерно 2 Мвыб/с, в данной схеме это «бутылочное горлышко». Почему именно квадратурный гетеродин? Из теории цифровой обработки сигналов известно, что, имея только сигналы I и Q, можно декодировать сигнал с любым из существующих способов модуляции. Например, АМ-модуляция, на которой мы ниже и сосредоточимся, реализуется наиболее просто.
Если представить, что I — это действительная часть, а Q — мнимая часть комплексного сигнала Z, то и есть искомый демодулированный сигнал. C ЧМ и ФМ уже будет сложнее, но не принципиально. Впрочем, теория цифровой обработки сигналов слишком тяжела, чтобы пересказывать ее в двух словах, — при желании можешь почитать подробнее сам.
Дальше сигнал обрабатывает уже компьютер, где из отдельных семплов I и Q формируется комплексный семпл . Однако, как ты понимаешь, это тоже некоторая условность, позволяющая использовать математический аппарат комплексного исчисления к сигналу.
По существу, все это реализуется такими программными пакетами, как SDR# (Windows), Gqrx (Linux) или GNU radio (Linux). Последний нам наиболее интересен, так как позволяет не только пробежаться по диапазону, но и понять, как программная часть реализована внутри. И при этом вовсе не нужно залезать в дебри программирования, а можно при помощи мыши составить структурную схему (граф) из отдельных блоков. Блоки обычно реализуют одну операцию (в лучших традициях Unix). Вот так в GNU Radio выглядит простейший FM-приемник на RTL-SDR, созданный за пару минут.
Простейший пример
RTL-SDR выступает в роли источника, выдающего поток комплексных Z-значений, что равносильно обоим потокам I и Q. Далее сигнал попадает в цифровой фильтр низких частот ФНЧ, который вырезает интересующую нас полосу. Так как в данном случае ожидается частотная модуляция, то нам потребуется полоса в ~200 кГц, с центром в нуле, которому соответствует выставленная на RTL-SDR частота. Далее сигнал попадает на частотный детектор, на выходе которого получается реальный звуковой сигнал, подходящий для звуковой карты. Ресемплер нужен, чтобы согласовать битрейт сигнала. Итого — половина приемника всего в несколько кликов мышки!
Next Steps
After getting your RTL-SDR set up with SDR# we recommend investigating the following:
- If you are using a RTL-SDR.com V3 dongle, view our V3 users guide to learn how to use the special features like HF direct sampling and the bias tee.
- Read our SDR# Users Guide to learn what each setting in SDR# does.
- Check out all our featured articles on this blog for various RTL-SDR related projects and tutorials.
- Upgrade from the stock antenna. For optimal reception you should use an outdoor roof mounted antenna. The optimal antenna will depend on the frequency and project you are interested in, but for a general all purpose antenna we recommend a Discone or planar disk antenna (pdf).
- If you are using your RTL-SDR for HF with direct sampling mode or an upconverter then we recommended using SDR# with the special decimation drivers. This will allow you to zoom in on the small bandwidth signals used on HF without loosing resolution.
- Check out our store for various RF accessories such as filters, LNA’s and antennas.
Equipment Guide
Currently, the most common RTL-SDR dongle is the R820T/R820T2 which usually sells for around $20 USD. See the Buy RTL-SDR dongles page for more information on purchasing.
Generally at least a dual core processor will be required to run most SDR software smoothly. Some command line software and ADS-B decoders may work on less powerful hardware.
To get the most enjoyment out of RTL-SDR you will need a decent antenna. Our packages that come with the dipole antenna set are a great start. Be sure to get them up high and outside (during good weather only) for best results. Units not sold by us may come with a smaller fixed length whip antenna that is okay for testing, but overall is not that great. The most recommended outdoor antenna for general scanning is a discone due to their wide band receiving properties. You can also cheaply build a wideband planar disk antenna (pdf warning) out of some metal pizza pans.
What dongle should I buy?
The cheapest, most common and generally best performing dongle at the moment is the Rafael Micro R820T2. It can be bought for about $20 USD.
The Elonics E4000 used to be the most common, but Elonics has closed and ceased chip production, making the E4000 rarer and much more expensive these days. Note that there seems to be a misconception that the E4000 is better than the R820T2 because it costs more — this is not the case, the increased cost is only due to its rarity.
The R820T2 is generally regarded as having better performance and sensitivity for most interesting frequencies compared to the E4000. For ADS-B, the R820T2 is much more sensitive at 1090 MHz. There are now also the R820T2 dongles, which offer increased sensitivity over the R820T. For these reasons, the R820T2 is currently the recommended dongle, unless you need the higher frequencies that the E4000 provides and are willing to pay a premium price.
Be careful when buying a dongle as certain sellers tend to misrepresent their devices (knowingly or unknowingly) as having compatible tuners, when in fact they may send out a device with an incompatible tuner. Also be wary when buying E4000 dongles from auction sites as there are many dodgy sellers incorrectly advertising R820T2 dongles as the rare E4000.
See our RTL-SDR store page for more information about where to obtain dongles from reputable sources. We now sell our own «RTL-SDR Blog V3» dongles which come with several key improvements for the SDR crowd and we recommend these for users who want to mainly use their dongle for SDR.
Equipment Guide
Currently, the most common RTL-SDR dongle is the R820T/R820T2 which usually sells for around $20 USD. See the Buy RTL-SDR dongles page for more information on purchasing.
Generally at least a dual core processor will be required to run most SDR software smoothly. Some command line software and ADS-B decoders may work on less powerful hardware.
To get the most enjoyment out of RTL-SDR you will need a decent antenna. Our packages that come with the dipole antenna set are a great start. Be sure to get them up high and outside (during good weather only) for best results. Units not sold by us may come with a smaller fixed length whip antenna that is okay for testing, but overall is not that great. The most recommended outdoor antenna for general scanning is a discone due to their wide band receiving properties. You can also cheaply build a wideband planar disk antenna (pdf warning) out of some metal pizza pans.
Программы для работы с SDR-приемниками
Есть множество программ для работы с SDR-приемниками, однако сейчас все они ориентированы на работу с RTL-SDR и его более специализированными разновидностями, такими как HACK-RF, airspy и другими. Тем не менее из актуального софта SDR# поддерживает захват с аудиокарты. Это популярная программа, и мануалов по ней в Сети полно, хотя интерфейс и так интуитивен.
Поэтому устанавливаем, запускаем, выставляем желаемый диапазон на синтезаторе, подстраиваем антенну по максимуму сигнала, включаем АМ-демодулятор (большая часть всего интересного на КВ именно в АМ) — и вперед. Работает приемник очень устойчиво, с регенеративными аналогами (которые до сих пор иногда собирают) при схожей сложности тут по качеству просто нет никакого сравнения. Конечно, здесь видны и зеркальный канал, и отражения, особенно отчетливые на мощных станциях, но это расплата за простоту радиотракта. Побороть отражения можно, использовав ФНЧ на выходе операционного усилителя. А зеркальность реально подавить, отбалансировав каналы хотя бы по амплитуде.
Также для Windows есть совсем минималистичная и несколько устаревшая программа SDRadio, которая поддерживает и наш приемник. Впрочем, упомянуть ее стоило скорее ради ретроспективы.
Хорошо, а что в Linux? Тут чуть сложнее: gqrx ориентирована только на работу с чипами RTL и не поддерживает захват с аудиокарты. Так что воспользуемся GNU Radio!
Запускаем и строим несложный граф. В качестве источника используем , в свойствах которого выставляем количество выходов () и . Такие настройки любая аудиокарта потянет. Когда количество выходов указано как два, автоматически используются левый и правый каналы захвата.
При необходимости можно выбрать одну из нескольких аудиокарт. Дальше ставим блок , который из двух реальных значений создает одно комплексное, к его входам подключаем наш источник. Также полезно между и поставить умножение на константу, что позволит отбалансировать каналы по амплитуде. Теперь ставим фильтр низких частот, в котором указываем частоту среза 5 кГц. Фильтр выделит необходимую нам полосу сигнала 5 кГц вокруг нуля.
Очень полезная функция GNU Radio — возможность использовать переменные, значения которых задаются отдельно, или и вовсе изменять интерактивно с помощью элементов интерфейса. К выходу фильтра подключаем АМ-демодулятор, который находит модуль комплексного сигнала, и . А так как в данном случае sample rate источника и приемника равны, то согласовывать их ресемплингом нам не нужно. Простейший AM-приемник готов!
Он принимает станцию на частоте гетеродина, то есть в центре полосы, попадающей на аудиокарту. Хорошо, а как посмотреть спектр сигнала? Для этого добавляем элемент , который отрисует нам спектр сигнала. Подключать его стоит к выходу блока . Похожим образом элемент отвечает за «водопад».
Как будто все хорошо в нашем приемнике. Вот только нет программной перестройки частоты в окне, а это крайне полезная штука, учитывая, что аудиокарты часто дают артефакты в разных частях окна. Моя вот, например, в нуле (+/–100 Гц): судя по всему, это наводки от электросети мешают приему сигнала.
Сделать программную перестройку достаточно просто, надо добавить еще один блок умножения между и , но в данном случае не на константу, а на функцию, то есть на второй сигнал. В качестве источника второго сигнала возьмем блок , форма сигнала — косинус. Его частота должна быть равна той частоте, на которую необходимо сдвинуть сигнал.
Таким образом, мы добавили в приемник еще один преобразователь частоты, на этот раз уже программный. Теперь, перестраивая частоту , мы можем выбирать, какую часть окна отправить на детектор. Иными словами, мы просто сдвигаем ноль в нашем окне. Полученный граф приемника выглядит как на схеме.
Если хочется послушать радиолюбителей — никаких проблем, только вместо модуля сигнала нам теперь нужна его действительная часть (или мнимая, или их сумма, тут непринципиально). Был приемник АМ, а стал прямого преобразования! Тут, конечно, стоит поправить полосу пропускания фильтра, так как мы уже на SSB. Лучше выставить где-нибудь 1500 Гц.
На 40 м хорошо слышны радиолюбители. А вот так выглядит уверенный прием в режиме АМ «Международного радио Китая», которое здорово слышно во всех вещательных КВ-диапазонах.
Port Forwarding
If you want to connect to your SpyServer over the internet then you may need to activate port forwarding on your router. You need to tell your router what IP address or MAC address to forward data coming in from port 5555 which is the default SpyServer port. The data should be forwarded to the IP address or MAC address of the device running the SpyServer. You’ll probably also want to ensure that the device running the SpyServer is set to a static IP from within your router.
Port forwarding is slightly out of the scope of this tutorial as the procedure is different for each network router. There are guides for most routers in the world at portforward.com.
You can find your public IP by browsing to whatismyip.com on a PC on your network, or by running ‘curl ifconfig.me’ at a Linux terminal.
Server: Setting up SpyServer on Windows
Setting up a SpyServer server on Windows is extremely simple.
- Log on to the Windows PC that you want to be the remote server.
- Go to www.airspy.com/download and download the latest version zip file of SDR#. Extract all the files onto a folder on your PC.
- Run the install-rtlsdr.bat file to download the RTL-SDR drivers.
- In the SDR# folder find the file spyserver.config. Right click it and select ‘Open With -> Notepad’.
- Edit the ‘device_type’ line to show ‘device_type = RTL-SDR’.
- Save and close the spyserver.config text file.
- Double click on spyserver.exe to start the server.
- Open the start menu and type in ‘cmd’ and then press enter to open a command prompt.
- In the new command prompt type in ‘ipconfig’. This will display a list of network adapters on your PC, with their current IP addresses. Find the one actively being used (likely Ethernet or Wireless) and note down the IPv4 Address. This is your server PCs IP address.
Other SDR Windows Software Compatible with RTL-SDR
See the Software Guide for a big list of other compatible RTL-SDR software.
Getting Started on Linux
For Linux we first recommend having a look at Ranous’ Linux Quickstart guide document which can be found here (pdf).
The easiest way on most Debian Linux systems is to install rtl-sdr via apt-get. This can be done with the following commands. We recommend using the most modern version of Linux OS that you can find for your system to get the latest drivers.
sudo apt-get update
sudo apt-get install rtl-sdr
Instructions for installing the RTL-SDR drivers manually from source can be found at http://sdr.osmocom.org/trac/wiki/rtl-sdr. Repeated below is the code:
sudo apt-get install libusb-1.0-0-dev git cmake
git clone git://git.osmocom.org/rtl-sdr.git
cd rtl-sdr/
mkdir build
cd build
cmake ../ -DINSTALL_UDEV_RULES=ON
make
sudo make install
sudo cp ../rtl-sdr.rules /etc/udev/rules.d/
sudo ldconfig
After installing the libraries you will likely need to unload the DVB-T drivers, which Linux uses by default. To unload them temporarily type «sudo rmmod dvb_usb_rtl28xxu» into terminal. This solution is only temporary as when you replug the dongle or restart the PC, the DVB-T drivers will be reloaded. For a permanent solution, create a text file «rtlsdr.conf» in /etc/modprobe.d and add the line «blacklist dvb_usb_rtl28xxu». You can use the one line command shown below to automatically write and create this file.
echo 'blacklist dvb_usb_rtl28xxu' | sudo tee --append /etc/modprobe.d/blacklist-dvb_usb_rtl28xxu.conf
Now you can restart your device. After it boots up again run «rtl_test» at the terminal with the RTL-SDR plugged in. It should start running.
NOTE: Some devices like the Orange Pi zero have a bug in their current mainline OSes. Instead of blacklisting «dvb_usb_rtl28xxu», you will need to blacklist «dvb_usb_rtl2832u». If you installed rtl-sdr by «apt-get», you will need to update the black list file at /etc/modprobe.d/rtl-sdr-blacklist.conf manually too.
After installing the libraries and black listing the DVB-T drivers we recommend starting off with GQRX, a SDR program similar in operation to SDR#. It can be downloaded via the package manager in your Linux distribution or from http://gqrx.dk/download. We can now also recommend the multi-platform CubicSDR which can be downloaded from http://www.cubicsdr.com/.
If you want to install GNU Radio we recommend using Marcus Leech’s script by typing the following into terminal. This installs the RTL-SDR drivers as well.
wget http://www.sbrac.org/files/build-gnuradio && chmod a+x ./build-gnuradio && ./build-gnuradio
Note that if you want to run Linux in a virtual machine it has been reported that RTL-SDR performance with VirtualBox is rather poor due to it’s slow USB connection. VMWare Player on the other hand has good performance — just remember to set the USB controller to use the USB 2.0 protocol as by default it is set to USB 1.1.
Another good Linux quick start guide written by Kenn Ranous can be found here (pdf).
Getting Started on OSX
As there is a severe lack of SDR software for OSX, we recommend using either Linux or Windows. However, GQRX is a SDR program that works well on OSX.
We can now also recommend the multi-platform CubicSDR which can be downloaded from cubicsdr.com.
|
For a comprehensive book about the RTL-SDR you may be interested in our book available on Amazon. Available in physical and eBook formats. |
Conclusion
So with this hack the PlutoSDR is a much nicer unit that really makes an interesting and affordable choice for those wanting to upgrade from the RTL-SDR. Combined with a SpyVerter upconverter the unit should also be able to receive HF signals quite easily, so this gives a total cost of $148 for a DC to 6 GHz receiving system with TX capability, 12-bit ADC resolution and up to 56 MHz of bandwidth.
Of course we still need to confirm what the performance of the unit is like, especially in the frequency ranges opened up by the hacks and in regards to strong signal handling. We will test those in the coming weeks. If it handles those well and other software developers support it in their software then despite the unit being advertised as a learning module for students, it might become one of the best and most affordable general purpose SDRs available.


