Hdat2 — как пользоваться? программа для тестирования и диагностики дисков
Содержание:
- To Repair Bad Sectors
- Bad Sectors
- Physical Bad Sectors
- Step 1: Scan Disk to Mark the Bad Sector
- Очистка диска от мусора
- ↓ 02 – SeaTools by Seagate | Windows and DOS
- Тестирование и диагностика
- Part 2. Repair Bad Sectors on Hard Drive in Windows
- ↓ 08 – GSmartControl | Windows | macOS | Linux | Free
- Бэд-секторы, или сбойные секторы
- Создаем загрузочную флешку
- ↓ 07 – Abelssoft CheckDrive | Windows | Free/EUR10
- Причины исчезновения логических разделов
- Тестирование и восстановление данных
- Part 4. How to Recover Data from External Hard Drive
- Способы исправления bad-блоков на HDD
- Verifying The hard disk health
To Repair Bad Sectors
Please select the drive letter in Windows Explorer, choose «Properties» from the right-click menu, and then make a full scan of the hard disk in the «Tools» option.
If failed, users can try booting the computer via Windows 98 startup disk, and then run the DOS version of «Scandisk».
Sometimes, users can reformat the hard disk to repair some bad sectors. But, this method is not very effective.
If users cannot repair bad sectors, they can hide them. First, users should find out the general bad sectors range. Next, format it and record the percentage when bad sectors appear, and then calculate the approximate location of bad sectors according to the partition capacity. Or, users can resort to the «Scan Disk» to full scan the disk to determine the location of bad sectors. After that, users should divide the space as a separate partition. Finally, hide it.
Note: Users should carefully determine the range of the bad sectors. Otherwise, bad sectors will be used again or some hard disk space will be wasted. And, it’s recommended to backup some important data before hiding the bad sectors.
Repartition Bad Disk
In fact, users can turn to Fbdisk to hide bad sectors. Fbdisk can repartition the hard disk which contains bad sectors, and set the space which contains bad sectors as hidden partition, and set other space as available partitions. If sector 0 of the hard disk is bad, the entire disk cannot be used. Aiming at this situation, users can turn to the PCTOOLS9.0 DiskEdit to hid the useless 0 sector, and then replace it with the 1 sector.
- After booting the computer with Windows 98 startup disk, users can run the DE.EXE. Next, they can choose «Configuration» from the «Option» menu, and then press the spacebar to remove the trick. After that, select the drive, choose «Physical», press the spacebar, and press the Tab key to switch to the «Drive» items. Finally, select the hard disk, and then click «OK» button.
- Open the «Select» menu, and choose «Partition Table». Partition 1 is C drive which starts from the 0 cylinder. At this time, users just need to change the beginning cylinder from 0 to 1. And save it.
- Turn to the CMOS to detect the hard disk, and then format it. After formatting, users can write the partition information from 1 sector.
Bad Sectors
In computing, bad sector refers to a disk sector on a disk storage unit that is permanently damaged. When our hard drives have bad sectors, these sectors won’t respond to read or write request. In other words, the data cannot be saved on such sectors, and all information stored on them will be lost. What’s worse, rapidly developing bad sectors can certainly suggest oncoming hard drive failure.
Symptoms Indicating Bad Sectors
If you encounter the following symptoms when you use your computer, you should pay attention to whether the hard disk has bad sectors.
- The sound caused by normal friction of the hard disk suddenly becomes strange.
- The system cannot be started normally when the virus infection has been excluded, and the message “Sector not found” or “General error in reading drive C” appears.
- When the disk formatting cannot go smoothly, and finally get an error.
- Scandisk (a diagnostic utility) automatically runs every time the system is booted.
- When you use the fdisk command to partition hard disk (you can click here to learn how to partition the hard disk easily and reasonably), but the execution will become randomly to a certain process.
If any of the above errors is present, you need to be extra careful because your hard drive has bad sectors. To diagnose the bad sectors, you can use the third-party software MiniTool Partition Wizard.

Physical Bad Sectors
In contrast to logical bad sectors, there are only a few chances that your hard drive will develop physical bad sectors. If there are some physical bad sectors or hard bad sectors in the hard disk, neither OS or disk controller can access them nor any type of read and write operations can be performed.
In general, the physical bad sectors are caused by impact or sudden power failure during the use of the hard disk. As we know, the two main types oft he hard drive are HDD and SSD. The cause of physical bad sectors is a little different for these two types of hard disks.
On a traditional hard drive, there are many possibilities for physical bad sectors. The hard drive may have a manufacturing error and natural ware; the hard drive may have been dropped, causing the hard drive’s head to touch the platter and damage some of sectors. Or some air may have entered the sealed area of the hard drive and the dust may have damaged the drive.
Therefore, when there are some physical bad sectors on your hard drive, it means that it ends its life. In this situation, it is recommended to buy a new hard drive for your computer, recover the data from the hard disk with physical bad sectors, and back up all the data from the hard disk to the new one.
Note: It is not recommended to do low-level formatting to the hard disk with physical bad sectors, because this operation will re-divide tracks and sectors, standard address information, and so on, thereby causing severe were on the hard disk.
Step 1: Scan Disk to Mark the Bad Sector
You can carry out the following operations to mark the bad sectors. Here I take Windows 10 for example.
Note: Please close all open programs, web browsers, and so on, before performing a disk scan to ensure that disk activity is minimal while the disk is being scanned.
Method 1: using the error checking tool
- Open a File Explorer window by pressing the Windows icon and the E key on the keyboard.
- In this File Explorer window, click This PC in the left navigation pane.
- Right-click on the drive you want to scan in the Devices and Drives section on the right side of the window, and then click the Properties
- In the Properties window, move to the Tools Under Error checking, click the Check button.
- In the Error checking, please click Scan drive.
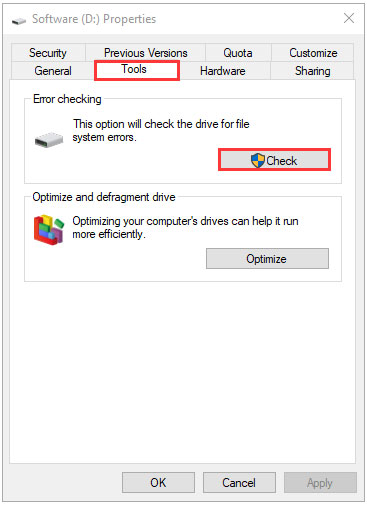
Depending on your system, the scan can take anywhere between 15 minutes and a few hours.
Method 2: Run SFC (System File Checker) to scan the hard disk
SFC is a command line tool that scans for corrupted files and resources on the system.
Follow the listed operations to scan your hard drive with SFC.
- Type Command Prompt in the Cortana’s search box and open the search result.
- At the Command Prompt window, please type sfc/scannowand hit the Enter key on the keyboard.
Note: Please do not close the Command Prompt window until the scan reports that it has finished.
Tip: If you receive the message “Windows Resource Protection could not perform the requested operation”, you can boot your computer in safe mode and repeat the operations above.
Since this step can only help you mark the detected bad sectors so that the operating system can’t access these zones, you need to carry out the following operations to fix bad sectors.
Очистка диска от мусора
Advanced SystemCare
Одна из лучших программ для очистки компьютера от мусора, исправления ошибок, правки реестра, удаления неверных ярлыков и т.д. Позволяет за несколько минут привести в порядок вашу Windows и сделать ее работу существенно быстрее.
Пользоваться программой очень просто: достаточно установить и запустить. В моем примере ниже я так и сделал — оказалось, что проблем хватает (хотя, регулярно пользуюсь мастерами для очистки от Windows…).
Найденный проблемы после сканирования в System Care
Также обратите внимание, что после установки Advanced SystemCare — в верхнем правом углу экрана появляется специальный менеджер: показывает текущую загрузку ЦП и ОЗУ (в процентах). Благодаря этому менеджеру — можно делать скриншоты, смотреть загрузку диска, памяти, процессора, выполнить быструю очистку, диагностику
В общем-то, заменяет собой диспетчер задач..
Благодаря этому менеджеру — можно делать скриншоты, смотреть загрузку диска, памяти, процессора, выполнить быструю очистку, диагностику. В общем-то, заменяет собой диспетчер задач…
Панель загрузки
Монитор производительности
CCleaner
Бесплатная утилита для комплексной очистки вашей Windows. Чистит разный мусор: временные ненужные файлы, «остатки» от удаленных программ, историю просмотров в браузерах (поддерживаются все популярные: Firefox, Opera, Chrome и т.д.).
Есть портативная версия: которая не нуждается в установке. Программа работает во всех популярных версиях Windows: XP, 7, 8, 10.
CCleaner — чистка диска, реестра
Wise Disk Cleaner
Эта программа позволяет провести глубокую очистку вашей системы Windows и жесткого диска от разнообразного мусора. Столько мусора, сколько найдет Wise Disk Cleaner — не найдет больше ни одна утилита!
Помимо основного своего назначения, в программе есть встроенный дефрагментатор. Очень хорошо сказывается на отзывчивости и производительности жесткого диска дефрагментация, проведенная после чистки.
В Wise Disk Cleaner удобный и приятный интерфейс: сверху расположены все основные вкладки, нажав на одну из них — можно быстро выполнить текущее задание. В общем, одни положительные эмоции от такого софта !
Wise Disk Cleaner — скриншот окна
↓ 02 – SeaTools by Seagate | Windows and DOS

SeaTools for Windows is a comprehensive, easy to use diagnostic tool that helps you quickly determine the condition of the disk drive in your external hard drive, desktop or notebook computer. It includes several tests that will examine the physical media on your Seagate, Maxtor or Samsung disk drive and any non-Seagate disk drive. SeaTools for Windows should run on both internal and external hard drives.
After testing, a large percentage of the drives returned to Seagate for warranty replacement are perfectly good drives with “No Problem Found” (NPF). Returning a drive for warranty service means system downtime and inconvenience for you in packing and returning your drive product. Before you send in a drive, it is in your best interest to determine if a replacement drive is really necessary. This hard disk diagnostic utility will help you make that determination and possibly save you time and money and preserve your data. Some typical reasons for No Problem Found are:
- File System Corruption
- Driver Corruption
- Broken Master Boot Record
- Virus and Trojan Attack
- Spyware, Adware and Keystroke loggers
- Hardware Conflicts
In addition to diagnostics tests, SeaTools also offers several features to help you manage your storage product. Seagate Instant Secure Erase is available for Self Encrypting Drives (SED), providing U.S government accepted media sanitization. See section 3.Advanced Tests and Features.
Тестирование и диагностика
HDDlife / SSDLife
Очень мне нравится эта утилита за свою наглядность и ориентированность на начинающих пользователей. Всё, что вам нужно сделать — это установить программу, через некоторое время вы узнаете:
- состояние о «здоровье» вашего диска в процентном выражении;
- состояние о его производительности;
- температуру;
- сколько фактического времени он отработал (не путать с возрастом и датой изготовления).
Состояние жесткого диска Samsung: здоровье 100%
Утилита работает в постоянном режиме (свернута в трее, рядом с часами), и при появлении тревожных сигналов — Вас вовремя известит. Что еще нужно для диагностики не искушенным пользователям?!
Victoria
Одна из самых прославленных утилит для тестирования и диагностики дисков. Программа позволяет проводить тестирование: HDD, FDD, CD/DVD, USB/Flash/SCSI.
Основные функции:
- просмотр полной информации о накопителе;
- поддержка IDE/SATA контроллеров;
- тесты для проверки «механики» диска;
- SMART-монитор;
- низкоуровневое форматирование и многое другое.
Тестирование быстрое (Quick) — Victoria 5
Вообще, должен признать, что программа не очень дружелюбна и проста для начинающих пользователей
Использовать ее нужно с осторожностью — здесь, как никогда, правильно: «не знаешь — не нажимай!»
MHDD
Очень популярная бесплатная программа для диагностики жестких дисков. Позволяет производить довольно точную диагностику мех. части накопителей, просматривать SMART-атрибуты, лучить дефектные сектора (прим.: ), есть в ее составе различные тесты, и др. полезные функции.
MHDD — главное окно
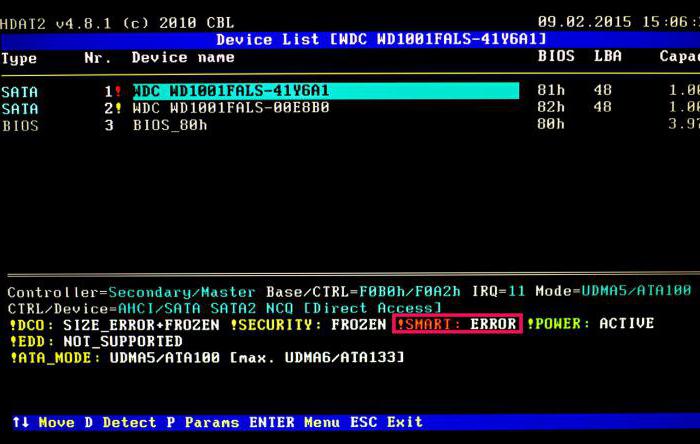
HDAT2
Отличная программа для тестирования дисков. Главное ее преимущество перед MHDD и Victoria (рассмотренных выше) — поддержка всех дисков с самыми разнообразными интерфейсами: ATA/ATAPI/SATA, SSD, SCSI и USB.
Кстати, программа не работает из-под Windows, для ее запуска необходимо записать загрузочный носитель (флешку или CD/DVD диск), и загрузившись с него, запустить утилиту.
Скриншот окна hdat2
HDDScan
Очень качественная утилита для проверки HDD и SSD на битые сектора, просмотра S.M.A.R.T., для настройки спец. параметров (управление питанием, регулировка акустического режима и т.д.).
Температуру жесткого диска можно вывести на панель задач (чтобы быть в курсе, как идут дела ).
HDDScan — скриншот окна
Поддерживаемые накопители:
- HDD с интерфейсом ATA/SATA, SCSI, USB, FireWire или IEEE 1394;
- SSD с интерфейсом ATA/SATA;
- RAID массивы с ATA/SATA/SCSI интерфейсом;
- Flash накопители с интерфейсом USB.
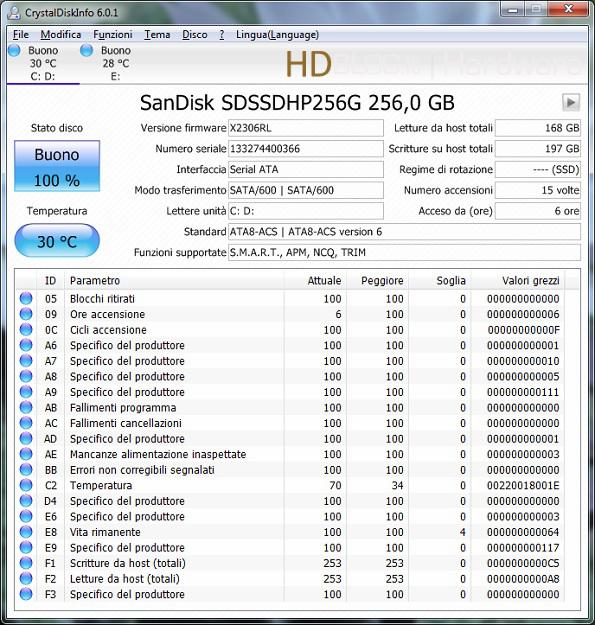
CrystalDiskInfo
Достойная программа для отслеживания состояния жестких дисков, поддерживающих технологию S.M.A.R.T.
Программа отображает детальную информацию о ваших дисках: интерфейс, общее время работы, прошивка, серийный номер, стандарт, позволяет управлять AAM/APM настройками, (полезно, когда ваш накопитель сильно шумит), выводит параметры S.M.A.R.T. (ошибки чтения, время поиска дорожки, количество циклов включения-выключения, производительность, запуски/остановки шпинделя, ошибки секторов и др.).
Показания диска из CrystalDiskInfo
Part 2. Repair Bad Sectors on Hard Drive in Windows
As you may know that when the operating system detects bad sectors, it would marked them as unusable no matter it’s logical or physical bad sectors. As a result, data loss and the lose of disk capacity is unavoidable.
Pick up any method below to get rid of bad sectors from your drive or external storage device now.
Your Best Choice — Clone Disk to A Good/Bigger One (Skip Bad Sectors)
Applies to: remove or skip bad sectors, take care of your data by disk cloning.
If the disk contains many soft bad sectors, always stuck or slow to load data on computer, or the drive is failing due to physical bad sectors, it is impossible to repair the bad sectors. Your wise choice is to replace the disk.
Here we’d like to recommend you try a powerful disk cloning software — EaseUS Disk Copy which is fully compatible with all Widnows OS.
You can just apply this software to help you upgrade and clone the hard drive without bad sectors to a good one with ease.
EaseUS Disk Copy
Replace the Disk with a Good one
Get It Now
$19.90
If your computer can’t boot into your operating system, you must download this software and create a bootable USB. Then you can follow the steps below:
Remember to connect your good new hard drive to the computer as a storage device in advance.
Step 1: Choose «Disk mode» and select the smaller hard drive as the source disk.
Step 2: Choose the bigger hard drive to save the data and then click «Next».
Step 3: A warning message tells you that the data on the destination disk will be overwritten. Click “OK” to continue if you do not have important data on the destination disk.
Step 4: Edit the disk layout and then click «Proceed» to continue.
- «Autofit the disk» resize the layout on destination disk according to the size of it to make the disk as the best status.
- «Copy as the source» doesn’t change anything on destination disk and the layout is same as source disk.
- «Edit disk layout» allows you to manually resize/move partition layout on this destination disk.
Step 5: Wait for the process to complete.
When the cloning process finishes, shut down your computer, insert the newly upgrade hard drive to your computer and replace the old drive. If it’s a system drive, set the computer to boot from a new hard drive instead of the old one in BIOS.
Repair Soft/Logical Bad Sectors in Windows
Applies to: repair soft bad sectors on your drive.
If your hard drive is experiencing one or more bad sectors, still accessible, follow our instructions to fix your problem as soon as possible.
# 1. Restore Data First
If your hard drive contains bad sectors but still accessible, take action to back up data from your drive and save to another secure location first.
If your hard drive becomes inaccessible, applie reliable data recovery software to scan and restore your valuable data first.
# 2. Run CHKDSK Command and Format Hard Drive
If there only a few bad sectors on your drive, you can run CHKDSK command and format the drive to repair those bad sectors:
Step 1. Run CHKDSK command to fix soft bad sectors.
1. Press the Windows key and type cmd.
2. Right-click «Command Prompt» and choose «Run as administrator».
3. Type chkdsk E: /f /r /x and hit Enter. (Replace E with the drive letter of your hard drive.)
Step 2. Format hard drive to usable again
1. Open Windows File Explorer, locate and right-click on your hard drive.
2. Select «Format», reset the file system as NTFS, tick «Quick Format» and click «Start».
After this, you can save your data back to your hard drive and use it again.
Hard/Physical Bad Sector Repair
Applies to: fix hard bad sectors.
Mostly, when your hard drive contains hard bad sectors, you cannot repair bad sectors by using normay solutions. The only possible way is to low-level format the drive, resetting the hard drive blocks, clusters, and sectors.
A low-level format is also called a physical format. Modern hard drives are low-level formatted at the factory for the life of the drive. A PC cannot perform an LLF on a modern IDE/ATA or SCSI hard disk, and doing so would destroy the hard disk. That is to say, you can’t repair a bad sector.
To resolve this issue, you have two choices:
1. Send your hard drive to the manufacturer or a local repair center, customize for low-level format.
2. Choose to to avoid the hard disk getting worse with more bad sectors.
↓ 08 – GSmartControl | Windows | macOS | Linux | Free

Hard disk drive and SSD health inspection tool. GSmartControl is a graphical user interface for smartctl (from smartmontools package), which is a tool for querying and controlling SMART (Self-Monitoring, Analysis, and Reporting Technology) data on modern hard disk and solid-state drives. It allows you to inspect the drive’s SMART data to determine its health, as well as run various tests on it.
- Automatically reports and highlights any anomalies.
- Allows enabling/disabling SMART.
- Allows enabling/disabling Automatic Offline Data Collection – a short self-check that the drive will perform automatically every four hours with no impact on performance.
- Supports configuration of global and per-drive options for smartctl.
- Performs SMART self-tests.
- Displays drive identity information, capabilities, attributes, device statistics, etc.
- Can read in smartctl output from a saved file, interpreting it as a read-only virtual device.
- Works on most smartctl-supported operating systems.
Бэд-секторы, или сбойные секторы
Секторы на винчестере устанавливаются изготовителем. Именно в этот момент в него закладываются магнитные свойства, которые позволяют осуществлять запись данных на диск. Если он когда-либо падал на пол, получал даже незначительный удар по корпусу, начинается постепенная деградация его поверхности. Эти деградирующие части обнаруживают с помощью специальных программ для тестирования и диагностики дисков. Те сектора, которые повреждены, не подлежат восстановлению, хотя во многих подобных программах и пишут, что возможно «тестирование и восстановление диска». На самом деле винчестер имеет резервные области секторов. Если появляется сбойный участок на определенном секторе, то данные программы переназначают адрес сбойного сектора новому сектору из резервного блока.
Одной из программ, позволяющих производить тестирование и восстановление бэд-блоков или секторов, является HDAT2. Как пользоваться ею — рассмотрим в данной статье.
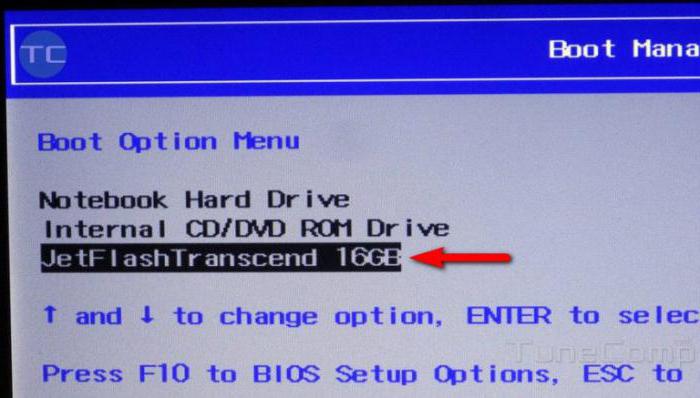
Создаем загрузочную флешку
Как пользоваться HDAT2? Первым делом необходимо создать флешку с возможностью загружать данную программу.
Рассмотрим, как создать такую флешку в Windows.
Проще всего сделать подобную флешку в специальных приложениях, например, в UltraISO. Скачиваем это приложение, устанавливаем и запускаем от имени администратора. На панели инструментов выбираем иконку папки, показывающую, что мы хотим открыть файл. Находим файл .iso с данной программой, сохраненный на компьютере. Переходим в меню «Самозагрузка» и выбираем «Записать образ жесткого диска».
Появится окно, в котором нужно проверить информацию и выбрать метод записи «USB-HDD+», после чего кликнуть на кнопку «Записать».
В среде GNU/Linux создать загрузочную флешку HDAT2 можно с помощью команды dd: dd if=/путь_куда_скачан_образ_программы.iso of=/dev/sdx, где sdx — флешка в обозначении дисков в данной системе.
↓ 07 – Abelssoft CheckDrive | Windows | Free/EUR10

CheckDrive works as a “Disk Doctor” to scan for symptoms: typical hard disk failures. If issues are discovered, the tool acts immediately. If the error is not repaired in time, the affected computer can work unstable and crash frequently. The worst case occurs when hard drives fails completely – and the user suffers a lot when all the data stored is lost forever. CheckDrive analyses all the hard drives installed the computer, in order to increase the security of the data storage. The tool displays the so-called S.M.A.R.T. data and other functions and also calculates the health status of the hard disks.
- Check hard disks for errors – CheckDrive offers you an easy way of checking your PCs hard drives for errors. Even Solid-state drives (SSD) are supported.
- Shows drive information – CheckDrive shows info about your drives and determines if your hard drive needs to be cleaned or defragmented.
- Monitors hard disks in real-time – The CheckDrive Background Guard monitors all the time the values of your hard drives.
Причины исчезновения логических разделов
Что может вызвать данную неполадку? Давайте разберем основные причины.
- Случайное удаление: Даже люди, общающиеся с компьютером на “ты” внутри своей профессиональной сферы, иногда могут допускать ошибки в управлении диском, и тем самым случайно удалять его.
- Повреждение данных: В некоторых случаях информация, хранимая внутри логических разделов диска, может попасть под вредоносное влияние вируса или быть вручную повреждена неправильными манипуляциями пользователя. Подобное воздействие может привести к потере тома диска.
- Битые сектора: Наличие битых секторов жесткого диска может препятствовать корректному распознаванию логического раздела операционной системой.
- Перебои в подаче электроэнергии: Внезапный скачок напряжения или сбой питания могут запросто повредить логический раздел диска и вывести его из строя.
Как правило, в случае исчезновения логического раздела, система удаляет его для конкретного расположения. Это говорит о том, что система сохраняет данные тома, однако в то же время забывает путь ко хранящейся на нем информации. Тем не менее не стоит расслабляться раньше времени — во всем и всегда существуют подводные камни. Здесь они кроются в том, что в ходе дальнейшего использования HDD, без своевременного восстановления файлов, система постепенно перезаписывает старую информацию новой. Именно по этой причине в данной ситуации не стоит мешкать и рекомендуется немедленно приступить к восстановлению утерянного раздела.
В этой статье мы рассмотрим 5 эффективных программ, которые станут незаменимым инструментом для любого пользователя как в офисных, так и домашних условиях.
Тестирование и восстановление данных
После совершения последнего подтверждения появится окно «Мое меню», в котором будут предложены различные режимы запуска в HDAT2.
Там будет перечислено несколько вариантов запуска программы.
Как пользоваться HDTA2 в этом случае? Сначала диск лучше проверить на сбойные сектора без восстановления. Это обусловлено тем, что информация, которая будет расположена в bad-блоках, может оказаться недоступной. Это происходит за счет того, что программа для восстановления жесткого диска при кажущемся восстановлении поврежденных секторов и блоков пытается заменить их рабочими из резервной области диска. Поэтому сначала нужно убедиться, что это этот диск поврежден, попытаться сохранить всю возможную информацию с него. Лучше делать периодические бэкапы, но если они не делались, то либо перегружаемся в систему, если она загружается и сохраняем то, что возможно, либо переключаем винчестер на другой компьютер с загружаемой системой и сохраняем максимум по возможности.
В связи с этим вначале лучше выбрать Device test menu, а в нем — Detect bad sectors menu.
После подтверждения выбираем тип тестирования, лучше выбрать «Чтение» (Detect with READ).
В случае необходимости проведения лечения выбираем Detect and Fix bad sectors menu. Далее выбираем способ тестирования, например, «Проверка/Запись/Проверка» — Verify/Write/Verify. Работать программа для восстановления жесткого диска может достаточно длительный промежуток времени.
Помимо этих режимов можно использовать режим Powerful test READ/WRITE/READ/COMPARE, который протестирует винчестер на наличие ошибок. После этого выбираем Fix with Verify/Write/Verify.
После окончания сканирования будет выдан результат, на котором нерабочие участки помечены красным цветом, действующие в рабочем режиме — синим, а которые долгое время не откликаются на действия программы — желтым.
Чем больше в диске ошибок, обнаруженных программой HDAT2, тем меньше шансов на то, что этот диск протянет еще какое-то значительное время.
Part 4. How to Recover Data from External Hard Drive
The major problem with hard drive bad sectors is that it can make the data stored in it inaccessible, making it permanently lost. That is why you need the Recoverit Data Recovery to recover data from corrupted hard drives, USB flash drives, memory cards, and others. This recovery tool has been the best software for recovering lost data due to accident deletion, storage corruption, virus infection, etc.
Recoverit Data Recovery
Why Choose This Hard Drive Data Recovery Software:
- It is compatible with both Windows and Mac operating system.
- It supports a large number of storage device type including hard drives, USB flash drives, SD cards, etc.
- All major types of files can be recovered including music, images, video, documents, emails, and archives.
- It has a deep scan features for in-depth scanning of the hard drive for searching files to recover.
Free Download Free Download
2,332,067 people have downloaded it
Easy Steps to Recover Lost Data from External Hard Drive
Step 1: Get Recoverit Hard Drive Recovery Software
Download and install Recoverit on your computer. After installing it, launch the software.
Step 2: Choose the Hard Drive
Select the drive from which you want to recover files and click «Start». This will start the scanning process. It is also possible to recover data from mobile devices if they support mounting the internal storage.
Step 3. Recover Data from External Hard Drive
Preview the files that are found on the drive for recovery. The results will have all details of the files like file type, name, and size in Recoverit Data Recovery. Hit the «Recover» button and select the location where to recover the file.
Free Download Free Download
Conclusion: Now, you’ve learned more about 5 Hard Disk Bad Sector Removal Software. You can choose the right software according to your own needs. Recoverit comes with powerful functions to help you recover data from the external hard drives. You can free download and have a try.
Способы исправления bad-блоков на HDD
Далее вкратце опишем методику поиска «плохих» секторов с помощью специализированных программ. Кроме них, существуют и другие. Советуем ознакомиться со списком: https://softdroid.net/proverka-hdd-na-oshibki-programmy-dlya-zhestkogo-diska.
HDD Regenerator
Утилита HDD Regenerator работает с программной и аппаратной частью носителя одновременно, за счёт чего с его помощью получается существенно продлить срок эксплуатации жесткого диска с минимальным сокращением его объёма. Чтобы попытаться вылечить bad-блоки, нужно выполнить анализ:
- Во вкладке «Восстановление» (Regeneration) выбрать первый пункт — «Старт обработки из под Windows» (Start process under Windows).
- Закрыть все работающие приложения, чтобы обеспечить утилите доступ ко всем секторам HDD.
- При появлении ошибки доступа нажать «Отмена» (Cancel).
- В открывшемся консольном окне выбрать второй режим (ввести «2» и нажать Enter) и выполнить проверку с нуля — не менять предложенное значение старта.
По завершении сканирования HDD Regenerator выведет отчет, в котором важны два пункта: Bad sectors founded (найденные) и Bad sectors recovered (восстановленные).
Для лечения bad-сегментов нужно повторить описанные выше действия, только выбрать пункт 1 — «Проверка и восстановление bad blocks». Желательно делать это в безопасном режиме Windows.
VictoriaHDD
VictoriaHDD работает по аналогичному принципу, но возможностей у утилиты больше и интерфейс сложнее для пользователей, которые первый раз столкнулись с этой проблемой. Первая сложность заключается в необходимости создания загрузочной флешки с «Викторией». Это удобно делать через утилиту WinSetupFromUSB.
Для загрузки с флешки придётся немного изменить настройки BIOS:
- В разделе Main следует выбрать пункт SATA Mode и выставить для него значение IDE.
- После внесения изменений обязательна перезагрузка с сохранением изменений, в большинстве БИОСов для этого нужно нажать F10 и подтвердить намерения.
Исправить bad-блоки в VictoriaHDD можно так:
- Загрузиться с флешки с утилитой.
- По завершении загрузки перейти к выбору порта (английская буква P на клавиатуре) и кликните на Ext. PCI ATA/SATA для SATA или на IDE — для винчестера с соответствующим интерфейсом подключения.
- Нажать F4 для активации режима BB: Erase 256 sect.
ВАЖНО! При обнаружении bad-блока программа пытается его восстановить, но стирает с участка всю информацию, поэтому перед проверкой ОБЯЗАТЕЛЬНО создавать резервную копию всех файлов!
-
По завершении повторите процесс, только в режиме BB: Classic REMAP — секторы, которые нельзя излечить, будут перенесены в резервную область, что незначительно ускорит работу HDD.
После «Виктории» необходимо загрузиться в Windows, в свойствах локального диска найти «Сервис» → «Выполнить проверку» → «Запустить» (Properties – Tools – Check – Scan drive).
CHKDSK
Встроенная в Windows утилита CHKDSK — вариант работы с bad-секторами для тех, кому хочется попроще и без заморочек. Для запуска проверки и восстановления «родным» способом:
- В командной строке ввести CHKDSK /F /R.
- Нажать Enter и дождаться, пока утилита проверить все содержимое HDD.
- Перезагрузить компьютер.
Лечить bad-блоки, как это делают HDD Regenerator и VictoriaHDD, CHKDSK не умеет, только находить и помечать их флагами. Помеченные сектора система воспринимает, как неисправные, и не пытается считывать/записывать информацию на них. Но лучше хоть иногда выполнять CHKDSK, чем совсем ничего не делать для предупреждения распространения bad`ов.
Механические повреждения, разумеется, никак не получится восстановить программно. Даже логические сбои порой не лечатся. Поэтому нельзя считать программы для исправления bad-секторов панацеей и инструментами для бесконечного продления срока эксплуатации жесткого диска. Скорее, это профилактика проблем, связанных с активной эксплуатацией HDD.
Verifying The hard disk health
To verify the hard disk health, use the following command –
$ sudo smartctl -H /dev/sda
The sample output should be like this −
smartctl 6.5 2016-01-24 r4214  (local build)
Copyright (C) 2002-16, Bruce Allen, Christian Franke, www.smartmontools.org

=== START OF READ SMART DATA SECTION ===
SMART overall-health self-assessment test result: PASSED
If the above result gives a failure information, then use the following command to scan the bad blocks.
$ sudo badblocks -v /dev/sdb
It takes few minutes to check hard disk. In my case, it has given the following result −
Checking blocks 0 to 3595263
Checking for bad blocks (read-only test): done
Pass completed, 0 bad blocks found. (0/0/0 errors)
Congratulations! Now, you know “How to find out bad Sectors ie. bad Blocks on your Linux Hard Disk? ”. We’ll learn more about these types of commands in our next Linux post. Keep reading!
Samual Sam
Published on 22-Oct-2019 16:52:44
Previous Page
Print Page
Next Page


