Управление дисками при помощи gparted
Содержание:
Usage
Parted has two modes: command line and interactive. Parted should always be started with:
# parted device
where is the hard disk device to edit (for example ). If you omit the argument, parted will attempt to guess which device you want.
Command line mode
In command line mode, this is followed by one or more commands. For example:
# parted /dev/sda mklabel gpt mkpart P1 ext3 1MiB 8MiB
Note: Options (like ) can only be specified on the command line.
Interactive mode
Interactive mode simplifies the partitioning process and reduces unnecessary repetition by automatically applying all partitioning commands to the specified device.
In order to start operating on a device, execute:
# parted /dev/sdx
You will notice that the command-line prompt changes from a hash () to : this also means that the new prompt is not a command to be manually entered when running the commands in the examples.
To see a list of the available commands, enter:
(parted) help
When finished, or if wishing to implement a partition table or scheme for another device, exit from parted with:
(parted) quit
After exiting, the command-line prompt will change back to .
If you do not give a parameter to a command, Parted will prompt you for it. For example:
(parted) mklabel
New disk label type? gpt
GParted is alternative to Partition Magic
Ten years ago, Partition Magic is the top of partition software. But with the
updating of Windows, it does not support Windows Vista and more advanced version.
Although Windows disk management has also been upgraded, it also has many
limitations, such as resizing system partition, it is inconvenience because Windows
is just a platform and can not do everything.
Thus, there are many third-party software are developed to assist and make up the
inadequate of Windows program. GParted is a free(as in freedom and free beer)
alternative to Partition Magic and Window disk manager. GNOME Partition Editor
(short name is GParted) is an excellent open source partition tool for the
task-resizing existing partitions and available on Live CD.
Features of GParted
You can do a lot of things with GParted, ranging from a simple format task to important partitioning tasks. I’ll highlight the key features with some screenshots to help you know more about it before installing it.
Create partition tables
You can create a new partition table for your new disks or erase the content of your existing disk to modify the partition table.
You will be able to select msdos, gpt, atari, and a lot more types of partition tables.
Create, move, label, delete & modify partitions
You can easily create, label, delete or modify the partitions with a bunch of options available within GParted.
Of course, you will have to be careful about what you want to do.
The good thing is that GParted makes sure that you do not directly apply any changes – it queues up your selected operations/tasks and asks for another final confirmation before you hit it.
The tick mark symbol ✓on the top allows you to confirm the changes and then only your changes take into effect.
Here’s another screenshot for the options you have available for the partitions:
Attempt data rescue
Apart from editing partitions, you can also try to recover your lost data in Linux using the “Attempt Data Rescue” feature as shown in the screenshot below.
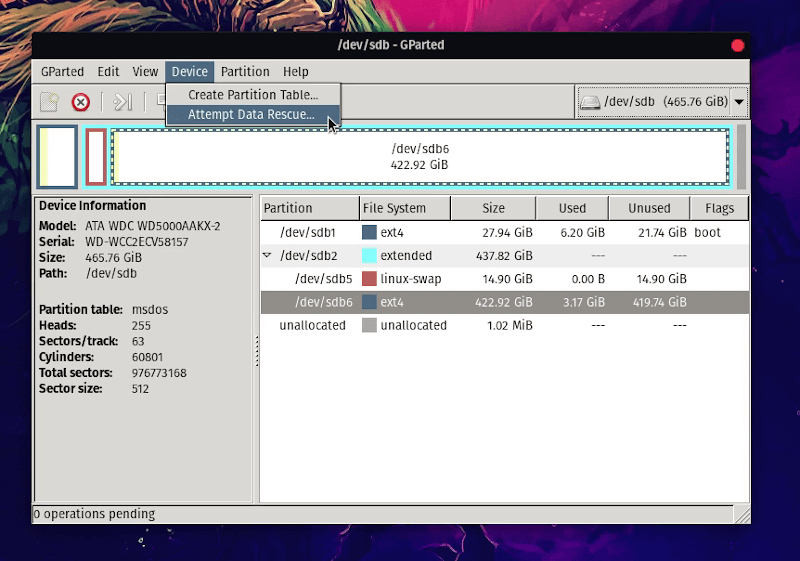
It is worth noting that you do not have this feature installed by default – you only see the option visible. So, for the data recovery feature to work, you have to install gpart separately using the following command (on Ubuntu/Debian-based distributions):
In addition to all the key features, it supports a wide range of storage devices and filesystems. You can learn more about it from the list of features on their official website.
Увеличиваем свободное место на диске
Теперь если вы откроете файловый менеджер Nautilus, в списке устройств появятся новые диски с именами BURGER и CAT. Если по ним щелкнуть, тогда они примонтируются.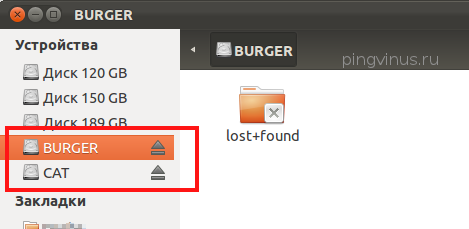
В Ubuntu диски монтируются в директорию /media. Так как у наших дисков есть метки, они примонтируются в директории /media/BURGER и /media/CAT. Теперь нам нужно определить название устройства, используемого для созданных разделов (дисков). Для этого выполните в терминале команду:
В выводе команды вы сможете увидеть названия устройств, которые используются для наших дисков BURGER и CAT. У меня это /dev/sdb1 и /dev/sdb2:
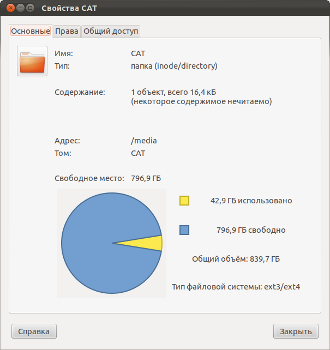
Откройте диск в Nautilus, щелкните правой кнопкой мыши по свободному месту и в открывшемся меню нажмите Свойства (или нажмите Ctrl+Enter). Откроются свойства диска.
 |
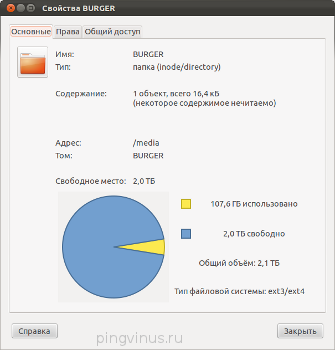 |
Как вы можете видеть на дисках уже занято 42 и 107Гб! Это связано с тем, что система резервирует 5% от общего объема диска для пользователя root. В частности, предполагается, что когда на диске не будет хватать места, тогда система воспользуется этими 5% и корректно выполнит все операции. Но это справедливо только для системных разделов, например, для корневого раздела файловой системы / или, например, для раздела /boot (если он у вас есть). А если вы используете диск только для хранения данных, тогда 5% места будут просто потеряны и не будут никогда использоваться. Можно просто отключить резервирование места, а можно уменьшить его количество. Чтобы уменьшить объем резервируемого пространства с 5% до 1%, выполните команду (число после ключа -m определяет количество процентов, используемых для резервирования):
Чтобы полностью отключить резервирование места, выполните команды (первая команда для BURGER, вторая для CAT):

Теперь, если вы посмотрите свойства диска, тогда мы должны получить следующее: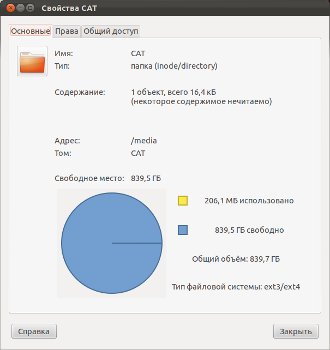
A Live CD Linux distribution built around the GParted hard/solid disk drive partitioning software
What’s new in GParted LiveCD 1.1.0-1:
- Includes GParted 1.1.0
- Based on the Debian Sid repository (as of 2020/Jan/21)
- Linux kernel updated to 5.4.13-1
- Fix an issue about makeboot.sh which failed to run
Read the full changelog
GParted LiveCD is a Live Linux operating system built around the GNOME Partition Editor (popularly known as GParted) software, which can be used for disk partitioning tasks. The GParted application is successfully used in many Linux distributions to efficiently partition hard disk drives, solid disk drives and USB flash disks. It allows users to resize, move and copy partitions without losing any data.
Distributed as a Live CD
The GParted LiveCD Linux operating system is distributed as a Live CD ISO images, supporting the 64-bit and 32-bit (i486 and i686-PAE) architectures. It is our number one choice for disk partitioning tasks, no matter the operating system you are currently using on your PC or laptop.
Live CD boot options
The Live CD presents a GRUB-based boot menu that allows you to start the GParted LiveCD Linux operating system with the default settings (this is the recommended option for most users), boot the operating system that is currently installed on the computer’s hard disk drive, and test the machine’s physical memory. There’s also an option for advanced users who want to copy the entire live environment to RAM and eject the boot media, and one for those of you who encounter graphical issues with the default option.
How the Live CD works
Hitting Enter on the default selection will start the live environment, during which you will be able to select a different keymap (this is mostly useful for non-USB keyboards), as well as to select your preferred language (English is the default option). Finally, you will be able to choose if you want to start the X Window System and use the GParted LiveCD in graphical mode (this is the default option), override the display settings, or drop to a shell prompt.
Uses the Fluxbox window manager
If you choose the default option, you will immediately see a minimalistic desktop environment powered by the lightweight Fluxbox window manager and the GParted application. On the desktop you will find a small and fast web browser called NetSurf, a screenshot utility, a Linux terminal, as well as two utilities, one for changing the screen resolution and another one for configuring the network.
Helps you to shrink Microsoft Windows C: partitions
Microsoft Windows users can use GNOME Partition Editor to easily shrink or grow their C: drive, in order to create space for new operating systems. In addition, it can be used to rescue data from lost partitions.
Starting GParted:
Now that GParted is installed, you can start GParted from the Application Menu of Ubuntu as you can see in the screenshot below.

GParted requires root privileges. To allow root privileges to GParted, type in your login password and click on Authenticate.

GParted should start.

Selecting Storage Device:
The first thing to do in GParted is to select the storage device that you want to work with. To do that, click on the drop down menu on the top right corner of GParted.

Then, select the storage device that you want to work with.

As you can see, I selected my 32GB USB thumb drive.

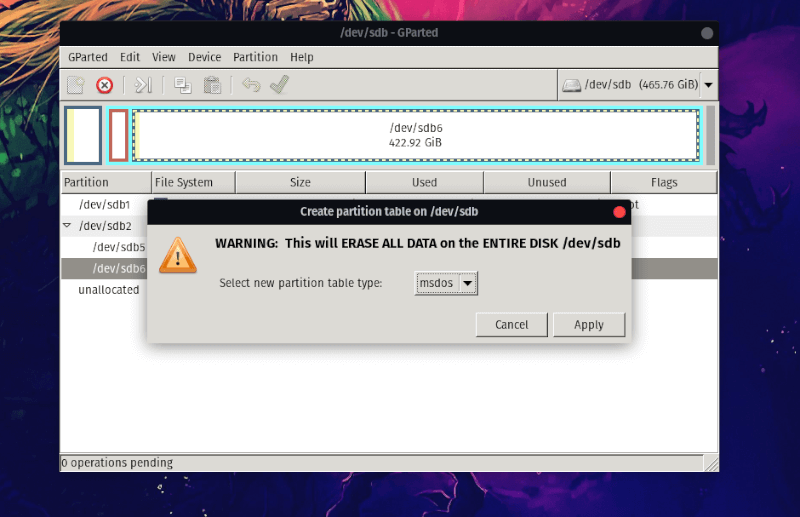
Creating a New Partition Table:
To create a new partition table using GParted, click on Device > Create Partition Table… as marked in the screenshot below.

You will see the following dialog box. From here, you can select your desired partition table type. The most widely known partition table types are msdos and gpt. By default, msdos is selected. But you can click on the dropdown menu to change it.

As you can see, there are so many partition table types to choose from.

Once you’ve selected a partition table type, click on Apply.

An empty partition table should be created as you can see in the screenshot below.

Creating New Partitions:
Before you create a new partition, make sure you have enough unallocated free spaces. Now, to create a new partition with GParted, select the unallocated space and click on Partition > New.

A new window should appear.

You can move the slider back and forth to change the size of the partition. You can also type in the size of the new partition directly in the New size (MiB) textbox as marked in the screenshot below.

You can also select a file system for your new partition using the File system dropdown menu. By default, ext4 is selected. This is one of the thing I like about GParted. It formats the partition to your desired file system when you create a new partition.

As you can see, GParted supports a lot of file systems. The file systems that are installed on your computer should be enabled here. The ones that are not installed are disabled at the moment. To enable the disabled ones here, you will have to install the file systems on your computer.

You can also type in a Partition name and a Label for your new partition. These are used to make it easy for yourself to identify the partition, nothing else. You can also leave them empty if you want. These are completely optional.

As you can see, a partition is created. But the changes are not saved permanently. To save the changes, click on the tick icon as marked in the screenshot below.

Now, click on Apply.

The new partition is being formatted.

Once it’s done, click on Close.

As you can see, a new partition is created.

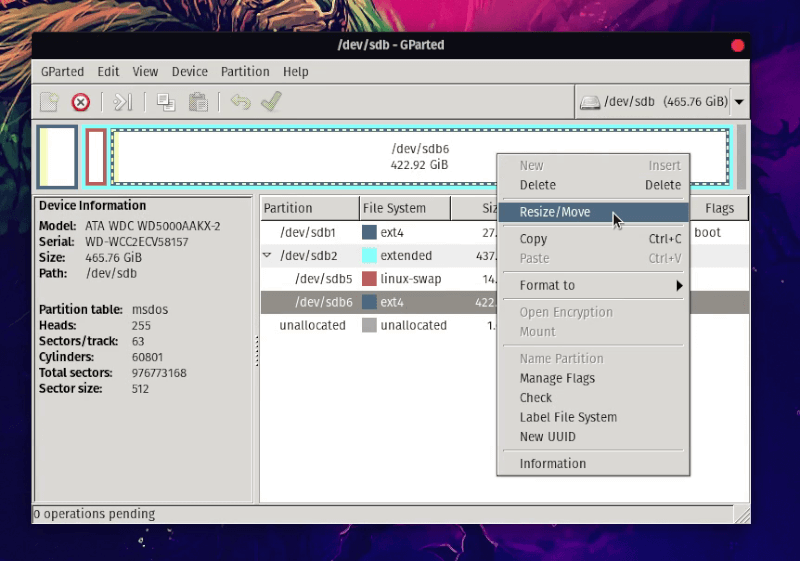
Resizing Partitions:
There are 2 resize operations that you can perform on a partition, Extend and Shrink. In order to extend a partition, you must have unallocated free spaces after that partition. To resize a partition, right click on the partition and click on Resize/Move.

Now, you can use the handle to extend or shrink the partition. You can also type in the new size of the partition directly on the New size (MiB) textbox.

Once you’re done, click on Resize/Move.

If everything is alright, then click on the tick icon to save the changes permanently.

Now, click on Apply to confirm the operation.

The changes should be applied. Now, click on Close.

As you can see, the partition has been resized.

Deleting Partitions:
I created a new partition to demonstrate how partitions are deleted with GParted. Right now, the partition table looks as follows:

To delete a partition, right click on the partition and click on Delete.

Now, to save the changes permanently, click on the tick icon as marked in the screenshot below.

Now, to confirm the operation, click on Apply.

Once the operation is complete, click on Close.

As you can see, the partition is deleted.

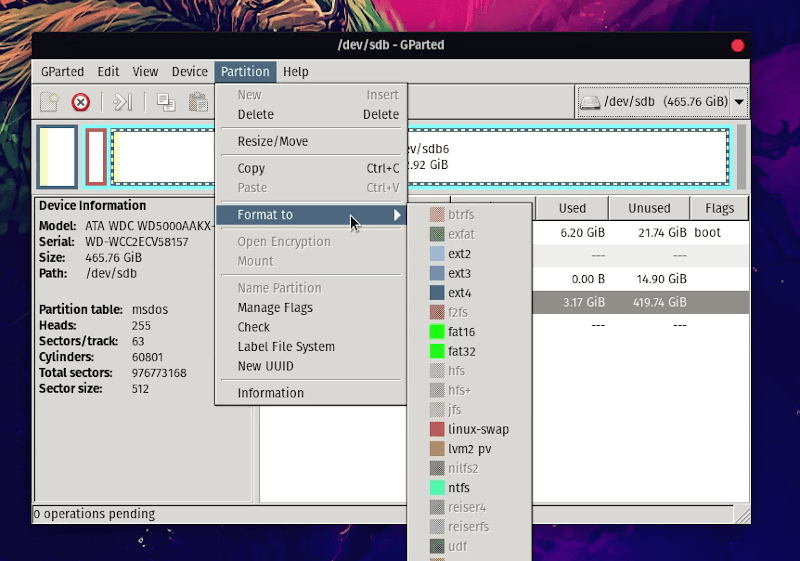
Formatting a Partition with GParted:
To format a partition with GParted, right click on the partition and click on Format to and select the filesystem type which you want the partition to be formatted to.

Now, to save the changes permanently, click on the tick icon as marked in the screenshot below.

Now, click on Apply.

Once the operation is complete, click on Close.

As you can see, the partition is formatted to the newly selected filesystem type.

So, that’s how you use GParted on Ubuntu to do basic partitioning and disk management. Thank you for reading this article.
Included Packages
GParted Live includes additional packages, such as:
Graphical Utilities
Right click on the desktop to access a pop-up menu.
| Program | Description |
|---|---|
| lxterminal | Terminal emulator (provides access to command line) |
| pcmanfm | Graphical file manager |
| leafpad | Graphical text editor |
| netsurf | Small web browser |
| gsmartcontrol | Hard disk drive and SSD health inspection tool |
| calcoo | RPN and algebraic scientific calculator |
Command Line Utilities
| Program | Description |
|---|---|
| fsarchiver | File system archiver and restorer |
| partclone | Backup partitions into a compressed image file (e.g., partclone.ext4) |
| partimage | Backup partitions into a compressed image file |
| testdisk | Data recovery tool that can help recover lost partitions |
| gpart | (Older) data recovery tool that can help recover lost msdos partition tables |
| grub | GRand Unified Bootloader for restoring GRUB 2 boot loader |
| mc | Text based file manager known as Midnight Commander |
| nano | Text editor |
| vim-tiny | Enhanced vi text editor |
| parted | Partition table editor |
| fdisk | MSDOS partition table editor |
| sfdisk | MSDOS partition table editor also useful to save/restore partition table to/from a file |
| gdisk | GPT partition table editor |
| sgdisk | GPT partition table editor also useful to save/restore partition table to/from a file |
| gptsync | GPT and MSDOS partition tables synchronization tool useful for Mac OS X users |
| openssh | Secure shell (ssh) connectivity tool suite |
| screen | Screen manager with VT100/ANSI terminal emulation |
| ping | Check network connectivity to another host on a network |
| rsync | Fast, versatile, remote (and local) file-copying tool |
| telnet | Communicate with another host using the TELNET protocol |
| traceroute | Print the route packets trace to network host |
| bc | Arbitrary precision calculator language |
To view all of the included packages you can either:
refer to the «packages-x.y.z—w.txt» file in the
download directory,
or
view the file «live/packages.txt» file inside the
GParted Live iso file or zip file.
USB setup with Windows
Choose one of the following methods to setup GParted Live on your
USB flash drive using MS Windows:
Windows Method A: Tuxboot
- Download Tuxboot on your MS Windows computer.
-
Follow
the USB setup with MS Windows instructions to
install GParted Live on your USB flash drive.
Windows Method B: Manual
|
WARNING! |
-
Download the GParted
Live zip file. -
If you already have a partition of at least 300 MB in size on your
USB flash drive formatted with a FAT file system then skip to the
next step (3).
Otherwise create at least a 300 MB partition on your USB flash
drive and format it with a FAT16 or FAT32 file system.The partition must be large enough to hold the extracted
contents of the GParted Live zip file. -
Extract all the contents of the zip file to FAT16/FAT32
partition on your USB flash drive. Keep the directory
architecture, for example, file «GPL» should be in the USB
flash drive’s top directory (e.g. G:\GPL). -
Browse to your USB flash drive and as an administrator
(On the USB flash key, create a shortcut to the makeboot.bat file.
Then right-clic on the shortcut, Properties, Advanced and check
«Run as administrator».), click the makeboot.bat in the dir
utils\win32\. WARNING!
Makeboot.bat must be run from your USB flash drive. -
Follow the on-screen instructions.
(PS: The above description is modified from:
http://www.pendrivelinux.com/2007/01/02/all-in-one-usb-dsl.
Thanks to PDLA from http://pendrivelinux.com)
Windows Method C: Unetbootin
|
CAUTION: Unetbootin creates a different boot menu. |
-
If you already have Unetbootin installed on your computer then
skip to the next step (2).
Otherwise download and
install Unetbootin on your MS Windows computer. -
Download the GParted
Live iso file. -
From Windows, run the Unetbootin program and follow the
instructions in the GUI to install GParted Live on your USB flash
drive.
Windows Method D: LinuxLive USB Creator
-
If you already have LinuxLive USB Creator installed on your computer then
skip to the next step (2).
Otherwise download and
install LinuxLive USB Creator on your MS Windows computer. -
Download the GParted
Live iso file. -
From Windows, install then run the LinuxLive USB Creator program and follow the
instructions in the GUI to install GParted Live on your USB flash
drive.
GParted Live on Hard Disk using GRUB
In this example we use the grub boot loader. You have to put the
GParted live files in a FAT, ext2, ext3, reiserfs or some other grub
supported partition.
If you do not have such a partition, you can
use gparted to resize an existing
partition to free up space and then create another partition to put
GParted Live. From this point on we assume you already have a FAT
partition /dev/sda4 to put GParted live. Following are the set up
steps:
- Boot the OS in the hard drive. Let’s assume it is GNU/Linux.
-
Mount /dev/sda4 as /mnt, you can manually mount it by issuing a
command like: «mount /dev/sda4 /mnt» -
Download GParted live zip file, and
unzip all the files in /mnt, make sure you put all the files in
/mnt, say, file «GPL» is in /mnt/, not in any subdir. You can do
this with a command such as: «unzip gparted-live-*.zip -d /mnt»
(Replace gparted-live-*.zip with the file name you just
downloaded). -
Change the dir name «live» under /mnt to another name, say
«live-hd». You can do this with a command like: «cd /mnt; mv live
live-hd» -
Add the appropriate menu entry for your version of GRand Unified
Bootloader (GRUB):-
GRUB 1.x (Legacy)
If your grub is version 1.x, edit your grub config file
/boot/grub/menu.lst, and append the following:title GParted live root (hd0,3) kernel /live-hd/vmlinuz boot=live config union=overlay username=user components noswap noeject vga=788 ip= net.ifnames=0 live-media-path=/live-hd bootfrom=/dev/sda4 toram=filesystem.squashfs initrd /live-hd/initrd.img bootIn grub version 1 syntax, /dev/sda4 is (hd0,3).
-
GRUB 2.x (and 1.9x)
If your grub is 2.x (grub-pc), e.g. on Debian Jessie or Ubuntu
16.04, edit /etc/grub.d/40_custom, make it like:menuentry "GParted live" { set root=(hd0,4) linux /live-hd/vmlinuz boot=live config union=overlay username=user components noswap noeject vga=788 ip= net.ifnames=0 live-media-path=/live-hd bootfrom=/dev/sda4 toram=filesystem.squashfs initrd /live-hd/initrd.img }NOTE: In grub2, (hd0,4) means the first hard drive and
the 4th partition. It’s different from that in grub version
1. Then run «update-grub2» to update your grub2
config. (Thanks to Louie Chen for providing this).
Alternatively from GParted live version 0.4.8-7 onwards, you
can use only the GParted live iso file in grub2 (Thanks to the
patches files from grml). For
example, put gparted-live-0.28.1-1-i686.iso in dir /home/isos/, then
make the grub2 custom file /etc/grub.d/40_custom like:menuentry "Gparted live" { set isofile="/home/isos/gparted-live-0.28.1-1-i686.iso" loopback loop $isofile linux (loop)/live/vmlinuz boot=live config union=overlay username=user components noswap noeject vga=788 ip= net.ifnames=0 toram=filesystem.squashfs findiso=$isofile initrd (loop)/live/initrd.img }Then run «update-grub2» to update your grub2 config.
-
GRUB4DOS and WINGRUB
If your grub is grub4dos, edit your grub config file
menu.lst, and append the following:title gparted 28.1 live find --set-root /gparted-live-0.28.1-1-i686.iso map /gparted-live-0.28.1-1-i686.iso (0xff) || map --mem /gparted-live-0.28.1-1-i686.iso (0xff) map --hook root (0xff) kernel /live/vmlinuz boot=live union=overlay username=user components noeject vga=788 ip= findiso=/gparted-live-0.28.1-1-i686.iso toram=filesystem.squashfs initrd /live/initrd.img(Thanks to Frank Breitling for pointing out this sample menu entry.
See Bug
#682160 — GParted Live on Hard Disk from Windows)
NOTE1: In the above examples we added an extra parameter
«toram=filesystem.squashfs» so that the
partition /dev/sda4 won’t be locked after booting GParted Live from
hard disk.NOTE2: Remember to check parameters in
syslinux/syslinux.cfg from the zip file, copy them to here. It
might be different from here, say vmlinuz path maybe
different. -
GRUB 1.x (Legacy)
For more information on grub you can refer to
the GNU GRUB web
site.
For more information on grub4dos, see
the GRUB for DOS web
site.


