Как написать расширение для gnome shell: режим «do not disturb»
Содержание:
- Интересные факты
- Applications
- Bonus Tip: Get notified of GNOME Shell Extensions updates
- Creating Extensions
- Configuring Extensions
- Основные элементы интерфейса
- Screenshots & Screen Recording
- What is a GNOME Shell Extension?
- Сохранение настроек в реестре
- Уборка за собой
- In the overview
- Богоявление (GNOME Web)
- Установка нового расширения
- Управление расширениями
- Обновление расширений
- И немного классики, GUI на GTK
- Debugging your Extension
- Особенности работы GNOME Shell и Javascript
- Выключение/включение звука
- Creating and Enabling your extension
- Developer tools
- Adoption
- Software architecture
- Запуск GNOME
- Установка
- Пакеты дистрибутивов
Интересные факты
- Впервые в качестве среды рабочего стола появилась в Fedora 15
- Разработчики придерживаются мнения, что современному человеку всё реже необходимо выключать компьютер, поэтому кнопка выключения по умолчанию скрыта и заменена кнопкой сна. Её можно увидеть, нажав Alt, или же установив соответствующее расширение. В релизе 3.6 кнопка выключения была возвращена.
- Также разработчики посчитали кнопки «свернуть» и «развернуть» окно редкоиспользуемыми — благодаря концепции виртуальных рабочих столов кнопка сворачивания может быть не нужна, а вместо кнопки «развернуть» пользователи гораздо чаще пользуются двойным щелчком на заголовке или автораскрытием окна при перетаскивании его вверх.
- По умолчанию рабочий стол не является папкой, и на него нельзя помещать файлы, папки или ярлыки. При запуске оболочки пользователь будет видеть исключительно фоновой рисунок и верхнюю панель. Поведение можно изменить при помощи утилиты gnome-tweak-tool.
Applications
Applications in GNOME 3 have some new features, including some handy tricks.
Search
Many GNOME 3 applications allow you to search simply by typing, including Files, Contacts and Documents. Just start typing to search.
Application Menus
Each GNOME application has an application menu in the black top bar, where it says the application’s name. This menu always includes the Quit menu item. For many GNOME 3 application, these application menus also provide application-wide options and actions, such as Preferences and Help.
The application menu can also be opened with the Super+F10 keyboard shortcut.
Hidden titlebars
To save space on small screens, and to avoid distraction, many GNOME applications hide their titlebar when maximized. Such titlebar-less maximized windows can be dragged by clicking on empty space in the applications menubar or toolbar, or by starting a drag in the top bar.
Invisible borders
GNOME sports very clean-looking, thin window decorations. Nevertheless, windows can still be easily resized by starting a drag close to the window edge, on what is called the windows invisible border. The area in which this is possible roughly correlated to the shadow that is drawn around the window.
Bonus Tip: Get notified of GNOME Shell Extensions updates
By now you have realized that there is no way to know if an update is available for a GNOME Shell extension except for visiting the GNOME extension website.
Luckily for you, there is a GNOME Shell Extension that notifies you if there is an update available for an installed extension. You can get it from the link below:
How do you manage GNOME Shell Extensions?
I find it rather weird that you cannot update the extensions via the system updates. It’s as if GNOME Shell extensions are not even part of the system.
If you are looking for some recommendation, read this article about best GNOME extensions. At the same time, share your experience with GNOME Shell extensions. Do you often use them? If yes, which ones are your favorite?
Creating Extensions
As GNOME Shell and extensions are written in GJS, it is important to understand that GJS is simply JavaScript bindings for the existing GNOME platform APIs. This means many of the classes and functions you will use are already documented (see below).
Here we have a growing number of tutorials and guides for creating extensions, as well as working with some of the developer tools included with GNOME Shell.
Tutorials
-
Beginner’s Tutorial
At the time of writing, this is most up to date and thorough tutorial on writing Shell extensions. For educational purposes it avoids the use of many higher-level tools available to extension authors.
-
Migrating Shell Classes
As GJS has improved, many classes have been refactored as proper GObject classes, which changes the way they are subclassed. This is a short guide to migrating GNOME Shell objects from native JavaScript classes to GObject classes.
-
Tips On Memory Management
Most extension authors will never have to worry about GObject referencing or memory leaks, especially if writing clean, uncomplicated code. This page describes some common ways extensions fail to take scope into account or cleanup main loop sources and signal connections.
Documentation
-
-
— The toolkit Mutter and GNOME Shell are built with
-
— The window manager in GNOME Shell
-
— A toolkit built on top of Clutter, especially for GNOME Shell
-
— GNOME Shell specific utilities
-
Tools
As of GNOME Shell 3.34, there is a new gnome-extensions command-line tool for working with extensions:
$ gnome-extensions
Usage:
  gnome-extensions COMMAND

Commands:
  help      Print help
  version   Print version
  enable    Enable extension
  disable   Disable extension
  reset     Reset extension
  uninstall Uninstall extension
  list      List extensions
  info      Show extension info
  show      Show extension info
  prefs     Open extension preferences
  create    Create extension
  pack      Package extension
  install   Install extension bundle

Use “gnome-extensions help COMMAND” to get detailed help.
Configuring Extensions
Some extensions may provide a preferences dialog for configuration options or settings. These can be accessed a number of ways:
-
The Installed tab of the GNOME Extensions website
-
The Extensions tab of GNOME Tweaks
-
The gnome-shell-extension-prefs tool shipped with GNOME Shell
Each of these tools can be used to enable, disabled and launch the preferences window of extensions. More advanced configuration may be available at the dconf path /org/gnome/shell/, while many extensions store configuration options under the /org/gnome/shell/extensions/ path.
Installed extensions are also listed in the Looking Glass developer console.
Основные элементы интерфейса
- Верхняя панель с кнопкой «Обзор», часами, системными индикаторами (переключение раскладки, громкость, bluetooth, сеть и др.), меню пользователя
- Кнопка «Обзор» открывает на весь экран панель управления приложениями, которая включает в себя:
- Док (так называемый «Dash») слева позволяет закреплять избранные приложения, запускать и переключаться между ними
- Вкладка «Окна», в которой отображаются все открытые окна приложений на текущем рабочем столе и панель переключения виртуальных рабочих столов
- Вкладка «Приложения», в которой отображаются все установленные приложения с возможностью сортировки по категориям
- Поиск. Осуществляет поиск по установленным приложениям, системным настройкам, контактам и недавно использованным документам. Кнопки «Wikipedia» «Google» открывают в браузере соответствующую страницу с поисковым запросом
- Область уведомлений в правом нижнем углу экрана. Скрыта по умолчанию, вызывается перемещением курсора в правый нижний угол экрана
Screenshots & Screen Recording
Screenshots
The PrintScn key will take a screenshot, and will automatically save the image in your Pictures folder. There are some other handy shortcuts that you can use here:
-
Alt+PrintScn — take a screenshot of the current window only
-
Shift+PrintScn — select a specific area of the screen
-
Ctrl+PrintScn — save the screenshot to the clipboard
These keyboard shortcuts can be combined. For example: Alt+Ctrl+PrintScn will save a screenshot of the current window to the clipboard.
Screen Recording
GNOME 3 comes with a built-in screen recorder. This can be activated using the Shift+Ctrl+Alt+r keyboard shortcut. A red circle is displayed in the bottom-right hand corner of the screen while recording is taking place.
What is a GNOME Shell Extension?
A GNOME Shell Extension is basically a tiny piece of code that enhances the capability of GNOME desktop.
Think of it as an add-on in your browser. For example, you can install an add-on in your browser to disable ads. This add-on is developed by a third-party developer. Though your web browser doesn’t provide it by default, installing this add-on enhances the capability of your web browser.
Similarly, GNOME Shell Extensions are like those third-party add-ons and plugins that you can install on top of GNOME. These extensions are created to perform specific tasks such as display weather condition, internet speed etc. Mostly, you can access them in the top panel.
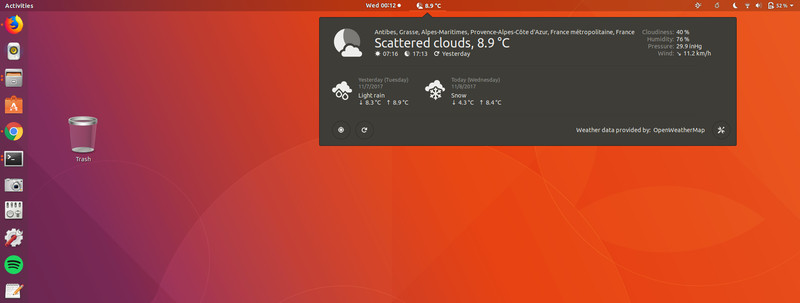
GNOME Shell Extension to display weather information
There are also GNOME Extensions that are not visible on the top panel. But they still tweak GNOME’s behavior. For example, middle mouse button can be used to close an application with one such extension.
Сохранение настроек в реестре
Не, конечно реестра в Linux-е нет. Тут вам не Windows. Есть лучше, называется GSettings (это API), за ним скрывается несколько вариантов реализации, по умолчанию в GNOME используется Dconf. Вот так выглядит GUI-шка для него:
— Чем это лучше хранения настроек в обычных текстовых файлах? — спросят олдовые и бородатые пользователи Linux-а. Основная фишка GSettings в том, что можно легко подписаться на изменения в настройке, пример:
Единственная пока настройка в нашем «Do Not Disturb» — это опция «mute-audio», которая позволяет по желанию пользователя выключать или нет звук на время «тихого часа».
Уборка за собой
Каждое расширение GNOME Shell имеет доступ ко всем объектам всего GNOME Shell. К примеру, чтобы отобразить кол-во непрочитанных еще уведомлений, доберемся до контейнера с ними в , расположенного по центру сверху, номер 4 на картинке (нажмите на надпись с текущим временем, она кликабельна в реале, не здесь):
Можно узнать, сколько их, непрочитанных уведомлений, подписаться на события добавления и удаления уведомлений:
Это прекрасно, но пользователь, бывает, может решить, что расширение X ему больше не нужно, и нажмет кнопку отключить расширение. Для расширения это равносильно вызову функции disable(), и нужно предпринять все усилия, чтобы выключенное расширение не поломало работающий GH:
В данном случае, помимо того, что удаляем саму кнопку, нужно отписаться от событий «actor-added»/»actor-removed», пример:
Если этого не сделать, то код обработчиков будет продолжать вызываться на соответствующего события, пытаться обновлять состояние несуществующей уже кнопки с менюшкой и… GNOME Shell начнет глючить. Ну да, напакостим мы, ругаться будут пользователи, камни полетят в разрабов GNOME Shell и GNOME в целом. Реальная картина, че.
Итак, GNOME Shell/Gjs представляет собой симбиоз двух систем, Glib/GTK и Javascript, и у них разный подход к управлению ресурсами. Glib/GTK требует явного освобождения своих ресурсов (кнопок, таймеров и прочего). Если же объект создан движком Javascript-а, то действуем как обычно (ничего не освобождаем).
В итоге, как только наше расширение готово, и не «течет», можно смело публиковать его на https://extensions.gnome.org.
In the overview
The dash on the left side is where your favorite applications and your running applications are shown. The glow behind the application icon indicates if the application is running.
Clicking on the application icon will launch it if it is not running, and will open the last used window of that application if it is already running.
Right clicking on the application icon for a running application will display a menu with window titles for selecting one of the windows. This menu also provides options to open a new window for that application and to remove or add that application to favorites depending on its current status.
Ctrl+Clicking or middle clicking on the application icon for a running application will open a new window of that application in the current workspace.
Running applications can be added to favorites with the help of the right click menu option. You can also drag an application from the application browsing pane to the favorites row to make it a favorite application.
Dragging an application icon within the dash moves its position. A trash can icon will appear at the bottom of the dash while dragging. If you drop the application icon on the trash can it will be removed from the dash.
Dragging an application icon to a particular workspace will open a new window for that application on that workspace. Unlike launching by clicking which results in leaving the overview mode and switching to the application immediately, launching by dragging does not leave the overview mode.
Search box allows searching for application names or their descriptions. It also has a section for preferences applets. The search box is focused on automatically when you are in the overview, so you can just start typing. You can navigate the search results with up and down arrows and hit Enter to launch them.
All open windows are shown on their corresponding workspaces. You can click on the window to switch to it and leave the overview. You can click on a workspace to switch to it an leave the overview. Switching to a workspace without selecting a specific window will just have the windows on it arranged the same way as when you last used that workspace.
Windows can be dragged between workspaces. Workspaces are dynamically added and removed as needed. There’s always one spare workspace.
Ctrl+Alt+Tab brings up the accessibility switcher, which can be used to select various parts of the shell UI and control them via the keyboard. This is not yet fully functional.
Богоявление (GNOME Web)
«Веб-браузер» GNOME Epiphany по-прежнему поддерживает плагины NPAPI и имеет предварительно установленный плагин необходимых расширений GNOME, поэтому нет необходимости настраивать его.
Если он еще не установлен, его можно установить с помощью:
Установка нового расширения
Наиболее популярные расширения будут отображаться на начальной странице вы получите, вы , однако , можете выбрать для сортировки содержимого страницы и результатов поиска , используя , и фильтры. Вы также можете выбрать отображение результатов, а не только тех, которые вы используете (попытка установить расширения, несовместимые с вашей версией GNOME, приведет к сбою в автоматическом режиме — операция не будет успешной, но вы не будете уведомлены об этом в в любом случае — хотя несовместимые расширения будут слегка выделены серым цветом в списке результатов, так что вы все равно сможете определить это даже при выбранном фильтре).
Различные фильтры, о которых я упоминал выше, доступны через соответствующие выпадающие меню (я поставил красную рамку вокруг нужных настроек):

Вы также можете использовать окно поиска, чтобы найти расширения, как только вы найдете расширение, которое хотите установить (если вы беспокоитесь о безопасности расширений, вам следует прочитать эту информацию в процессе проверки — перейдите в раздел — расширения имеют чтобы пройти, прежде чем они будут приняты на веб-сайте), нажмите на его имя в результатах поиска, а затем, как только вы окажетесь на его странице, нажмите ползунок рядом с его именем (как это было сделано выше в ), вы получите диалоговое окно с предложением вам если вы хотите установить указанное расширение, если вы это сделаете, нажмите , если вы передумали, нажмите .
Если у вас нет такого диалога, вы наткнулись на одно из ваших предустановленных расширений и активировали его!
После внесения изменений в установленные / активированные расширения с веб-сайта вам нужно будет перезапустить его, чтобы он зарегистрировал изменения.
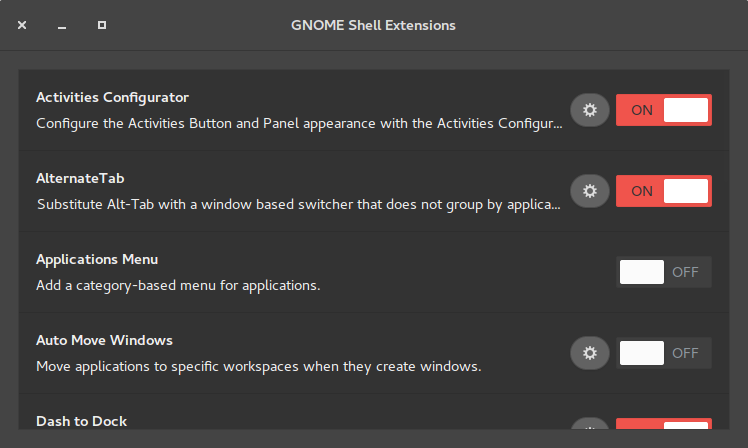
Управление расширениями
Чтобы активировать расширение, нажмите на ползунок рядом с его именем и описанием, чтобы изменить его статус с на (и наоборот, чтобы деактивировать его).
Вы увидите, что у предустановленных расширений есть кнопка с серым цветом рядом с каждым из них, она неактивна, потому что они предустановлены, если вы установите новое, однако вы сможете использовать эту кнопку для окончательного удаления ,
Вы также увидите, что некоторые расширения имеют кнопку рядом со своей кнопкой, которая выглядит следующим образом:
Нажатие на эту кнопку позволит вам изменить конфигурацию для рассматриваемого расширения (оно должно запустить окно настроек).
Онлайн просмотр позволяет также сделать то же (хотя это также позволяет удалить / удалить предварительно установленные расширения, так осторожно , — хотя, конечно , вы будете иметь возможность повторно установить их снова)
Обновление расширений
Он не поддерживает обновление расширений через свой интерфейс (хотя в будущем планируется удалить весь веб-интерфейс и все это сделать ), если выйдет новая версия расширения и вы захотите обновить для этого вы можете сделать это, перейдя сюда и нажав кнопку обновления рядом с ползунком (если кнопка обновления отсутствует, расширение уже обновлено):
Затем вам будет предложено, если вы хотите, чтобы указанное расширение, нажатие обновит его, однако нажатие кнопки отключит или, возможно, даже деинсталлирует его, так что вам нужно будет переустановить или повторно активировать его снова.
Советы и приемы:
Щелчок правой кнопкой мыши по кнопке (или как она обычно вызывается на кнопке) вызовет окно, специально предназначенное для ваших расширений GNOME Shell:
И немного классики, GUI на GTK
Чтобы красиво показать пользователю настройки нашего расширения (а не лезть грязными лапами в реестр), GH предлагает нам написать GUI-код и положить его в функцию buildPrefsWidget() файла prefs.js. В этом случае напротив нашего расширения в списке «Installed Extensions» здесь мы увидим дополнительную кнопку «Configure this extension», по нажатию которой наша красота и появится.
Давайте создадим отдельную вкладку About, ведь известно, что без «Эбаута», пардон, программа не является полноценной.
Вообще говоря, для построения классического графического интерфейса у GTK есть весь ассортимент строительных блоков, , заценить кол-во и качество которых можно здесь.
Мы же воспользуемся лишь несколькими из них:
- Gtk.Notebook — это вкладки, примерно как в браузере
- Gtk.VBox — это контейнер для вертикального структурирования списка виджетов
- Gtk.Label — это базовый элемент, надпись, с возможностью HTML-форматирования
Итоговый скриншот:
Debugging your Extension
The main debugging tool is, in a terminal :
gnome-shell --replace
» Be careful to not close this terminal or you will crash your desktop »
LookingGlass
The LookingGlass can give you some well needed informations too. To open it, Alt+F2 and type lg. It is divided into the following tabs:
Evaluator : here you can evaluate random javascript code, accesing gnome shell objects and libraries. For example, write this in the evaluator and press enter:
Main.notify("Hello world")
Also, in the Evaluator tab, you have a «picker» in the left corner. Click on it, Then «pick» random object of the interface of the gnome shell to know its name. This is useful if you are trying to know «where» the object you are seeing is in the class hierarchy of the gnome shell and what kind of object it is.
- Windows : where you can see wich windows are currently active. Pay attention to wmclass. This name let you identify an application inside gnome.
- Extensions : will tell you wich extensions are installed and some other information about each extension as well as opening their source code.
Особенности работы GNOME Shell и Javascript
На дворе конец 2018-го, и Node.js/V8 — основной инструмент для запуска Javascript-кода. Вся современная web-разработка держится на «ноде».
Но GNOME Shell и вся инфраструктура вокруг него использует другой Javascript-движок, SpiderMonkey от Mozilla, и отсюда следует много важных различий в работе.
Импорт модулей
В отличие от Node.js, здесь нет require(), и модного ES6-import-а — тоже. Вместо этого есть специальный объект imports, обращение к атрибутам которого приводит к загрузке модуля:
В данном случае мы загрузили модуль js/ui/panelMenu.js из библиотеки пакета GNOME Shell, в котором реализован функционал кнопки с всплывающим меню.
Да-да, все кнопки в панели современного десктопа Linux, использующего GNOME, написаны на базе panelMenu.js. В том числе: та самая правая кнопка с индикаторами батареи, Wi-fi, громкостью звука; переключалка языка ввода en-ru.
Далее, есть особый атрибут — это список путей (строк), где будут искаться наши JS-модули. К примеру, мы выделили в отдельный модуль timeUtils.js функционал работы с таймером и положили его рядом с входной точкой нашего расширения, extension.js. Импортим timeUtils.js следующим образом:
Логирование, отладка Javascript
Ну раз у нас не Node.js, то и логирование у нас свое. Вместо console.log() в коде доступны несколько функций логирования, см. gjs/../global.cpp, static_funcs:
- «logError» — логирует стек исключения:
- первый обязательный аргумент — исключение, затем через запятую — что хочешь
- пример, если нужно распечатать стек в нужном месте:
и это нарисует в stderr в стиле:
- «print» = g_print(«%s\n», txt); — только текст + «\n» в stdout, без префиксов и окраски, в отличие от log()
- «printerr» = g_printerr(«%s\n», txt) — отличие от print в том, что в stderr
А вот отладчика для SpiderMonkey из коробки нет (не зря же я кропотливо выписал выше все доступные инструменты для логирования, пользуйтесь!). При желании можно попробовать JSRDbg: раз, два.
Выключение/включение звука
Большинство современных Linux-десктопов управляется PulseAudio, небезызвестное поделие программа за авторством небезызвестного Lennart Poettering. До сих пор у меня не доходили руки пошерстить код PulseAudio, и я был рад представившейся возможности разобраться в PulseAudio на некотором уровне.
В итоге оказалось, что для mute/unmute достаточно одной утилиты , а точнее трех команд на ее основе:
- «pactl info»: узнать — на какой звуковой выход, если их несколько, подается звук по умолчанию
- «pactl list sinks»: узнать состояние mute/unmute соответствующего устройства
- «pactl set-sink-mute %(defaultSink)s %(isMute)s»: для собственно mute/unmute
Итак, наша задача состоит в запуске команд/процессов, чтении их вывода stdout и поиске нужных значений по регулярке. Короче, стандартная задача.
В GNOME за создание процессов отвечает базовая библиотека glib, и есть отличная документация по ней. И конечно она на C. А у нас JS. Известно, что пакет Gjs сделал умную, «интуитивно-понятную» прослойку между С-API и Javascript. Но все равно понимаешь, что нужны примеры и без гугления не обойтись.
В итоге, благодаря прекрасному gist-у получаем работающий код:
Creating and Enabling your extension
To create an extension, type in a terminal
gnome-shell-extension-tool --create-extension
Name your application. For this extension, «Hello world» and press enter.
Give it a description. Something like «Show a hello world label pressing an icon in the system tray» should do.
Then you will be asked about an uuid. This is a globally-unique identifier for your extension as well as the name of your extension’s folder.
UUID Guidelines
A «Hello World» example should appear in your IDE, gedit or your Browser if all else fails.
Open the gnome-tweak-tool and enable your extension in the extensions tab.
Developer tools
Looking Glass is GNOME Shell’s integrated inspector tool and JavaScript console useful for debugging. It can be run by typing ‘lg’ in the Alt+F2 prompt and can then be exited by pressing Esc. More details are here.
Typing ‘r’ or ‘restart’ in the Alt+F2 prompt will restart GNOME Shell. This is useful when you are make changes to the GNOME Shell code while working within the GNOME Shell. You don’t need to compile anything if you only changed JavaScript code, but you need to run compilation as you would normally do for C code before restarting.
Typing ‘rt’ in the Alt+F2 prompt will reload the GNOME Shell theme. This is useful when you are a theme designer and want to test changes in your theme without restarting the whole shell. The theme file is share/gnome-shell/theme/gnome-shell.css.
Typing ‘debugexit’ in the Alt+F2 prompt will quit GNOME Shell. This is generally only useful when you are running a development version of GNOME Shell which you started from the command line; in a normal GNOME 3 session, gnome-session will just restart GNOME Shell if you exit it.
Adoption
- Arch Linux dropped support of GNOME 2 in favor of GNOME 3 in its repositories in April 2011.
- Fedora uses GNOME Shell by default since release 15, May 2011.
- Sabayon Linux uses the latest version of GNOME Shell.
- openSUSE’s GNOME edition has used GNOME Shell since version 12.1 in November 2011.
- Mageia 2 and later include GNOME Shell, since May 2012.
- Debian 8 and later features GNOME Shell in the default desktop, since April 2015.
- Solaris 11.4 replaced GNOME 2 with GNOME Shell in August 2018.
- Ubuntu uses GNOME Shell by default since 17.10, October 2017, after Canonical ceased development of Unity. It has been available for installation in the repositories since version 11.10. An alternative flavor, Ubuntu GNOME, was released alongside Ubuntu 12.10, and gained official flavor status by Ubuntu 13.04.
Reception
GNOME Shell has received mixed reviews: It has been criticized for a variety of reasons, mostly related to design decisions and reduced user control over the environment. For example, users in the free software community have raised concerns that the planned tight integration with Mutter will mean that users of GNOME Shell will not be able to switch to an alternative window manager without breaking their desktop. In particular, users might not be able to use Compiz with GNOME Shell while retaining access to the same types of features that older versions of GNOME allowed.
Reviews have generally become more positive over time, with upcoming releases addressing many of the annoyances reported by users.
Software architecture
GNOME Shell is tightly integrated with Mutter, a compositing window manager and Wayland compositor. It is based upon Clutter to provide visual effects and hardware acceleration According to GNOME Shell maintainer Owen Taylor, it is set up as a Mutter plugin largely written in JavaScript and uses GUI widgets provided by GTK+ version 3.
Features
Changes to the user interface (UI) include, but are not limited to:
- Clutter and Mutter support .
- Support for HiDPI monitors.
- A new Activities overview, which houses:
- A dock (called «Dash») for quickly switching between and launching applications
- A window picker, similar to macOS’s Mission Control, also incorporating a workspace switcher/manager
- An application picker
- Search
- «Snapping» windows to screen borders to make them fill up a half of the screen or the whole screen
- A single window button by default, Close, instead of three (configurable). Minimization has been removed due to the lack of a panel to minimize to, in favor of workspace window management. Maximization can be accomplished using the afore-mentioned window snapping, or by double-clicking the window title bar.
- A fallback mode is offered in versions 3.0–3.6 for those without hardware acceleration which offers the GNOME Panel desktop. This mode can also be toggled through the System Settings menu. GNOME 3.8 removed the fallback mode and replaced it with GNOME Shell extensions that offer a more traditional look and feel.
Extensibility
The functionality of GNOME Shell can be changed with extensions, which can be written in JavaScript. Users can find and install extensions using the GNOME extensions website. Some of these extensions are hosted in GNOME’s git repository, though they are not official.
Запуск GNOME
GNOME может быть запущен как графически, используя экранный менеджер, так и вручную из консоли. При запуске из консоли некоторые возможности могут быть ограничены.
Примечание: Поддержка механизмов блокировки экрана в GNOME обеспечивается GDM. Если запускать GNOME не при помощи GDM, то вам придется использовать другой блокировщик экрана. Смотрите .
Вручную
Сессия Xorg
- Для запуска сессии GNOME Classic добавьте следующее в файл :
export XDG_CURRENT_DESKTOP=GNOME-Classic:GNOME
export GNOME_SHELL_SESSION_MODE=classic
exec gnome-session --session=gnome-classic
После редактирования файла можно запустить GNOME при помощи команды (для получения информации о других возможностях, например сохранении сессии logind, смотрите статью xinitrc). После настройки можете использовать инструкции из статьи Запуск Х при входе в систему, например, для запуска X на tty2 путём добавления следующих команд в :
if [[ -z $DISPLAY && $(tty) == /dev/tty2; ]]; then
  GDK_BACKEND=x11 exec startx
fi
Сессия Wayland
Примечание:
- Пакет все еще нужен даже для запуска тех приложений, которые не портированы на Wayland. Приложения, которые используют определённые графические библиотеки, такие как Qt, можно принудительно запускать с использованием Wayland при помощи установки переменных среды. См. для получения более детальной информации.
Вручную Wayland-сессию можно запустить следующей командой: .
Чтобы запускать сессию GNOME на tty1 при входе в систему, добавьте следующее содержимое в . Не все приложения проверяют переменную XDG_SESSION_TYPE, из-за чего необходимо добавить отдельные переменные для Firefox и Qt:
if [[ -z $DISPLAY && $(tty) == /dev/tty1 && $XDG_SESSION_TYPE == tty ]]; then
  MOZ_ENABLE_WAYLAND=1 QT_QPA_PLATFORM=wayland XDG_SESSION_TYPE=wayland exec dbus-run-session gnome-session
fi
Установка
Доступны две группы:
включает в себя дополнительные приложения GNOME, такие как архиватор, диспетчер дисков, текстовый редактор и набор игр
Обратите внимание, что эта группа опирается на .. Базовый рабочий стол состоит из GNOME Shell, плагина для оконного менеджера Mutter
Он может быть установлен отдельным пакетом —
Базовый рабочий стол состоит из GNOME Shell, плагина для оконного менеджера Mutter. Он может быть установлен отдельным пакетом —
Примечание: mutter выступает в роли композитного менеджера, который использует аппаратное ускорение для предоставления эффектов. Менеджер сеансов GNOME автоматически определяет, может ли ваша система работать с GNOME Shell, и, если нет, возвращается к использованию рендеринга с использованием llvmpipe.
Пакеты дистрибутивов
Наиболее простой способ установки расширения и коннектора — с помощью менеджера пакетов вашего дистрибутива.
В Firefox вы должны вручную установить расширение с сайта Mozilla Addons. Пожалуйста учтите, что Firefox поддерживается только начиная с версии 8 коннектора.
Opera поддерживалась начиная с версии 7 коннектора до версии 10.1. Однако расширение было деактивировано на сайте расширений Opera без какого-либо технического объяснения.
Debian Linux
Пакет доступен в Stable: chrome-gnome-shell.
Для установки пакета наберите:
$ sudo apt-get install chrome-gnome-shell
Fedora Linux
Пакет доступен в Fedora 26 и новее: chrome-gnome-shell.
Для его установки наберите:
# dnf install chrome-gnome-shell
С более старыми версиями используйте Copr region51/chrome-gnome-shell:
# dnf copr enable region51/chrome-gnome-shell
# dnf install chrome-gnome-shell
Gentoo Linux
Ebuild доступен в основном дереве. Просто наберите под пользователем root
# emerge -av gnome-extra/chrome-gnome-shell
Пакет доступен в Universe репозиториях
Для установки пакета наберите:
$ sudo apt-get install chrome-gnome-shell


