Interface basics
Содержание:
- Milestones
- The Graph
- SmartGit
- Different level of logging
- Tabs
- QGit
- Cross-platform Git Clients
- Hear Why Customers Love GitKraken
- Git Clients for Mac
- Git Cola
- ⚠️ End of project ⚠️
- rkt — the pod-native container engine
- Git-Cola
- Free Tools
- Amending commits
- Git Clients for Linux
- Commit Templates
- Executive Summary
- Gitg
- Making a commit
- Quick Start: Windows
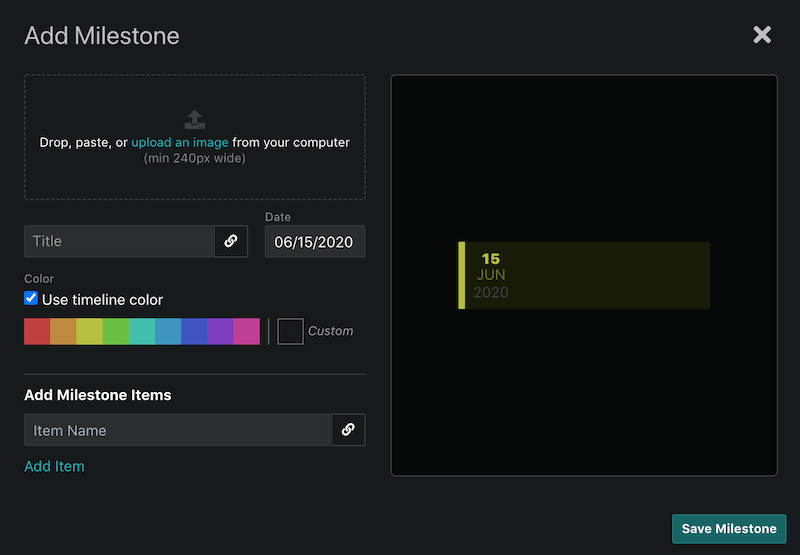
Milestones
Build out your timeline by adding milestones. You may add milestones by clicking the +Add Milestone button or bulk add milestones by selecting dropdown menu option.
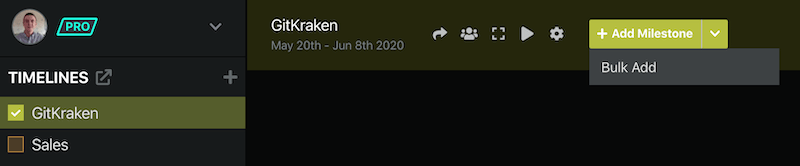
Alternatively, hover your mouse over the time line to add a milestone.
As you add milestones, GitKraken Timelines automagically adjusts your timeline to view all the milestones.
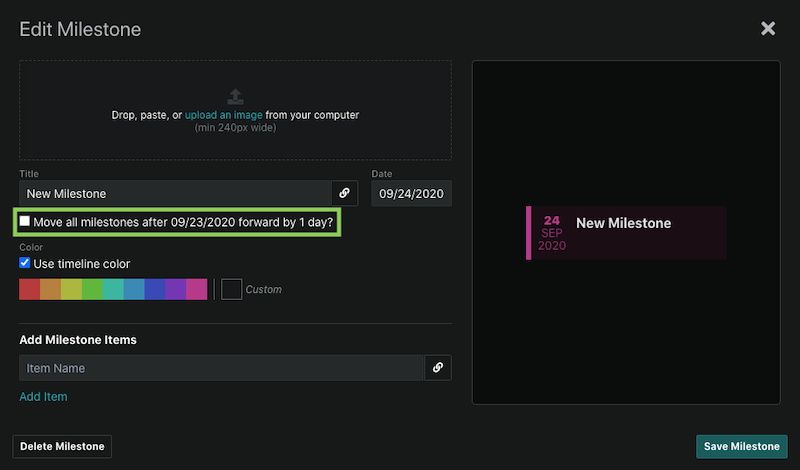
Edit Milestones
You can edit or delete a milestone by selecting the ellipsis icon on the milestone.
When editing an existing milestone’s Date, you will have the option to move all milestones after, forward or backward, by the number of days moved.
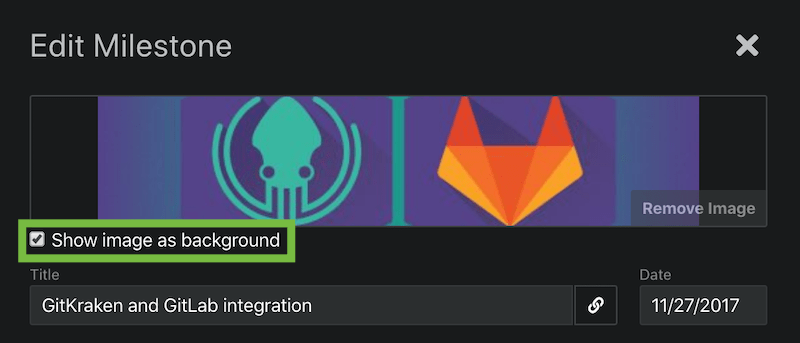
Add Images
To add an image cover to a milestone, click on a milestone. Then you may either click to browse to an image, or drag and drop an image file.
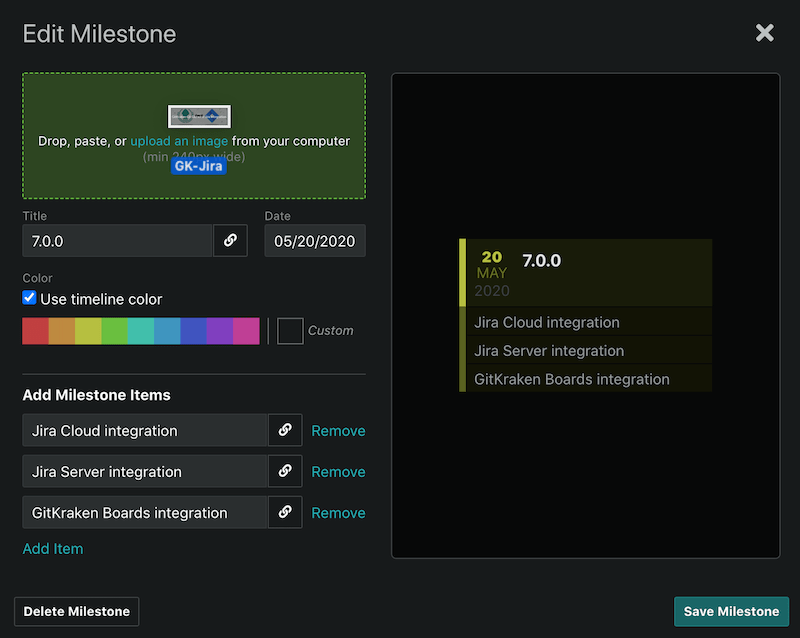
You also have an option to set this image as a background to your milestone. This means the milestone text will layer over the image.
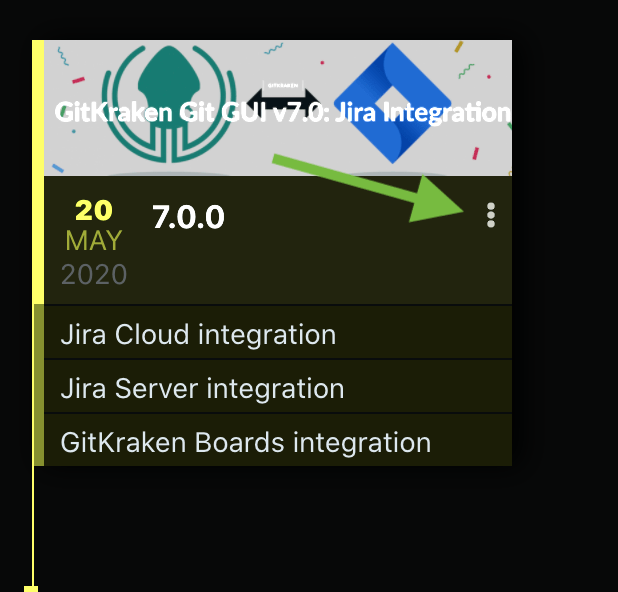
Milestone Items
Each milestone can have links and any number of milestone items. To add a milestone item, first click on a milestone.

You may then enter items from the Add Milestone Items section, and then click to nest the item under the milestone. Additionally, you may click the icon to add a link to this milestone item.
Be sure to hit Save Milestone to save your changes.
A link will then become available on the timeline by the milestone item.
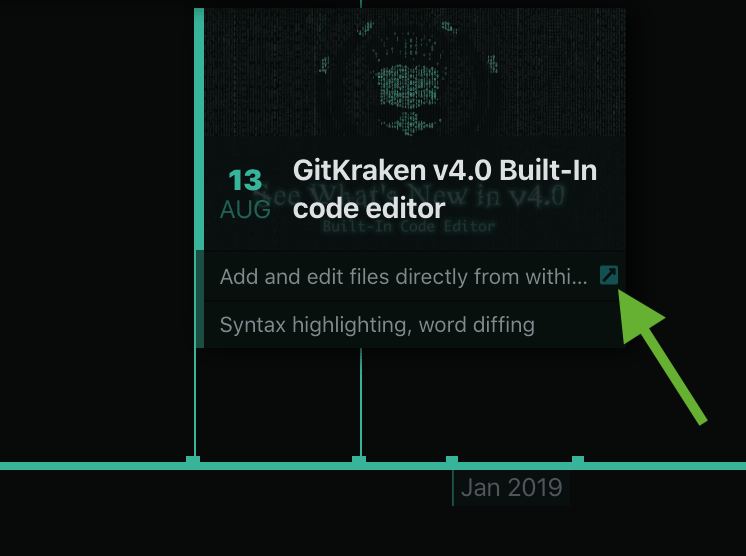
To view a hyperlink, click into a milestone and then click on the icon.
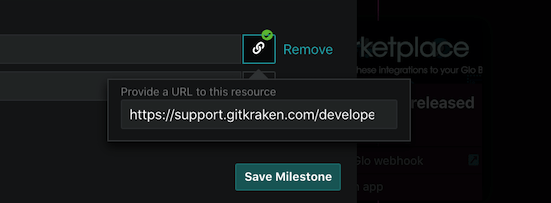
And to remove a hyperlink, click on the option.
Embed Youtube videos
Click to edit a milestone by selecting the ellipsis icon on the milestone. Then click the icon to paste a Youtube link.

Once you save, click any thumbnail to start watching!
The Graph
Oooo colors!
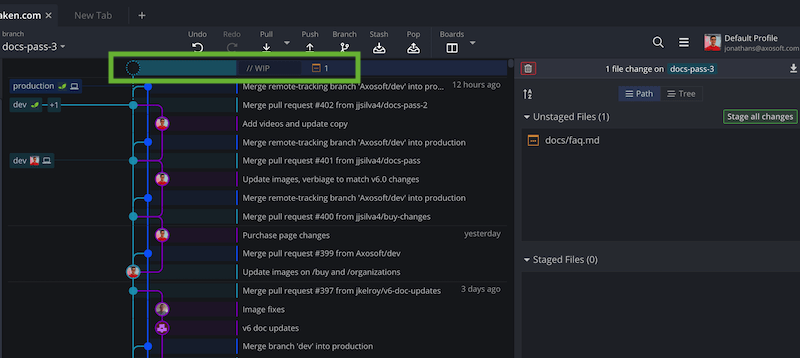
The graph in GitKraken is the core of your repo and a representation of the Directed Acyclic Graph (DAG). Your commits are displayed here, along with commits from other contributors.
Each row of the graph represents one commit, and the top is always for the latest changes. An interactive //WIP (Work-In-Progress) node will show if the working directory has changed since the last commit.
Branches and tag labels on the left side of the graph are pointers to specific commits, and each vertical column represents a branch currently available on the repository.
Columns can intersect through merge commits as shown in the graph legend. As also shown, multiple branches can be at the same place of a single commit and can be both local and remote.
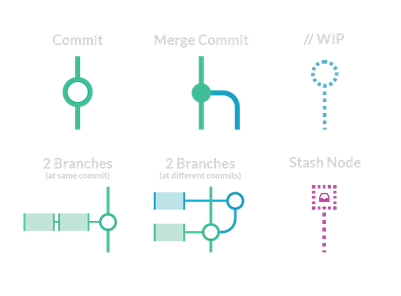
For a given vertical track, you can read from bottom to top, and right to left to see how changes are introduced into a focused branch.
SmartGit

SmartGit — это также кроссплатформенный, мощный, популярный клиент git gui linux, Mac OS X и Windows. Он предназначен для профессионалов, и позволяет пользователям решать повседневные проблемы, повышая свою продуктивность за счет использования эффективных рабочих процессов.
Пользователи могут использовать его с собственными репозиториями или другими хостинг-провайдерами. Он имеет следующие особенности:
Поддерживает запросов и комментариев Git;
- Поддержка SVN репозиториев;
- Имеет GIT-потоки, SSH-клиент и сравнение файлов/инструменты слияния;
- Сильно интегрирован с GitHub, BitBucket и Atlassian Stash.
Открыть *.sh файл текстовым редактором
Заменить
#SMARTGIT_JAVA_HOME=/usr/lib/java
на
SMARTGIT_JAVA_HOME=/usr/lib/jvm/java-1.6.0-openjdk/jre
Последнюю строку кода
$_JAVA_EXEC $_VM_PROPERTIES -Xmx${MAXIMUM_HEAP_SIZE} -Dsmartgit.vm-xmx=${MAXIMUM_HEAP_SIZE} -jar "$SMARTGIT_HOME/lib/smartgit.jar" "<a href="mailto:$@"">$@"</a>;
заменить на
$_JAVA_EXEC $_VM_PROPERTIES -Xmx${MAXIMUM_HEAP_SIZE} -Dsmartgit.checkIncompatibleJava=false -Dsmartgit.vm-xmx=${MAXIMUM_HEAP_SIZE} -jar "$SMARTGIT_HOME/lib/smartgit.jar" "<a href="mailto:$@"">$@"</a>;
Распаковать и запустить *.sh файл.
Different level of logging
Multiple logging profiles are available in confs/ to be able to have different traces of your execution (particularly useful for debugging). For instance, you will find:
- debug.logcfg: Similar to using -vv, but also puts logs in a debug.log.
- debug_network.logcfg: The root logging level is INFO (-v), the network activities are in DEBUG mode and will be logged in debug_network.log.
- testing.logcfg: Mostly for coverage tests, do not set any logging config on stdout, but:
- DEBUG logs and above are available in debug.log.
- INFO logs and above are available in info.log.
- WARNING and ERROR logs are available in error.log.
Under normal circumstances, we expect error.log to remain empty../
To load one of those logging profiles:
$ LOG_CFG=confs/debug.logcfg bin/umake
Tabs
Quickly switch between multiple repositories and Glo boards!

You can add new tabs, drag & drop to rearrange, and remove tabs from the top bar. You can also use the corresponding shortcut keys cmd+1-9 on Windows/Linux and cmd+1-9 on mac to quickly switch between repositories.
Tip: You can open a new tab with the + icon (shortcut: cmd/ctrl+T) and you can close a tab with middle-click (shortcut: cmd/ctrl+W)
Tabs are saved for each profile, so you can have multiple sets of tabs that will open when you switch profiles!

For more details on the interface, like soloing remotes, visit Hiding and Soloing.
QGit
If Gitg is the GNOME client, QGit is the Plasma/Qt one. QGit has been around for a while, and it’s really refined its approach. QGit also has an excellent visual representation of your project’s history that’s intuitive to navigate. You can not only see what the commit was but the affected files as well.
It also has a great file tree browser that lets you dig through your project in a snap and view files and the changes made to them by revision.
QGit taks a more classic approach to its controls. Most of them are in the toolbar to the top of the window. You can manage everything from your own commits to branches from there. It’s nothing groundbreaking but is effective.
Cross-platform Git Clients
If you’re looking for Git clients that are all-rounders that can run in Linux, Windows, or Mac platforms, we’ve compiled a list below:
1. GitKraken

What is more, you can easily fix mistakes with one click.
The tool has a built-in code editor where you can start a new project and edit the files directly in GitKraken. Plus it lets you track your tasks as it can sync with GitHub in real time, organize tasks in the calendar view, and mention team members to notify them about updates.
The software is free for non-commercial use. But there are GitKraken Pro and Enterprise for business owners to use as well. Each cost $4.08/month and $8.25/month respectively.
2. SmartGit

It has a single-view feature where you can see your index, working tree, and commands all in the Log window.
The tool lets you compare or merge files and edit them side-by-side. It can resolve merge conflicts by using the Conflict Solver. SmartGit also provides SSH client, an improved rebase performance and Git-Flow that allows you to configure branches without additional tools.
It integrates with popular Git platforms such as GitHub and BitBucket, making collaborative pull requests and code reviews easier.
The software is free to download. For commercial use, you can purchase a in a single payment ‒ $129 for a year to $319 for a lifetime or subscribe monthly for $8.99.
3. Git Cola
Git Cola is a simple yet powerful Git client that was developed using Python, and it’s free to use. The interface is made of multiple tools that you can hide and rearrange to your needs. The four panes of the interface allow you to view separate aspects of your project.
It also has Git-Dag, a Dag visualizer for commits and branches and the list of keyboard shortcuts is useful for an efficient and quicker work-flow.
Moreover, Git Cola will remember your work layout and restore it back to how it was the next time it’s launched.
Other than supporting custom GUI settings, the tool has language settings as well. Since Git Cola is open source, the tool is easy to maintain and update.
4. Aurees

simple and fastfree to download
You need to log in to your GitHub account to use it.
Aurees shows commit and merging changes in side by side windows, making it effortless for you to trace back and resolve conflicts quickly. Tags are color coded so that you can navigate through the repo with ease.
With Aurees you can get an idea of which team member make what changes as it allows you to explore all documents. You can also indent merge commits to see line numbers or differences when comparing documents.
Hear Why Customers Love GitKraken

«I’m a command line junkie, but I use GitKraken in a few ways to enhance my command line experience with Git…It’s a lot easier to come into GitKraken and use the diff tools to fix anything that went wrong with a rebase.»Ken S, Ionic

«Being an enthusiast for intuitive and seamless UIs, I was immediately drawn to this tool. When you start diving deeper, you realize the remarkable user experience that the developers at Axosoft have created.»Michael C, Sensa Technologies

«When I found GitKraken, everything was so much easier. It saves a lot of time! And the addition of the Glo Boards has been a game changer. We have our whole team on it, whether they are developers or not.»James P, TeamBuildr
«I’m no stranger to the command line, but I love the version history available through GitKraken, and the easy diff tool integrations.»Bruce B, Adobe
«GitKraken made what would have otherwise been a pretty daunting transition , simple with great versioning controls and a really easy to follow UI.»Nathan M, Johnson Controls

» has been nothing but helpful for us to hire on new developers that have never used Git software—or have never used the CLI—to just jump right in and use our version control.»Teyler H, Nonprofit Organization

«When we’re modifying, staging, and committing, not needing to use Terminal commands is very valuable for me and my time. Being able to focus on what matters most is why I use GitKraken.»Justin W, Catapult

«I love using GitKraken because it makes collaboration easy. It provides my teammates and I with a simple way to visualize changes and track progress.»Amel H, Tufts University

«My favorite feature is the tree view. Git can be so confusing at times, but this visualization tool has helped me and my team sort through many complex merges.»Jeremiah Z, Intuit

«When I first started using version control, I was so confused using the Terminal. Then, I met GitKraken! I was able to easily do and see the actions that I was doing.»Maisa M, CodeAcademy

«I like that I can easily ignore files, drag and drop to merge branches, and add tags to my commits.»Chris O, Student

«GitKraken has turned me from being a child with a nuclear bomb using Git, to a doctor with surgical precision in my commits and Git history editing.»Theko L, Axoni

«The reason we like GitKraken so much is because it really speeds up our workflow, and with the addition of Glo Boards, it reduces the number of programs we use.»John G, Homi

«I use GitKraken because I learn visually, and Git is not very intuitive if you see things visually. GitKraken has been the #1 tool I’ve used to learn Git.»John F, Heupr

«I love the interface of GitKraken; it makes my Git workflow so seamless and easy. Everything is just easy to see visually, and it’s just what I would expect it to be.»Matt G, The Nerdery
Git Clients for Mac
For Mac users, no need to worry as there are developers who’ve created Git GUI clients that run on Mac. A few of the recommended ones are:
1. GitUp
GitUp is a Git GUI client specifically for Mac users. It’s free to download, open source, and comes with GitUpKit – a toolkit that lets you build Git apps. The tool is easy to use and allows you to see your branches and merges clearly.
If you’re new to Git, GitUp offers a safe environment for you to learn and experiment. The interface is clutter-free, and it has a Live Map feature that lets you see your project’s progress without refreshing. Plus the Undo and Snapshot features enable you to change and record your steps.
Speed is one of the best things when it comes to GitUp. Not only it can load 40,000 commits in less than a second, but you can also instantly search for commits, branches, and tags in the repository. Git operations can’t get any quicker either since the tool is fully featured.
2. GitBox
This GIt GUI client has claimed that working with Git commands and operations can be easy as checking your mail. Well, it’s true since the tool allows you to commit, pull, and push code changes with one click.
With GitBox, you can automatically retrieve new commit from your server, avoiding merge commits and conflicts. You can also search for commits in the repository history by author or description.
Adding and undoing commands such as branch reset, cherry picking, and rebase is pretty straightforward as well when using GitBox.
You can download the software for free, and it’s also available on the Mac App Store with a license for $14.99. If you’re a student, you can get a 50% discount by scanning your student ID.
3. GitX-dev
GitX-dev is a free Git client for Mac, designed and created to be a first-class, maintainable tool for active developers. The tool is specialized for software developers, and it’s full-featured for most Git work-flows.
You can browse your repository history and view a nicely arranged diff of any revision. Plus you will also be able to see a complete tree of the revisions.
You can copy files by dragging them out of the tree and dropping them into your system or preview them with QuickLook.
Changes can be searched based on the author or subject. GitX-dev supports large repositories and all parameters of git-rev-list as well.
Git Cola
Git Cola has been around for a decent amount of time, and it’s a classic example of an open-source Linux tool that does exactly what it needs to, without getting bogged down with a lot of unnecessary extras.
Git Cola is written in Python and features a GTK interface, so it integrates perfectly with most desktops. Since it’s open source, it’s also available in most distribution repositories, making it easy to update and maintain.
The interface is broken down into four panes. Each displays a separate aspect of your project’s Git repo. It lets you easily visualize the difference between commits in your files, and you can quickly navigate and browse between branches.
⚠️ End of project ⚠️
This project has ended, and all development/maintenance activities have halted.
As it is free software, people are free and welcome to fork and develop the codebase on their own.
However, to avoid any confusion, the original repository is archived and we recommend any further fork/development to proceed with an explicit rename and rebranding first.
We encourage all interested parties to mirror any relevant bits as we can’t actively guarantee their existence in the future.
rkt — the pod-native container engine
rkt (pronounced like a «rocket») is a CLI for running application containers on Linux. rkt is designed to be secure, composable, and standards-based.
Some of rkt’s key features and goals include:
- Security: rkt is developed with a principle of «secure-by-default», and includes a number of important security features like support for SELinux, TPM measurement, and running app containers in hardware-isolated VMs.
- Composability: rkt is designed for first-class integration with init systems (like systemd, upstart) and cluster orchestration tools (like Kubernetes and Nomad), and supports swappable execution engines.
- Open standards and compatibility: rkt implements the appc specification, supports the Container Networking Interface specification, and can run Docker images and OCI images. Broader native support for OCI images and runtimes is in development.
Git-Cola

Git-cola представляет из себя мощный, функциональный Git клиент для Linux, который предлагает пользователям красивый графический интерфейс git. Он написан на Python и выпущен под лицензией GPL.
Интерфейс Git-cola включает несколько инструментов для совместной работы, которые могут быть скрыты и изменены в соответствии с предпочтениями пользователей. Он также предлагает пользователям множество полезных горячих клавиш.
Вот его дополнительные возможности:
- Множество команд;
- Пользовательские настройки окна;
- Настраиваемое и изменяемое окружение;
- Языковые настройки;
- Поддержка пользовательских настроек интерфейса.
sudo apt-get install git-cola
Free Tools
When your students are using one ecosystem for managing their Git repos with the GitKraken Git GUI and tracking issues with GitKraken Boards, it makes it easier for them to learn and collaborate, and easier for you to review. Plus, GitKraken Timelines is a great tool for communicating project milestones and deadlines to your class.
Omar Jair Purata FunesTeacher at Universidad de Guanajuato in León, Mexico
GitKraken Git GUI
The GitKraken Git GUI is a cross-platform client for Windows, Mac, & Linux, simplifying complicated Git commands into drag-and-drop actions. GitKraken offers seamless integrations with GitHub and GitHub Enterprise. Students can resolve merge conflicts without leaving the app, and use GitHub Actions to create workflow automations.
GitKraken Boards
GitKraken Boards offers an easy way for students and teachers to track individual and group tasks! GitKraken Boards syncs in real-time with GitHub Issues and GitHub Milestones. Students can use GitHub Actions to automate their workflow by triggering actions in GitKraken Boards by linking cards to pull requests descriptions or commit messages in GitHub. Students have multiple options for viewing tasks and can add labels, @mention team members, and associate cards to curriculum milestones.GitKraken Boards is not currently included in GitKraken Stand-Alone, but it’s free for students and teachers to sign up!
GitKraken Timelines
GitKraken Timelines will help you and your students stay organized by visualizing upcoming project deadlines and curriculum milestones in a linear timeline. Add items to milestones that students are required to complete; create timelines for each class and view them layered on top of one another using the overlay feature. Add images to milestones or as background images.
Amending commits
GitKraken allows you to amend a commit message, add additional changes, or both.
To add more changes, amend a commit by clicking on the //WIP node on the graph.

Stage the target files and then be sure to check the Amend box to apply your changes to the previous commit.
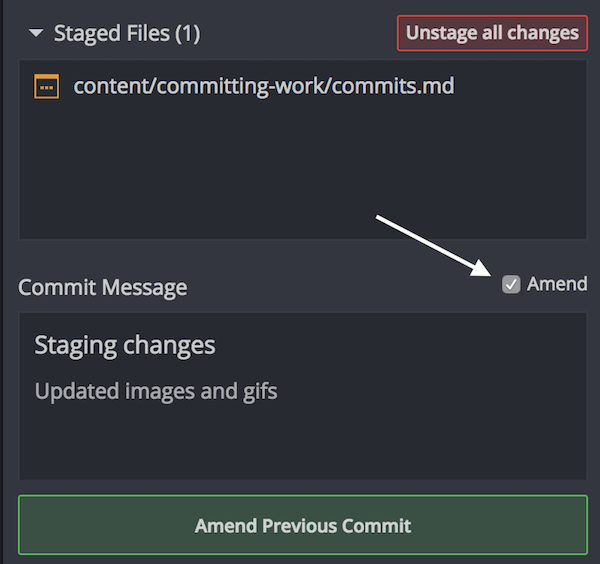
If you only need to update the commit message, select the most recent commit and click in the message box to amend the message.
To accommodate viewing a longer commit description, click on the bar at the the bottom of the message box and drag downwards to dynamically resize the text field.

Select Update Message to save your changes or Cancel Amend to discard.
Note: Amending commits which are already pushed to a remote are more difficult to apply and would require a force push for the rewrite.
Git Clients for Linux
Looking for Git GUI clients that work on Linux and choosing the one that is compatible for you can be time-consuming. To make it much easier, we’ve listed some for you:
1.
QGit is a free Git GUI for Linux that can graphically show different branches and allows you to see patch content and changes in files. With this tool, you can view archive trees, file histories, revisions, and diffs.
You’re also able to compare files, and visually change modified content using QGit. Applying or formatting patch series from selected commits, and moving commits between two QGit instances are also possible.
You can use the same semantic of Git commits to create new patches and implement common StGit commands. Scripts and commands sequences can be connected to a custom action.
2. Gitg
The user interface of Gitg is straightforward to use. It can open existing Git repositories saved in your computer. You can download the software for free, and it has a GPLv2 license. Remote repositories can also be viewed using Gitg.
Gitg enables you to perform common Git operations, browse commits, and preview files. You can see commit messages, untracked and unstaged commits through the commit view.
The downside of this tool is that large files tend to load slower, and it doesn’t show a project’s history.
3. Git Force
Git Force is a visual front-end tool for Git that runs on Linux as well as Windows, and it’s free to download. This software will help beginners as the interface is intuitive with a drag and drop feature, and it can be used solely without calling a command line Git tool.
You can create multiple Git repositories and branches, managing them all using Git Force. The tool is able to support one or more remote repositories and can quickly scan local ones.
The work you do in a git repository will be picked up by Git Force on the first refresh. However, it only works on most common Git commands, and because of that, it doesn’t keep any detailed state information.
Commit Templates
Reading the Commit Template
When you open a repository, GitKraken will first check for a commit template set up in your repository’s . If no commit template is found, it will then check your default (global) . If no commit template is found there either, then no commit template will be populated in GitKraken.
Creating and Updating the Commit Template
You can create and update a commit template in GitKraken by visiting Preferences Commit Template.
If a commit template was read from your local git config, any changes you make to the template in GitKraken will save to the file specified.
If a commit template was not read from your default or you are creating a template for the first time, any change you make to the template in GitKraken will be written to a file called in your repository’s directory. GitKraken will also update your repository’s git config setting to point to this file. This allows you to make changes to your local commit template without overwriting your global commit template for all of your other repositories.
Checking the option will automatically apply the template to the commit message pane. If this option is not checked, the commit message pane will be blank.
There are three different ways to set up commit templates in GitKraken:
-
Create the template in GitKraken — This will create a file called in your repository’s directory.
-
Add a repo-specific commit template — Open a terminal in your local repository and run
-
Add a global commit template — Open a terminal window and run
Note: Any changes made in GitKraken to a global commit template will cause GitKraken to create a file in your local directory and point your repository’s git config setting to the file
Executive Summary
While many software methodologies have fallen in and out of favor over the decades, it’s clear that DevOps is not a trend, and it’s well on its way to becoming the standard way of software development and operations. Today, enterprise teams are at various stages of their DevOps transformations, working towards faster, more secure delivery of their technologies to gain a competitive advantage.
When developers work in tandem with IT leaders to remove roadblocks and create a seamless software development lifecycle, it can have an incredible effect on the productivity, performance, visibility, collaboration, and innovation of the organization.
That being said, it’s not an easy or straightforward transition to DevOps. It requires significant changes, including: evolving employee mindsets, introducing the appropriate tools, and teaching new skills. No matter the stage of your DevOps transformation, your focus should be continuous improvement. Start with foundations, and then identify your unique constraints; once those constraints no longer hold you back, repeat the process.
Not having the right tools is a fairly easy constraint to eliminate and well-worth the investment. The mission of this report is to provide guidance and insights on the best DevOps tools from trailblazers who have already successfully implemented them. We asked our global community of developers which tools they rely on for DevOps success, and are proud to present this report, which is based on over 2,700 responses.
Gitg
Gitg is the default graphical Git client for the GNOME desktop. Like many newer GNOME utilities, it’s sort of bare bones in appearance. GNOME’s minimalist design choices don’t mean that Gitg can’t do exactly what you need it to.
Gitg has a great visualization of the project’s history, and it lets you select your branch on the fly. Its commit screen is a little confusing at first, but its actually very easy to use once you get the hang of it. It presents you with the staged changes, and you can easily evaluate them right there and create your commit.
Gitg is an excellent option if you’re looking for something simple that fits right in with your desktop.
Making a commit
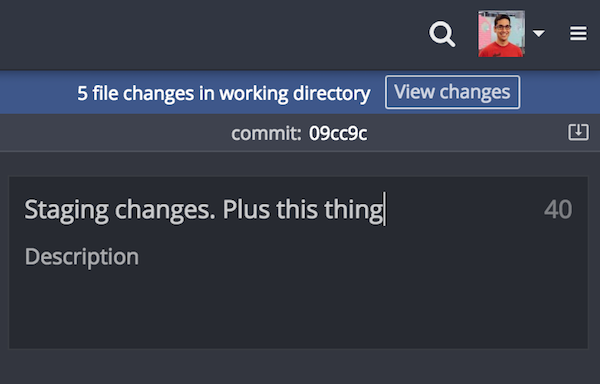
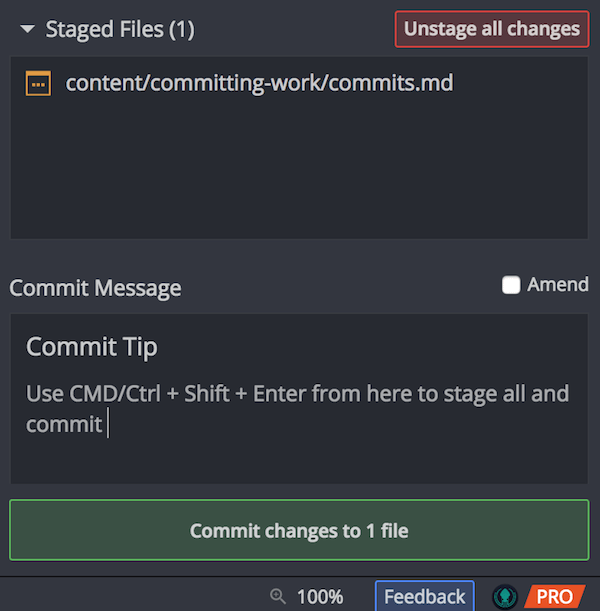
To make a commit in GitKraken, select your Work in Progress and to view recent changes on the Commit Panel.
Select the files you wish to stage, and click on any files you wish to review in the diff. To stage all your files, use the keyboard shortcut ⌘ShiftS for Mac or CtrlShiftS for Windows or Linux.
When you’re ready, type your message and hit commit to commit your changes. You can also use this Commit keyboard shortcut ⌘ + Enter for Mac or Ctrl + Enter if you are on Linux or Windows.
The graph updates with your commit, but the undo button or this keyboard shortcut
⌘ + Z for Mac or Ctrl + Z for Windows/Linux can undo a commit made by mistake.
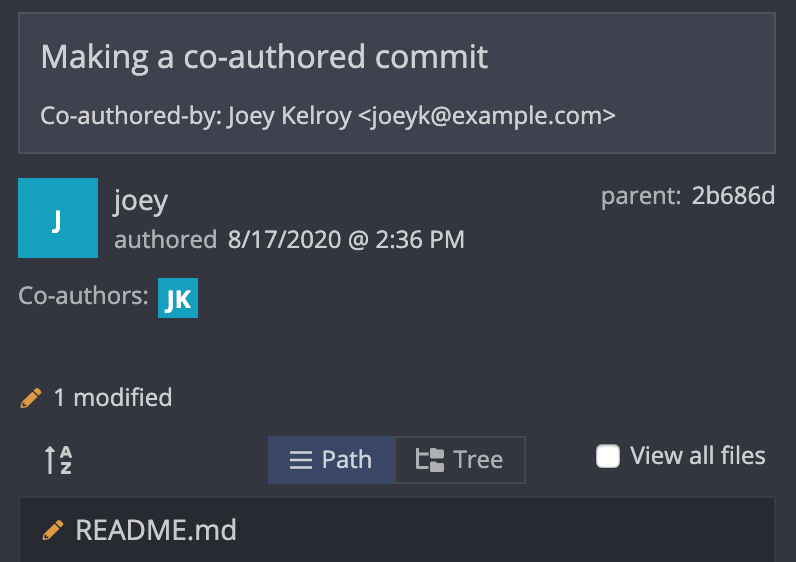
Committing with Co-Authors
To add co-authors to a commit, add a line to your commit description using the following format:
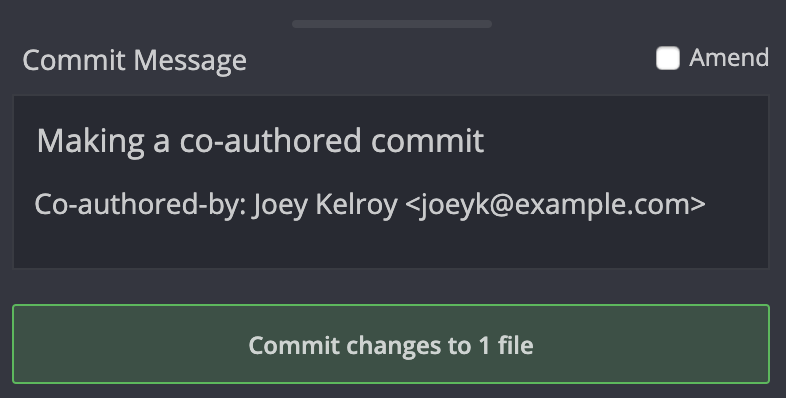
The commit panel will then show the co-author in the history for that commit:
Quick Start: Windows
Prerequisites:
- Windows 7 or newer
First, download and bootstrap vcpkg itself; it can be installed anywhere,
but generally we recommend using vcpkg as a submodule for CMake projects,
and installing it globally for Visual Studio projects.
We recommend somewhere like or ,
since otherwise you may run into path issues for some port build systems.
> git clone https://github.com/microsoft/vcpkg
> .\vcpkg\bootstrap-vcpkg.bat
To install the libraries for your project, run:
> .\vcpkg\vcpkg install
You can also search for the libraries you need with the subcommand:
> .\vcpkg\vcpkg search
In order to use vcpkg with Visual Studio,
run the following command (may require administrator elevation):
> .\vcpkg\vcpkg integrate install
After this, you can now create a New non-CMake Project (or open an existing one).
All installed libraries are immediately ready to be ‘d and used
in your project without additional configuration.
If you’re using CMake with Visual Studio,
continue .
In order to use vcpkg with CMake outside of an IDE,
you can use the toolchain file:
> cmake -B  -S . -DCMAKE_TOOLCHAIN_FILE=/scripts/buildsystems/vcpkg.cmake
> cmake --build
With CMake, you will still need to and the like to use the libraries.
Check out the for more information,
including on using CMake with an IDE.
For any other tools, including Visual Studio Code,
check out the integration guide.


