Как в linux создать rdp подключение
Содержание:
- For users with a distro that supports Snap packages, including Ubuntu
- For users with a distro that supports Flatpak, including Ubuntu
- Options
- Установка необходимого ПО «на минималках», тестирование подключения
- Способ № 1 С помощью реестра (ручной метод):
- Настройки и аудит безопасности RDP
- Отмена публикации приложений RemoteApp
- Извлечение граблей
For users with a distro that supports Snap packages, including Ubuntu
We are still working to deliver a stable Snap package, but we still have many issues with SNAP packaging. If you encounter any issues, try first an other mean of installation and only after report the problem through https://github.com/FreeRDP/Remmina/issues.
Snap currently lacks some functionalities, read this chapter to find more informations.
Please also note note that currently the SNAP package does not work under Ubuntu 17.10 + Wayland, see issue #1414.
Ensure you’ve installed in your system. Then in Ubuntu you can install the last release from the Software center, looking for , otherwise you can install it from terminal with:
sudo snap install remmina
Please note that this is not enough to make remmina fully functional, due to some limitations of the snap subsystem.
Some features, for example password saving via a keyring, are disabled and must be manually enabled:
sudo snap connect remmina:avahi-observe :avahi-observe # servers discovery
sudo snap connect remmina:cups-control :cups-control # printing
sudo snap connect remmina:mount-observe :mount-observe # mount management
sudo snap connect remmina:password-manager-service :password-manager-service # password manager
Some features just don’t work, for example accessing your personal ~/.ssh directory is not possible for a snap. You have to manually copy your ~/.ssh/* files under ~/snap/remmina/common/.ssh/
If you want to install latest git revision of remmina, you can use it from the channel:
sudo snap install remmina --edge
Or update the current installed version with the selected channel:
sudo snap refresh remmina --channel=edge # use --channel=stable otherwise
Snap packages will be updated automatically and will include both latest git and latest release (for better security).
For users with a distro that supports Flatpak, including Ubuntu
flatpak remote-add --user --if-not-exists flathub https://flathub.org/repo/flathub.flatpakrepo
flatpak install --user flathub org.remmina.Remmina
flatpak run --user org.remmina.Remmina
If you use SSH agent (https://github.com/flatpak/flatpak/issues/1438 )
flatpak run --filesystem=$SSH_AUTH_SOCK --env=SSH_AUTH_SOCK=$SSH_AUTH_SOCK org.remmina.Remmina
Just be aware that flatpak store data for installed applications (the XDG config/data folders) under
So for instance, if you previously have installed remmina with another package manager, you will have to transfer what was under and under, respectively and
Options
-0
- Attach to the admin console of the server.
- -a bpp
- Sets the color depth for the connection to bpp bits per pixel. Valid values are 8, 15, 16, 24 and 32. The default value is the color depth of the
FreeRDP-window. - -c dir
- Sets the working-dir to dir. This parameter is only used when an AlternateShell (-s shell) is requested. dir should contain the
executable file specified in the AlternateShell. - -D
- Removes the windows decorations.
- -d
- Domain used in authentication.
- -f
- start in full screen mode. This mode can always be en- and disabled using Ctrl-Alt-Enter.
- -T text
- Sets the window title to text.
- -g geometry
- Sets the size of the FreeRDP window (and of the remote desktop, when establishing a new connection). geometry can have one of the following
forms: - • WxH — in this case the resulting window will be of WxH pixels.
- • P% — in this case the resulting window will be P% of your screen.
- • The special keyword workarea — in this case the resulting window will be of the same size as your workarea.
- -k id
- Sets the keyboard-layout-id to id.
- -m
- Don’t send mouse motion events.
- -n hostname
- Set the reported client hostname to hostname. Default is to automatically detect the hostname.
- -o
- Play audio on the console instead of redirecting to the client.
- -p password
- Password used in authentication.
- -s shell
- Sets the startup-shell to shell. This parameter should contain a complete path to the alternate shell. If the alternete shell requires a different
working directory use -c dir. - -t port
- Connect to port, instead of the default 3389.
- -u username
- Username used in authentication.
- -x flag
- Set the experiance performance flags. flag can be one of:
- • m — (modem): Equivalent to 15.
- • b — (broadband): Equivalent to 1.
- • l — (lan): Equivalent to 0.
- • num — A hexadecimal number that represents a bit-mask, were numbers mean the following :
• 1: Disable desktop wallpaper.
• 2: Disable full-window drag (only the window outline is displayed when the window is moved).
• 4: Disable menu animations.
• 8: Disable user interface themes.
• 20: Disable mouse cursor shadows.
• 40: Disable cursor blinking.
• 80: Enable font smoothing.
• 100: Enable Desktop Composition.
- -z
Enable compression.
- —app
initialize a RemoteApp connection. This implies -g workarea.
- —ext
load an extension
- —no-auth
Skips authentication. This is useful e.g. for the current FreeRDP server that doesn’t yet support server-side authentication.
- —no-fastpath
Disables fast-path. Use slow-path packets instead, which have larger headers. It might be good for debugging certain issues when you suspect it might be
linked to the parsing of one of the two header types.
- —gdi
GDI rendering backend. backend can be either sw (software) or hw (hardware).
- —no-osb
Disable off screen bitmaps.
- —no-bmp-cache
Disable bitmap cache.
- —plugin
load a plugin
- —rfx
Enable RemoteFX.
- —rfx-mode
RemoteFX operational flags. flags can be either v, i), default is video.
- —nsc
Enable NSCodec.
- —disable-wallpaper
Disable wallpaper.
- —composition
Enable composition (RDVH only, not to be confused with remote composition).
- —disable-full-window-drag
Disable full window drag.
- —disable-menu-animations
Disable menu animations.
- —disable-theming
Disable theming.
- —no-rdp
Disable Standard RDP encryption.
- —no-tls
Disable TLS encryption.
- —no-nla
Disable network level authentication.
- —sec proto
force protocol security. proto can be one of rdp, tls or nla.
- —ntlm
force NTLM protocol version. version can be one of 1 or 2.
- —ignore-certificate
ignore verification of logon certificate.
- —version
Print version information.
Установка необходимого ПО «на минималках», тестирование подключения
2.3 Установить русскую локаль и раскладку
Localisation Options
- Change Locale, снимаем * с en-GB.UTF-8 и устанавливаем напротив ru-RU.UTF-8. Подтверждаем, и в следующем окне выбираем ее же, как основную.
- Change Timezone, и выберите страну и город часового пояса.
- Change Keyboard Layout, там Generic 105-key (Intl) PC → Other → Russian → Russian → Control+Shift (или Alt+Shift, по желанию, для переключения раскладки) → No temporary switcher → Right Alt (AltGr) → No compose key.
FinishFinish
UTF-8Guess optimal character setLet the system to select…8×16
Midnight Commander
mcedit
2.6 Вынесем волатильные разделы на виртуальные диски
/tmp/var/log
- система не точила попусту sd-карту,
- было меньше шансов, что при аварийном отключении питания развалится корневая файловая система,
- чтобы в отдаленном будущем логи не забили свободное место на карте.
/etc/fstab
/var/log/tmp
сесть за физический терминал
Способ № 1 С помощью реестра (ручной метод):
1. Правим реестр. Запускаем regedit.exe. И идем в ветку:
HKEY_LOCAL_MACHINE\SOFTWARE\Microsoft\WindowsNT\CurrentVersion\TerminalServer\TSAppAllowList
В разделе TSAppAllowList создаем новый подраздел Applications. Далее создаем подразделы для программ, которые должны будут запускаться в качестве RemoteApp. Для каждой программы свой подраздел. Для проверки создадим подраздел с названием iexplore браузера Internet Explorer. Переходим в него и создаем два строковых параметра Name и Path. Для параметра Name задаем значение iexplore.exe, а для Path – путь к папке где лежит приложение, в нашем случае – C:\Program Files\Internet Explorer\iexplore.exe

Также в разделе TSAppAllowList следует изменить параметр fDisableAllowList, выставив значение 1.
С реестром закончили.
Настройки и аудит безопасности RDP
Незащищенный RDP сервер очень уязвим. Пользователь может оказаться жертвой злоумышленников, ведь подобные взломы с целью получения личных данных — довольно частое явление. Как же защитить RDP и настроить его при подключении Linux к Windows:
- шифрование. На ОС Windows в командной строке требуется ввести «gpedit.msc» и пройти путь: «Конфигурация компьютера» — «Административные шаблоны» — «Компоненты Windows» — «Службы удаленных рабочих столов» в левой части экрана. Далее нужно кликнуть на раздел «Безопасность». В правой части необходимо выбрать «Требовать использования специального уровня безопасности для удаленных подключений по методу RDP» и указать на «Включить», а в пункте «Уровень безопасности» отметить «SSL TLS 1.0»;
- смена порта. Изначально протокол RDP находится на TCP 3389. Чтобы изменить порт, в реестре рекомендуется поменять ключ PortNumber по адресу: HKEY_LOCAL_MACHINE\System\CurrentControlSet\Control\Terminal Server\WinStations\RDP-Tcp;
- пустые пароли. Для безопасности необходимо включить параметр «Учетные записи: разрешать использование пустых паролей только при консольном входе». Путь для включения такой же, как в пункте «Шифрование»;
- список пользователей. Его нужно проверить в «Свойствах системы» — «Удаленный доступ»;
- аутентификация NLA.

Шифрование
Удаленный рабочий стол Linux является весьма удобной функцией для взаимодействия с несколькими ПК. Если следовать инструкции, то все можно подключить быстро и без проблем. Главное — не забывать о безопасности системы.
Отмена публикации приложений RemoteApp
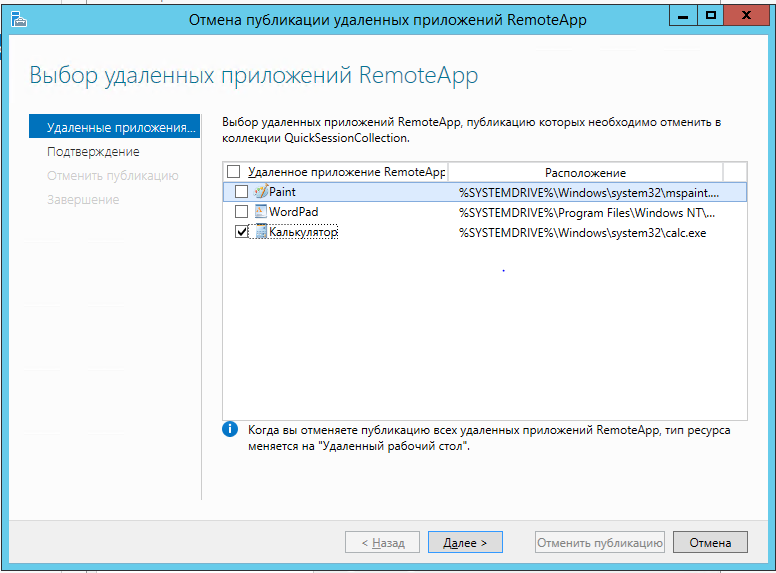
В случае, когда удалённое приложение больше не используется, целесообразно отменить его публикацию. Рассмотрим выполнение этой операции на примере приложения Калькулятор.
Для того, чтобы вызвать мастер отмены публикации удалённых приложений RemoteApp нужно выбрать пункт Отменить публикацию удалённых приложений RemoteApp в меню Задачи на панели Удалённые приложения RemoteApp.

На первом шаге мастера выбираем из списка опубликованных приложений RemoteApp приложение, публикацию которого необходимо отменить. Можно выбрать все приложения и в таком случае после отмены их публикации станет возможен доступ к удалённому рабочему столу полностью.
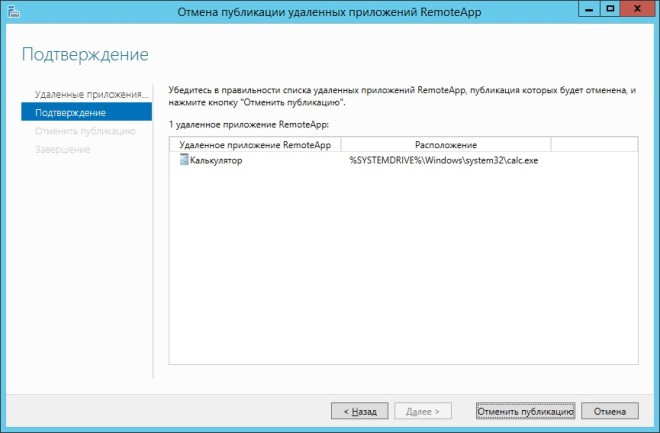
В окне с подтверждением выбора предлагается проверить правильность выбранных приложений и нажать кнопку Отменить публикацию.
После успешного выполнения операции отмены публикации отобразится окно, сообщающее об этом.
Извлечение граблей
/usr/share/rdesktop/keymapsraw
/home/user/runrdp-k raw
4.4. При попытке запустить rdesktop сеанс не открывается, в консоль выводится ошибка CredSSP
- Отключить проверку подлинности на сервере, снизив настройки безопасности. В принципе, в тех средах, где Pi пытаются использовать в качестве клиента RDP, это не должно быть слишком большой проблемой безопасности.
- Воспользоваться другим клиентом, например freerdp, remmina, заменив содержимое скрипта runrdp на строку запуска этого клиента.
4.5. Включение и выключение устройства
- С одной стороны, мы можем вообще не выключать устройство, выключая только монитор. Строго говоря, где я поставил RPi, все так и сделано. В общем-то устройство почти не греется, не потребляет электроэнергию, не шумит. Монитор, перед уходом, пользователь выключит.
- Можно настроить выключение на ночь по Cron-у, но тогда, чтобы утром включить RPi, пользователю придется передергивать провод, или блок питания.
- Решить этот вопрос можно, купив питающий USB-кабель с кнопкой размыкания (чтобы включить RPi нужно достаточно будет кратковременно разомкнуть цепь кнопкой). 120 рублей все удовольствие. Но здесь у пользователей сработает автоматика на выключение тем же способом, что для устройство будет аварийно. Учитывая, что мы вынесли волатильные разделы на tmpfs, наверное, маловероятно, что возникнут проблемы, но все таки никто не застрахован, что пользователь не войдет утром в систему из за краха rootfs. Не получилось, так сказать, решения «прибитого гвоздями».
- Есть решения с дополнительной кнопкой, включаемой в GPIO-порт, и включающей / выключающей устройство нежно (надлежащим способом). Но колхозить ее на корпус — это тратить часы и увеличивать себестоимость.
- Впрочем, для RPi даже есть корпуса со встроенной такой кнопкой (у китайцев вообще есть все). Но я лично еще не пробовал.
- Я думаю насчет включения устройства через разрыватель в USB-кабеле, а выключении его по горячей клавише (типа Ctrl+Alt+Shift+P), которая отслеживается системной службой, но руки проработать это решение никак не дойдут.


