Обзор браузера mozilla firefox quantum
Содержание:
- Extensions
- Summing Up
- どうして Mozilla は私の意図する通りに描画してくれないの? 確かに私のページは標準準拠ではないわ。でも、ちゃんとしたブラウザーだったら何はともあれ作者の意図通りにページを描画するべきよ!
- Network throttling
- An Even Better Debugger
- WebExtension API Additions
- JavaScript が機能しない! どうして?
- The commands
- WebVR, FLAC, and Other Tidbits
- The Core Tools
- Opening the Browser Console
- Controlling Responsive Design Mode
- Расширение инструментов разработчика
- Connection to Firefox for Android 68
- Why The Built-in Tools?
- How is the treatment of application/xhtml+xml documents different from the treatment of text/html documents?
- Examples
- Rules view
Extensions
Loading a temporary extension
With the Load Temporary Add-on button you can temporarily load a web extension from a directory on disk. Click the button, navigate to the directory containing the add-on and select its manifest file. The temporary extension is then displayed under the Temporary Extensions header.
You don’t have to package or sign the extension before loading it, and it stays installed until you restart Firefox.
The major advantages of this method, compared with installing an add-on from an XPI, are:
- You don’t have to rebuild an XPI and reinstall when you change the add-on’s code;
- You can load an add-on without signing it and without needing to disable signing.
Once you have loaded a temporary extension, you can see information about it and perform operations on it.
You can use the following buttons:
- Inspect
- Loads the extension in the debugger.
- Reload
- Reloads the temporary extension. This is handy when you have made changes to the extension.
- Remove
- Unloads the temporary extension.
Other information about the extension is displayed:
- Location
- The location of the extension’s source code on your local system.
- Extension ID
- The temporary ID assigned to the extension.
- Internal UUID
- The internal UUID assigned to the extension.
- Manifest URL
- If you click the link, the manifest for this extension is loaded in a new tab.
Updating a temporary extension
If you install an extension in this way, what happens when you update the extension?
- If you change files that are loaded on demand, like content scripts or , then changes you make are picked up automatically, and you’ll see them the next time the content script is loaded or the popup is shown.
- For other changes, click the Reload button. This does what it says:
- Reloads any persistent scripts, such as
- Parses the file again, so changes to , , or any other keys take effect
Installed Extensions
The permanently installed extensions are listed in the next section, Extensions. For each one, you see something like the following:
The Inspect button, and the Extension ID and Internal UUID fields are the same as for temporary extensions.
Just as it does with temporarily loaded extensions, the link next to Manifest URL opens the loaded manifest in a new tab.
Note: It’s recommended that you use the Browser Toolbox, not the Add-on Debugger, for debugging WebExtensions. See Debugging WebExtensions for all the details.
The Add-ons section in about:debugging lists all web extensions that are currently installed. Next to each entry is a button labeled Inspect.
Note: This list may include add-ons that came preinstalled with Firefox.
If you click Inspect, the Add-on Debugger will start in a new tab.
See the page on the Add-on Debugger for all the things you can do with this tool.
Summing Up
To boil everything down to a bullet list, the differences Firefox Developer Edition bring to the table include:
- A separate profile so your development environment can be configured differently to your regular browsing environment
- Access to cutting edge features not available elsewhere
- A 12 week lead time on support for the newest additions to web standards
- Default preferences tuned for developers
- Dark theme style out of the box
That should clarify the differences between Firefox Developer Edition and regular Firefox, and help you decide if you want to incorporate it into your workflow.
For more on Firefox check out:
どうして Mozilla は私の意図する通りに描画してくれないの? 確かに私のページは標準準拠ではないわ。でも、ちゃんとしたブラウザーだったら何はともあれ作者の意図通りにページを描画するべきよ!
作者は Web 標準を用いてその意図を伝えることが求められます。そうしなければ、それぞれ特定の作者の意図を理解することはソフトウェアに実装するには物理的に不可能なのです。人間であれば意図を推定できるような場合でも、ソフトウェアがそのようにするのは大変遅く、バグを誘引することとなり、難しく複雑なものなのです。
お決まりの反論は考えるまでもなく、Mozilla は何でもブラウザー X のするようにすればいいのよ (ここで X は大概反論を述べている人が好きな Mozilla 以外のブラウザー)、というものです。ですがしかし、先の主張で述べられたところでは簡単なことのように見えても、考え得るあらゆる場合にブラウザー X のようにするというのは決して簡単ではないのです。
人が違えば Mozilla が合わせるべき X についての意見も異なります。第二の問題は Web 作者達は標準を逸脱した様々な方法を持ち出してくるのに大変創造的だということです。事実、ブラウザーへの入力は恣意的長さとなり、標準からの脱線方法が異なる数には上限がないのです。それゆえ、Mozilla が可能な入力すべてに対して正確にブラウザー X のように反応するかどうか確かめることは不可能なのです。(同様に、標準の多様な機能自身が組み合わされ得る方法の数にも上限はなく、ソフトウェア品質保証を厳しいものとしています)
また、ブラウザー X の標準非準拠入力に対する反応の仕方は必ずしも意図的ではありません。一部の反応は複雑なプログラム内部での不明で意図されない相互作用に因るものです。ブラウザー X のソースコードを持っていたとしても、1 つあるいはそれ以上のプログラム内部の不明で意図されない相互作用を変更する危険を冒すことなく何一つ変えることなどできないでしょう。
お決まりの反論となるのは、Mozilla はあり得る場合すべてでブラウザー X の振る舞いに合わせる必要などないわ、ただ特定されている一般的な場合だけ合わせればいいのよ、というものです。ですがこれは既に Mozilla がしていることになります。Mozilla の Standards モードは、明らかに、同じ標準をそれなりに正しく実装している他のブラウザーと既に互換性があります。その一方で、Mozilla の Quirks モードは一般的なレガシーブラウザーの振る舞いが原因である一般的な非標準状態に既に適応しています。
リバースエンジニアリングやレガシーブラウザーを真似するのに時と労力を費やすのではなく、標準を実装するのに注力するほうがもっと効果があります。レガシーソフトのバグを一つ一つ真似るよりも標準は (他でも同様に実装されれば) よりしっかりと相互利用性を促進します。
また、HTML は異なる表現メディアに適応するよう設計されているため、同じドキュメントでも異なった表示になるのは意図されたことなのです。
Network throttling
If you do all your development and testing using a very fast network connection, users may experience problems with your site if they are using a slower connection. In Responsive Design Mode, you can instruct the browser to emulate, very approximately, the characteristics of various different types of networks.
The characteristics emulated are:
- Download speed
- Upload speed
- Minimum latency
The table below lists the numbers associated with each network type, but please do not rely on this feature for exact performance measurements; it’s intended to give an approximate idea of the user experience in different conditions.
| Selection | Download speed | Upload speed | Minimum latency (ms) |
|---|---|---|---|
| GPRS | 50 KB/s | 20 KB/s | 500 |
| Regular 2G | 250 KB/s | 50 KB/s | 300 |
| Good 2G | 450 KB/s | 150 KB/s | 150 |
| Regular 3G | 750 KB/s | 250 KB/s | 100 |
| Good 3G | 1.5 MB/s | 750 KB/s | 40 |
| Regular 4G/LTE | 4 MB/s | 3 MB/s | 20 |
| DSL | 2 MB/s | 1 MB/s | 5 |
| Wi-Fi | 30 MB/s | 15 MB/s | 2 |
To select a network, click the list box that’s initially labeled «No throttling»:
An Even Better Debugger
Piece by piece, we’ve been rewriting our developer tools in standard Web technologies. In Developer Edition, the Console, Debugger, Network Monitor, and Responsive Design Mode are all implemented in plain HTML, JavaScript, and CSS atop common libraries like React and Redux. This means that you can use your existing web development skills to hack on the DevTools. The source for debugger.html is on GitHub, and we do our best to tag good first bugs and mentor new contributors.
We’ve implemented tons of new features during the rewrite, but the debugger deserves special mention. First, source maps finally work everywhere, and even include proper syntax highlighting for markup like JSX:
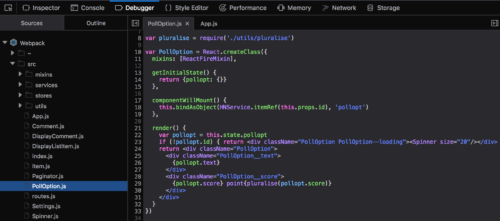 You might also notice that the debugger recognized Webpack, and appropriately labeled it in the Sources tree.
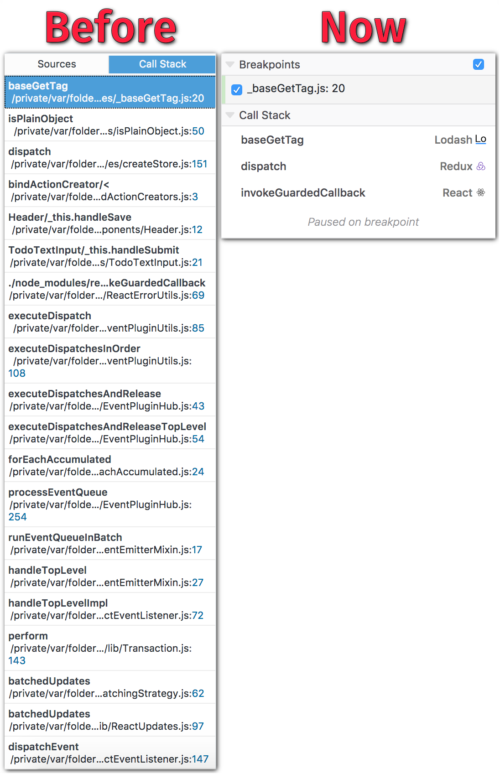
Similarly, the debugger can recognize two dozen common JavaScript libraries and group their stack frames in the call stack. This makes it easy to separate the code you wrote from code provided by a framework when you’re tracking down a bug:
 We even implemented “sticky” breakpoints that intelligently move with your code when you refactor or rearrange declarations in a file.
The other tools have also improved: can now be collapsed, the network monitor , etc.
The best way to discover the new DevTools is to download Developer Edition and try them yourself.
WebExtension API Additions
Firefox Quantum removed support for legacy add-ons and added dozens of . Firefox 58 adds even more APIs, including ones to:
- Access brand new website privacy controls like first-party isolation and fingerprinting resistance, added as part of the ongoing Tor Uplift.
- Toggle, observe, and control whether or not a tab is displayed in Reader Mode.
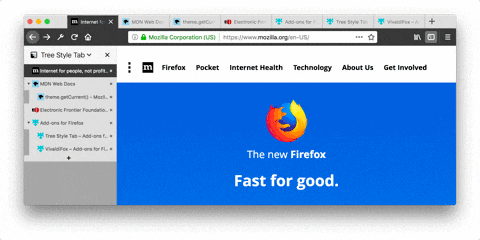
- Query and observe changes to the browser theme, making it possible for add-ons to adapt themselves to fit in with arbitrary themes.
For example, Tree Style Tab can now adopt theme colors from WebExtensions like VivaldiFox:
We’re currently planning additional WebExtension capabilities for 2018, including looking into possibilities for hiding individual tabs, or the entire tab bar.
JavaScript が機能しない! どうして?
や といった独自拡張のドキュメントオブジェクトは W3C DOM には含まれておらず、Mozilla ではサポートされていません。(なお、比較的新しいバージョンの Mozilla では、 の部分不検知サポートが含まれています。しかし、この機能は IE 専用に作られたサイトとの互換性のために存在しているだけです。新しいページに関して Mozilla の サポートに依存すべきではありません。) メソッドを 。
In the Standards mode Mozilla does not generate implicit top-level JavaScript variable bindings for elements with the or attribute. The correct way to access an element by id is to call the method with the id as a string as the argument.
また、古いクライアント判別コードは新しいブラウザーを閉め出すかも知れないことに注意してください。共通 API (W3C DOM) を採用する目的は実行環境への依存をなくすこと (相互運用性) であり、特定のブラウザーをチェックすることはその目的に反します。DOM を使用する場合には使用するつもりのメソッドやオブジェクトの存在を確認する方がより適切です。例えば、 の存在は次のようにして確認できます:
if(document.getElementById) {
   /* code that uses document.getElementById() */
}
The commands
The JavaScript command line provided by the Web Console offers a few built-in helper functions that make certain tasks easier.
-
Looks up a CSS selector string , returning the first node descended from that matches. If unspecified, defaults to . Equivalent to or calls the $ function in the page, if it exists.
See the QuerySelector code snippet.
- Looks up a CSS selector string , returning an array of DOM nodes descended from that match. If unspecified, defaults to . This is like for , but returns an array instead of a .
- The currently-inspected element in the page.
- Stores the result of the last expression executed in the console’s command line. For example, if you type «2+2 <enter>», then «$_ <enter>», the console will print 4.
- Evaluates the XPath expression in the context of and returns an array of matching nodes. If unspecified, defaults to . The resultType parameter specifies the type of result to return; it can be an , or a corresponding string: , , , , or ; if not provided, is used.
- (Starting in Firefox 80) Followed by an unquoted string, blocks requests where the URL contains that string. In the Network Monitor, the string now appears and is selected in the . Unblock with .
-
Switches JavaScript evaluation context to a different iframe in the page. This helper accepts multiple different ways of identifying the frame to switch to. You can supply any of the following:
- a selector string to be passed to to locate the iframe element
- the iframe element itself
- the content window inside the iframe
See working with iframes.
- Clears the console output area.
- Just like a normal command line, the console command line . Use this function to clear the console’s command history.
- Copies the argument to the clipboard. If the argument is a string, it’s copied as-is. If the argument is a DOM node, its is copied. Otherwise, will be called on the argument, and the result will be copied to the clipboard.
- Deprecated since Gecko 62
- Displays help text. Actually, in a delightful example of recursion, it brings you to this page.
- Given an object, generates rich output for that object. Once you select the object in the output area, you can use the arrow keys to navigate the object.
- Given an object, returns a list of the keys (or property names) on that object. This is a shortcut for .
- Formats the specified value in a readable way; this is useful for dumping the contents of objects and arrays.
- Creates a screenshot of the current page with the supplied filename. If you don’t supply a filename, the image file will be named with the following format:
The command has the following optional parameters:
Command Type Description boolean When present, this parameter will cause the screenshot to be copied to the clipboard. number The number of seconds to delay before taking the screenshot. number The device pixel ratio to use when taking the screenshot. boolean When present, the screenshot will be saved to a file, even if other options (e.g. ) are included. string The name to use in saving the file. The file should have a «.png» extension. boolean If included, the full webpage will be saved. With this parameter, even the parts of the webpage which are outside the current bounds of the window will be included in the screenshot. When used, «-fullpage» will be appended to the file name. string The CSS query selector for a single element on the page. When supplied, only this element will be included in the screenshot. - (Starting in Firefox 80) Followed by an unquoted string, removes blocking for URLs containing that string. In the Network Monitor, the string is removed from the . No error is given if the string was not previously blocked.
- Given an object, returns a list of the values on that object; serves as a companion to .
Please refer to the Console API for more information about logging from content.
WebVR, FLAC, and Other Tidbits
Firefox is driving new, fundamental capabilities of the Web. Firefox 55 introduced support for WebVR on Windows, and included experimental support for macOS. With Firefox 58, WebVR now is supported by default on both Windows and macOS.
If you’re interested in creating virtual reality experiences on the Web, check out the A-Frame library, or read our article on how Firefox Quantum delivers smooth WebVR performance at 90 fps.
In other firsts, Firefox 51 was the first browser to support FLAC, a lossless audio format, on the Web. Until now, this support was limited to Firefox on desktop platforms (Windows, macOS, and Linux), but Firefox 58 brings FLAC support to Android. That means that Firefox, Chrome, and Edge on every platform but iOS.
We also landed a few changes to help measure and improve Firefox’s performance:
- The API provides access to performance metrics related to page loading.
- Off Main Thread Painting (“OMTP”) has been enabled by default on Windows, which improves Firefox’s responsiveness by reducing the workload on the main thread.
- We’ve enabled which slows down scripts running in background tabs to save further CPU resources.
Lastly, Content Security Policies (CSPs) now support the directive.
The Core Tools
You can open the Firefox Developer Tools from the menu by selecting Tools > Web Developer > Toggle Tools or use the keyboard shortcut Ctrl + Shift + I or F12 on Windows and Linux, or Cmd + Opt + I on macOS.
The ellipsis menu on the right-hand side of Developer Tools contains several commands that let you perform actions or change tool settings.
| This button only appears when there are multiple iframes on a page. Click it to display a list of the iframes on the current page and select the one with which you want to work. | |
| Click this button to take a screenshot of the current page. (Note: This feature is not turned on by default and must be enabled in settings before the icon will appear.) | |
| Toggles Responsive Design Mode. | |
| Opens the menu that includes docking options, the ability to show or hide the split console, and Developer Tools settings. The menu also includes links to the documentation for Firefox Web Tools and the Mozilla Community. | |
| Closes the Developer Tools |
Page Inspector
View and edit page content and layout. Visualise many aspects of the page including the box model, animations, and grid layouts.
See messages logged by a web page and interact with the page using JavaScript.
Stop, step through, examine, and modify the JavaScript running in a page.
See the network requests made when a page is loaded.
Analyze your site’s general responsiveness, JavaScript, and layout performance.
See how your website or app will look and behave on different devices and network types.
Accessibility inspector
Provides a means to access the page’s accessibility tree, allowing you to check what’s missing or otherwise needs attention.
Application panel
Provides tools for inspecting and debugging modern web apps (also known as Progressive Web Apps). This includes inspection of service workers and web app manifests.
Note: The collective term for the UI inside which the DevTools all live is the Toolbox.
Opening the Browser Console
You can open the Browser Console in one of two ways:
- from the menu: select «Browser Console» from the Web Developer submenu in the Firefox Menu (or Tools menu if you display the menu bar or are on macOS).
- from the keyboard: press Ctrl+Shift+J (or Cmd+Shift+J on a Mac).
You can also start the Browser Console by launching Firefox from the command line and passing the argument:
/Applications/FirefoxAurora.app/Contents/MacOS/firefox-bin -jsconsole
The Browser Console looks like this:
You can see that the Browser Console looks and behaves very much like the Web Console:
- most of the window is occupied by a .
- at the top, a enables you to filter the messages that appear.
- at the bottom, a enables you to evaluate JavaScript expressions.
Beginning with Firefox 68, the Browser Console allows you to show or hide messages from the content process (i.e. the messages from scripts in all the opened pages) by setting or clearing the checkbox labeled Show Content Messages. The following image shows the browser console focused on the same page as above after clicking on the Show Content Messages checkbox.
Controlling Responsive Design Mode
With Responsive Design Mode enabled, the content area for web pages is set to the screen size for a mobile device. Initially, it’s set to 320 x 480 pixels.
Note: The device you select when in Responsive Design Mode and the orientation (portrait or landscape) is saved between sessions.
Information for the selected device is centered over the display. From left to right, the display includes:
- Name of the selected device — A drop-down list that includes whatever devices you have selected from the Device Settings screen.
-
Screen size — You can edit the width and height values to change the device size by editing a number directly or using the Up and Down keys to increase or decrease the value by 1 pixels on each keypress or hold and Shift to change the value by 10.
- The mouse wheel changes the size values by 1 pixel at a time
- You can also change the device’s screen size by grabbing the bottom-right corner of the viewport and dragging it to the size you want.
-
Orientation (portrait or landscape) — This setting persists between sessions
-
Screenshots are saved to Firefox’s default download location.
-
If you checked «Screenshot to clipboard» in the Developer Tools Settings page, then the screenshot will be copied to the system clipboard.
-
- DPR (pixel ratio) — Beginning with Firefox 68, the DPR is no longer editable; create a custom device in order to change the DPR
- Throttling — A drop-down list where you can select the connection throttling to apply, for example 2G, 3G, or LTE
- Enable/Disable touch simulation — Toggles whether or not Responsive Design Mode simulates touch events. While touch event simulation is enabled, mouse events are translated into touch events; this includes (starting in Firefox 79) translating a mouse-drag event into a touch-drag event. (Note that when touch simulation is enabled, this toolbar icon is blue; when simulation is disabled, it is black.
On the right end of the screen, three buttons allow you to:
- Camera button — take a screenshot
- Settings button — Opens the RDM settings menu
- Close button — closes RDM mode and returns to regular browsing
The Settings menu includes the following commands:
- Left-align Viewport — when checked moves the RDM viewport to the left side of the browser window
- Show user agent — when checked displays the user agent string
- The final two options define when the page is reloaded:
- Reload when touch simulation is toggled: when this option is enabled, the page is reloaded whenever you toggle touch support.
- Reload when user agent is changed: when this option is enabled, the page isreloaded whenever the user agent is changed.
Reloading on these changes can be helpful because certain page behaviors would otherwise not be applied. For example, many pages check for touch support on load and only add event handlers if it is supported, or only enable certain features on certain browsers.
However, if you are not interested in examining such features (maybe you are just checking the overall layout at different sizes), these reloads can waste time and possibly result in the loss of productive work, so it is useful to be able to control these reloads.
Now when you change such settings for the first time, you are given a warning message that tells you these reloads are no longer automatic, and informed about how you can make them automatic. For example:
Расширение инструментов разработчика
Инструменты разработчика предназначены для расширения. Дополнения Firefox могут получить доступ к инструментам разработчика и компонентам, которые они используют для расширения существующих инструментов и добавления новых инструментов. С помощью протокола удаленной отладки вы можете реализовать свои собственные клиенты и серверы отладки, что позволяет отлаживать веб-сайты с помощью собственных инструментов или отлаживать различные цели с помощью инструментов Firefox.
- Use these examples to understand how to implement a devtools add-on.
- Write an add-on that adds a new panel to the Toolbox.
- Remote Debugging Protocol
- The protocol used to connect the Firefox Developer Tools to a debugging target like an instance of Firefox or a Firefox OS device.
- A code editor built into Firefox that can be embedded in your add-on.
- The Interface
- An API that lets JavaScript code observe the execution of other JavaScript code. The Firefox Developer Tools use this API to implement the JavaScript debugger.
- How to extend and customize the output of the Web Console and the Browser Console.
Connection to Firefox for Android 68
Releases of Firefox for Android that are based on version 68 cannot be debugged from desktop Firefox versions 69 or later, because of the difference in release versions. Until such time as Firefox for Android is updated to a newer major release, in synch with desktop Firefox, you should use one of the following Firefox for Android versions:
- Firefox Preview, if your desktop Firefox is the main release or Developer Edition
- Firefox for Android Nightly
If you prefer to test with the main release of Firefox for Android (i.e., based on release 68), you can do so with the desktop Firefox Extended Support Release (ESR), which is also based on version 68.
Note that is not enabled by default in Firefox ESR. To enable it, open the Configuration Editor () and set to true.
If you used a higher version of Firefox prior to installing Firefox ESR, you will be prompted to create a new user profile, in order to protect your user data. For more information, see
Why The Built-in Tools?
The Web owes a lot to Firebug. For a long time, Firebug was the best game in town. It introduced the world to visual highlighting of the DOM, inplace editing of styles, and the console API.
Before the release of Firefox 4 we decided that Firefox needed a set of high-quality built-in tools. Baking them into the browser let us take advantage of the existing Mozilla community and infrastructure, and building in mozilla-central makes a huge difference when working with Gecko and Spidermonkey developers. We had ambitious platform changes planned: The JSD API that Firebug uses to debug Javascript had aged badly, and we wanted to co-evolve the tools alongside a new Spidermonkey Debugger API.
We thought long and hard about including Firebug wholesale and considered several approaches to integrating it. An early prototype of the Inspector even included a significant portion of Firebug. Ultimately, integration proved to be too challenging and would have required rewrites that would have been equivalent to starting over.
How is the treatment of application/xhtml+xml documents different from the treatment of text/html documents?
- An XML parser (expat) is used instead of the tag soup parser.
- Most well-formedness constraints are enforced. (Currently Mozilla does not catch character encoding errors, because the document is re-encoded using a lenient encoding converter before the document reaches the XML parser. This is a bug.) Despite common allegations to the contrary, the document isnot checked for validity.
- Externally defined character entities other than the five pre-defined ones (, , , and ) are only supported if the document references a public identifier for which there is a mapping in Mozilla’s pseudo-DTD catalog and the document has not been declared standalone.
- In older versions of Mozilla as well as in old Mozilla-based products, there is no pseudo-DTD catalog and the use of externally defined character entities (other than the five pre-defined ones) leads to an XML parsing error. There are also other XHTML user agents that do not support externally defined character entities (other than the five pre-defined ones). Since non-validating XML processors are not required to support externally defined character entities (other than the five pre-defined ones), the use of externally defined character entities (other than the five pre-defined ones) is inherently unsafe in XML documents intended for the Web. The best practice is to use straight UTF-8 instead of entities. (Numeric character references are safe, too.)
- is not supported. The stream that is going into the parser can’t be tampered with in mid-parse.
- Things that look like XML comments are treated as XML comments—even inside or elements.
- Elements need to be in the XHTML namespace in order to be treated as XHTML elements.
- tags are not examined for character encoding information.
- , , , and are not inferred if the tags are not explicitly present.
- CDATA sections are supported.
- XML empty element notation () is supported.
- White space characters in attribute values are to spaces at parse time, so the original white space never makes it to the DOM. This affects data round tripping using hidden form s.
- In versions prior to Gecko 1.9/Firefox 3, the document is not loaded and rendered incrementally. That is, the document is displayed only after the entire document has been received and parsed. Contrary to a common misguided assertion, this is not done in response to a requirement set forth in any W3C specification. In particular, the XML specification doesnot require the entire document to be checked for errors before rendering can start. The lack of incremental loading and display is simply a bug (or a missing feature). This has been fixed in Gecko 1.9/Firefox 3.
- The layout mode is the (Full) Standards Mode regardless of doctype.
- CSS works according to the XML+CSS rules.
- HTML-specific CSS exceptions do not apply. 例えば、the element gets no special treatment.
- CSS selectors are case-sensitive.
- The DOM is in the XML mode.
- Namespace-aware variants of methods need to be used when working with elements (eg. instead of ).
- In older versions of Mozilla, the object does not implement the interface.
- Element and attribute names are not normalized to upper case.
- In older versions (including Firefox 1.0), content cannot be added using .
- Other namespaces are supported.
- MathML
- Simple XLink
- SVG (in SVG-enabled builds only)
- XUL (Please note that XUL is Mozilla-specific and, therefore, using it on the public Web causes interoperabilty problems.)
- is observed when following links.
- Style sheets can be references using processing instructions.
Examples
Looking at the contents of a DOM node
Let’s say you have a DOM node with the ID «title». In fact, this page you’re reading right now has one, so you can open up the Web Console and try this right now.
Let’s take a look at the contents of that node by using the and functions:
inspect($("#title"))
This automatically generates rich output for the object, showing you the contents of the DOM node that matches the CSS selector , which is of course the element with ID . You can use the up- and down-arrow keys to navigate through the output, the right-arrow key to expand an item, and the left-arrow key to collapse it.
Rules view
The Rules view lists all the rules that apply to the selected element, ordered from most-specific to least-specific. See above.
See Examine and edit CSS for more details.
Layout view
The Layout view displays the box model of the page. If the page includes any sections using either the Flexbox display model or CSS Grids, this view shows the Flexbox or Grid settings used on the page.
To learn more about the Layout view, see Examine and edit the box model. Note that before Firefox 50, the box model view did not appear in the «Computed view» tab, but had its own tab.
To learn more about the CSS declarations listed in this view, see .
When you are editing in the Rules view, you can see the changes you have made in the Changes view.
Computed view
The Computed view shows you the complete computed CSS for the selected element (The computed values are the same as what getComputedStyle would return.):
Compatibility view
Starting with Firefox Developer Edition version 77, the Compatibility view shows CSS compability issues, if any, for properties applied to the selected element, and for the current page as a whole. It shows icons for the browsers that do support the properties, and notes properties that are experimental or deprecated.
- Click the name of the property to open the reference article for that property on MDN Web Docs. The «Browser compatibility» section of the article gives details of browser support for the property.
- In the All Issues section, click the name of the element that uses the property to select that element in the inspector. If more than one element has a given property applied to it, click the triangle to show all the occurences.
- To configure the set of browsers you want the Compatibility view to check for, click Settings at the bottom of the panel.
Untick the checkbox for any browser you are not interested in. As new browser versions are released, the version numbers in this list will be updated.
The Fonts view shows all the fonts in the page along with editable samples.
See View fonts for more details.
Animations view
The Animations view gives you details of any animations applied to the selected element, and a controller to pause them:
See Work with animations for more details.


