Как установить ffmpeg linux (centos, ubuntu, arch)
Содержание:
- Пакетная обработка FFmpeg
- Examples
- Как установить FFmpeg в Ubuntu
- Guides and How to’s
- libmp3lame
- Miscellaneous
- Different parallel outputs
- Concatenation of files with different codecs
- Поддерживаемые кодеки и форматы
- ЧТО ТАКОЕ FFMPEG?
- Running ffmpeg.exe without opening a console window
- ffdshow tryouts
- Fitting into a Rectangle / Statically-sized Player
- Filtering
- Video
- Known Bugs/Feature Requests
Пакетная обработка FFmpeg
Если необходимо сконвертировать не один, а несколько десятков файлов, очевидным неудобством станет то, что придется множество раз вводить одну и ту же команду и прежде, чем поставить кодироваться следующий файл, нужно будет дождаться завершения предыдущего.
Написание скриптов, тема для отдельной статьи, здесь же приведу примеры для Windows и MacOS, с помощью которых за раз можно сконвертировать всю папку с файлами.
Примеры скриптов FFmpeg для Windows
Создайте текстовый файл, с расширением .bat, поместите в него содержимое указанное ниже и скорректируйте по своему усмотрению.
Чтобы воспользоваться скриптом, потребуется указать путь до папки с файлами, которые хотите сконвертировать, расширение исходных файлов, выходной формат и расширение (контейнер) выходных файлов.
Скрипт из примера возьмет все файлы из папки ( C:\folder\ ) с расширением .avi и сконвертирует их (используя двухпроходное кодирование) в формат mp4, расширение выходных файлов так же будет mp4. Выходные файлы будут помещены в ту же папку, что и исходные.
Ниже приведен аналогичный пример для конвертации аудио. Cкрипт конвертирует файлы с расширением .wav в .mp3.
Примеры скриптов FFmpeg для MacOS
Создайте текстовый файл, с расширением .sh, поместите в него содержимое указанное ниже и скорректируйте по своему усмотрению.
Чтобы воспользоваться скриптом, потребуется указать расширение исходных файлов, расширение (контейнер) выходных файлов, выходной формат, а также путь до папки с файлами, которые хотите сконвертировать.
Не забудьте сделать скрипт исполняемым.
Скрипт из примера возьмет все файлы из папки ( ~/Desktop/folder/ ) с расширением .avi и сконвертирует их (используя двухпроходное кодирование) в формат mp4, расширение выходных файлов так же будет mp4. Выходные файлы будут помещены в ту же папку, что и исходные.
Ниже приведен аналогичный пример для конвертации аудио. Cкрипт конвертирует файлы с расширением .wav в .mp3.
Examples
Scaling
Starting with something simple. Resize a 640×480 input to a 320×240 output.
ffmpeg -i input -vf scale=iw/2:-1 output
iw is input width. In this example the input width is 640. 640/2 = 320. The -1 tells the scale filter to preserve the aspect ratio of the output, so in this example the scale filter will choose a value of 240. See the for additional information.
Multiple input overlay in 2×2 grid

Here four inputs are filtered together using the -filter_complex option. In this case all of the inputs are the -f lavfi -i testsrc (the ) but could be other inputs.
Within the filtergraph the first input is unchanged, and the other three inputs are individually filtered using , , and . The and filters are then used to stack each video into the desired location.
ffmpeg -f lavfi -i testsrc -f lavfi -i testsrc -f lavfi -i testsrc -f lavfi -i testsrc -filter_complex \
"negate; \
 hflip; \
 edgedetect; \
 hstack=inputs=2; \
 hstack=inputs=2; \
 vstack=inputs=2" -map "" -c:v ffv1 -t 5 multiple_input_grid.avi
This next example is the same as above, but uses the and filters instead. The pad filter is used to make an appropriate sized background, and overlay is used to place each video into the correct location. This method is slower than using hstack + vstack as shown above.
ffmpeg -f lavfi -i testsrc -f lavfi -i testsrc -f lavfi -i testsrc -f lavfi -i testsrc -filter_complex \
"pad=iw*2:ih*2; \
 negate; \
 hflip; \
 edgedetect; \
 overlay=w; \
 overlay=0:h; \
 overlay=w:h" -map "" -c:v ffv1 -t 5 multiple_input_grid.avi
Be aware that frames are taken from each input video in timestamp order, so it is a good idea to pass all overlay inputs through a setpts=PTS-STARTPTS filter to have them begin in the same zero timestamp, such as hflip,setpts=PTS-STARTPTS;setpts=PTS-STARTPTS;overlay.
Burnt in Timecode
Using the video filter.
PAL 25 fps non drop frame:
ffmpeg -i in.mp4 -vf "drawtext=fontfile=/usr/share/fonts/truetype/DroidSans.ttf: timecode='09\:57\:00\:00': r=25: \
x=(w-tw)/2: y=h-(2*lh): fontcolor=white: box=1: boxcolor=0x00000000@1" -an -y out.mp4
NTSC 30 fps drop frame
(change the : to a ; before the frame count)_________________________________________________________
                                                                                                     \
ffmpeg -i in.mp4 -vf "drawtext=fontfile=/usr/share/fonts/truetype/DroidSans.ttf: timecode='09\:57\:00\;00': r=30: \
x=(w-tw)/2: y=h-(2*lh): fontcolor=white: box=1: boxcolor=0x00000000@1" -an -y out.mp4
Synthetic Input
The generates a test video pattern showing a color pattern, a scrolling gradient, and a timestamp. This is useful for testing purposes.
This example will create a 10 second output, 30 fps (300 frames total), with a frame size of 1280×720:
ffmpeg -f lavfi -i testsrc=duration=10:size=1280x720:rate=30 output.mpg
ffplay can also be used to view the resulting filtergraph:
ffplay -f lavfi -i "testsrc=duration=10:size=1280x720:rate=30"
You can also specify testsrc as a filter:
ffmpeg -filter_complex testsrc OUTPUT
Another type of testsrc is using the :
ffmpeg -f lavfi -i "smptebars=duration=5:size=1280x720:rate=30" output.mp4
Or a color
./ffmpeg -f lavfi -i color=c=red:size=100x100
There are other options for generating synthetic video input, see here and here («generic equation» filter).
Other Filter Examples
- Fancy Filtering Examples – Examples for various psychedelic effects and other weird filtering.
- Null describes the nullsink filter.
Как установить FFmpeg в Ubuntu
Установить FFmpeg 4 — последнюю версию — на Ubuntu 14.x и выше очень просто.
Мы установим FFmpeg из mc3man ppa. PPA означает Personal Package Archives (Персональные Пакеты Архивов), которые поддерживаются сообществом Ubuntu.
Чтобы добавить этот PPA, нам нужно выполнить:
sudo apt-get install -y software-properties-common
add apt-repository ppa:mc3man/trusty-media
После установки PPA перейдите к обновлению хранилища, выполнив:
apt-get update
apt-get dist-upgrade
Наконец, для установки ffmpeg нам нужно выполнить:
apt-get install ffmpeg
На этом установка ffmpeg завершена. Проверить версию можно с помощью следующей команды:
ffmpeg -version
Guides and How to’s
How to encode DVD/VOB to DivX/XviD with gui4ffmpeg
gui4ffmpeg video tutorials
| 13 reviews, Showing 1 to 5 reviews |
Post review Show all 13 reviews |
Report!
Wow. This worked GREAT! I’m pretty tech-illiterate. I know enough to get by, but I have downloaded numerous virus-ridden freeware in the past. I could tell from the simple interface and user comments that this one was legit. Thanks for making my life easier. Now to find an audio converter that won’t crash my computer!
on
Jul 28, 2012 Version: XP
OS: WinXP Ease of use: 7/10
Functionality: 9/10
Value for money: 10/10
Overall: 8/10
Report!
In this version is a problem with the structure of files and folders. So you can’t see the properties of the source, batch file handling goes wrong and you’ll have no help.
After unpacking you’ll have a folder named Gui4ffmpeg, gui4ffmpeg.exe and ffmepg.exe in the main folder.
Open the folder Gui4ffmpeg and copy the whole content into the main folder.
Then the problems are solved.
on
Nov 21, 2008 Version: 3.0
OS: WinXP Ease of use: 10/10
Functionality: 8/10
Value for money: 10/10
Overall: 9/10
Report!
With Windows XP SP3, I am only able to convert (using the related guide) one VOB file at a time (batch encoding does not work as described). Additionally, when a VOB file is loaded, no properties show in the related window as the program’s description says it should, so I have to guess at which audio track to use when converting. I posted a similar comment under the gui4ffmpeg guide section, but thought this issue should be noted in the review of this program here as well as I am not the only one reporting this problem.
on
Nov 18, 2008 Version: 3.0
OS: WinXP Ease of use: 9/10
Functionality: 7/10
Value for money: 10/10
Overall: 9/10
Report!
bruper, I noticed the same with the video quality with new ffmpeg versions. The bitrate with new ffmpeg version seam to now want a k at the end of the rate you use. You will want to use -b 2200k not -b 2200 on the command line.
on
Dec 19, 2006 Version: 2.x
OS: WinXP Ease of use: 5/10
Functionality: 6/10
Value for money: 8/10
Overall: 7/10
Report!
excellent tool however with this new version video quality was horrible downloaded previous ffmpeg and ran the same batch file and things were normal. with new ffmpeg i asked for video bitrate of 2200 but got 300. I didn’t notice till i went to burn my 2 movie dvd and it was only 1 gig. overall great tool though.
on
Dec 18, 2006 Version: 2.1
OS: WinXP Ease of use: 6/10
Functionality: 10/10
Value for money: 10/10
Overall: 9/10
| 13 reviews, Showing 1 to 5 reviews |
Post review
Show all 13 reviews |
libmp3lame
MP3 audio encoder.
Requires ffmpeg to be configured with --enable-libmp3lame.
If your repository provides libmp3lame-dev version ≥ 3.98.3 then you can install that instead of compiling:
sudo apt-get install libmp3lame-dev
Otherwise you can compile:
cd ~/ffmpeg_sources && \
wget -O lame-3.100.tar.gz https://downloads.sourceforge.net/project/lame/lame/3.100/lame-3.100.tar.gz && \
tar xzvf lame-3.100.tar.gz && \
cd lame-3.100 && \
PATH="$HOME/bin:$PATH" ./configure --prefix="$HOME/ffmpeg_build" --bindir="$HOME/bin" --disable-shared --enable-nasm && \
PATH="$HOME/bin:$PATH" make && \
make install
Miscellaneous
- General command line usage:
- Solutions to some errors and messages
- Creating multiple outputs from the same input
- How to concatenate, join, or merge media files
- How to use -map option to select exactly which streams to process
- Seeking to split a file or select a segment
- framemd5 Intro and HowTo for using per-frame checksums
- FFprobe Tips for getting frame rate, frame size, duration, etc.
- How to extract subtitles that are included within video files.
- Effects:
- Video:
- Changing the frame rate
- Limiting the output bitrate
- Chroma Subsampling
- Debugging Macroblocks and Motion Vectors
- Viterbi Algorithm
- Audio:
- Audio Channel Manipulation – Upmix, downmix, split, and manipulate audio channels
- Audio Types – List of the different types of raw audio
- Audio Volume Manipulation – Change audio volume and perform normalization (peak, RMS, EBU R128)
- FFmpeg and the SoX Resampler – High quality audio resampling
- Working with other tools:
- How to encode with FFmpeg from Adobe Premiere Pro
- Using FFmpeg from PHP scripts
- Other:
- How to ask good questions on ffmpeg-user mailing list
- Articles for Creation – A simple idea/reminder list for new community contributed wiki articles
- Downstreams – A list of downstream software products that distribute FFmpeg, including versions and end-of-life dates
- Projects – A list of free projects and programs known to incorporate work from FFmpeg.
Different parallel outputs
No filtering
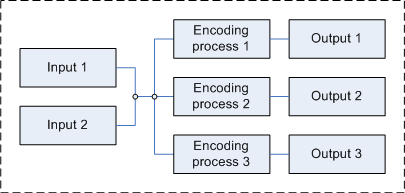
ffmpeg supports multiple outputs created out of the same input(s) in the same process. The usual way to accomplish this is:
ffmpeg -i input1 -i input2 \
	-acodec … -vcodec … output1 \
	-acodec … -vcodec … output2 \
	-acodec … -vcodec … output3
This way ffmpeg can create several different outputs out of the same input(s).
For example, to encode your video in HD, VGA and QVGA resolution, at the same time, you would use something like this:
ffmpeg -i input \
	-s 1280x720 -acodec … -vcodec … output1 \
	-s 640x480  -acodec … -vcodec … output2 \
	-s 320x240  -acodec … -vcodec … output3
Same filtering for all outputs
If you would like to use filtering, but with the same filter applied to all outputs, simply use -filter_complex with the split filter.
For example, to encode your video in HD, VGA and QVGA resolution, at the same time, but with the yadif filter applied, you would use something like this:
# the `split=3` means split to three streams
ffmpeg -i input -filter_complex 'yadif,split=3' \
        -map '' -s 1280x720 -acodec … -vcodec … output1 \
        -map '' -s 640x480  -acodec … -vcodec … output2 \
        -map '' -s 320x240  -acodec … -vcodec … output3
One filtering instance per each output
If you would like to use filtering, with the different filter(s) applied to each outputs, use -filter_complex and split, but using split directly to the input.
For example, to encode your video to three different outputs, at the same time, but with the boxblur, negate, yadif filter applied to the different outputs respectively, you would use something like this:
# the `split=3` means split to three streams
ffmpeg -i input -filter_complex 'split=3;boxblur;negate;yadif' \
        -map '' -acodec … -vcodec … output1 \
        -map '' -acodec … -vcodec … output2 \
        -map '' -acodec … -vcodec … output3
Concatenation of files with different codecs
In many cases, input files will have different codecs or different codec properties, which makes it impossible to use any of the above methods.
Concat filter
See the for more info. The filter works on segments of synchronized video and audio streams. All segments must have the same number of streams of each type, and that will also be the number of streams at output.
Note: Filters are incompatible with ; you can’t use -c copy with this method. Since you have to re-encode the video and audio stream(s), and since re-encoding may introduce compression artifacts, make sure to add proper target bitrate or quality settings. See the encoding guides? for more info.
For the concat filter to work, the inputs have to be of the same frame dimensions (e.g., 1920⨉1080 pixels) and should have the same framerate. Therefore, you may at least have to add a or filter before concatenating videos. A handful of other attributes have to match as well, like the stream aspect ratio. Refer to the documentation of the filter for more info.
Instructions
Let’s say we have three files that we want to concatenate – each of them with one video and audio stream. The concat filter command would look like this:
ffmpeg -i input1.mp4 -i input2.webm -i input3.mov \
-filter_complex "concat=n=3:v=1:a=1" \
-map "" -map "" output.mkv
Now, let’s dissect that command. We first specify all the input files, then instantiate a -filter_complex filtergraph – this is needed instead of -filter:v because it has multiple inputs and outputs.
The following line:
tells ffmpeg which streams to take from the input files and send as input to the concat filter. In this case, video stream 0 and audio stream 0 from input 0 (input1.mp4 in this example), and video stream 0 and audio stream 0 from input 1 (input2.webm), etc.
concat=n=3:v=1:a=1'
This is the concat filter itself. n=3 is telling the filter that there are three input segments; v=1 is telling it that there will be one video stream per segment; a=1 is telling it that there will be one audio stream per segment. The filter then concatenates these segments and produces two output streams. and are names for these output streams. Note that the quotes around the filter section are required.
The following image shows the stream mapping to and from the filter in the above example:

You can then either re-use these streams in other filters, or map them to the output file:
-map "" -map "" output.mkv
This tells ffmpeg to use the results of the concat filter rather than the streams directly from the input files.
There is a Bash script called mmcat which was useful for older versions of ffmpeg that did not include the concat filter.
Поддерживаемые кодеки и форматы
Участниками проекта FFmpeg были подвергнуты обратной разработке и/или реализованы следующие кодеки и форматы:
Кодеки
- ATRAC1, ATRAC3, ATRAC3plus (только декодирование)
- H.261, H.263, H.264/AVC, и H.265/HEVC
- Intel Indeo 2, 3, 4 и 5
- QDesign Music Codec 1/2, используемый в QuickTime до QuickTime 7
- Sorenson Video 1/3 используемый в QuickTime
- Theora (вместе с Vorbis используется в контейнере Ogg)
- Truespeech
- MP3
- AAC (LC/HE/HEv2)
- TXD
- VP5, VP6
- VP8
- Vorbis
- Windows Media Audio (WMA1, WMA2, WMA Pro, WMA Lossless и WMA Speech)
- Некоторые кодеки, связанные с Windows Media Player (Microsoft RLE, Microsoft Video 1, Cinepak, Indeo 2, 3 и 5, Motion JPEG, Microsoft MPEG-4 v1, v2 и v3, WMV1, WMV2 и WMV3 (он же VC-1))
- MxPEG от Mobotix
ЧТО ТАКОЕ FFMPEG?
ffmpeg — это один из лучших мультимедийных фреймворков, который содержит различные инструменты, для решения разных задач. Например, ffplay — портативный медиа плеер, утилита ffmpeg может использоваться для обработки и инвертирования файлов, ffserver — для потоковой передачи данных, а ffprobe может анализировать мультимедийный поток.
В набор ffmpeg, кроме утилит, входят такие библиотеки: libavutil libavcodec libavformat libavdevice libavfilter libavresample libswscale libswresample libpostproc. Из-за своей архитектуры, этот набор инструментов очень безопасный, и с помощью него вы можете сделать почти все что угодно с видео или аудио. В этой статье мы будем рассматривать в основном утилиту ffmpeg. Давайте рассмотрим ее синтаксис:
$ ffmpeg -i
- Опции источника — указывают параметры чтения файла, настройки и так далее;
- Источник — опция -i задает источник, откуда будет читаться файл, источников может быть несколько и это может быть не только файл, но и устройство;
- Основные опции — задают параметры работы всей утилиты;
- Кодеки — кодек, который будет использоваться для сохранения видео и аудио;
- Преемник — файл или устройство, куда будут записаны данные.
Сейчас мы не будем подробно рассматривать опции, рассмотрим их потом, уже в самих командах.
Running ffmpeg.exe without opening a console window
If you want to run your ffmpeg «from a gui» without having it popup a console window which spits out all of ffmpeg’s input, a few things that may help:
- If you can start your program like rubyw.exe or javaw.exe then all command line output (including child processes’) is basically not attached to a console.
- If your program has an option to run a child program «hidden» or the like, that might work. If you redirect stderr and stdout to something you receive, that might work (but might be tricky because you may need to read from both pipes in different threads, etc.)
ffdshow tryouts
ffdshow tryouts is a separate project that basically wraps FFmpeg’s core source (libavcodec, etc.) and then presents them as filter wrappers that your normal Windows applications can use for decoding video, etc. It’s not related to FFmpeg itself, per se, though uses it internally. see also https://github.com/Nevcairiel/LAVFilters?
Fitting into a Rectangle / Statically-sized Player
Sometimes you need to scale the input image so that it fits into a specified rectangle, e.g. when consolidating material from different sources.
You can achieve this with the force_original_aspect_ratio option. It has two possible values:
- decrease: The output video dimensions will automatically be decreased if needed.
- increase: The output video dimensions will automatically be increased if needed.
This allows you to force the image to fit into a 320×240 box, downscaling it with the correct aspect ratio:
ffmpeg -i input.jpg -vf scale=w=320:h=240:force_original_aspect_ratio=decrease output_320.png
This produces our 320×207 image that we had seen before.

You may have additional constraints such as adding black bars (pillar- and letterboxing) to fill up the remaining space when scaling to a certain rectangle. You can additionally add a black border using the pad filter:
ffmpeg -i input.jpg -vf "scale=320:240:force_original_aspect_ratio=decrease,pad=320:240:(ow-iw)/2:(oh-ih)/2" output_320_padding.png
More examples can be found in this Super User answer.
Filtering
- Filtering Guide, including syntax for filter options
- Fancy Filtering Examples
- Scaling (re-sizing) video
- Xfade – Crossfades, wipes, and other transitions
- Postprocessing – Postprocessing low-quality video with FFmpeg
- Stereoscopic – 3D movies with ffmpeg
- Null – Filter for testing decoding speed
- WaveformMonitor – Waveform Monitor in FFmpeg
- Vectorscope – Vectorscope in FFmpeg
- Histogram – Histogram in FFmpeg
- Afade audio filter curves illustrated
- Remap – Copies pixels from source frame to target frame based on mapping files/streams
- Audio Channel Manipulation – Upmix, downmix, split, and manipulate audio channels
- Audio Volume Manipulation – Change audio volume and perform normalization (peak, RMS, EBU R128)
Video
cellauto

ffplay -f lavfi -i cellauto=rule=110
Other interesting cellauto rule values: 9, 18, 22, 26, 30, 41, 45, 50, 54, 60, 62, 73, 75, 77, 82, 86, 89, 90, 97, 99, 101, 102, 105, 107, 109, 110 (default), 124, 126, 129, 131, 133, 135, 137, 145, 146, 149, 150, 151, 153, 154, 161, 167, 169, 181, 182, 183, 193, 195, 210, 218, 225.
life

ffplay -f lavfi -i life=s=300x200:mold=10:r=60:ratio=0.1:death_color=#C83232:life_color=#00ff00,scale=1200:800:flags=16

ffplay -f lavfi -i life=s=640x480:mold=10:r=100:ratio=0.1:death_color=blue:life_color=#00ff00,boxblur=2:2

ffplay -f lavfi -i mandelbrot
ffplay -i INPUT -vf "crop=iw/2:ih:0:0,split;hflip; hstack"
video channel separation effect with lut filter
RGB version

ffplay -f lavfi -i testsrc -vf "split=4;lutrgb=g=0:b=0;lutrgb=r=0:b=0;lutrgb=r=0:g=0;hstack=4"
YUV version

ffplay -f lavfi -i testsrc -vf "split=4;lutyuv=u=128:v=128;lutyuv=y=0:v=128;lutyuv=y=0:u=128;hstack=4"
histogram & waveform

ffplay -f lavfi -i mandelbrot -vf "format=gbrp,split=4,histogram=display_mode=0:level_height=244,waveform=m=1:d=0:r=0:c=7,waveform=m=0:d=0:r=0:c=7,vstack,vstack,hstack"
vectorscope & waveforms

ffplay -f lavfi -i mandelbrot -vf "format=yuv444p,split=4,waveform,vstack,waveform=m=0,vectorscope=color4,vstack,hstack"
waveform

Split the waveform filter to show broadcast range of the waveform (y values between 16 and 235) in green and out of broadcast range in red.
ffplay -i http://download.blender.org/peach/bigbuckbunny_movies/big_buck_bunny_480p_surround-fix.avi -vf "split;format=gray,waveform,split;pad=iw:ih+256;geq=g=1:b=1;geq=r=1:b=1,crop=in_w:220:0:16;overlay=0:16;overlay=0:H-h"
waveform with envelope
Split the waveform filter to show broadcast range of the waveform (y values between 16 and 235) in green and out of broadcast range in red and also use envelope.
ffplay ~/matrixbench_mpeg2.mpg -vf "split;waveform=e=3,split=3;crop=in_w:20:0:235,lutyuv=v=180;crop=in_w:16:0:0,lutyuv=y=val:v=180;crop=in_w:220:0:16,lutyuv=v=110 ; vstack=4"
Known Bugs/Feature Requests
Send a message to rogerdpack@gmail.com if you want to discuss these issues.
- Do you have a feature request? Anything you want added? digital capture card support added? analog tv tuner support added? email me (see above). Want any of the below fixed? email me…
- currently there is no ability to «push back» against upstream sources if ffmpeg is unable to encode fast enough, this might be nice to have in certain circumstances, instead of dropping it when the rtbuffer is full.
- currently no ability to select «i420» from various yuv options meh
- could use an option «trust video timestamps» today it just uses wall clock time…
- cannot take more than 2 inputs per invocation. this can be arranged, please ask if it is a desired feature
- no device enumeration API as of yet (for libav users). At least do the name!
- my large list
- libav «input» to a directshow filter…could use my recycled screen-capture-recorder filter, woot LOL.
- 3D audio support’ish (non dshow but mentioning it here)
- passthrough so it can use locally installed dshow codecs on windows
- echo cancelling support (non dshow but mentioning it here)


