How to securely erase your hard drive
Содержание:
DBAN (Darik’s Boot and Nuke)
Darik’s Boot And Nuke, usually referred to as DBAN, is the best free data destruction software available.
Data Sanitization Methods: DoD 5220.22-M, RCMP TSSIT OPS-II, Gutmann, Random Data, Write Zero
DBAN is freely available in a ready-to-go ISO format, so all you need to do is burn it to a CD or flash drive and then boot from it. The DBAN program’s menu interface is also very easy to use.
Learn how to use DBAN to erase a hard drive for help.
DBAN is an open source project and a great tool that should certainly be your first choice if wanting to completely erase a hard drive. However, you should know that it does not support SSDs.
Because DBAN works from outside of the operating system, it can work with any version of any OS, like Windows, macOS, etc.
How to Use HDDErase
Once you’re booted to HDDErase on whatever device you have it installed to, you can most likely just sit a while for the program to fully load and let the default options be accepted.
This is what the screen will look like if you’re starting HDDErase from a disc:
-
Several lines of text will show and then give you several startup options to choose from. Just let the screen time out so that it chooses the very first option called Boot with emm386 (most compatible), otherwise type 1 and then press Enter.
If HDDErase doesn’t end up booting properly, you can return to this step and select a different option from that list by entering the number next to it.
-
More lines of text will show and then a prompt will ask about using the CD or changing its configuration. Let this screen time out as well.
-
After some more text is shown, you’ll be given a drive letter that corresponds to the disc. This is where you will actually enter the commands to use HDDErase.
Enter HDDERASE. If that doesn’t work, try to append the EXE file extension to the end by entering HDDERASE.EXE.
-
On the next screen, when asked if you want to proceed, enter Y to start the wizard.
-
Press any key to continue through to the next step, which is just a disclaimer.
-
The wizard is composed of some more confirmation prompts and other questions that just require you to enter Y a few more times.
-
If you see a screen about selecting the device that should be erased, look for an option that actually has something next to it and not the ones that say NONE. Once you find that one, enter the letter and number next to it, such as P0.
-
To enter the options menu on the next screen, type Y again.
-
Enter 1 on the next screen. The other options are for changing the active hard drive and exiting the program without erasing the hard drive.
-
Finally, enter Y once more to actually start erasing the disk.
-
When it’s finished, if you’re asked to see the LBA sector, you can choose N to finish or Y to read the serial number and model number of the drive that was erased.
-
When back on the main menu, enter E to exit HDDErase.
-
You can now remove the disc, flash drive, etc.
What’s the Difference between Formatting and Wiping a Hard Drive?
The first and most importance difference of formatting and wiping a hard drive is: the data in the formatted hard drive can be recovered with some data recovery software, while data in the erased hard drive can’t be restored.
Disk formatting:
Formatting a hard drive is the process of initializing the hard drive, SSD, USB drive. The formatting process often include: low-level formatting (basic medium preparation), partitioning (make the storage device visible to OS), and high-level formatting (generate a new file system). Formatting a drive generally leaves all data on the disk, and you can use some data recovery tools to get the data back if the drive is not overwritten. If you want to avoid the recovery of your private sensitive data, you can use one of top 10 free hard drive data wipe software to permanently erase the data.
Disk wipe:
Also known as data erasure or data sanitization. It is the real permanent data removal process and it’s impossible to retrieve data from a wiped disk. Data wiping aims to completely destroy all data from the hard drive or other storage devices. It uses zeros and ones to overwrite data to fill into all hard disk sectors. Through this overwriting, the old data on the hard drive is unrecoverable any more. Most of the disk wipe software listed above allows you to select a specific wiping standard based on your own needs, and lets you remove all data from the device.
3.4 Erase or Wipe Logical Drives (Partitions)
In all previous examples in this chapter, the process has erased or wiped data from a physical drive.
Using a similar method, you can erase or wipe logical disks and partitions. This includes damaged «Unallocated» areas where partitions used to exist and the areas not visible to the current operating system.
The Wipe button is disabled when partitions cannot be wiped because of issues such as an unknown or unsupported file system.
KillDisk must lock the partition before performing a Wipe or Erase action. A partition cannot be locked if it is in use by another user or application. In this case a dialog box appears with information that the disk is being used and you need to either skip it, or force a «volume dismount». If you skip it, the wipe or erase operation is canceled for this drive. If you select «volume dismount», some data in the drive’s cache may be lost.
This could affect other applications working with the same volume. If, for example, you made changes to a Word document located on D: and haven’t saved the file, a subsequent » forced dismount» for D: would likely result in the loss of the changes. The file’s original version should be unaffected.
3.5 Erase Data From a Logical Drive
To erase data from a logical drive:
- Start Active@ KillDisk from a bootable device or from the Programs menu.
- The Local System Devices screen appears.
All system hard drives and removable drives are displayed in the left pane. System information is displayed in the right pane. - Select the check box of a logical disk/volume or the Unallocated area.
- Press F10 or click Kill. The Kill dialog box appears.
- Set the erase method and other parameters for erasing. For information on these parameters, see Erase/Wipe Parameters in this guide.
- Complete the process as you would for other devices.
3.6 Wipe Data From a Logical Drive
To wipe data from a logical drive:
- Start Active@ KillDisk from a bootable device or from the Programs menu.
- The Local System Devices screen appears.
- All system hard drives and removable drives will be displayed in the left pane along with their system information in the right pane.
- Select the check box of a logical drivedisk/volume, or next to the Unallocated space.
- Press F9 or click Wipe to wipe data from unoccupied areas. The Wipe Free Disk Space dialog box appears.
- Select a wipe method and set other parameters for wiping. For information on these parameters, see Erase/Wipe Parameters in this guide.
- Complete the process, similar to the process for devices.
Before < Erase or Wipe Logical Drives (Partitions) > Next
WipeDisk
WipeDisk is a portable hard drive wiper that’s pretty easy to use and supports several data wipe methods. It works by selecting a drive and then choosing a wipe method.
Data Sanitization Methods: Bit Toggle, DoD 5220.22-M, Gutmann, MS Cipher, Random Data, Write Zero
You can log activities to a file, optionally wipe just the free space, and choose custom text to use for overwriting data.
After clicking Wipe, you must read and confirm a four character code to ensure you really want to use WipeDisk to erase all the files, which is a handy obstacle used to avoid accidentally erasing a whole hard drive.
I tested WipeDisk on Windows 10 and Windows 8, but it should also run on previous versions of Windows too.
More About HDDErase
HDDErase is a text-only program, which means there aren’t any buttons or menus that you can use to work with it.
To get started, just select Download Freeware Secure Erase Utility on the download page to download HDDErase as a ZIP file called hdd-erase-web.zip.
The easiest way to use HDDErase is from the bootable ISO image included with the download, called HDDErase.iso. You can also create any boot media you want (floppy, disc, flash drive, etc.) and copy the HDDERASE.EXE file to it.
The included text file called HDDEraseReadMe.txt has some information on how to create the boot disk. You can also read our guide on How to Burn an ISO Image File if you need a little more help with that part of the process.
The only data sanitization method HDDErase supports is Secure Erase, but this is arguably the very best one available.
File Shredder
File Shredder is a data destruction tool that can erase a disk full of files by simply adding the drive’s contents to the program. It recognizes both traditional and solid state drives.
Data Sanitization Methods: DoD 5220.22-M, Gutmann, Random Data, Write Zero
File Shredder isn’t as easy to use as some of these programs because you can’t drag the drive itself into the program. Instead, you have to drag and drop all the files and folders you want to delete.
However, you can grab the contents from the root of the drive and drop them into File Shredder.
File Shredder works with Windows 10, 8, 7, Vista, XP, 2000, and Windows Server 2008.
Freeraser
Freeraser, very much unlike some of the other programs on this list, is a full-fledged Windows application, complete with a setup wizard and Start Menu icons.
Data Sanitization Methods: DoD 5220.22-M, Gutmann, Random Data
I like Freeraser so much because it’s incredibly easy to use. It places a Recycle Bin-like icon on your desktop, so you just need to drag all of a drive’s files/folders into the bin for everything, subfolders and all, to be forever erased from your computer.
Freeraser can only delete files from a whole hard drive if it’s connected over USB. Internal hard drives are not supported.
Freeraser can also be used as a portable program by choosing that option during setup.
Freeraser works with Windows 10 through Windows XP.
Free EASIS Data Eraser
Free EASIS Data Eraser is another data destruction program that’s super simple to use.
Data Sanitization Methods: DoD 5220.22-M, Gutmann, Random Data, Schneier, VSITR, Write Zero
When you first open the program, select any hard drive from the top list and then choose the partitions you wish to wipe data from.
Unfortunately, I’ve found that clicking the Abort button to stop a wipe results in strange behavior. The program shuts down but then appears to still be in progress when it’s reopened. It seems you must restart the computer to return Free EASIS Data Eraser to its regular state. Fortunately, though, the data is still destroyed effectively.
Free EASIS Data Eraser officially supports Windows 7 through Windows 2000, but I was also able to get it to run without issues on Windows 10 and Windows 8.
Erasing or Formatting a Mac’s Startup Drive Using Disk Utility
Disk Utility can’t directly erase or format a startup disk because Disk Utility and all of the system functions it uses are located on that disk. If Disk Utility tried to erase the startup disk, it would, at some point, erase itself, which would present a problem.
To get around this, use Disk Utility from a source other than the startup disk. One option is your OS X Install DVD if you have one, which includes Disk Utility. Macs without optical drives use the Recovery volume.
Using Your OS X Install DVD
-
Insert the OS X Install DVD in your Mac’s CD/DVD reader.
-
Restart the Mac by selecting the Restart option in the Apple menu. When the display goes blank, press and hold the C key on the keyboard.
-
Booting from the DVD can take time. After you see the grey screen with the Apple logo in the middle, release the C key.
-
Select Use English for the main language when this option appears and then click the arrow button.
-
Select Disk Utility from the Utilities menu.
-
When Disk Utility launches, select the drive from the disks and volumes listed at the left side of the Disk Utility window.
-
Click the Erase tab. The selected drive’s name and current format display in the right side of the Disk Utility workspace.
-
Click Erase. Disk Utility unmounts the drive from the desktop, erases it, and then remounts it on the desktop.
↓ 14 – CCleaner | Disk | Windows

When you delete a file, Windows removes the reference to that file, but doesn’t delete the actual data that made up the file on your hard drive. Over time, this data will be overwritten as Windows writes new files to that area of the drive.
This means that, given the right software, someone could reconstruct all, or parts of files that you’ve deleted. For privacy and security reasons, you can set CCleaner to wipe the free areas of your hard disk so that deleted files can never be recovered. CCleaner is the number-one tool for cleaning your PC. It protects your privacy and makes your computer faster and more secure!
Main Features
| Freeware | Professional | |
|---|---|---|
|
Parallel erasing of multiple disks at the same time, independent erase sessions |
for 2 disks | for 2+ disks |
|
Erasing disks with One Pass Zeros sanitizing standard |
||
|
Support for more than 20 international erasing standards including US DoD 5220.22 M and User Defined erase method |
||
|
Command Line parameters used in scripting allow to automate erase procedures (Batch Mode) |
||
|
Certificates can be customized with company’s logo & comments can be easily added to certificates for each session |
||
|
Included Windows-based boot disk supporting UEFI secure boot on x64 systems |
||
|
User defined erase method can specify custom pattern for each pass using even hexadecimal (HEX) values |
||
|
Save Log & Shutdown PC option after erase completed |
||
|
Fingerprint including sanitizing status can be placed to disk’s first sector & displayed after boot up the disk |
||
|
Displays information about all volumes, partitions, hard disks, external USB disks & Memory sards currently connected |
||
|
Wipes out unused space on all disks completely by securely overwriting data on the physical level |
||
|
Support for wiping out unused sectors on Apple HFS+, Linux Ext2/Ext3/Ext4, Unix UFS/XFS/JFS & MS FAT/exFAT/NTFS file systems |
||
|
Supports all possible I/O interfaces: IDE / USB / SATA / eSATA / SSD / SCSI disks, LUN / RAID disk arrays |
||
|
Supports large-size disks (more than 4TB in size) & new disks having 4kb sector size |
||
|
Built-in Hex Viewer allows to inspect raw disk’s sectors: MBR, volume boot sectors, file system records & data file clusters |
||
|
Very easy to use: intuitive user interface for beginners, as well as a powerful command line mode for advanced users |
||
|
Supports fixed disks (HDD), Solid State Disks (SSD), Memory Cards and USB/USB3 external devices |
||
|
Utility can be placed on a bootable disk and used from it. You do not even need to boot from the hard drive to erase it |
||
|
Supports MBR and GPT (GUID Partition Table) style partitioning for wiping/erasing of volumes |
||
|
Certificate can be displayed after erase/wipe completion and saved as PDF |
||
|
Erases physical disks, partitions, logical drives & even unused disk space |
||
|
Boot Disk Creator can pre-configure KillDisk startup process on the Boot Disk using Command Line parameters |
||
|
Universal Boot Disk Creator prepares CD/DVD/BD/ISO/USB media for bootable Windows-based environment |
||
|
Data verification can be performed after erasing is completed |
||
|
Prints customizable Sticky Labels in different formats for HDDs/SSDs |
Command Line Mode
The utility has a command line mode which can be used in custom scripts. It allows you even to start the erase procedure automatically without user’s interaction (batch mode). By running the utility with parameters you can:
- Start erasing of any particular disk or all detected disks
- Specify one of more than twenty disk sanitizing methods to use
- Store disk erase log & disk erase PDF certificates to a desired location
- Write erase fingerprint to disk’s first sector, shutdown PC after completion and much more…
Example:
This example shows how you can run the utility with command line parameters. It will automatically detect and erase all detected hard drives using DoD 5220.22 M data destruction method (3 passes) with no user interaction.
> KillDisk –eraseallhdds -erasemethod=2 -noconfirmation
If you’ve place this command to the bootable disk startup script (like «autoexec.bat») and insert the disk into the CD/USB drive,
all you have to do to erase everything on the machine is Turn On the computer!
Active@ KillDisk Customizations
Our customization service allows you to request additional functions and features which we would be able to build in to the product. Such features can include anything from:
- Customization to the boot menu
- Custom erase methods
- Include your logo in erasure logs/certificates
- Customized erasure reports for additional fields/attributes as required
How to perform SSD Secure Erase with AOMEI Partition Assistant
You can follow the step by step guide below to securely erase SSD and then reset it to factory state .
Step 1. Connect your SSD to a Windows 7 computer via SATA port (since SSD Secure Erase is only workable in Windows at present). Install and run AOMEI Partition Assistant Professional.
Step 2. In the left menu of AOMEI Partition Assistant, Click «SSD Secure Erase Wizard» and click «Next». Or, right click on the SSD and select «SSD Secure Erase».

Step 3. Select the SSD that you want to securely erase and click «Next».

Step 4. Double check the SSD identification information in case of erasing the wrong SSD because the data is unrecoverable after the Erase. Now, you will see the SSD is in a frozen state. To continue, you need to perform a hot swap.

To perform Hot Swap
Sometimes, Secure Erase SSD requires hot-swapping the drive to unlock it from the frozen state. To avoid unexpected issues, follow the steps below:
1. Open your computer case. If it is a laptop, open the computer’s rear cover or drive shell.
2. Locate the SSD that needs to be securely erased.
3. Unplug the power cable from the SSD.
4. Disconnect the SATA data cable from the SSD.
5. Then reconnect the SATA cable to the SATA port on the SSD.
6. Finally, plug the power cable back into the SSD’s power connector to complete the hot-swap.
Step 5. click «Next» to start the SSD Secure Erase.
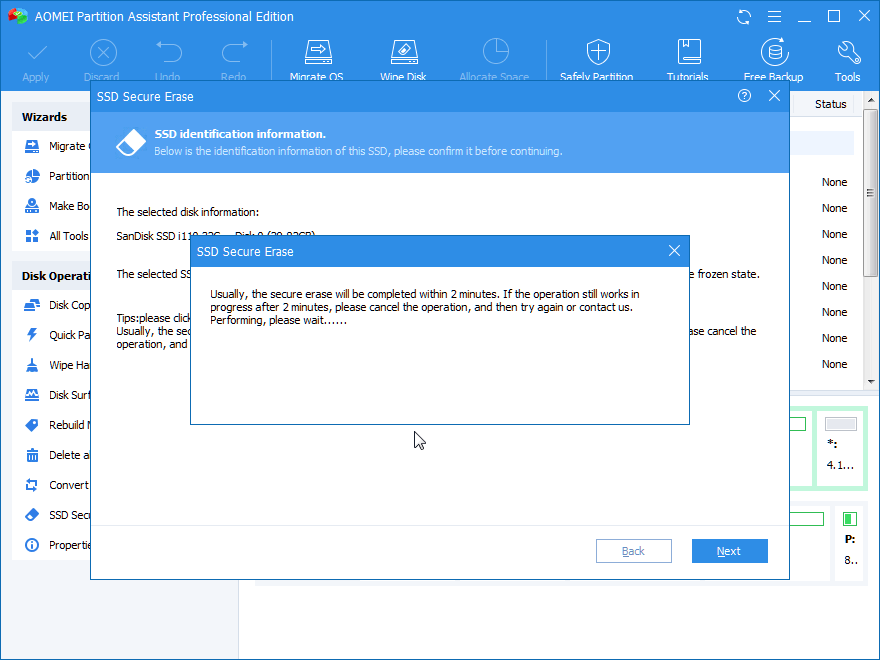
Almost instantly, the Secure Erase process is complete and you will see the SSD shown as a block of unallocated space. If you want to wipe your current system disk where Windows is installed. You can connect your SSD to another computer that runs Windows 7 to follow the steps above to securely erase your system SSD.
CCleaner
While CCleaner is normally used as a system cleaner to remove temporary Windows files and other internet or cache files, it also contains a tool that can wipe free disk space or completely destroy all the data on a drive.
Data Sanitization Methods: DoD 5220.22-M, Gutmann, Schneier, Write Zero
CCleaner works from within the operating system, so it can’t wipe the data off the same drive that Windows is installed to. However, it can wipe the free space of that drive.
You can choose more than one drive at once for CCleaner to wipe them all consecutively. It supports both SSDs and mechanical drives.
Once CCleaner is opened, go to the Tools section and then select Drive Wiper to access this data wiping feature. Be sure to choose Entire Drive from the dropdown menu.
CCleaner can be installed on Windows 10 through Windows XP, as well as Windows Server 2012, 2008, and 2003.
Make sure your Android device is encrypted
The biggest fear with wiping an Android device is the improbable but not impossible prospect of someone later using data recovery tools to find and assemble lingering bits of data.
That’s why the first and most important step in securely erasing your Android device is to make sure its local storage is encrypted. That way, even if your phone makes its way into the hands of a shady character — and even if said scoundrel is able to recover the data you’ve erased — your sensitive info will remain virtually unreadable.
If your phone is reasonably recent, it should almost certainly be encrypted by default. But if you’re getting rid of an older Android phone, it might not be. Either way, it’s worth double-checking to make sure.
Head to the Security section of Android’s system settings and look for the option labeled «Encryption» or «Encryption & credentials» — or just use the search function within your settings to look for the word «encrypt.» The exact wording and placement may vary depending on your device’s manufacturer and Android version, and some recent phones, such as those made by Samsung, may not even show the option at all (simply because it’s considered a given that encryption is in place, and there’s nothing you can do to change that).
The only reason to worry is if you find an encryption setting and see that the device isn’t already encrypted. In that case, you’ll want to follow the steps in that same area to encrypt it and make sure your data is properly protected.
The visuals will vary from one Android version to another, but most older Android phones will either show you that they’re encrypted or give you an option to enable encryption.
Be warned that the actual encryption process may take a while, and you won’t be able to use your device while the process is underway. Once it’s done, though, you can rest easy knowing your data has a powerful layer of protection from prying eyes in the unlikely event that it’s even recovered.
Secure Eraser
Secure Eraser is a software suite that serves not only as a registry cleaner but also as a data destruction tool.
Data Sanitization Methods: DoD 5220.22-M, Gutmann, Random Data, VSITR
After selecting the drive or partition that should be wiped, just click Start deletion to choose one of the above methods.
After Secure Eraser has done its job, you can set it to reboot the computer, exit, or shutdown the computer.
Because Secure Eraser runs from within Windows, you can’t use it to erase the hard drive that it’s installed to (like the C drive). However, it does work with both traditional HDDs and SSDs, as well as USB-connected storage devices.
Secure Eraser can be installed on Windows 10 through Windows XP, as well as Windows Server 2019, 2016, 2012, 2008, and 2003.
How to Recover Data from Hard Disk, External Hard Drive, USB, etc.
Once you wipe the hard drive with professional hard drive data eraser, the hard drive will leave no traces of the old data.
However, if you mistakenly delete some files or format the drive, you can easily recover the deleted or lost data with MiniTool Partition Wizard Pro Ultimate.
This program equips two hard drive data recovery functions: data recovery, partition recovery. Here we’ll introduce how to recover deleted or lost data from computer hard drive, SSD, external hard drive, USB flash drive, etc.
Get MiniTool Partition Wizard Pro Ultimate below and install it on your Windows 10/8/7/Vista/XP computer. If you’d like to recover data from external drives, you need to connect it with your computer first.
Step 1. Launch this best data recovery software, and click Data Recovery function in the toolbar.
Step 2. Choose which device you’d like to recover data from. And click Scan. Optionally you can click Settings to choose to scan specific types of files.
Step 3. This software will begin scanning the chosen hard drive or partition, and display the recovered files in the plate.
Step 4. Find the files you need and click Save icon to store them to a new drive.

Remove any remaining account associations
Last but not least, take a moment to manually remove the phone from your Google account and any other accounts that might be associated with it.
For Google, visit the Your Devices section of the web-based account manager. Find your phone in the list, click it, and then click the «Sign out» button that appears. That’ll ensure your Google account has no lingering connection to the phone.
JR Raphael/IDG
Severing the connection between a phone and your accounts is a smart final step to take.
Think through any other services that might have similar options — Android password managers like LastPass, for instance, or Android security apps like Authy — and sign into their respective websites to sever any remaining connections.
And with that, you’re all set: Your Android phone is securely erased and ready to move on to its new life.
This article was originally published in December 2017 and updated in July 2020.
↓ 01 – Eraser | Files/Disk | Windows

Eraser is an advanced security tool for Windows which allows you to completely remove sensitive data from your hard drive by overwriting it several times with carefully selected patterns. Eraser is currently supported under Windows XP (with Service Pack 3), Windows Server 2003 (with Service Pack 2), Windows Vista, Windows Server 2008, Windows 7 and Windows Server 2008 R2. With these following technology, you can rest assure your
- Gutmann (35 passes)
- US DoD 5220.22-M (8-306./E,C & E) (7passes)
- RCMP TSSIT OPS-II (7 passes)
- Schneier 7 pass (7 passes)
- German VSITR (7 passes)
- US DoD 5220.22-M (8-306./E) (3passes)
- British HMG IS5 (Enhanced) (3 passes)
- US Air Force 5020 (3 passes)
- US Army AR380-I9 (3 passes)
- Russian GOST P50739-95 (2 passes)
- British HMG IS5 (Baseline) (1 pass)
- Pseudorandom Data (1 pass)
CBL Data Shredder
CBL Data Shredder comes in two forms: you can either boot from it via a disc or USB stick (like with DBAN) or use it from within Windows like a regular program.
To erase the hard drive that’s running an operating system, you’re required to boot to the program, whereas deleting another internal or external drive can be done with the Windows version.
Data Sanitization Methods: DoD 5220.22-M, Gutmann, RMCP DSX, Schneier, VSITR
In addition to the above, you can create your own custom method to include 1s, 0s, random data, or custom text with a custom number of passes.
The bootable version tells you how large each drive is but that’s about the only identifiable information given, whereas the Windows version makes it easier to know what drive you’re about to wipe clean.
The Windows version of CBL Data Shredder works with Windows XP through Windows 10.
SDelete
SDelete, short for Secure Delete, is a command-line based data destruction tool and can be run from the Command Prompt in Windows.
Data Sanitization Methods: DoD 5220.22-M
SDelete is part of the Sysinternals Suite of free system utilities available from Microsoft. SDelete does not utilize Secure Erase even though its name might lead you to think otherwise.
Like some of these other programs, SDelete runs from within Windows, so you can not use the program to erase the C drive. Use another data destruction software program that you can boot to or see How to Format C for some other ideas.
There are several drawbacks to using SDelete and the information on their download page has a fair discussion of those issues. If you need a full-drive data destruction program then SDelete isn’t a good choice, but it could be very useful in specific situations.
SDelete works with all Windows operating systems newer than Windows XP, as well as Windows Server 2003 and higher.
SATA drive
Step 1 — Make sure the drive security is not frozen
Issue the following command:
# hdparm -I /dev/sdX | grep frozen
In the security section of the output it should say «not frozen». If it shows as just «frozen» then you cannot continue to the next step. Some BIOSes block the ATA Secure Erase command by issuing a «SECURITY FREEZE» command to «freeze» the drive before booting an operating system.
A possible solution is to simply suspend the system. Upon waking up, it is likely that the freeze will be lifted. If unsuccessful, one can try hot-(re)plug the data cable (which might crash the kernel). If hot-(re)plugging the SATA data cable crashes the kernel try letting the operating system fully boot up, then quickly hot-(re)plug both the SATA power and data cables. If hot-(re)plugging of SATA cables still crashes the kernel, make sure that AHCI is enabled in the BIOS (AHCI allows hot-(re)plugging operations without a crash). Using a USB-to-SATA adapter is an option if it supports hotplugging. One can also use via USB.
Dell Systems
If the command output shows «frozen», you may be able to work around it by:
- Reboot into the Dell BIOS by pressing F2 on startup.
- Set the Internal HDD Password in the BIOS (be careful, the keymap is en_US / qwerty).
- Apply the changes and reboot.
- When prompted for the password by Dell Security Manager, press Escape rather than entering it. The drive will remain locked but not frozen.
- Skip step 2, and go directly to Step 3 below.
Step 2 — Enable security by setting a user password
Note: When the user password is set the drive will be locked after next power cycle denying normal access until unlocked with the correct password.
Any password will do, as this should only be temporary. After the secure erase the password will be set back to NULL. In this example, the password is as shown:
# hdparm --user-master u --security-set-pass PasSWorD /dev/sdX
security_password="PasSWorD"
/dev/sdX:
Issuing SECURITY_SET_PASS command, password="PasSWorD", user=user, mode=high
As a sanity check, issue the following command
# hdparm -I /dev/sdX
The command output should display «enabled»:
Security:
        Master password revision code = 65534
                supported
                enabled
        not     locked
        not     frozen
        not     expired: security count
                supported: enhanced erase
        Security level high
        2min for SECURITY ERASE UNIT. 2min for ENHANCED SECURITY ERASE UNIT.
Step 3 — Issue the ATA Secure Erase command
The final step is to issue the secure erase command, instructing the device’s BIOS to erase its contents. Note for the device used in this example, earlier output states:
2min for SECURITY ERASE UNIT. 2min for ENHANCED SECURITY ERASE UNIT.
Warning:
- Triple check that the correct drive designation is used. There is no turning back once the command is confirmed. You have been warned.
- Ensure that the drive is not mounted when this is ran. If a secure erase command is issued while the device is mounted, it will not erase properly.
# hdparm --user-master u --security-erase PasSWorD /dev/sdX
Wait until the command completes. This example output shows it took about 40 seconds for an Intel X25-M 80GB SSD.
security_password="PasSWorD"
/dev/sdX:
Issuing SECURITY_ERASE command, password="PasSWorD", user=user
0.000u 0.000s 0:39.71 0.0%      0+0k 0+0io 0pf+0w
The drive is now erased. After a successful erasure the drive security should automatically be set to disabled (thus no longer requiring a password for access). Verify this by running the following command:
# hdparm -I /dev/sdX
The command output should display «not enabled»:
Security:
        Master password revision code = 65534
                supported
        not     enabled
        not     locked
        not     frozen
        not     expired: security count
                supported: enhanced erase
        2min for SECURITY ERASE UNIT. 2min for ENHANCED SECURITY ERASE UNIT.
Format Command With Write Zero Option
Beginning in Windows Vista, the format command was granted the ability to write zeros during the format, giving the command basic data destruction abilities.
Data Sanitization Methods: Write Zero
Since all Windows 10, Windows 8, Windows 7, and Windows Vista users already have the format command at their disposal, this is a quick and effective data destruction method. Granted, you won’t be able to satisfy some stringent data sanitization standards, but if that’s not a concern then this option is perfect.
The format command included with Windows XP and prior operating systems does not support this option. However, there is a way to use this method on a computer with Windows XP if you have access to another computer with Windows 7, 8, or 10.
↓ 05 – Hard Disk Scrubber Files/Disk | Windows

Summit’s Hard Disk Scrubber is a Free secure delete program designed to help you permanently destroy sensitive data from your PC. Use Hard Disk Scrubber to overwrite free space on your Windows drives, or to permanently delete files so that they can no longer be recovered.
The Hard Disk Scrubber v3 offers new scrub types in addition to Normal, and Heavy that were found in earlier versions of the software. A description of each of these types follows. Each “Scrub Type” is a collection of “Scrub Patterns”. The Hard Disk Scrubber offers 6 different scrub patterns in all. Each pattern is a 512K block of bit data. This data is what is used to overwrite the private data that you are permanently destroying.
- Normal – Single Pass using Random Pattern
- Heavy – Three passes, using Zeros, then Ones, then Random
- Super – Five passes, using Zeros, Ones, Checkerboard Beginning with Zero, Checkerboard Beginning with One, then Random
- Ultra – DoD prescribed – overwrite, overwrite with 1’s compliment, overwrite random, verify. These 4 steps repeated 3 times.
- Custom – User-definable Scrub Type. Any patterns in any order for as many passes as needed.
DP Secure WIPER (DPWipe)
DP Secure WIPER (DPWipe) is a small portable tool that works by dragging and dropping a disk drive onto the program and clicking Start wiping to completely erase all the files.
You can also enter the path of the drive into the text area.
Data Sanitization Methods: DoD 5220.22-M, Gutmann, Write Zero
In addition to the above, you can also set DPWipe to clean a hard drive using no special method, which results in a simple, non-secure normal delete.
DPWipe doesn’t delete folders when wiping a drive. All the files inside the folders are removed just fine, but the folders themselves will remain.
I was able to get DPWipe to work in Windows 10 and Windows XP, which means it will likely work in Windows 8, 7, and Vista as well.
CopyWipe
CopyWipe is a data destruction tool that can run from a disc using CopyWipe for DOS or from inside Windows with CopyWipe for Windows, though both methods are text-only, non-GUI versions.
Data Sanitization Methods: Gutmann, Random Data, Secure Erase, Write Zero
CopyWipe for DOS has an Entropy Source option you can define before erasing a drive, which lets you choose how random data should be created. For example, you can enter random keys on the keyboard to generate entropy for the operation or choose to use the current time and speed of the computer.
There are hardly any options with CopyWipe, and although the interface is in text form and not too user-friendly, it’s actually pretty simple to use and makes you confirm that you want to wipe a drive before starting.
CopyWipe for Windows is entirely portable, which means it doesn’t need to be installed before you can use it. It runs on Windows 10, 8, 7, Vista, and XP.
Erasing a Non-Startup Volume
Erasing a volume is an easy way to free up drive space. Many multimedia applications, such as Adobe Photoshop, need a large amount of contiguous disk space to work efficiently. Erasing a volume is a faster way of creating that space than using third-party defragmenting tools. Because the process erases all the data on a volume, some multimedia-savvy individuals create small volumes to hold a project’s worth of data and then erase the volume before starting the next project.
The data-erase method outlined here doesn’t address any security issues that may be associated with the erased data. Most data recovery programs could resurrect the data that was erased using this process. If you’re concerned about security, use the secure erase procedure addressed later in this guide.
To erase a volume:
-
Select a volume from the disks and volumes listed at the left side of the Disk Utility window. Each disk and volume is identified by the same name and icon that it displays on the Mac desktop.
-
Click the Erase tab. The selected volume’s name and current format display in the right side of the Disk Utility workspace.
-
Click Erase. Disk Utility unmounts the volume from the desktop, erases it, and then remounts it on the desktop.
The erased volume retains the same name and format type as the original. If you need to change the format type, see how to format a Mac’s hard drive using Disk Utility later in this guide.







