Обновление ядра в centos до последней версии
Содержание:
- Решение:
- Enabling the EPEL repo
- Create Local YUM Repository with DVD
- Как подключить стандартные репозитории CentOS 6
- YUM Repository Configuration File
- CentOS DVD ISO YUM Repository
- Разные релизы CentOS
- Yum: история и логи установки/удаления пакетов
- Install epel*.rpm file using yum command
- How Can I Enable EPEL 7 on armhfp ?
Решение:
Базовые репозитории CentOS содержат наиболее стабильные пакеты.
Следует иметь в виду, что подключение дополнительных репозиториев сопряжено с дополнительным риском потери согласованности системы, стабильности, защищенности.
Некоторые репозитории несовместимы между собой. Иногда это может разрушить систему.
Скрипт добавления EPEL, REMI, RPMforge репозиториев в Centos 6 x64.
cd /tmp
yum -y  install wget
rpm --import /etc/pki/rpm-gpg/RPM-GPG-KEY*
rpm --import http://dag.wieers.com/rpm/packages/RPM-GPG-KEY.dag.txt
wget http://pkgs.repoforge.org/rpmforge-release/rpmforge-release-0.5.2-2.el6.rf.x86_64.rpm
rpm -ivh rpmforge-release-0.5.2-2.el6.rf.x86_64.rpm
rpm --import https://fedoraproject.org/static/0608B895.txt
wget http://dl.fedoraproject.org/pub/epel/6/x86_64/epel-release-6-8.noarch.rpm
rpm -ivh epel-release*
rpm --import http://rpms.famillecollet.com/RPM-GPG-KEY-remi
rpm -ivh http://rpms.famillecollet.com/enterprise/remi-release-6.rpm
rpm --import http://elrepo.org/RPM-GPG-KEY-elrepo.org
rpm -Uvh http://elrepo.org/elrepo-release-6-4.el6.elrepo.noarch.rpm
yum install -y yum-priorities
sed -i '/enabled=1/a\priority=10\' /etc/yum.repos.d/elrepo.repo && sed -i '5c\enabled=1\' /etc/yum.repos.d/remi.repo && sed -i '5a\priority=10\' /etc/yum.repos.d/remi.repo
yum update
Краткое описание репозиториев
- RPMforge является результатом сотрудничества Dag-а,Dries-а, и других создателей пакетов. Он обеспечивает более 4000 пакетов для CentOS. Он не является частью Red Hat или CentOS, но предназначен для работы с этими основными дистрибутивами.
- Remi Collet содержит последние версии MySQL и PHP
- ELRepo это репозиторий с последними драйверами для графических, сетевых, звуковых карт, веб камер и многого другого.
Уменьшение рисков
Если у вас повышенные требования к стабильности и вы опасаетесь при автоматическом обновлении поломать систему, то рекомендуем после установки репозитория отключить его установкой параметра enabled=0 (По умолчанию там будет enabled=1)
Например для EPEL это можно сделать в файле параметров репозитория /etc/yum.repos.d/epel.repo
Для RPMforge в файле /etc/yum.repos.d/rpmforge.repo
/etc/yum.repos.d/rpmforge.repo
name = RHEL $releasever - RPMforge.net - dag
baseurl = http://apt.sw.be/redhat/el6/en/$basearch/rpmforge
mirrorlist = http://apt.sw.be/redhat/el6/en/mirrors-rpmforge
#mirrorlist = file:///etc/yum.repos.d/mirrors-rpmforge
enabled = 0
protect = 0
gpgkey = file:///etc/pki/rpm-gpg/RPM-GPG-KEY-rpmforge-dag
gpgcheck = 1
После этого пакеты из этих репозиториев не будут доступны если вы не используете в команде установки пакета или обновления системы параметр
--enablerepo=<имя репозитория>
Например:
yum --enablerepo=epel install iftop
yum --enablerepo=rpmforge install iftop
Если вы используете нечто вроде ISPManager, то не отключайте репозитории, иначе вам не будут доступны пакеты из них.
Enabling the EPEL repo
Enabling the EPEL repo will differ slightly depending on which OS you are enabling it from. Overall the installation process for EPEL should be pretty straight forward, there are some distros that make it even easier though! At Liquid Web the only distributions that this will apply to is CentOS; however we’ll also cover the process for RHEL.
Pre-flight Check:
- These instructions were created with Liquid Web servers in mind.
- Root level command line access via SSH will be necessary to follow along.
Installing EPEL on CentOS via yum
By far CentOS is the easiest distro to install EPEL on. The CentOS distribution includes a repo called ‘CentOS Extras’ by default. Within this repo users can find a EPEL package, so in this case enabling EPEL is as easy as installing any other package.
- Connect to the server via SSH as the root user; or open a terminal if you’re working locally.
- Install the EPEL repository with the following command: sudo yum install epel-release
- Confirm your work and refresh the repo list by running: sudo yum repolist
Essentially once you’re logged in as the root user, just run the following command:
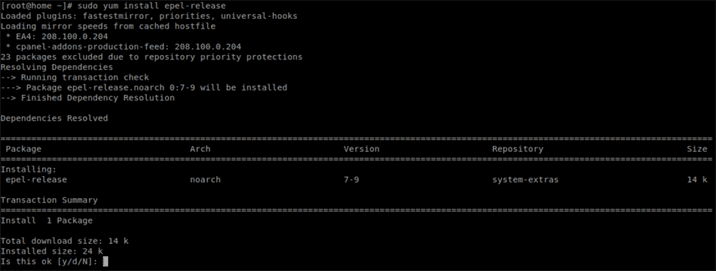
Once you hit enter Yum will do some work and prompt you with a confirmation dialog. once you confirm the install and hit enter it will complete the install process for you. That’s it, it’s really that simple.
If, for whatever reason, your version of CentOS is missing the CentOS Extras repo necessary for this to work you can follow the directions below.
Installing EPEL on RHEL/CentOS/etc
If you are running a different supported distribution you can install the EPEL rep with the following method. This method should also work on CentOS if you’d like to do a manual install. First start by running the following command:
Then download the rpm file for installation. The file download depends on what OS version you are using, select from the list bellow:
- RHEL 7/CentOS 7/etc:
- RHEL 6/CentOS 6/etc:
- RHEL 5/CentOS 5/etc:
Once you’ve downloaded the EPEL rpm file for your OS version, you can now install the EPEL repository. To install the EPEL rpm run:
The above command uses a wildcard (*), this allows the command to work no matter which version you are installing.
Create Local YUM Repository with DVD
Create Source
Mount the CD/DVD ROM on any directory of your wish. For testing, mount it on /cdrom.
mkdir /cdrom

mount /dev/cdrom /cdrom
Create Repo file
Before creating a repo file, move your existing repo files present in /etc/yum.repos.d directory, if not required.
mv /etc/yum.repos.d/*.repo /tmp/
Create the new repo file called cdrom.repo under /etc/repos.d directory.
vi /etc/yum.repos.d/local.repo
Add the following details.
name=LocalRepository
baseurl=file:///cdrom
enabled=1
gpgcheck=1
gpgkey=file:///etc/pki/rpm-gpg/RPM-GPG-KEY-CentOS-7
Where,
= Repository Name which will be displayed during package installation
name = Name of the repository
baseurl = Location of the package
Enabled = Enable repository
gpgcheck = Enable secure installation
gpgkey = Location of the key
gpgcheck is optional (If you set gpgcheck=0, there is no need to mention gpgkey)
Install Package from Local DVD YUM repository
Clear the repository cache by issuing the following command.
yum clean all
Let’s install the vsftpd package from the local repository.
yum install vsftpd
The output will be like below; it will try to cache the package information. When you give yes to download the package, it will prompt you to accept gpg signing key.
Loaded plugins: fastestmirror
LocalRepo                                                | 3.6 kB     00:00
(1/2): LocalRepo/group_gz                                  | 157 kB   00:00
(2/2): LocalRepo/primary_db                                | 2.7 MB   00:00
Determining fastest mirrors
Resolving Dependencies
--> Running transaction check
---> Package vsftpd.x86_64 0:3.0.2-9.el7 will be installed
--> Finished Dependency Resolution

Dependencies Resolved

================================================================================
Package         Arch            Version               Repository          Size
================================================================================
Installing:
vsftpd          x86_64          3.0.2-9.el7           LocalRepo          165 k

Transaction Summary
================================================================================
Install  1 Package

Total download size: 165 k
Installed size: 343 k
Is this ok [y/d/N]: y
Downloading packages:
warning: /cdrom/Packages/vsftpd-3.0.2-9.el7.x86_64.rpm: Header V3 RSA/SHA256 Signature, key ID f4a80eb5: NOKEY
Public key for vsftpd-3.0.2-9.el7.x86_64.rpm is not installed
Retrieving key from file:///etc/pki/rpm-gpg/RPM-GPG-KEY-CentOS-7
Importing GPG key 0xF4A80EB5:
Userid     : "CentOS-7 Key (CentOS 7 Official Signing Key) <security@centos.org>"
Fingerprint: 6341 ab27 53d7 8a78 a7c2 7bb1 24c6 a8a7 f4a8 0eb5
Package    : centos-release-7-0.1406.el7.centos.2.3.x86_64 (@anaconda)
From       : /etc/pki/rpm-gpg/RPM-GPG-KEY-CentOS-7
Is this ok [y/N]: y
Running transaction check
Running transaction test
Transaction test succeeded
Running transaction
Installing : vsftpd-3.0.2-9.el7.x86_64                                    1/1
Verifying  : vsftpd-3.0.2-9.el7.x86_64                                    1/1

Installed:
vsftpd.x86_64 0:3.0.2-9.el7

Complete!</security@centos.org>
Как подключить стандартные репозитории CentOS 6
Шаг 1. В каталоге /etc/yum.repos.d создадим CentOS-Base.repo с содержимым
- CentOS-Base.repo
-
# CentOS-Base.repo
#
# The mirror system uses the connecting IP address of the client and the
# update status of each mirror to pick mirrors that are updated to and
# geographically close to the client.  You should use this for CentOS updates
# unless you are manually picking other mirrors.
#
# If the mirrorlist= does not work for you, as a fall back you can try the
# remarked out baseurl= line instead.
#
#

base
name=CentOS-6 - Base
mirrorlist=http://mirrorlist.centos.org?release=6&arch=$basearch&repo=os
#baseurl=http://mirror.centos.org/centos/6/os/$basearch/
gpgcheck=1
enabled=1
gpgkey=file:///etcpkirpm-gpgRPM-GPG-KEY-CentOS-6

#released updates
updates
name=CentOS-6 - Updates
mirrorlist=http://mirrorlist.centos.org?release=6&arch=$basearch&repo=updates
#baseurl=http://mirror.centos.org/centos/6/updates/$basearch/
gpgcheck=1
gpgkey=file:///etcpkirpm-gpgRPM-GPG-KEY-CentOS-6

#additional packages that may be useful
extras
name=CentOS-6 - Extras
mirrorlist=http://mirrorlist.centos.org?release=6&arch=$basearch&repo=extras
#baseurl=http://mirror.centos.org/centos/6/extras/$basearch/
gpgcheck=1
gpgkey=file:///etcpkirpm-gpgRPM-GPG-KEY-CentOS-6

#additional packages that extend functionality of existing packages
centosplus
name=CentOS-6 - Plus
mirrorlist=http://mirrorlist.centos.org?release=6&arch=$basearch&repo=centosplus
#baseurl=http://mirror.centos.org/centos/6/centosplus/$basearch/
gpgcheck=1
enabled=
gpgkey=file:///etcpkirpm-gpgRPM-GPG-KEY-CentOS-6

#contrib - packages by Centos Users
contrib
name=CentOS-6 - Contrib
mirrorlist=http://mirrorlist.centos.org?release=6&arch=$basearch&repo=contrib
#baseurl=http://mirror.centos.org/centos/6/contrib/$basearch/
gpgcheck=1
enabled=
gpgkey=file:///etcpkirpm-gpgRPM-GPG-KEY-CentOS-6
Шаг 2. Загрузим в систему GPG-ключ, которым подписаны пакеты врепозитории с сайта CentOS
http://mirror.centos.org/centos/ и скопируем его в каталог /etc/pki/rpm-gpg/
# wget http://mirror.centos.org/centos/RPM-GPG-KEY-CentOS-6 -P /etc/pki/rpm-gpg/
После этого можно будет устанавливать пакеты из подключённого репозитория.
Автор первичной редакции:Алексей Максимов
Время публикации: 02.03.2017 23:17
YUM Repository Configuration File
We can install new software on Red Hat/CentOS Linux with «yum install packagename» command from console. Running this command first checks for existing YUM Repository configuration files in /etc/yum.repos.d/ directory. It reads each YUM Repository configuration file to get the information required to download and install new software, resolves software dependencies and installs the required RPM package files.
YUM Repository configuration files must:
- be located in /etc/yum.repos.d/ directory
- have .repo extension, to be recognized by YUM
Available YUM Repository configuration file options are:
- Repository ID — One word unique repository ID (example: )
- Name — Human readable name of the repository (example: name=Example Repository)
- Baseurl — URL to the repodata directory. You can use file://path if repository is located locally or ftp://link, http://link, https://link if repository is located remotely — HTTP Authentication available http://user:password@www.repo1.com/repo1 (example: baseurl=http://mirror.cisp.com/CentOS/6/os/i386/)
- Enabled — Enable repository when performing updates and installs (example: enabled=1)
- Gpgcheck — Enable/disable GPG signature checking (example: gpgcheck=1)
- Gpgkey — URL to the GPG key (example: gpgkey=http://mirror.cisp.com/CentOS/6/os/i386/RPM-GPG-KEY-CentOS-6)
- Exclude — List of the packages to exclude (example: exclude=httpd,mod_ssl)
- Includepkgs — List of the packages to include (example: include=kernel)
Required YUM Repository configuration file options are:
- Repository ID
- Name
- Baseurl
- Enabled
Step 1: Create YUM Repository configuration file
Use your favorite console text editor and create a new YUM Repository configuration file with .repo extension in /etc/yum.repos.d/ directory. To create a new file with «vi editor» run the following command from console:
vi /etc/yum.repos.d/example.repo
Example YUM Repository Configuration file:
/etc/yum.repos.d/example.repo
name=Example Repository
baseurl=http://mirror.cisp.com/CentOS/6/os/i386/
enabled=1
gpgcheck=1
gpgkey=http://mirror.cisp.com/CentOS/6/os/i386/RPM-GPG-KEY-CentOS-6
CentOS DVD ISO YUM Repository
CentOS DVD ISO holds a large number of software (RPM package files) which are available for installation during Red Hat/CentOS installation wizard. We can also use RPM package files from CentOS DVD ISO to create CentOS DVD ISO YUM Repository. This way we can install all of the software available on CentOS DVD ISO with «yum install packagename» command from VPS console even after we have completed Red Hat/CentOS installation wizard.
Step 1: Download/Transfer CentOS DVD ISO
CentOS DVD ISO files are available for download at http://mirror.centos.org/. We need to download or transfer CentOS DVD ISO to our VPS:
- Transfer — If we have already downloaded CentOS DVD ISO to a machine different than our VPS, we will need to transfer it from our machine to our cloud server via FTP or SSH. We can do this with software like WinSCP (free SFTP client and FTP) or similar.
- Download — We can download CentOS DVD ISO directly to our VPS with «wget» command from console (please change HTTP link accordingly):
wget http://mirror.lihnidos.org/CentOS/6.4/isos/i386/CentOS-6.4-i386-LiveDVD.iso
Step 2: Mount CentOS DVD ISO
To view the CentOS DVD ISO data, we first need to mount it on desired location. We usually mount CD-ROM, USB devices or ISO files to /mnt directory (if free to use). To mount CentOS DVD ISO run the following command from console (please change /path/to/iso and /mnt accordingly):
mount -o loop /path/to/iso /mnt
Step 3: Create YUM Repository Configuration file
To start using the newly created Custom YUM Repository we must create YUM Repository Configuration file with .repo extension, which must be placed to /etc/yum.repos.d/ directory. Instructions to create YUM Repository Configuration file are covered in the first topic of this article called «YUM Repository Configuration File».
Example CentOS DVD ISO YUM Repository Configuration file:
/etc/yum.repos.d/centosdvdiso.repo
name=CentOS DVD ISO
baseurl=file:///mnt
enabled=1
gpgcheck=1
gpgkey=file:///mnt/RPM-GPG-KEY-CentOS-6
Разные релизы CentOS
В одном репозитории мы можем легко хранить пакеты для различных релизов операционной системы CentOS (и не только CentOS, но и PPA). Для этого создаем каталог под новый релиз, синхронизируем его с источником и создаем из него репозиторий, например:
mkdir -p /usr/share/nginx/html/repos/6/{os,updates}/x86_64
* в данном примере предполагается использование репозитория для релиза 6.
Синхронизируем пакеты:
rsync -iavrt —delete —exclude=’repo*’ rsync://mirror.yandex.ru/centos/6/os/x86_64/ /usr/share/nginx/html/repos/6/os/x86_64/
rsync -iavrt —delete —exclude=’repo*’ rsync://mirror.yandex.ru/centos/6/updates/x86_64/ /usr/share/nginx/html/repos/6/updates/x86_64/
Создаем репозитории:
createrepo -v /usr/share/nginx/html/repos/6/os/x86_64
createrepo -v /usr/share/nginx/html/repos/6/updates/x86_64
Yum: история и логи установки/удаления пакетов
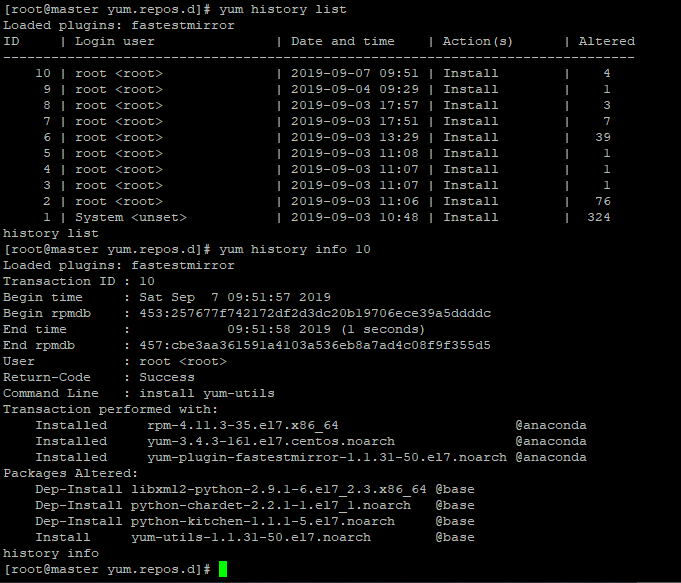
Вы можете вывести информацию об истории установки пакетов yum (списка транзакций) с помощью команды:
Вывод состоит из 5 столбцов, в первом выводится ID транзакции по которому можно посмотреть всю информацию (установленные пакеты, зависимости):
Например:
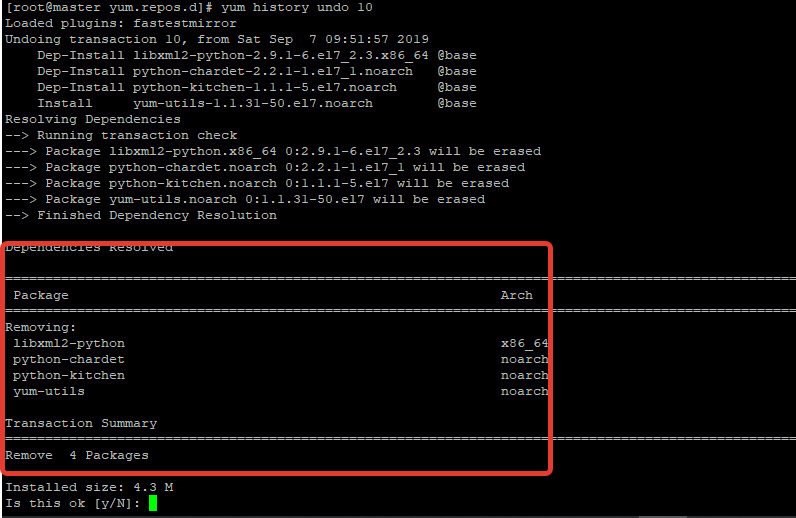
Более того, можно отменить данную транзакцию командой:
В моем случае удалилось бы 4 пакета:
Так же всю информацию об истории установки/удаления пакетов менеджером yum можно посмотреть в логе /var/log/yum.log:
Sep 03 11:06:38 Installed: mpfr-3.1.1-4.el7.x86_64
Sep 03 11:06:38 Installed: libmpc-1.0.1-3.el7.x86_64
Sep 03 11:06:38 Installed: libquadmath-4.8.5-36.el7_6.2.x86_64
Sep 03 11:06:38 Installed: apr-1.4.8-3.el7_4.1.x86_64
Sep 03 11:06:38 Installed: m4-1.4.16-10.el7.x86_64
Sep 03 11:06:38 Installed: apr-util-1.5.2-6.el7.x86_64
Sep 03 11:06:38 Installed: unzip-6.0-19.el7.x86_64
Sep 03 11:06:38 Installed: patch-2.7.1-10.el7_5.x86_64
Sep 03 11:06:38 Installed: 1:perl-Error-0.17020-2.el7.noarch
Sep 03 11:06:38 Installed: boost-system-1.53.0-27.el7.x86_64
Sep 03 11:06:38 Installed: perl-Thread-Queue-3.02-2.el7.noarch
Sep 03 11:06:38 Installed: avahi-libs-0.6.31-19.el7.x86_64
Sep 03 11:06:38 Installed: zip-3.0-11.el7.x86_64
Sep 03 11:06:38 Installed: boost-thread-1.53.0-27.el7.x86_64
Sep 03 11:06:38 Installed: libgfortran-4.8.5-36.el7_6.2.x86_64
Sep 03 11:06:39 Installed: cpp-4.8.5-36.el7_6.2.x86_64
Install epel*.rpm file using yum command
You can use the yum command instead of rpm command: Sample outputs:
Loaded plugins: product-id, rhnplugin, security, subscription-manager This system is not registered to Red Hat Subscription Management. You can use subscription-manager to register. This system is receiving updates from RHN Classic or RHN Satellite. Setting up Install Process Examining epel-release-6-8.noarch.rpm: epel-release-6-8.noarch Marking epel-release-6-8.noarch.rpm to be installed Resolving Dependencies --> Running transaction check ---> Package epel-release.noarch :6-8 will be installed --> Finished Dependency Resolution Dependencies Resolved ================================================================================ Package Arch Version Repository Size ================================================================================ Installing: epel-release noarch 6-8 /epel-release-6-8.noarch 22 k Transaction Summary ================================================================================ Install 1 Package(s) Total size: 22 k Installed size: 22 k Is this ok y/N: y Downloading Packages: Running rpm_check_debug Running Transaction Test Transaction Test Succeeded Running Transaction Installing : epel-release-6-8.noarch 1/1 Verifying : epel-release-6-8.noarch 1/1 Installed: epel-release.noarch :6-8 Complete! |
How Can I Enable EPEL 7 on armhfp ?
The answer is easy in a sense that there is no official EPEL repository for armhfp. But because lot of users were asking for this, we decided to use the centos armhfp builders to (re)build Source packages from EPEL 7 (and try to track those automatically) when they’re idle. Please note that it’s just an automatic rebuild without any QA/test and also the resulting packages are not signed. To use that repository, proceed as follows:
# cat > /etc/yum.repos.d/epel.repo << EOF

name=Epel rebuild for armhfp
baseurl=https://armv7.dev.centos.org/repodir/epel-pass-1/
enabled=1
gpgcheck=0

EOF
#


