Windirstat для анализа и очистки дискового пространства
Содержание:
- Filelight
- Общее описание карты, сюжет
- DUC
- Удаление любых разделов
- Reviews
- Top disk-usage Askers
- Fix 4: Disable Windows Search
- Fix 11: Perform a Disk Check
- Check disk space from command line
- xdiskusage
- Как узнать, чем забит жесткий диск [Анализ!]
- Folder Size
- Как отформатировать диск через командную строку с помощью команды format
- Fix 8. Perform a Clean Boot on Windows 10
- Форматирование флешки или диска в командной строке с помощью DISKPART
- df (Disk Find)
- Disk Savvy
- Xdiskusage
- Nautilus
- Выводы статьи
Filelight
Filelight is a GUI based KDE app, provides a sunburst representation of the disk usage. Instead of showing a tree view, list view of directories/files, it shows the usage in a concentric pie chart view representing each directories.
You can mouse hover to a specific color/pie to get the informations about that specific segment. It also provide a way to deep dive into a particular segment till single file level to analyze! This feature is pretty neat.
Features:
• Scan local, remote or removable disks
• Configurable color schemes
• File system navigation by mouse clicks
• Information about files and directories on hovering
• Files and directories can be copied or removed directly from the context menu
 Filelight Running in Ubuntu
How to Install Filelight
Filelight is available in Ubuntu software. Open software and search for Filelight.
OR
You can run below commands from terminal to install Filelight in Ubuntu 16.04 LTS, 18.04 LTS and other Ubuntu derivatives, Linux Mint:
sudo apt install filelight
After installation, you can find filelight via dash search / application menu.
Общее описание карты, сюжет
На зелёно-коричневом фоне в изображении 9 Дисков Кроули мы видим девять дисков, три из которых объединены в равносторонний треугольник — по центру, а остальные шесть — выглядят более солидно и образуют шестиугольник (если мы, конечно, зададимся целью провести через них линии). От центра карты расходятся во все стороны лучи, но они не похожи на потоки света или нечто абстрактное, неосязаемое — они вполне материальны и имеют определённую форму. Центральные диски отмечены магическими знаками, а оставшиеся шесть — это ничто иное, как монеты с символичными изображениями планет.
Название карты — Прибыль или Владыка Материального Успеха. Астрологическое соответствие — Венера в Деве. Многие называют эту карту «9 Монет Таро Тота», однако это грубая ошибка — сам Кроули не раз в своей книге по данной колоде упоминал, что перемена названия масти не случайна — именно диски символизируют вращение, в то время как монеты/пентакли статичны.
DUC
Dude! Were are my bytes! – That’s the tagline of DUC – another disk usage visualization tool. Like Filelight, DUC also shows the visualization in a sunburst presentation.
DUC have some unique features such as it comes with certain tools which enables you to query its internal database of disk data which it accumulated after analyzing. Also it has flexibility to run via command line, can be plugged in the web using CGI.
As per the documentations, DUC also capable of handling file systems with millions of files on petabytes of storage.

How to Install
To install DUC in Ubuntu, Linux Mint run below command from terminal:
sudo apt install duc
After installation, DUC needs a setup. You have to build its own database by running below command (for example: if you want to index the /usr directory):
duc index /usr
Once index is completed, you can either use below commands for terminal view or graphical view of the analysis of disk space.
duc gui /usr
Or
duc ui /usr
Удаление любых разделов
Чтобы провести удаление системных, зарезервированных и скрытых разделов, пользователю понадобиться загрузочная флешка или установочный диск. Загружаемся с них и в меню выбора языка нажимаем сочетание клавиш Shift+F10 для открытия командной строки.
В командной строке, аналогично с предыдущим способом, вводим команды: diskpart, list disk, select disk 0, lis part, select partition 2 (или любой другой раздел, который невозможно удалить) и удаляем его командой del par override.
Стоит отметить, что команда del par override удаляет абсолютно любой раздел, независимо от его атрибутов.
Важно! Удаление некоторых разделов диска может повлиять на его работу, поэтому мы настоятельно не рекомендуем прибегать к удалению защищенных разделов
Reviews
http-equiv=»Content-Type» content=»text/html;charset=UTF-8″>lass=»plugin-reviews»>
I’m sort of experienced WP user. But I’ve forgotten more than I remember, and loathe to use SSH or CLI to actually find stuff. My wp-content folder was waaay tooooo large and I knew something wasn’t right but didn’t know where to look. After poking around the usual suspects I added Disk Usage Sunburst … which told me my wp-admin was 3.7 GB… hey that ain’t right… poke around… find a 3.5 GB error log…. oops…
thanks
Helped me find those elusive huge backup files that were hiding.
I used to use the P3 plugin to compare the sizes of my plugins, which was an important tool, but the author of the plugin stopped updating it. I came across this plugin from an article reviewing 16 alternatives to the P3 plugin. The disk usage sunburst was listed at the bottom. But it really is the only real alternative. When you turn it on and drill down to where the wp content>plugins area is, you can see which of your plugins are big (e.g.: All-in-one Calendar, WP SEO Yoast, GravityForms) and which ones are not (e.g.: Disk Usage Sunburst).
Awesome plugin, used many times on many sites. Quick and easy way to see how large your entire site is (apart from database of course). Also a great way to see what’s pushing you over a quota and causing upload errors, or other types of errors (if you have a quota).
It helps a lot, when you are out of quota.
Plugin helped me find how big my WP site was and what was taking up so much disk space.
Top disk-usage Askers
Last 30 Days
| 1 |
user1121558 1111 bronze badge |
|
| 1 |
Prince Kukreja 8111 silver badge44 bronze badges |
|
| 1 |
Malika Arora 733 bronze badges |
|
| 1 |
sancho.s ReinstateMonicaCellio 1,98811 gold badge1010 silver badges2727 bronze badges |
All Time
| 577 |
greg 8,15544 gold badges1515 silver badges1515 bronze badges |
|
| 575 |
user6722 6,02533 gold badges1313 silver badges1313 bronze badges |
|
| 227 |
Ryan Detzel 2,41122 gold badges1313 silver badges77 bronze badges |
|
| 171 |
Dr_Bunsen 4,26244 gold badges2323 silver badges3939 bronze badges |
|
| 153 |
Olivier Lalonde 46.6k5555 gold badges115115 silver badges144144 bronze badges |
|
| 148 |
hawkeye 2,92766 gold badges2424 silver badges2525 bronze badges |
|
| 125 |
clamp 1,44933 gold badges1414 silver badges1717 bronze badges |
|
| 103 |
Karl Morrison 6,2221717 gold badges4949 silver badges7676 bronze badges |
|
| 99 |
Jatttt 2,06799 gold badges2727 silver badges4040 bronze badges |
|
| 84 |
Renjith G 3,12344 gold badges2020 silver badges2222 bronze badges |
|
| 73 |
drevicko 3,57566 gold badges2626 silver badges4040 bronze badges |
|
| 70 |
blade19899 24.4k2020 gold badges105105 silver badges170170 bronze badges |
|
| 60 |
Kasun Gajasinghe 73811 gold badge55 silver badges88 bronze badges |
|
| 50 |
ændrük 62.4k6767 gold badges210210 silver badges348348 bronze badges |
|
| 45 |
Jesse 55511 gold badge55 silver badges55 bronze badges |
|
| 45 |
Anush 64111 gold badge77 silver badges1010 bronze badges |
|
| 45 |
Philip Howard 45311 gold badge44 silver badges66 bronze badges |
|
| 43 |
rihan 53111 gold badge55 silver badges55 bronze badges |
|
| 42 |
Ronald 57111 gold badge44 silver badges77 bronze badges |
|
| 42 |
Don A 52111 gold badge44 silver badges44 bronze badges |
Only non community-wiki questions and answers are included in these totals (updated daily)
Fix 4: Disable Windows Search
Windows Search enables to search files on your PC fast. If you don’t use it at all, you can disable it completely. Disabling Windows Search service will stop the indexing of all files. However, to identify whether this is the cause of your 100% disk utilization problem, we recommend temporarily disabling Windows Search first.
First Move: Temporarily Disable Windows Search
Note that Windows Search will start again when you restart your computer. So, this change has no impact on your computer performance.
Step 1. Press «Win+X» combination keys and select «Command Prompt (Admin)». Then allow its user account control.
Step 2. In the Command Prompt window, type «net.exe stop “Windows search”» (image attached) and hit the Enter key.
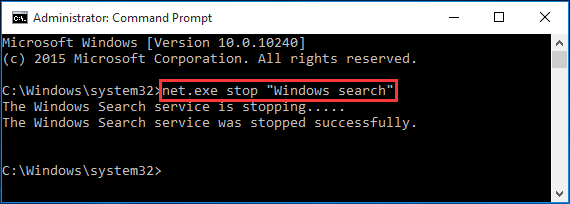
Check if your disk usage and the performance of your computer improve. If YES, you should permanently disable Windows Search as described below.
Second Move: Permanently Disable Windows Search
Step 1. Press «Win+R» combination keys to call out the Run box, then type «services.msc» and hit Enter.
Step 2. Locate «Windows Search» and double-click it to enter its «Properties» window.

Step 3. Change the Startup type option to «Disabled». Then click «Apply» and «OK» to save your change.
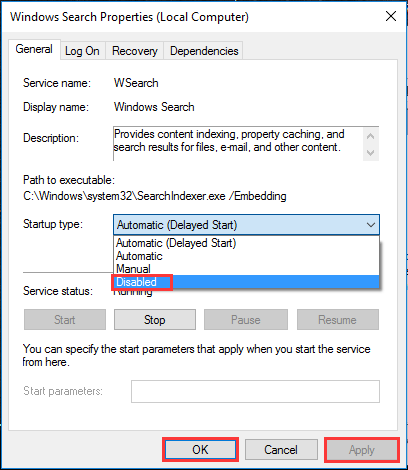
Check whether this works for 100 disk usage Windows 10.
Fix 11: Perform a Disk Check
If the above solutions all do not help, it is necessary having a check of your hard drive. You can do this by using MiniTool Partition Wizard Free which simplifies things within a few clicks. With this tool, you can manage hard drive partitions in all aspects even you are not professional.
Download MiniTool Partition Wizard Free and install it on computer.
Step 1. In the main interface of MiniTool Partition Wizard, select the system partition from the disk map and choose “Check File System” from the action panel.

Step 2. Select “Check & fix detected errors” in the pop-up window. Then click Start to begin.

Continue to check and fix errors on the rest drives. If no error is found, you can try the last way.
Check disk space from command line
You can get a quick and concise readout of the hard disk usage on your Ubuntu 20.04 system with the following command:
$ df -h
 df command on Ubuntu 20.04
The flag tells the command to make the sizes «human-readable.» It’s much easier to look at gigabyte values as opposed to bytes. The output from this command is very informative because it also shows us the size of all the mounts on our system; however, this includes psuedo file systems, such as all the directories in the screenshot above.
An even better way to use the command is by specifying the mount point you wish to check. So to check the free space on root, you can use this command:
$ df -h /
Ah, a much cleaner output…
 df command of the root directory
While is great for checking disk usage on any mount point, the command complements it by being able to check the storage usage on any directory — and optionally, its subdirectories. For example, here’s how we’d see how much space our user’s home directory is using:
$ du -sh ~
 Using du to check a directory size on Ubuntu 20.04
The flag in the command tells to just return statistics for a single directory, rather than also listing all the subdirectories. The flag makes the output human-readable, as discussed earlier.
Running the command without the flag is also very helpful, since you can see which subdirectories are taking up a lot of space. Be warned though, the output can be overwhelming if there are a lot of subdirectories, like this:
 The output is pretty long — try piping to more
Another handy flag is which tells how deeply it should traverse into subdirectories. Use it like this (replacing 1 with any number):
$ du -h --max-depth=1 /home/linuxconfig
If you try to run on your root directory to see storage space across the entire disk, keep in mind that you’ll need to execute that command with root privileges and you should redirect standard error to since you’ll get a lot of «permission denied» spam in your output.
$ sudo du -sh / 2> /dev/null
xdiskusage
Another block-based graphical usage analyzer, xdiskusage has a quite basic UI and gathers information from the du command. This is run on your behalf, however, so the usage data is quickly compiled and presented.
Install in Debian-based systems with
Run the xdiskusage command in the terminal to launch, then select the directory, or disk, to analyze.
The result is a tree-based presentation, with the parent directory block displayed left-most and the child directories and folders branching off to the right. Each block displays the directory name and disk usage.
You can navigate through this graphic representation of your directory structure using the mouse or arrow keys. Need to find out more about the directory block? Simply right-click for options, which include copying the path to the clipboard, and printing the display.
While it doesn’t offer great graphics, xdiskusage is designed to be extremely lightweight. If you’re in a situation where your disk has filled up without explanation and you’re short of space, xdiskusage could be the solution you’re looking for.
The downloadable executable for xdiskusage is 64-bit only, however the source can also be downloaded, and compiled on your system for installation.
Как узнать, чем забит жесткий диск [Анализ!]
WinDirStat
Совсем небольшая утилита (менее 1 МБ), способная за считанные минуты показать вам какие папки и файлы отнимают больше всего места. Причем, все это выполнено очень наглядно, и поиск “виновника” происходит очень быстро!
Ниже покажу на собственном примере, как нашел файл, который “отнимал” 12 ГБ!
И так, после установки и запуска утилиты просто выберите диск(и), который нужно проанализировать, нажмите OK. См. скриншот ниже.
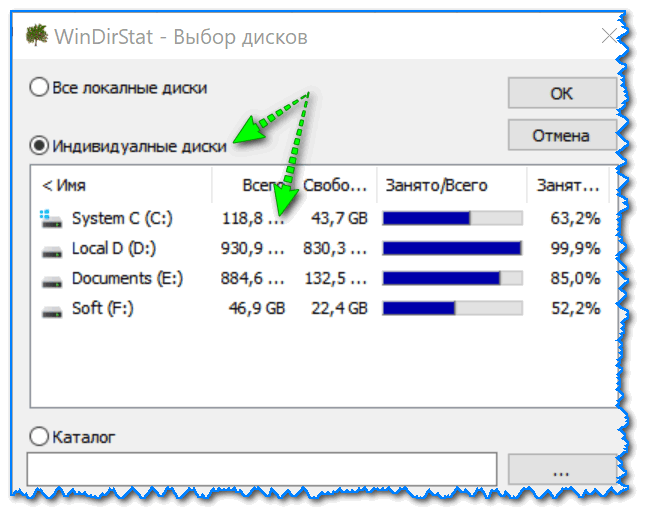
Выбор диска (доступен также системный диск)
Далее подождите окончания сканирования (обычно 2-5 минут на 1-2 ТБ диск, зависит от количества и размера файлов, на нем расположенных) .
После чего вы увидите цветную диаграмму: каждый “прямоугольник” – это файл, размер прямоугольника рисуется относительно размера файла. Т.е. благодаря такой работу – вы сразу же находите наиболее крупные файлы на диске и можете приступить к их удалению.
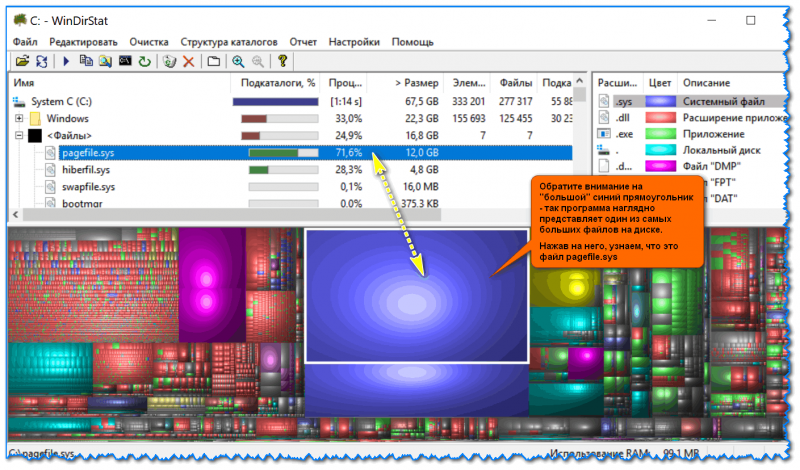
Анализ моего диска / Кликабельно
Например, у меня на диске занимал 12 ГБ места файл pagefile.sys (см. скрин выше). Для тех, у кого проблема с этим же файлом, скажу, что это файл подкачки. Используется он системой автоматически, но его можно ограничить, либо перенести на другой диск (как это сделать – рассказано в одной из моих статей, ссылку привожу ниже).
TreeSize
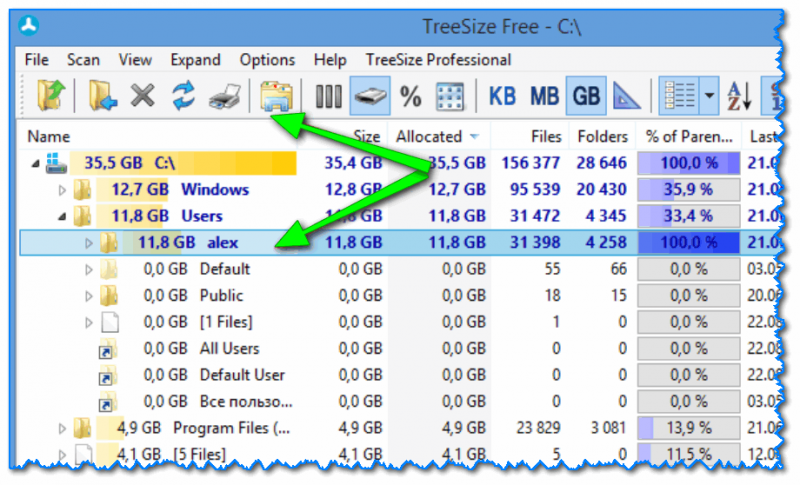
TreeSize – главное окно программы
Эта программа, в отличие от предыдущей, не строит диаграмм, однако она удобно сортирует папки согласно их размеру. Причем, напротив каждой из папок “горит” определенное значение в процентах, относительно ее размера (весь диск – это 100%).
Отмечу еще одну удобную штуку: из ее окна можно открыть любую из папок (файлов) в проводнике. TreeSize “видит” все файлы и папки на диске (в т.ч. скрытые и системные), так что будьте осторожнее с удалением всего и вся.
Scanner
Анализ занятого места на HDD с помощью Scanner
Аналогичная утилита, правда, ее размер еще меньше . После запуска, утилита быстра просканирует диск и покажет вам круговую диаграмму: наводясь мышкой на отдельные ее участки, вы сможете найти все папки и файлы, которые стали занимать слишком много места.
Обратите внимание, что слева в меню программы вы можете выбрать любой из жестких дисков, которые видит ваша ОС Windows. SpaceSniffer
SpaceSniffer
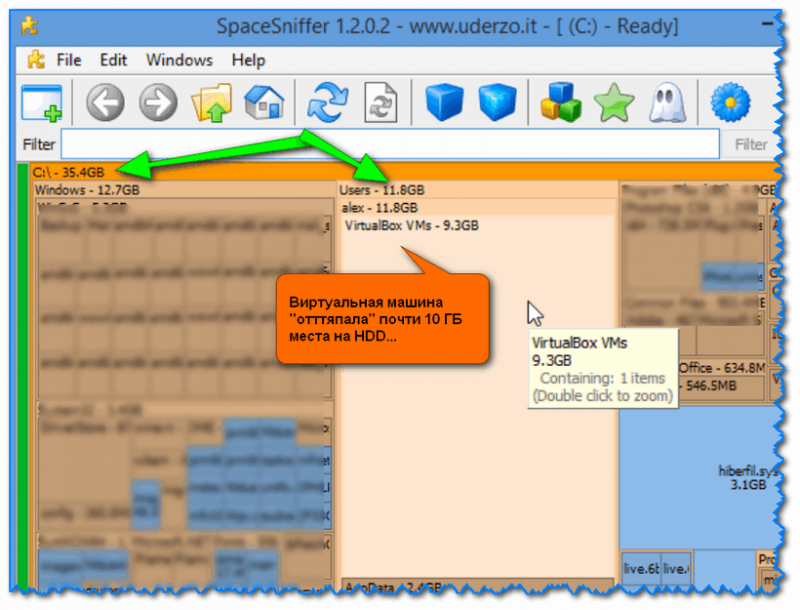
Главное окно программы SpaceSniffer
От других аналогичных программ SpaceSniffer отличается весьма оригинальным интерфейсом и немного отличным подходом к делу (возможно, благодаря этому пользуется спросом).
При первом запуске, программа покажет вам все диски, и после вашего выбора одного из них – приступит к сканированию. После чего, пред вами предстанет наглядная схема: перемещаясь по ней вы быстро найдете, что “оттяпало” лишнее месте на диске (см. скрин выше).
Также программа позволяет прямо из окна удалять или перемещать файлы, производить поиск файлов по определенному фильтру (например, по их расширению).
В общем и целом, программа заслуживает высокой оценки, рекомендую к использованию!
DiskView
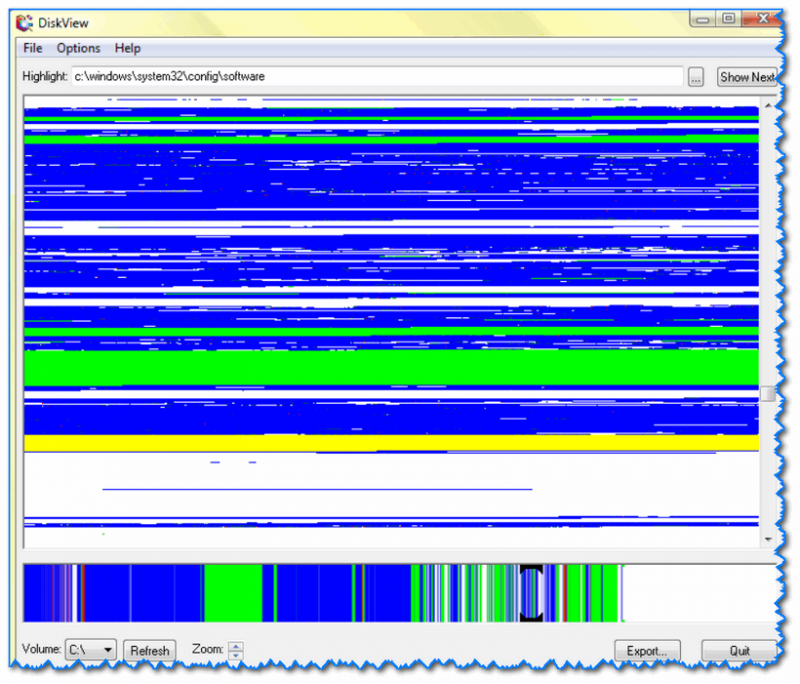
Главное окно DiskView
Эта программа отличается от остальных тем, что работает даже на относительно старых ОС Windows NT 4, 2000, XP (новые Windows 7, 8, 10 – разумеется поддерживаются).
В остальном работа аналогична: строится схема диска, воспользовавшись которой, вы можете легко определить какой файл у вас занимает те или иные кластеры.
Программа бесплатна, русский не поддерживает.
JDiskReport
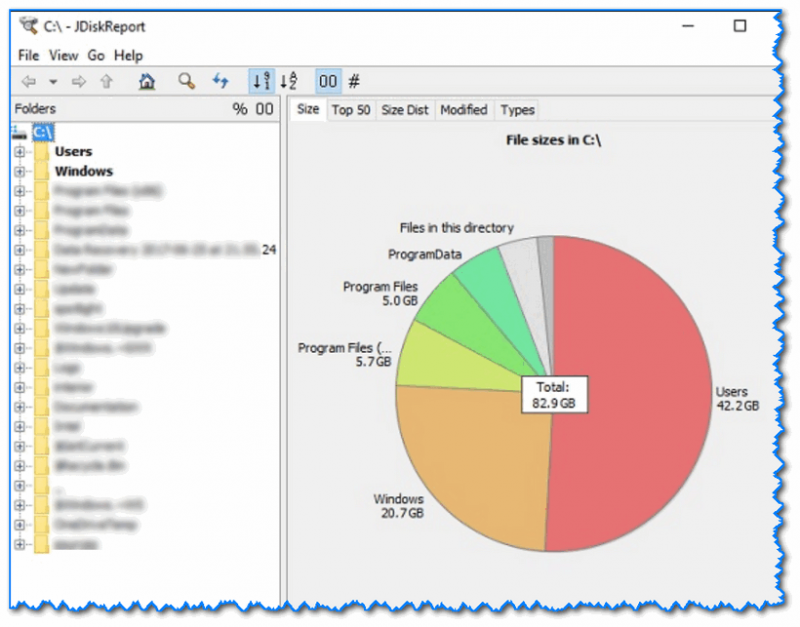
JDiskReport – скрин главного окна программы
Отличная программа для анализа HDD. Позволяет за считанные минуты найти потерянное место! Благодаря архи-удобной круговой диаграмме сразу же видно какие папки заняли все место.
Отмечу, что, войдя в самую большую папку: диаграмма перестраивается, и вы снова видите какие файлы/папки уже в ней занимают место, и т.д.
Кстати, в программе есть топ 50 – покажет все самые большие файлы на диске!
Spyglass
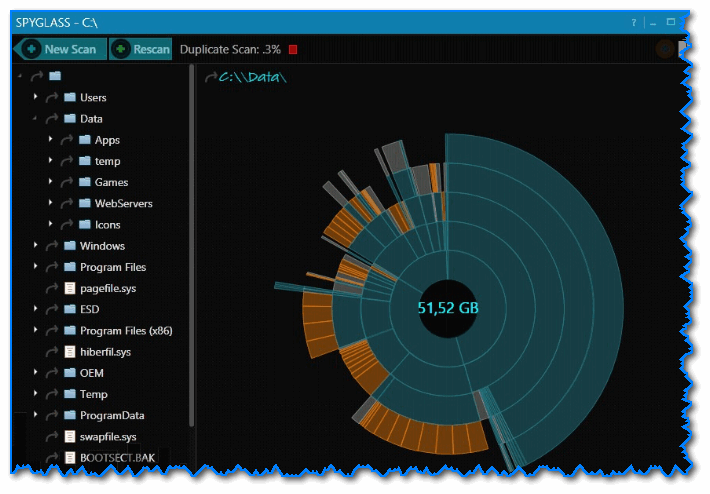
SPYGLASS – главное окно программы
Простая бесплатная программа, позволяющая быстро строить диаграммы на основе занятого места на HDD. Отмечу, что Spyglass включает в себя также “локатор”, обнаруживающий полные дубликаты файлов.
Из окна программы вы можете открыть любую папку или файл, или даже отправить их в корзину (не получится так только с системными файлами).
Дополнения по теме будут весьма кстати!
Folder Size
What We Like
-
Integrates with Explorer
-
Lets you sort folders by size
-
Extremely easy to use
What We Don’t Like
-
Shows results in an extra window instead of within the original window you’re viewing
-
Runs on Windows only
Folder Size is the simplest program from this entire list, and that’s because it has virtually no interface.
This disk space analyzer is useful because Windows Explorer doesn’t provide you with the size of a folder you’re looking at, but instead just the size of files. With Folder Size, a small additional window displays that shows each folder’s size.
In this window, you sort the folders by size to easily see which ones are using the biggest slice of storage. Folder Size does have some settings you can modify like to disable it for CD/DVD drives, removable storage, or network shares.
A quick look at the picture here of Folder Size demonstrates that it’s nothing like the other software from above. If you don’t need charts, filters, and advanced features, but just want to be able to sort folders by their size, then this program will do just fine.
Как отформатировать диск через командную строку с помощью команды format
В инструменте Командная строка (CMD) имеется команда «format», с помощью которой выполняется форматирование диска в указанную файловую систему. В работающей операционной системе, с помощью данной команды получится отформатировать разделы на диске, на которых не установлена Windows.
Если на жестком диске имеется несколько разделов (система находится на диске «C»), например, диски «D» и «E», которые необходимо отформатировать, то при помощи команды «format» сначала проводится форматирование диска «D», а затем диска «E». В случае подключения к компьютеру другого дополнительного жесткого диска, этот диск можно отформатировать полностью, потому что на нем нет операционной системы.
Вам также может быть интересно:
- Команды командной строки Windows: список
- Как запустить командную строку от имени администратора — 7 способов
1 вариант. Выполняем форматирование диска через командную строку Windows (стандартный вариант):
- Запустите командную строку от имени администратора.
- Введите команду для форматирования диска:
format d: /FS:NTFS
В этой команде «d» — имя локального диска на компьютере, который нужно отформатировать. «FS:NTFS» — выбранная файловая система, вместо файловой системы «NTFS» можно выбрать другую подходящую файловую систему. В подавляющем большинстве случаев, происходит выбор между файловыми системами «NTFS» и «FAT32».
- Введите метку тома для диска, который будет отформатирован.
Присвойте метку тома (имя диска) для диска. Можно выбрать любое удобное имя, которое можно поменять в дальнейшем из настроек Windows.
- Далее необходимо нажать на клавишу «Y» для согласия с условиями форматирования диска, а затем нажать на клавишу «Enter». Вас предупреждают, что все данные на диске будут уничтожены.
После этого начнется процесс форматирования диска.
2 вариант. Если добавить дополнительные ключи в команду «format», можно настроить параметры форматирования.
- Запустите командную строку от имени администратора.
- В окне интерпретатора командной строки выполните команду:
format d: /FS:NTFS /x /q
В данную команду добавлены ключи: /x — отключение тома, /q — быстрое форматирование. Первый ключ отключает внешнее воздействие на диск от работающей операционной системы, чтобы все прошло удачно. Второй ключ запускает быстрое форматирование. При быстром форматировании Windows помечает все пространство диска как неиспользованное. Данные остаются на диске, операционная система их не видит, на это место постепенно записываются новые файлы. При обычном, полном форматировании все данные на диске удаляются, но этот процесс занимает гораздо больше времени, чем быстрое форматирование.
- Для того, чтобы приступить к форматированию нажмите на клавишу «Y».
После завершению процесса, в окне командной строки появится информация об окончании данной операции.
Мы рассмотрели вариант форматирования в командной строке отдельных разделов жесткого диска, или другого жесткого диска, на котором не установлена Windows.
Fix 8. Perform a Clean Boot on Windows 10
Clean Boot State is used to diagnose and troubleshoot advanced Windows problems. A «clean boot» starts Windows with a minimal set of drivers and startup programs so that you can determine whether a background program is interfering with your system performance. If you have never performed a clean boot, now is the time to learn.
Step 1. Type msconfig in start search and hit «Enter» to open «System Configuration.»
Step 2. Click the «General» tab, and then click «Selective Startup.» Clear the «Load Startup Items» checkbox, and ensure that «Load System Services» and «Use Original boot configuration» are checked.
Step 3. Click the «Services» tab. Select the «Hide all Microsoft services» checkbox. Select the item and then select «Disable all.»
Click «Apply/OK» and restart the computer. This will put Windows into a Clean Boot State.
Форматирование флешки или диска в командной строке с помощью DISKPART
Инструмент командной строки Diskpart, доступный в Windows 7, 8 и Windows 10, позволяет не только отформатировать отдельные разделы флешки или диска, но и удалить их или создать новые.
Сначала рассмотрим использование Diskpart для простого форматирования раздела:
Запустите командную строку от имени администратора, введите diskpart и нажмите Enter.
По порядку используйте следующие команды, нажимая Enter после каждой.
list volume (здесь обратите внимание на номер тома, соответствующий букве диска, который нужно отформатировать, у меня это 8, вы в следующей команде используйте свой номер). select volume 8
format fs=fat32 quick (вместо fat32 можно указать ntfs, а если вам требуется не быстрое, а полное форматирование, не указывайте quick)
exit
На этом форматирование будет завершено. Если же вам требуется удалить все без исключения разделы (например, D, E, F и остальные, в том числе скрытые) с физического диска и отформатировать его как единый раздел, сделать это можно похожим способом. В командной строке используйте команды:
- diskpart
- list disk (вы увидите список подключенных физических дисков, вам нужен номер диска, который будет форматироваться, у меня это 5, у вас будет свой).
- select disk 5
- clean
- create partition primary
- format fs=fat32 quick (вместо fat32 возможно указать ntfs).
- exit
В результате на диске останется один отформатированный основной раздел с выбранной вами файловой системой. Это может быть полезно, например, когда флешка неправильно работает из-за того, что на ней несколько разделов (об этом здесь: Как удалить разделы на флешке).
Форматирование в командной строке — видео
В завершение, о том, что делать, если нужно отформатировать диск C с системой. Для этого вам потребуется загрузиться с загрузочного накопителя с LiveCD (в том числе с утилитами для работы с разделами жесткого диска), диска восстановления Windows или установочной флешки с Windows. Т.е. требуется, чтобы система не была запущена, так как при форматировании удаляется и она.
Если вы загрузились с загрузочной флешки Windows 10, 8 или Windows 7, можно нажать в программе установки клавиши Shift+f10 (или Shift+Fn+F10 на некоторых ноутбуках), это вызовет командную строку, где форматирование диска C уже будет доступным. Также программа установки Windows при выборе режима «Полная установка» позволяет отформатировать жесткий диск в графическом интерфейсе.
df (Disk Find)
Report file system disk space usage — check /dev/sd''XX''.
Since the df command provides details on mounted partitions you should run the df command after you have decided which devices you wish to investigate and have run the appropriate mount/umount command. By closing all applications and running sudo umount -a first, df commands are more likely to report only system partition information.
- Deleted files in Trash are included in used space until completely removed from the system.
df -Th
# Optionally: df -Th | grep -v «fs» | sort - Sample result:
/dev/sda1 ext3 15G 7.7G 6.3G 55% /
/dev/sda2 ext3 15G 2.1G 12G 15% /media/data
/dev/sdb2 ext3 48G 35G 11G 76% /media/backup
Filesystem Type Size Used Avail Use% Mounted on -
Mounted NTFS partitions will be displayed as type: fuseblk.
Disk Savvy
What We Like
-
Much easier to use than most disk space analyzers
-
Categorizes files in several ways
-
Updates to newer versions often
-
Able to scan multiple locations simultaneously
-
Results can be exported to a report file
-
Also works from within Explorer
What We Don’t Like
-
Not all features you see in the program are free to use; some require you to upgrade to the Pro edition
-
It can show only 500,000 files per scan
We list Disk Savvy as the No. 1 disk space analyzer program because it’s both easy to use and full of useful features that are sure to help you free up disk space.
Analyze internal and external hard drives, search through the results, delete files from within the program, and group files by extension to see which file types are using the most storage.
Examine a list of the top 100 biggest files or folders. You can even export the list to your computer to review them later.
There’s a professional version of Disk Savvy available, too, but the freeware version seems perfect. Install Disk Savvy on Windows 10 through Windows XP, as well as on Windows Server 2016/2012/2008/2003.
Xdiskusage
xdiskusage is user friendly, lightweight program which which analyses disk and represents the results in a box-representation where the size of boxes represents the size of directories. It uses “du” and represents it output in a graphical manner.
When launched, you can either choose to analyze directories or files. Once it is loaded, you can start browsing via double clicking the boxes to analyze further down.
 xdiskusage Running in Ubuntu
How to Install
You can run below commands from terminal to install xdiskusage in Ubuntu 16.04 LTS, 18.04 LTS and other Ubuntu derivatives, Linux Mint:
sudo apt install xdiskusage
Nautilus
-
Open with: Places > Home Folder. (In terminal: gksudo nautilus &)
- The familiar file browser is good for reviewing folder contents and deleting specific folders/files.
- Nautilus will show mount points (although not the contents of unmounted devices) even when a device is not mounted on the mount point.
-
Unless nautilus is opened with administrative privileges (gksudo nautilus &) certain folders/files such a root’s Trash will not be visible. The folder may show no contents even though sub-folders or files exist.
-
Right click a folder and select Properties to display the size (for files) and free space remaining on the parent partition.
Выводы статьи
Бесплатная программа WinDirStat анализирует занимаемое файлами и каталогами дисковое пространство. Благодаря полученной статистике, вы можете наглядно увидеть и узнать, сколько места занимают на диске конкретные каталоги и файлы. При необходимости, вы можете удалить конкретные файлы или папки со своего компьютера.
WinDirStat для анализа и очистки дискового пространства (видео)
Похожие публикации:
- Everything — мгновенный поиск файлов и папок
- Clipdiary — менеджер истории буфера обмена
- Unlocker для удаления неудаляемых файлов
- Бесплатные программы для Windows
- Виртуальная машина для установки операционных систем


