Digikam редактирование и организация фото 7.0.0
Содержание:
Speed Up The Code-Compile-Test Cycle
Assuming you have setup your environment in ~/.bashrc as is suggested for development, you can add something like this to your ~/.bashrc:
function digikam_start
{
LD_LIBRARY_PATH=${KDE_BUILD}/extragear/graphics/lib:${LD_LIBRARY_PATH} ${KDE_BUILD}/extragear/graphics/digikam/digikam/digikam
}
function digikam_start_gdb
{
LD_LIBRARY_PATH=${KDE_BUILD}/extragear/graphics/lib:${LD_LIBRARY_PATH} gdb ${KDE_BUILD}/extragear/graphics/digikam/digikam/digikam
}
This allows you to run digikam after compiling without the need of a «make install», even if you changed code in the libraries.
Краткая справка
Общество с Ограниченной Ответственностью»Строй Гарант» зарегистрирована 28 ноября 2016 г. регистратором Инспекция Федеральной налоговой службы по г. Кемерово. Руководитель организации: директор Мустафина Яна Вякиловна. Юридический адрес Общество с Ограниченной Ответственностью»Строй Гарант» — 652515, Кемеровская Область — Кузбасс область, город Ленинск-Кузнецкий, улица Зварыгина, дом 18 а, офис 202.
Основным видом деятельности является «Строительство жилых и нежилых зданий», зарегистрировано 30 дополнительных видов деятельности. Организации ОБЩЕСТВО С ОГРАНИЧЕННОЙ ОТВЕТСТВЕННОСТЬЮ»СТРОЙ ГАРАНТ» присвоены ИНН 1681627033, ОГРН 7024719611642, ОКПО 10627347.
Сортируем фотографии
Альбомы digiKam хранятся в иерархической структуре. В самом верху структуры (в корне) находится каталог, называемый «Мои альбомы». Когда вы в первый раз запустите digiKam, мастер первого запуска спросит вас, где хранить этот корневой каталог. На самом деле то, что мы называем альбомом, является каталогом в структуре подкаталогов «Мои альбомы». На рисунке 2 изображена структура каталогов в окне Konqueror.
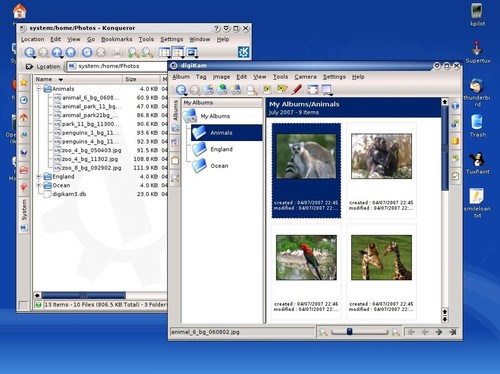
Рисунок 2: Альбомы в digiKam и файловая структура (нажмите, чтобы увеличить)
Такое расположение альбомов в файловой структуре упрощает процедуру создания запасной копии, но это не означает, что для создания альбома достаточно создать папку в Konqueror. На рисунке 2 в дальнем окне можно увидеть файл базы данных (если вам интересно, то это SQLite), в которой хранятся все изменения файловой структуры digiKam. Если вы попробуете удалить каталог или фотографию в «My albums», при следующем запуске digiKam уведомит вас об отсутствующих файлах.
У альбомов есть множество свойств, включая дату, которая может совпадать с самой новой или старой фотографией, комментарии и коллекции. Коллекции — метод группировки альбомов. У каждого альбома есть значок, который является уменьшенной копией первой его фотографии. Возможно сортировать альбомы по дате, а также сортировать фотографии по альбому и по дате.
Class, file and Variable names
Class and filenames
- filenames should always be in lower-case
- class names should match the filenames. Capitalize the first letter and other letters logically to improve readability
Protected Member variables
- protected member variable names should always be of the form m_varName.
- Capitalize logically so that it becomes easy to read it. Do not capitalize the first letter after _ (Use m_varName not m_VarName)
- variable names should be indicative of their functionality and also of the type they belong too if they are instances of qt widgets. for eg, QCheckBox* m_autoRotateCheckBox;
Private Member variables
private member variables must be stored in a d private container to reduce compilation time and improve binary compatibility between digiKam components. See more information how to use a ‘d’ private class at this url:
https://community.kde.org/Policies/Library_Code_Policy
Последние изменения
17.08.2020
Завершено рассмотрение судебного дела
№А27-27551/2019 от 26.11.2019 в
апелляционной
инстанции.
Организация
в роли ответчика, сумма исковых требований 31 703 509 615 руб.
10.08.2020
Завершено рассмотрение судебного дела
№А27-27551/2019 от 26.11.2019 в
апелляционной
инстанции.
Организация
в роли ответчика, сумма исковых требований 31 703 509 615 руб.
21.02.2020
Начато рассмотрение судебного дела
№А27-27551/2019 от 26.11.2019 в
апелляционной
инстанции.
Организация
в роли ответчика, сумма исковых требований 31 703 509 615 руб.
10.02.2020
Завершено рассмотрение судебного дела
№А27-27551/2019 от 26.11.2019 в
первой
инстанции.
Организация
в роли ответчика, сумма исковых требований 31 703 509 615 руб.
03.12.2019
Физическое лицо
Щербаков Олег Викторович
более не является учредителем
26.11.2019
Новое судебное дело
№А27-27551/2019 от 26.11.2019 в роли ответчика, сумма исковых требований 31 703 509 615 руб.
11.10.2019
Юридический адрес изменен с 652515, Кемеровская область, город Ленинск-Кузнецкий, улица Зварыгина, дом 18 а, офис 202 на 652515, Кемеровская Область — Кузбасс область, город Ленинск-Кузнецкий, улица Зварыгина, дом 18 а, офис 202
23.09.2019
Доля учредителя Щербаков Олег Викторович в уставном капитале изменена с 357 069 851 руб. на 351 941 392 руб.
Source Code Formatting
Adhere to this style guide strictly while adding new code to digiKam or working on existing code.
Indentation length
Indent with 4 spaces exactly.
for eg:
void function()
{
….int a;
….for (int i = 0 ; i < 10 ; ++i)
….{
……..a = i;
Emacs by default will indent to 4 spaces vim users add this to you .vimrc set tabstop=4
Tabs vs Spaces
Absolutely no tabs. Use a sensible editor which will convert tabs to spaces. This will reduce unnecessary changes in your cvs commits.
Emacs by default will convert tab to spaces. For vim users, add this to your .vimrc set expandtab
Line length
Line length should never exceed 80 chars (unless really necessary — these cases are rare). Having long lines greatly reduces readability of code
Bracketing
In all cases, {} brackets should start on a newline and should be aligned with previous line (follow the indentation spaces). for eg.
class A
{
…
for (int i = 0 ; i < 10 ; ++i)
{
if (a == foobar)
{
…
}
else
{
..
}
Positioning of Access modifiers
public, private, protected, public slots, … should be aligned to the beginning of the line with no margin
class A
{
public:
…
private Q_SLOTS:
Follow a consistent order in defining these attributes. The recommended order is public, protected (functions), private (functions), signals, public slots, protected slots, private slots, private (variables)
Freezes and Other Run-Time Issues
Linux host
Just run digiKam from the terminal command line to capture the text traces generated by the application.
Note that you need to turn on before all debug traces from digiKam with QT_LOGGIN_RULES environment variable.
Windows Host
On Windows, application text output is not sent to the terminal.
You need to install DebugView tool to capture text traces
generated by digiKam.
Before to start digiKam and DebugView, from your Windows System Info panel, add a new user variable with these criteria:
MacOS Host
As under Linux, run the application from a terminal.
digiKam executable is installed in .
Just start it from the command line to view text traces.
Note that you need to turn on before all debug traces from digiKam with QT_LOGGIN_RULES environment variable.
Основанные возможности DigiKam
Перенос изображений. Фоторедактор импортирует все фотографии с внешних носителей, поддерживает работу с камерами, факсом и принтером.Сортирование. В главном меню программы взору пользователя доступны все фото. В предыдущей версии, каждое фото открывалось в отдельном окне, что нагружало систему. Специальная структура поиска, позволяет в краткие сроки получать нужное вам фото.Система меток. При помощи метки вы можете соединить определенное количество изображений в единую группу. Эти изображения может что-то объединять. Таким образом, они отделены от основного потокаМестоположение. Благодаря геопозиции, можно определить место, где был сделан снимок. В результате чтения метаданных с исходного файла, в информации о файле, юзеру доступна вся информация. В итоге, описание к фотографии получается немного точным.Функция поиска лиц на фото.
Преимущества
- Водяной знак как показатель авторства;
- Быстрая печать через утилиту, возможность создать календарь или слайд-шоу;
- Организация фото в альбомы, добавление заметок или комментариев к ним;
- В метаданных сохраняется вся информация: время и дата, теги, рейтинг, ID и авторские права;
- Возможность придать каждому фото функции панорама;
- Редактор поддерживает глубинные цвета в 16 бит;
- Все фото стараются адаптироваться под разрешение монитора при просмотре;
- В боковой панели содержится вся информация о текущем кадре.
Недостатки
- Весьма затруднительно встретить данный редактор на русском языке;
- Объёмные операции над файлами недоступны.
Как пользоваться DigiKam?
В главном окне, при просмотре фото, доступны все основные опции софта. С левой стороны виден весь функционал: изменение глубины цвета, исправление пересвечивания и удаление дефектов. Каталог «мои альбомы» хранит в себе весь фотоматериал.
Для редактирования любого фото, выбираете параметр «изменить» в панели инструментов. Инструмент под названием «восстановление», возвращает фотографиям былой вид, который исчез при сканировании.
Digikam. Программа для обработки фотографий.
В Альтлинукс-6 с KDE-4, есть программа для обработки фотографий Digikam. Очень неплохая. Если у Вас есть нормальный цифровой фотоаппарат (не «мыльница») то программа как раз для него. Автоматом читает файлы формата RAW (или, скажем, никоновский NEF) и запускает в свои недра для обработки. Выглядит программа как на скрине. Три колонки (могут быть и две и одна по желанию) содержимое боковых колонок определяется кнопками на бортах окна (красные стрелки). Вверху — меню с нехилым содержанием. Если описывать каждую кнопку из этого богатства…
Чуть было не написал «это мне до пенсии хватит», забыл, что я уже…
Ниже основного меню — менюшка вызова дополнительных функций. Но к ней мы ещё вернёмся.
А пока, для всякого фотографа, решившего узнать как работает программа для обработки фотографий Digikam, нужно познакомить её со своим фотоаппаратом. Делается это в меню Импорт—добавить камеру. После щелчка по нему, вылезет пустоватое окно настроек, в котором пока имеет значение кнопка ДОБАВИТЬ. Щелчок по ней вызовет ещё одно окно с необъятным списком, знакомых программе, фотокамер. Остаётся найти свою, щёлкнуть по ней и знакомство состоится. Впрочем, предстоит ещё кое-что добавить врукопашную, но, думаю, проблем с этим у Вас не возникнет.
На что ещё ст0ит обратить внимание, так это на настройки. Живут они в меню Настройка—Настроить Digikam и представляют собой окно с кучей всего вкусного
В колонке слева — разделы, справа — подробности каждого. Сдуру там лучше ничего не трогать, а то хлопот не оберётесь, но знать надо.
Теперь об интересном.
Щелчок по кнопке Редактор изображений вызовет окно редактора. Достаточно мощного. Даже беглый просмотр возможностей каждой кнопки её меню, не оставит Вас равнодушными. Программа для обработки фотографий Digikam. умеет очень многое. Но не буду отбирать у Вас удовольствие самостоятельного знакомства с окном редактора. Скажу только, что слева у Вас будет картинка а справа будут параметры и ползунки того инструмента, который Вы выберете. Чаще всего картинка сразу показывает применение происходящего.
Но и это не всё. Программа для обработки фотографий Digikam умеет пакетную обработку. То есть применение выбранного инструмента ко всему содержимому выбранной (или набранной) папки. Скажем изменить размер пары сотен фотографий вручную, в том же Гимпе было бы невесело… А здесь чирик — и готово.
Как это делается.
Во-первых вызываем само окно Управление очередями пакетной обработки из самой программы. Открываем в программе (не в окне) нужную папку с картинками. Выделяем их все, протаскиванием мыша. Потом (красная стрелка) мышом цепляем выделенное и перетаскиваем всю кучу на поляну пакетной обработки слева.
В правом нижнем окне (зелёная стрелка) находим нужный инструмент или фильтр (или типа того), и перетаскиваем его на центральную поляну. На полянке справа появятся параметры перетащенного (зелёный овал). При желании — корректируем.
Там, где синий овал, выбираем папку, в которую будет сваливаться обработанное. Или (синяя стрелка) добавляем новое место.
Остаётся щелчком по синему треугольнику окна запустить процесс и откинуться на спинку табуретки, пока он не закончится.
Ну, в общем, на этом и все? Программа для обработки фотографий Digikam настолько многогранна, что о ней можно говорить не один час. А ст0ит ли? Лучше Вам самим, методом научного тыка, запомнить что к чему и потом только и делать, что давать простор своей фантазии.
Так оно запоминается лучше.
Удачи…
Рубрика: О графике, Тем, кто не любит Виндовс. |
Метки: Линукс
Просмотр и редактирование фотографий
Для редактирования просматриваемого изображения нажмите значок «Изменить» на панели инструментов. При этом открывается дополнительное окно. Возможности редактирования включают не только традиционные фильтры наподобие устранения эффекта красного глаза или уменьшения шума, но также богатый набор других инструментов. Одно их перечисление потребует отдельной статьи, но я попробую кратко осветить некоторые из них.
Старые и поврежденные отсканированные изображения могут быть отреставрированы с помощью инструмента «Восстановление», а средство автоматической коррекции цвета позаботится о правильном цвете ваших фотографий. Преобразование в черно-белые цвета предоставляет не только традиционные преобразования в сепию и серое, но также позволяет уподобить изображение тону 35-миллиметровой пленки, например, Ilford Delta или AGFA Pan, как показано на рисунке 4.
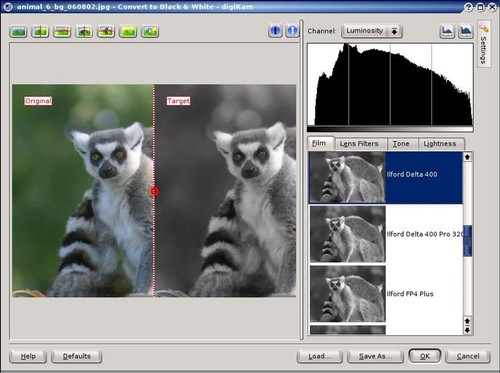
Рисунок 4: Преобразование палитры изображения (нажмите, чтобы увеличить)
Можно также добавлять текстуры и края с множеством параметров, таких как вдавленные края или деревянная рамка. Присутствуют и обязательные элементы, такие как изменение размеров, масштабирование, обрезка и перспектива. Наконец, в дополнение к обычным фильтрам «тиснение» или «масляная краска» имеются новые, такие как «инфракрасная пленка» или «дождевые капли». В общем, digiKam предоставляет вам мощные, и в то же время интуитивно понятные средства по редактированию фотографий.
Core Configuration
- Extra feature support options:
- ENABLE_KFILEMETADATASUPPORT : Build digiKam with KDE files indexer support (default=OFF).
- ENABLE_AKONADICONTACTSUPPORT : Build digiKam with KDE Mail Contacts support (default=OFF).
- ENABLE_MEDIAPLAYER : Build digiKam with Media Player support (default=OFF).
- ENABLE_DBUS : Build digiKam with DBUS support (default=ON).
- ENABLE_APPSTYLES : Build digiKam with support for changing the widget application style (default=OFF).
- ENABLE_QWEBENGINE : Build digiKam with QWebEngine instead of QWebKit (default=ON).
- Experimental support options
- ENABLE_MYSQLSUPPORT : Build digiKam with MySQL dabatase support (default=ON).
- ENABLE_INTERNALMYSQL : Build digiKam with internal MySQL server executable (default=ON).
- Developers only options:
- Packaging options
- ENABLE_DRMINGW : Enable the Dr. Mingw crash handler for windows (default=ON).
- ENABLE_MINGW_HARDENING_LINKER : Enable DEP (NX), ASLR, and high-entropy ASLR linker flags for MinGW (default ON).
Setup Local Compilation and Run-Time
This section describes how to install digiKam from the git repository, while keeping a system-wide digiKam install.
This procedure is based on the configure script bootstrap.local
- Set the root directory for your git install in bootstrap.local (DIGIKAM_INSTALL_PREFIX variable)
- If you want a clean build directory, set CLEANROOT to 1
- Type the following command in your terminal:
$ ./bootstrap.local # or «./bootstrap.local —eclipse» if you intend to use Eclipse
$ cd build
$ make
$ make install
$ KDESYCOCA=»/your/root/directory/var/tmp/kde-$USER/ksycoca5″ kbuildsycoca5
To run digikam, use the following commands:
$ export KDESYCOCA=/your/root/directory/var/tmp/kde-$USER/ksycoca5
$ export QT_PLUGIN_PATH=/your/root/directory/lib64/plugins:/your/root/directory/lib/plugins:$QT_PLUGIN_PATH
$ export XDG_DATA_DIRS=/your/root/directory/share:$XDG_DATA_DIRS
$ /your/root/directory/bin/digikam
The same applies for all binaries in /your/root/directory/bin/
If your shell is bash, you can edit your .bashrc file (in $HOME) and add the follwing alias:
DIGIKAMROOT=»/your/root/directory»
alias digikam-dev=»KDESYCOCA=\$DIGIKAMROOT/var/tmp/kde-$USER/ksycoca5 XDG_DATA_DIRS=\$DIGIKAMROOT/share:\$XDG_DATA_DIRS QT_PLUGIN_PATH=\$DIGIKAMROOT/lib64/plugins:\$DIGIKAMROOT/lib/plugins:\$QT_PLUGIN_PATH \$DIGIKAMROOT/bin/digikam»
then you can start your newly installed digikam with
$ digikam-dev
Debug Traces At Run-Time
digiKam uses categorized logging at run-time. By default, all debug messages are printed on the console. To disable output, you can either fine-grained control by using one or more logging categories listed below.
Note: under Windows, to catch all debug messages you need to install an extra Microsoft application named DebugView available at this url: http://technet.microsoft.com/en-us/sysinternals/bb896647.aspx
Установка
Прим. перев.: в последней версии он был объединен с digikam
Если ваш менеджер пакетов не установит автоматически, вам придется установить этот пакет вручную. Также рекомендую установить пакет расширений Kipi для дополнительной функциональности (об этом немного позже). Тем, кто предпочитает работать с исходниками, стоит сходить на сайт digiKam.
Хотя программа digiKam является частью KDE, она может быть запущена и в других средах, таких как XFCE и GNOME (хотя любителям GTK-интерфейса стоит попробовать F-Spot). Возможно, в этом случае придется установить дополнительные KDE-библиотеки, но любой серьезный менеджер пакетов должен с этим справиться.
Естественно, идеальная среда для digiKam — это KDE, заглавная буква K в названии программы это и означает.
Software Components
digiKam project use a single git repository to host whole source code base. The project page is given below:
Even if code base can be compiled as well, more features can be enabled if extra components are downloaded and compiled at the same time. The project pages of these extra components are given below:
digiKam handbook : https://phabricator.kde.org/source/digikam-doc/
Development Envirronnement
If you are a developer with push access to the git repositories, it is strongly recommended to use the «kde:» prefix and let git use the read-only mirrors for pulling.
If you did not clone this repository from «kde:», do it again:
git config —global url.git:
git config —global url.ssh:
git clone kde:digikam
See below an example of .gitconfig file working with a developer account :
Cmake Configuration Options
To configure the project with CMake, use dedicated «bootstrap» script for your platform where all available configuration options are present with default values.
There are two configuration sections : the top level and the core.
Top Level Configuration
- Packaging options:
- DIGIKAMSC_COMPILE_DIGIKAM : Build digiKam core (default=ON).
- DIGIKAMSC_CHECKOUT_PO : Extract application translation files from remote repositories (default=ON).
- DIGIKAMSC_CHECKOUT_DOC : Extract documentation translation files from remote repositories (default=ON).
- DIGIKAMSC_COMPILE_DOC : Build handbook i18n files. It require to checkout documentation translations files before from remote repositories (default=ON).
- DIGIKAMSC_COMPILE_PO : Build GUI i18n files. It require to checkout application translations files before from remote repositories (default=ON).
- Developers only options:
Unit Testing / Automated Testing
Unit Testing is great way to ensure that software units (in OOP this normally means classes) work as expected. Wikipedia gives a good introduction to Unit Testing:
It is also worth to follow most of QTTest API rules with digiKam:
The digiKam test suite is located under tests and will be compiled if BUILD_TESTING is turned ON at cmake configuration time. After compiling the source code the tests can be executed via
make test
The console output while running the tests is stored in Testing/Temporary/LastTest.log in the CMake binary dir.
All tests are simple binaries that can be executed separately if needed.
Profiling With Cachegrind
Valgrind also includes a tool to find out in which parts of your code time is spent.
valgrind —tool=callgrind digikam
Profiling can be disabled at startup to limit the output to the code you are interested in. Start with
valgrind —tool=callgrind —instr-atstart=no digikam
and prepare the situation you want to profile. Then, in another console, start profiling with «callgrind_control -i on» and, after the situation has passed, request a profile dump with «callgrind_control -d». The resulting callgrind.out files need to be viewed with the kcachegrind program, e.g.:
kcachegrind callgrind.out.16693.1
CMake Implementation Details
Include Directories
Local include directories are all managed by this snippet of code:
set(DK_INCLUDES_ALL «»)
HEADER_DIRECTORIES(DK_LOCAL_INCLUDES_RAW)
The libjpeg- folders are all included, so we need to delete them all and include the correct one only:
# This macro will set all paths which do not containt libjpeg-
# We will add later the directory we need
FOREACH(var ${DK_LOCAL_INCLUDES_RAW})
STRING(REGEX MATCH «libjpeg-» item ${var})
IF(item STREQUAL «»)
LIST(APPEND DK_LOCAL_INCLUDES ${var})
ENDIF(item)
ENDFOREACH(var)
set(DK_LOCAL_INCLUDES ${DK_LOCAL_INCLUDES}
libs/jpegutils/${DIGIKAM_LIBJPEG_DIR})
include_directories(${DK_LOCAL_INCLUDES})
There is no need for manual intervention to add new includes, even if you add a new folder, just keep in mind to use:
#include «tagmngrlistitem.h»
instead of :
#include «models/tagmngrlistitem.h»
To avoid linking overhead and make a better use of sources there are some dynamic libs as these one:
- digikamcore : core components used by almost all executables as digiKam and Showfoto.
- digikamdatabase : database components, also used together with digikamcore but only for digiKam
Please add sources to digikam core or digikam database only if they don’t depend on any big component from digikam main executable. These two shared libs must be kept small because they link in a lot of places
Static Libraries
Currently cmake configuration features a lots of shared libraries as:
- metadataedit
- geolocationedit
- digikamfaceengine
This libraries are linked in digikam main executable and some tests tools.
Avoid making static libraries if possible, and use OBJECT libraries instead. Only make STATIC libraries which does not depend on other digikam code. Also make sure you put the PRIVATE parameter when setting the target_link_libraries.
target_link_libraries(digikamcore
PRIVATE
Qt5::Core
Qt5::Gui
Qt5::Widgets
)
Object Libraries
While static libraries are still collection of objects, CMake offer a better approach by allowing to specify an OBJECT library:
set(libslideshow_SRCS
slidetoolbar.cpp
slideosd.cpp
slideproperties.cpp
slideimage.cpp
slideerror.cpp
slideend.cpp
slideshow.cpp
slidehelp.cpp
slideshowsettings.cpp
)
add_library(slideshow_src OBJECT ${libslideshow_SRCS})
OBJECT library is a cmake internal implementation feature and allow to easily manage sources. Here is an example of how to make a shared lib using OBJECT libraries:
add_library(digikamcore
SHARED
$<TARGET_OBJECTS:slideshow_src> # the lib we made few lines above
$<TARGET_OBJECTS:digikamdatabasecore_src>
$<TARGET_OBJECTS:dimg_src>
….
)
This section’s purpose is to guide contributors and developers to help on the digiKam project.
Dealing with Crashes in digiKam
Linux host
In case digiKam crashes, you can provide a backtrace using GDB debugger.
digiKam needs to be compiled with all debug info; otherwise the backtrace will be useless.
If you installed digiKam using the packages provided by your distribution, make sure to install
the corresponding debug package. The debugging guide
provides further information on debugging.
If you use a regular binary, i.e. no AppImage, use the following command to get into GDB and start digiKam:
If you use an AppImage bundle, replace the name of the AppImage with the one you have and run:
Instructions how to get into GDB are below. When you are in debugger and digiKam crashes, you will get to the
GDB command prompt. If digiKam “just” freezes, press ctrl-c to get to the GDB prompt.
Once you are at the prompt, use the “bt” command, copy the backtrace and exit GDB as shown here:
Windows Host
The binary installers comes with debug symbols and a DrMinGw crash course handler,
which will generate a file backtrace in you home directory as below:
Just replace “user_name” with your Windows loggin account.
MacOS Host
Mac users need to install Apple XCode development tool which integrate lldb
debugger. Run it as follows to get a crash backtrace from the debugger:
Features
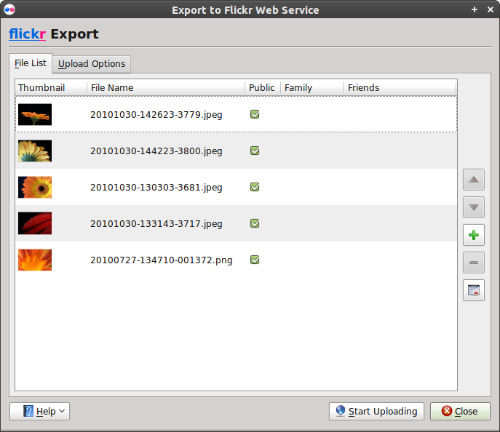
digiKam runs on most known desktop environments and window managers, as long as the required libraries are installed. It supports all major image file formats, such as JPEG and PNG as well as over 200 raw image formats and can organize collections of photographs in directory-based albums, or dynamic albums by date, timeline, or by tags. Users can also add captions and ratings to their images, search through them and save searches for later use. Using plug-ins, users can export albums to various online services including (among others) 23hq, , Flickr, Gallery2, Google Earth’s KML files, Yandex.Fotki, MediaWiki, Rajce, SmugMug, Piwigo, Simpleviewer, Picasa Web Albums. Plug-ins are also available to enable burning photos to a CD and the creation of web galleries.
digiKam provides functions for organizing, previewing, downloading and/or deleting images from digital cameras. Basic auto-transformations can also be deployed on the fly during picture downloading. In addition, digiKam offers image enhancement tools through its KIPI (KDE Image Plugins Interface) framework and its own plugins, like red-eye removal, color management, image filters, or special effects. digiKam was the only free photo management application on Linux that could handle 16 bit/channel images, until RawTherapee version 4.0 was released in 2011, using a new 32 bits/channel engine for all internal image processing. Digital Asset Management is the mainstay of digiKam.
Редактирование и доводка снимков
Для доводки фотографий digiKam предлагает целый набор инструментов. В дополнение к стандартным : цветокоррекции, шумоподавлению и установке уровня (level adjustment), digiKam предлагает еще несколько инструментов. Например, метод усреднения экспозиции позволяет из нескольких снятых подряд снимков сделать один правильно экспонированный кадр. Для проведения этого процесса используется понятный Мастер, который проводит весь процесс. Имеется также инструмент коррекции объектива, который поможет устранить подушкообразное искажение (pincushion distortion) снимка. Если нужно сравнить бок о бок два снимка, пригодится инструмент Light Table.
Менеджер Групповых Операций (Batch Queue Manager) позволяет применить серию изменений к группе снимков. К примеру, можно изменить размер, удалить шум, добавить водяные знаки и перевести в другой формат целую группу фотографий за один раз.
digiKam позволяет просматривать и редактировать метаданные в форматах EXIF, IPTC и XMP. Есть возможность создания одного или нескольких трафаретов с метаданными и применения их к выбранным снимкам. Скажем, составляется шаблон, содержащий сведения о авторе и копирайте, и им помечаются ваши снимки.