Dd_rescue vs gnu ddrescue: зачем нужен клон, когда есть оригинал
Содержание:
- Пример работы
- Extract individual files from recovered image
- Introduzione
- ddrescue Package Description
- More about GNU
- Introducciуn
- Come aiutare
- Errors during the boot process
- Порядок действий с битым hdd
- Download links
- Introduction
- Descargar (Download) ddrescue
- What is GNU?
- Licensing
- Ntfsprogs
- What is Free Software?
- ddrescue примеры
- How do I use ddrescue command?
Пример работы
Для примера. Посмотреть где какой раздел:
Запустил программу с такими параметрами:
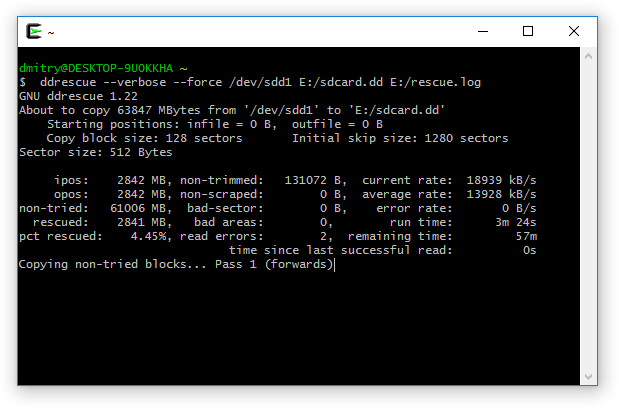 В окне детализации видно следующее:
- ipos/opos – позиция чтения и записи соответственно;
- non-tried: не прочитано ещё 61006 Мб;
- rescued: прочитано успешно уже 2841 Мб;
- pct rescued: процент прочитанного: 4,45%;
- non-trimmed: первично помечено как “подлежит обрезке” 131071 байта (256 секторов по 512 байт). А 256 = 128 секторов (значение Copy block size (размер блока)) * 2 (ошибки чтения read errors);
- run time: прошло 3м 24сек;
Прошло некоторое количество времени (7 часов 51 минута 40 секунд):
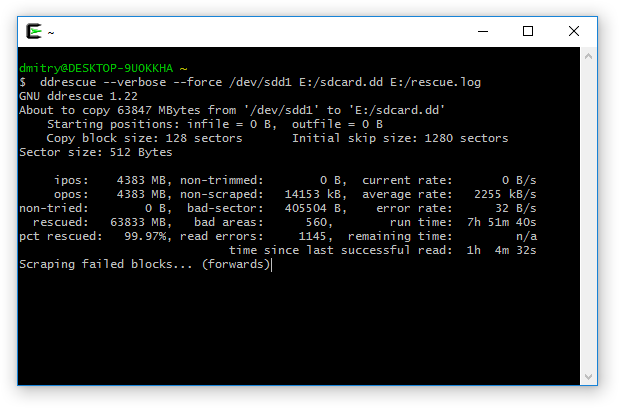
Вот что изменилось:
- non-tried: 0 (весь диск пробежались);
- rescued: 63833 Mb (успешно прочитано), pct rescued: 99.97% от всего диска;
- non-trimmed: 0 (все участки “подрезаны”);
- non-scraped: 14153 Kb (осталось порядка 14 Мб “выцарапать”);
- bad-sector: 405504 B (помечено как окончательно нечитаемые участки порядка 400 Кб, за остальные идёт борьба);
Мне этого хватило, процесс остановил и скормил образ R-Studio. Вытащил достаточно много нужной информации. Уверен, что если ещё немного подождать (ещё сутки), то из тех 14 мегабайт ещё порядка 5-6 может быть “выцарапано”.
Extract individual files from recovered image
Foremost
Foremost is a command-line tool which can recover files from a number of filesystems, including fat, ext3 and NTFS. It can be installed and run from the live cd.
Boot from the live cd and then enable the universe repository and install foremost:
Use any method to install the following package:
foremost
Foremost can recover files from an image of the drive, or from the drive directly. If the drive has suffered hardware problems, use gnuddrescue to image the drive first.
Assuming the lost files are on hda, you need to create a writeable directory on another drive where you can put the recovered files (lets say you have a big external usb drive (sdb)
sudo mount /dev/sdb1 /recovery
sudo mkdir /recovery/foremost
And then run foremost:
sudo foremost -i /dev/hda -o /recovery/foremost
To run formost on an image, just substitute the filename for the device
sudo foremost -i image -o /recovery/foremost
The recovered files will then be owned by root. Change their ownership so that you can use them:
sudo chown -R youruser:youruser /recovery/foremost
Use the -w switch to obtain only an audit of recoverable files:
sudo foremost -w -i /dev/hda -o /recovery/foremost
To recover only specific file types, use the -t switch:
sudo foremost -t jpg -i /dev/hda -o /recovery/foremost
Available types:
|
Filetype |
Comment |
|
jpg |
Support for the JFIF and Exif formats including implementations used in modern digital cameras. |
|
gif |
|
|
png |
|
|
bmp |
Support for windows bmp format. |
|
avi |
|
|
exe |
Support for Windows PE binaries, will extract DLL and EXE files along with their compile times. |
|
mpg |
Support for most MPEG files (must begin with 0x000001BA) |
|
wav |
|
|
riff |
This will extract AVI and RIFF since they use the same file format (RIFF). note faster than running each separately. |
|
wmv |
Note may also extract -wma files as they have similar format. |
|
mov |
|
|
|
|
|
ole |
This will grab any file using the OLE file structure. This includes PowerPoint, Word, Excel, Access, and StarWriter |
|
doc |
Note it is more efficient to run OLE as you get more bang for your buck. If you wish to ignore all other ole files then use this. |
|
zip |
Note is will extract .jar files as well because they use a similar format. Open Office docs are just zip’d XML files so they are extracted as well. These include SXW, SXC, SXI, and SX? for undetermined OpenOffice files. |
|
rar |
|
|
htm |
|
|
cpp |
C source code detection, note this is primitive and may generate documents other than C code. |
|
all |
Run all pre-defined extraction methods. |
Scalpel
Scalpel is a fast file carver that reads a database of header and footer definitions and extracts matching files from a set of image files or raw device files. It is similar to foremost and may have some improvements.
By default, all file types in the database (/etc/scalpel/scalpel.conf) are commented out. To specify which filetypes you want to carve, you need to edit the file and uncomment each line.
sudo scalpel FILE -o Directory
Where FILE is the image file (or device) and Directory is the output directory.
Magic Rescue
Another program that scans for files using «magic bytes» to identify their presence and type, and which can be extended for many file types using «recipes», can be obtained by installing, using any method, the package magicrescue.
Note that most of the provided recipes need other software installed to work, so open the desired recipes in /usr/share/magicrescue/recipes/ using a text editor and read the comments contained.
If you want to recover (for example) gzip files and PNG images from a partition named /dev/sda1, you can run
mkdir ~/output
sudo magicrescue -r gzip -r png -d ~/output /dev/hdb1
This will write all recovered files in a directory output inside your home directory.
Photorec
Photorec is file data recovery software designed to recover lost pictures from digital camera memory or even Hard Disks. It has been extended to search also for non audio/video headers. It searches for 80 different types of files. Photorec is part of the Testdisk package. Use any method to install the following package:
testdisk
To run Photorec on an image file, do:
sudo photorec imagefilename
To recover files directly from a device, run photorec without any arguments and you will be given a menu of available devices.
sudo photorec
See this link for a detailed description of how to use Photorec.
recoverjpeg
This program is dedicated to identifying and recovering JPEG pictures. You can install the package recoverjpeg using any method, and then run (assuming /dev/sda1 is the partition you want to recover from)
sudo recoverjpeg /dev/sda1
Recovered files will be saved in your home directory, with names following the pattern image*.jpg.
Introduzione
GNU ddrescue и uno strumento di recupero dati. Copia i dati da un file o
dispositivo a blocchi (hard disk, cdrom, ecc.) ad un altro, cercando
fortemente di recuperare i dati in caso di errori di lettura.
Il funzionamento base di ddrescue и pienamente automatico. Non si deve
perciт aspettare un errore, fermare il programma, eseguirlo in modalitа
inversa, ecc.
Se si usa la funzionalitа per file di registro di ddrescue, i dati sono
recuperati molto efficacemente (sono letti solo i blocchi necessari).
Inoltre si puт interrompere il ripristino in qualsiasi momento e
riprenderlo successivamente dallo stesso punto.
Ddrescue non scrive zeri in uscita quando trova settori danneggiati in
ingresso, e non tronca il file di output se non richiesto. Perciт, ogni
volta che lo si esegue sullo stesso file di output, cerca di riempire i
vuoti, senza cancellare i dati giа salvati.
L’unione automatica di backup: se si hanno due o piщ copie danneggiate
di un file, cdrom, ecc. e si esegue ddrescue su tutte, una alla volta,
con lo stesso file di output, probabilmente si otterrа un file completo
e senza errori. Questo perchй la probabilitа di avere aree danneggiate
nello stesso punto in file di input differenti и molto bassa. Usando il
file di registro sono letti solo i blocchi necessari dalla seconda copia
e dalle successive.
Ddrescue raccomanda
lzip per la
compressione dei backup, per la sua affidabilitа e capacitа di recupero
dati, inclusa la fusione di copie di backup con controllo degli errori.
La combinazione ddrescue + lziprecover и l’opzione migliore per il
recupero dati da copie molto danneggiate.
Supporti CD e DVD registrabili conservano i propri dati solo per un
tempo limitato (in genere per molti anni). Trascorso tale termine, la
perdita di dati aumenta lentamente, con errori di lettura crescenti a
partire dalla regione esterna dei supporti verso l’interno. E’
sufficiente fare due (o piщ) copie di ogni CD/DVD importante che si
masterizza in modo da poter poi recuperarle con ddrescue.
Il file di registro и periodicamente salvato su disco. Perciт in caso di
crash si puт riprendere il ripristino senza ricopiare molto.
Inoltre, lo stesso file di registro puт essere usato per comandi
multipli che copiano aree differenti del file e per tentativi di
recupero multipli su sottoinsiemi diversi.
Ddrescue dispone anche di una «modalitа di riempimento» in grado di
sovrascrivere selettivamente parti del file di output, che ha un certo
numero di utilizzi interessanti come cancellare i dati, la marcatura di
aree danneggiate o addirittura, in alcuni casi, «riparare» i settori
danneggiati.
ddrescue Package Description
Like dd, dd_rescue does copy data from one file or block device to another. You can specify file positions (called seek and Skip in dd). There are several differences:
- dd_rescue does not provide character conversions.
- The command syntax is different. Call dd_rescue -h.
- dd_rescue does not abort on errors on the input file, unless you specify a maximum error number. Then dd_rescue will abort when this number is reached.
- dd_rescue does not truncate the output file, unless asked to.
- You can tell dd_rescue to start from the end of a file and move backwards.
- It uses two block sizes, a large (soft) block size and a small (hard) block size. In case of errors, the size falls back to the small one and is promoted again after a while without errors.
- Author: garloff
- License: GPLv2
Tools included in the ddrescue package
dd_rescue – Copy data from one file or block device to another
root@kali:~# dd_rescue -h
dd_rescue Version 1.28, garloff@suse.de, GNU GPL
($Id: dd_rescue.c,v 1.130 2012/05/19 20:46:14 garloff Exp $)
(compiled Dec 15 2012 12:04:22 by gcc (Debian 4.7.2-4) 4.7.2)
(features: O_DIRECT splice )
dd_rescue copies data from one file (or block device) to another.
USAGE: dd_rescue infile outfile
Options: -s ipos start position in input file (default=0),
-S opos start position in output file (def=ipos),
-b softbs block size for copy operation (def=65536, 1048576 for -d),
-B hardbs fallback block size in case of errs (def=4096, 512 for -d),
-e maxerr exit after maxerr errors (def=0=infinite),
-m maxxfer maximum amount of data to be transfered (def=0=inf),
-y syncfrq frequency of fsync calls on outfile (def=512*softbs),
-l logfile name of a file to log errors and summary to (def=»»),
-o bbfile name of a file to log bad blocks numbers (def=»»),
-r reverse direction copy (def=forward),
-t truncate output file (def=no),
-d/D use O_DIRECT for input/output (def=no),
-k use efficient in-kernel zerocopy splice
-w abort on Write errors (def=no),
-a spArse file writing (def=no),
-A Always write blocks, zeroed if err (def=no),
-i interactive: ask before overwriting data (def=no),
-f force: skip some sanity checks (def=no),
-p preserve: preserve ownership / perms (def=no),
-q quiet operation,
-v verbose operation,
-V display version and exit,
-h display this help and exit.
Sizes may be given in units b(=512), k(=1024), M(=1024^2) or G(1024^3) bytes
This program is useful to rescue data in case of I/O errors, because
it does not necessarily abort or truncate the output.
dd_rescue Usage Example
Start at position 100 of the input file (-s 100 /var/log/messages) and write, beginning at position 0 of the destination file (-S 0 /tmp/ddrescue-out):
root@kali:~# dd_rescue -s 100 /var/log/messages -S 0 /tmp/ddrescue-out
dd_rescue: (info): Using softbs=65536, hardbs=4096
dd_rescue: (info) expect to copy 1766kB from /var/log/messages
dd_rescue: (info): ipos: 1024.1k, opos: 1024.0k, xferd: 1024.0k
errs: 0, errxfer: 0.0k, succxfer: 1024.0k
+curr.rate: 1122807kB/s, avg.rate: 1018906kB/s, avg.load: 0.0%
>…………………..-……………..< 57% ETA: 0:00:00
dd_rescue: (info): read /var/log/messages (1767.0k): EOF
dd_rescue: (info): Summary for /var/log/messages -> /tmp/ddrescue-out:
dd_rescue: (info): ipos: 1767.0k, opos: 1767.0k, xferd: 1767.0k
errs: 0, errxfer: 0.0k, succxfer: 1767.0k
+curr.rate: 352945kB/s, avg.rate: 568151kB/s, avg.load: 0.0%
>…………………..-…………….-< 100% ETA: 0:00:00
More about GNU
GNU is a Unix-like operating system. That
means it is a collection of many programs: applications, libraries,
developer tools, even games. The development of GNU, started in
January 1984, is known as the GNU Project. Many of the programs in
GNU are released under the auspices of the GNU Project; those we
call GNU packages.
The name “GNU” is a recursive acronym for “GNU’s
Not
Unix.” “GNU”
is pronounced g’noo, as one syllable, like saying
“grew” but replacing the r with n.
The program in a Unix-like system that allocates machine resources
and talks to the hardware is called the “kernel”. GNU is
typically used with a kernel called Linux. This combination is
the GNU/Linux operating
system. GNU/Linux is used by millions, though
many call it “Linux” by
mistake.
GNU’s own kernel, The Hurd,
was started in 1990 (before Linux was started). Volunteers continue
developing the Hurd because it is an interesting technical
project.
Introducciуn
GNU ddrescue es una herramienta de recuperaciуn de datos. Copia los
datos de un fichero o un dispositivo de bloques (disco duro, cdrom, etc)
a otro, intentando recuperar primero las partes no daсadas en caso de
producirse errores de lectura.
Ddrescuelog es una herramienta que manipula mapfiles producidos por
ddrescue, muestra su contenido, convierte mapfiles a/de otros formatos,
compara mapfiles, verifica el estado de un rescate, y puede borrar un
mapfile si el rescate estб completo. Las operaciones de ddrescuelog se
pueden restringir a una o varias partes del mapfile si se usan las
opciones de delimitaciуn de dominio.
La operaciуn bбsica de ddrescue es totalmente automбtica. Es decir, no
es necesario esperar a que se produzca un error, parar el programa,
ejecutarlo de nuevo desde otra posiciуn, etc.
Si se usa el fichero de anotaciones (mapfile) de ddrescue, los datos son
recuperados muy eficientemente, (sуlo se leen los bloques necesarios).
Ademбs se puede interrumpir el rescate en cualquier momento y reanudarlo
despuйs en el mismo punto.
Ddrescue no escribe ceros en la salida cuando encuentra errores en la
entrada, ni trunca el fichero de salida si no se le pide. De este modo
cada vez que es ejecutado sobre el mismo fichero de salida, intenta
rellenar los huecos sin borrar los datos ya recuperados.
Fusiуn automбtica de copias de seguridad: Si se tienen dos o mбs copias
daсadas de un mismo fichero, cdrom, etc, y se ejecuta ddrescue en todas
ellas, una cada vez, sobre el mismo fichero de salida, se obtendrб
probablemente un fichero completo y libre de errores. Esto es asн porque
la probabilidad de tener la misma бrea daсada en todas las copias es
baja. Usando el fichero de anotaciones (mapfile), sуlo se leen los
bloques que se necesiten de la segunda copia y sucesivas.
Ddrescue recomienda
lzip para comprimir
copias de seguridad porque el formato lzip estб diseсado para el archivo de
datos a largo plazo y proporciona capacidades de recuperaciуn de datos que
complementan muy bien las de ddrescue. (Ddrescue rellena los sectores
ilegibles con datos de otras copias, mientras que lziprecover corrige los
sectores corrompidos con datos de otras copias). Si la causa de la
corrupciуn del fichero es un soporte fнsico daсado, la combinaciуn
ddrescue + lziprecover
es la mejor opciуn para recuperar datos a partir de varias copias daсadas.
El mapfile es salvado periуdicamente en disco. De modo que en caso de
bloqueo puede reanudarse el rescate sin apenas recopiado.
Tambiйn el mismo mapfile puede ser usado por mъltiples comandos que copian
diferentes бreas del fichero, y por mъltiples intentos de rescate sobre
diferentes subconjuntos de una misma бrea.
Ddrescue tambiйn proporciona un «modo de llenado» (fill mode) capaz de
sobreescribir selectivamente partes del fichero de salida, lo que tiene
algunos usos interesantes como borrar datos, marcar бreas defectuosas o
incluso, en algunos casos, «reparar» sectores daсados.
Una de las grandes fortalezas de ddrescue es que es independiente del
interfaz, y por tanto puede ser usado con cualquier clase de dispositivo
soportado por el kernel (ATA, SATA, SCSI, antiguos discos MFM,
disquetes, o incluso tarjetas de memoria como las SD).
Come aiutare
Per contattare l’autore, sia per segnalare un bug o per contribuire con
correzioni o miglioramenti, inviare una mail a
bug-ddrescue@gnu.org.
Si prega di inviare i messaggi come testo normale. Se inviate patch
dovrebbero essere nel formato diff unificato aggiornato all’ultima
versione. Queste dovrebbero includere una descrizione testuale.
Vedi anche la pagina del
progetto ddrescue
su Savannah.
Questa pagina и stata tradotta da Paolo Melchiorre.
Ritorna alla home page GNU.
Per informazioni su FSF e GNU rivolgetevi, possibilmente in inglese, a
gnu@gnu.org. Ci sono anche
altri modi di contattare
la FSF.
Puoi inviare commenti relativi a questa pagina in particolare a
bug-ddrescue@gnu.org,
inviate commenti relativi alle pagine web di www.gnu.org in generale a
webmasters@www.gnu.org,
inviate le altre questioni a
gnu@gnu.org.
Copyright 2016 Free Software Foundation, Inc., 51 Franklin St, Fifth
Floor, Boston, MA 02110-1301 USA
La copia letterale e la distribuzione di questo articolo nella sua
integritа sono permesse con qualsiasi mezzo, a condizione che questa
nota sia riprodotta.
Updated: $Date: 2016/11/09 18:31:10 $ $Author: antonio $
Errors during the boot process
Various issues can cause SystemRescueCd to hangs or fail with unexpected errors
during the boot process. Please do not report these as bugs unless you have
verified the frequent causes of these issues:
- Boot medias such as CD, DVD, and USB stick are often unreliable and bad
blocks will cause problems. You can try another media to see if it makes a
difference, and you can enable verification when you burn/copy the ISO image
to make sure data written to the device can be read and match the original. - Damaged RAM will cause all type of programs to behave unexpectedly. Computers
memory can be tested using program such as memtest which is included with SystemRescueCd. - You will also get problems if the system runs out of memory. So make sure your
computers has at least 2GB of memory if you start with the default boot
options or 4GB if you cache the system into RAM.
Порядок действий с битым hdd
Типичный порядок действий, которому я стараюсь следовать при наличии таких проблем как ошибки чтения\записи, нетипичный треск диска и другие симптомы выхода из строя жесткого диска:
- Выключаю комп с проблемным диском
- Загружаю с LiveCD\LiveUSB — утилиты MHDD или Victoria
- Проверяю, определяется ли жесткий диск и есть ли возможность провести проверку диска чтением. Если запуск проверки диска прошел успешно, это можно считать положительным показателем работоспособности электроники. Останавливаю проверку.
- Далее я перехожу к переносу данных с помощью ddrescue.
- После успешного восстановления я пытаюсь запустить remap битых секторов. Обычно, действую по алгоритму: если remap начал обнаруживать очень большое количество битых секторов, то останавливаю. Диск летит в мусорку. Если битых секторов не шибко много, то диск после ремапа может еще не один год поработать, как средство для переноса некритичных данных между ПК.
- Запускаю проверку перенесенной файловой системы (fsck для linux, chkdsk для Windows разделов).
В общем то, если не брать проблемы с электроникой жесткого диска, а рассматривать ситуацию, когда у Вас жесткий диск — что называется — посыпался. То по данной схеме я восстановил не один десяток дисков с разной степенью повреждений практически без значимой потери данных. Итак, в данной статье речь пойдет о 4 и 5 шаге.
Download links
You can download SystemRescueCd immediately from this page. It is recommended to
use the 64bit version (amd64) but a 32bit version (i686) is also available.
| Release | SystemRescueCd-6.1.7 for amd64 | SystemRescueCd-6.1.7 for i686 |
|---|---|---|
| Release date | 2020-08-01 | 2020-08-01 |
| Download size | 688 MiB | 675 MiB |
| Download ISO | systemrescuecd-amd64-6.1.7.iso | systemrescuecd-i686-6.1.7.iso |
| SHA256 checksum | systemrescuecd-amd64-6.1.7.iso.sha256 | systemrescuecd-i686-6.1.7.iso.sha256 |
| SHA512 checksum | systemrescuecd-amd64-6.1.7.iso.sha512 | systemrescuecd-i686-6.1.7.iso.sha512 |
| Signature | systemrescuecd-amd64-6.1.7.iso.asc | systemrescuecd-i686-6.1.7.iso.asc |
Introduction
GNU ddrescue est un outil de rйcupйration de donnйes. Il copie les
donnйes provenant d’un fichier ou d’un pйriphйrique mode bloc (disque
dur, cdrom, etc) vers un autre, en essayant toutes les astuces possibles
afin de rйcupйrer des donnйes en cas d’erreurs de lectures.
Le fonctionnement, en mode basique, de ddrescue est entiиrement
automatique. Cela signifie que vous n’avez pas а attendre qu’une erreur
se produise, arrкter le programme, le lancer en mode inversй (reverse
mode), etc…
L’utilisation du ‘fichier_map’ (mapfile) de ddrescue, vous permettra de
rйcupйrer des donnйes avec une grande efficience (seuls les blocs
nйcessaires seront lus). De cette faзon, vous pouvez stopper ddrescue
quand vous le voulez et le relancer а l’endroit oщ il s’йtait arrкtй.
Ddrescue n’йcrit pas des zйros dans son flux de sortie lorsqu’il lit des
secteurs dйfectueux dans son flux d’entrйe, et ne tronque pas le fichier
de sortie, si vous ne l’avez pas expressйment demandй. Ainsi, chaque
fois que vous relancez ddrescue sur le mкme fichier de sortie, il
tentera de remplir les vides tous en prйservant les donnйes
antйrieurement rйcupйrйes.
Fusionnnement automatique de sauvegardes : Si vous avez deux (ou plus)
copies endommagйes d’un mкme fichier, cdrom, etc, et que vous lancez
ddrescue sur chacune d’elle, une а la fois, en utilisant le mкme fichier
de sortie, vous obtiendrez probablement un fichier rйsultant entiиrement
exempt d’erreurs. Cela provient du fait que, la probabilitй de trouver
des zones endommagйes au mкme endroit sur diffиrents fichiers d’entrйes
est trиs faible. Si vous utilisez le ‘fichier_map’ (mapfile), seul les
blocs nйcessaires seront lus а partir de la deuxiиme copie, puis des
suivantes.
Ddrescue recommande le programme
lzip pour la
compression de vos sauvegardes (backups), ceci en raison de sa grande
fiabilitй et de sa capacitй de rйcupйration de donnйes, incluant le
contrфle d’erreurs lors du mйlange (la fusion) de plusieurs copies d’une
mкme sauvegarde (backup). La combinaison ddrescue + lziprecover est la
meilleure option pour la rйcupйration de donnйes а partir de multiples
copies, d’une mкme sauvergarde (backup), endommagйes.
Les CD et DVD enregistrables ne prйservent l’intиgritй de leurs donnйes
que pendant une durйe limitйe (typiquement, quelques annйes). Aprиs
cette pйriode, des pertes de donnйes se dйveloppent progressivement et
les erreurs de lectures s’accroissent, en commanзant par la zone la plus
externe du support jusqu’а, pour finir, la zone la plus interne. En
crйant deux (ou plus) copies des donnйes importantes que vous gravez sur
CD/DVD, vous augmentez, de maniиre significative, les possibilitйes de
rйcupйrations ultиrieures de ces derniиres а l’aide de ddrescue.
Le ‘fichier_log’ est pйriodiquement sauvegardй sur le disque. Ainsi, en
cas de crash, vous pouvez reprendre la rйcupйration lа oщ elle s’йtait
arrйtйe, avec un minimum de recopie.
De plus, le mкme ‘fichier_log’ peut кtre utilisй pour des commandes
multiples qui copient diffиrentes zones d’un fichier, et de multiples
tentatives de rйcupйrations а partir de diffиrentes copies de rйserve.
Ddrescue possиde, aussi, un ‘mode remplissage’ (fill mode) capable de
surйcrire sйlectivement des parties du fichier de sortie. Ce mode est
dotй d’intйressantes caractиristiques, comme le nettoyage des donnйes,
le marquage des zones dйfectueuses, ou mкme, dans certains cas, la
rйparation de secteurs endommagйs.
Descargar (Download) ddrescue
La ъltima versiуn publicada de GNU ddrescue se puede encontrar en
http://ftpmirror.gnu.org/ddrescue/
o en el subdirectorio en tu
rйplica GNU preferida.
Para ver otras formas de obtener ddrescue, consulta
Cуmo
conseguir Software GNU. La ъltima versiуn publicada serб la versiуn
mбs reciente disponible en
http://ftp.gnu.org/gnu/ddrescue/.
Para descomprimir las tarballs de ddrescue puede ser necesario instalar lzip
desde
http://www.nongnu.org/lzip/lzip_es.html
y despuйs usar «» o
«»
para extraer los ficheros.
Puedes encontrar versiones antiguas y versiones beta para probar en
http://download.savannah.gnu.org/releases/ddrescue/.
What is GNU?
GNU is an operating system that
is free software—that is,
it respects users’ freedom. The GNU operating system consists of GNU
packages (programs specifically released by the GNU Project) as well
as free software released by third parties. The development of GNU
made it possible to use a computer without software that would trample
your freedom.
We recommend installable
versions of GNU (more precisely, GNU/Linux distributions) which
are entirely free software. .

Hyperbola 0.3 with i3 window manager,
cool-retro-term (terminal emulator), Gimp (image editor), and Iceweasel-UXP (web
browser)
Dragora / IceWM
Guix / GNOME3
Hyperbola / i3
Parabola / LXDE
PureOS / GNOME3
Trisquel / MATE
… or
Try parts of GNU
Licensing
Ddrescue is free software: you can redistribute it and/or modify it
under the terms of the GNU General Public License as published by the
Free Software Foundation, either version 2 of the License, or (at your
option) any later version.
Return to GNU’s home page.
Please send FSF & GNU inquiries & questions to
gnu@gnu.org. There are also
other ways to contact
the FSF.
Please send comments on this particular web page to
bug-ddrescue@gnu.org,
send comments about www.gnu.org web pages in general to
webmasters@www.gnu.org,
send other questions to gnu@gnu.org.
Copyright 2020 Free Software Foundation, Inc., 51 Franklin St, Fifth
Floor, Boston, MA 02110-1301 USA
Verbatim copying and distribution of this entire article is
permitted in any medium, provided this notice is preserved.
Updated: $Date: 2020/03/03 12:23:04 $ $Author: antonio $
Ntfsprogs
NtfsUndelete can recover deleted files from an NTFS file-system. The Windows and LiveCd versions have a very nice intuitive gui but the linux one is probably stronger and does not have a front-end gui at the moment.
Briefly, it has 3 modes
- «Scan», searches for deleted files and find info about them
- «Undelete», see note below …
- «Copy», err i am not sure what this does as i am not a wizard
The best simple guide i have found so far (24-11-2010) is http://www.howtogeek.com/howto/13706/recover-deleted-files-on-an-ntfs-hard-drive-from-a-ubuntu-live-cd/
When undeleting chose which files to undelete and where to undelete them too. By default this appears to be the desktop of the OS you are booted into, whether that is a LiveCd or on a different partition or drive. For a LiveCd or LiveUsb you will need to move them onto Usb-stick or safe partition before rebooting as the desktop gets forgotten on LiveCds unless you are using a «Persistent image».
To search
ntfsundelete /dev/sda2
To undelete
ntfsundelete /dev/sda2 -u -i 3689 -o work.doc -d ~/output
This will write all recovered files in a directory output inside your home directory.
For better information on using ntfsundelete please see the separate page NtfsUndelete, particularly the External Links there.
What is Free Software?
Free software means the users have the freedom to run,
copy, distribute, study, change and improve the software.
Free software is a matter of liberty, not price. To understand the
concept, you should think of “free” as in “free
speech”, not as in “free beer”.
More precisely, free software means users of a program have
the four essential
freedoms:
- The freedom to run the program as you wish,
for any purpose (freedom 0). - The freedom to study how the program works, and change it so it
does your computing as you wish (freedom 1). Access to the source
code is a precondition for this. - The freedom to redistribute copies so you can help others
(freedom 2). - The freedom to distribute copies of your modified versions
to others (freedom 3). By doing this you can give the whole
community a chance to benefit from your changes.
Access to the source code is a precondition for this.
Developments in technology and network use have made these freedoms
even more
important now than they were in 1983.
Nowadays the free software movement goes far beyond developing the
GNU system. See the Free Software
Foundation’s web site for more about what we do, and a list
of ways you can help.
ddrescue примеры
Пример 1: Восстановление целого диска с несколькими разделами ext3 (или любыми другими, хоть NTFS) с /dev/hda на /dev/hdb.
Примечание: Нет необходимости создавать таблицу разделов на /dev/hdb, т.к. данные копируются побайтово вместе со структурой разделов.
ddrescue -f -n /dev/hda /dev/hdb mapfile
ddrescue -d -f -r3 /dev/hda /dev/hdb mapfile
fdisk /dev/hdb
e2fsck -v -f /dev/hdb1
e2fsck -v -f /dev/hdb2
Пример 2: Восстановление одного раздела с /dev/hda2 на /dev/hdb2.
Примечание: результирующий раздел должен существовать с тем же типом и размером, что и исходный, либо должен быть создан.
ddrescue -f -n /dev/hda2 /dev/hdb2 mapfile
ddrescue -d -f -r3 /dev/hda2 /dev/hdb2 mapfile
e2fsck -v -f /dev/hdb2
mount -t ext2 -o ro /dev/hdb2 /mnt
# (попробуйте прочитать данные с восстановленного раздела)
Пример 3: Во время восстановления целого диска /dev/hda на /dev/hdb, /dev/hda остановился и перестал отвечать на позиции 12345678.
ddrescue -f /dev/hda /dev/hdb mapfile
# ( <-- /dev/hda freezes here --> )
# (переподключите  /dev/hda или перезагрузите компьютер )
# перезапускаем восстановление с байта 12350000
ddrescue -f -i 12350000 /dev/hda /dev/hdb mapfile
# Пробуем восстановить с конца диска
ddrescue -f -R /dev/hda /dev/hdb mapfile
Пример 4: Во время восстановления целого диска /dev/hda на /dev/hdb, /dev/hdb выдал ошибку и мы пытаемся восстановить данные на третий диск /dev/hdc
ddrescue -f -n /dev/hda /dev/hdb mapfile1
# (<-- /dev/hdb выдал ошибку -->)
ddrescue -f -m mapfile1 /dev/hdb /dev/hdc mapfile2
ddrescue -f -n /dev/hda /dev/hdc mapfile2
ddrescue -d -f -r3 /dev/hda /dev/hdc mapfile2
Пример 5: Во время восстановления целого диска /dev/hda на /dev/hdb, /dev/hda перестал отвечать, стал недоступен и невидим в /dev
ddrescue -f -n /dev/hda /dev/hdb mapfile
# (<-- /dev/hda fails here --> )
# Переподключите /dev/hda или перезагрузите компьютер столько раз, сколько необходимо
ddrescue -f -n -A /dev/hda /dev/hdb mapfile
ddrescue -d -f -r3 /dev/hda /dev/hdb mapfile
На этом все. Надеюсь, что данный материал Вам помог. Больше информации можно найти в ссылках ниже. Так же, в ссылках можно найти информацию о Live дистрибутивах, которые я использую для восстановительных работ.
Ссылки
https://www.gnu.org/software/ddrescue/ — основной ресурс разработчиков ddrescue
http://www.sysresccd.org/ — Live дистрибутив, специально заточенный под восстановление данных
https://www.scientificlinux.org/ — тоже интересный Live дистрибутив с необходимыми инструментами для работы с HDD
How do I use ddrescue command?
In this example rescue a /dev/sda to /dev/sdb
     ## No need to partition /dev/sdb beforehand, but if the partition table on /dev/sda ##
     ## is damaged, you will need to recreate it somehow on /dev/sdb. ##
     ddrescue -f -n devsda devsdb logfile
     ddrescue -d -f -r3 devsda devsdb logfile
     ## get list of partitions on a /dev/sdb ##
     fdisk devsdb

     ## check for errors ##
     fsck -v -f devsdb1
     fsck -v -f devsdb2
|
Understanding ddrescue command options
- -f : Overwrite output device or partition.
- -n : Do not try to split or retry failed blocks.
- -d : Use direct disc access for input file.
- -r3 : Exit after given three (3) retries (use -1 as infinity retries).
- -b2048 : Sector size of input device .
Example: Rescue a partition in /dev/sda3 to /dev/sdb3 in Linux
 ## You need to create the sdb2 partition with fdisk first. sdb2 should be of appropriate type and size ##
     ddrescue -f -n devsda2 devsdb2 logfile
     ddrescue -d -f -r3 devsda2 devsdb2 logfile
     e2fsck -v -f devsdb2
     mount -o ro devsdb2 mnt
## Rread rescued files from /mnt ##
     cd mnt
     ls -l
## Copy files using rsync ##
     rsync -avr . vivek@server1.cyberciti.biz:dataresucedwks01
|
Example: Rescue/recover a DVD-ROM in /dev/dvdom on a Linux
The syntax is:
     ddrescue -n -b2048 devdvdrom dvd-image logfile
     ddrescue -d -b2048 devdvdrom dvd-image logfile
|
Please note that if there are no errors (errsize is zero), dvd-image now contains a complete image of the DVD-ROM and you can write it to a blank DVD-ROM on a Linux based system:
Example: Resume failed rescue
In this example, while rescuing the whole drive /dev/sda to /dev/sdb, /dev/sda freezes up at position XYZFOOBAR (troubled sector # 7575757542):
## /dev/sda freezes here ## ddrescue -f devhda devhdb logfile ## So restart /dev/sda or reboot the server ## reboot ## Restart copy at a safe distance from the troubled sector # 7575757542 ## ddrescue -f -i 7575757542 devsda devsdb logfile ## Copy backwards down to the troubled sector # 7575757542 ## ddrescue -f -R devsda devsdb logfile |


