Что такое com.google.android.gms.persistent и почему он всегда использует процессор?
Содержание:
Исходный код
Это мой файл ProjectName / module / build.gradle:
Номер в моем манифесте отлично справляется. Вот мой файл ProjectName / module / src / main / AndroidManifest.xml:
Вот моя MainActivity, где я пытаюсь проверить, доступен ли GooglePlayServices:
Попробуйте это один раз и убедитесь, что вы не получаете никаких ошибок в структуре проекта, заявив, что «ComGoogleAndroidGmsPlay не добавлен»
Откройте « и проверьте все ниже. Если отображается ошибка, щелкните отмеченную красную лампу и нажмите «Добавить в зависимость».
Это ошибка в Android Studio и исправлена для следующей версии (0.4.3)
У меня была аналогичная проблема Не удалось разрешить com.google.android.gms.common.
Я выполнил руководство по настройке http://developer.android.com/google/play-services/setup.html, и он работает!
Резюме:
- Установленные / обновленные сервисы Google Play и Google репозиторий от SDK Manager
- Добавлена зависимость в build.gradle:
- Обновлен файл AndroidManifest.xml с
Я решил проблему, установив пакет услуг Google Play в sdk manager.
После этого создайте новое приложение и в build.gradle добавьте это
Как это
После нескольких часов работы с такой же проблемой обратите внимание, что если ваша банка находится в папке libs, это вызовет проблему, если вы установите ее на «Зависимости», поэтому я просто комментирую зависимости файлов и сохраняю их
зависимости
И проблема была решена.
Я просто попробовал свой и мне было очень хорошо, что я импортировал GMS, так что это не проблема.
Это было с и . Проверьте, установлены ли они еще раз
У меня та же проблема. Я просто пытался перестроить, очистить и перезапустить, но не повезло. Тогда я просто удаляю
От build.gradle и повторной синхронизации. После этого я положил его снова и повторно проверил. Рядом с этим я очищаю проект, и проблема ушла!
Надеюсь, это поможет любому из вас, стоящим перед тем же.
//gradle.properties
systemProp.http.proxyHost = http://www.somehost.org
systemProp.http.proxyPort = 8080
systemProp.http.proxyUser = идентификатор пользователя
systemProp.http.proxyPassword = пароль
systemProp.http.nonProxyHosts = * nonproxyrepos.com |. локальный
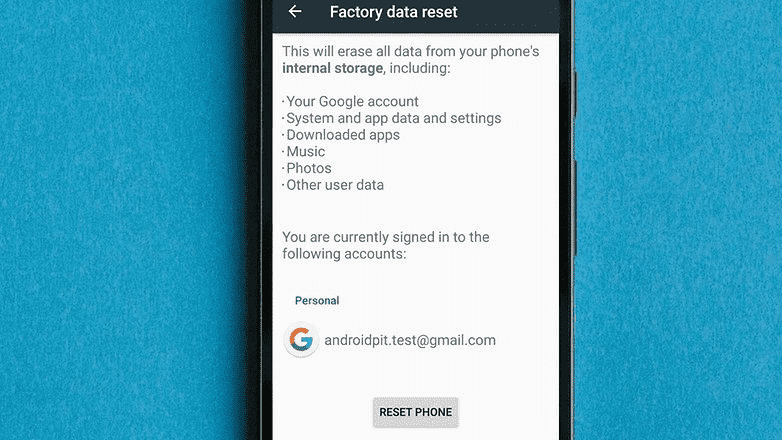
Выполните сброс настроек
Выполните сброс до заводских данных на вашем смартфоне
Если вы все еще сталкиваетесь с проблемами, попробовав все вышеперечисленное, у вас не осталось выбора, кроме как выполнить сброс настроек. Это радикальная мера, и есть последствия. Все ваши данные будут потеряны. Поэтому вы должны заранее.
Как только ваши данные будут сохранены, пришло время .
- Перейдите в Настройки
и нажмите «Восстановление и сброс».
- Теперь убедитесь, что включено Резервирование данных
. - Нажмите «Аккаунт для резервирования»,
чтобы выбрать, на какую учетную запись вы хотите сохранить свои данные. Убедитесь, что у вас есть доступ к этой учетной записи. - После этого перейдите в меню «Восстановление сброс»
и нажмите кнопку «Сброс настроек»
внизу.
Подтвердите, что вы хотите это сделать, и ваш телефон будет таким, каким он был, когда вы его купили. Ваши данные будут восстановлены при входе в аккаунт Google.
Периодическая отправка
По умолчанию Google Analytics SDK версии 4 для Android отправляет данные каждые 30 минут.
Вот как можно задать периодичность отправки программно:
// Set the dispatch period to 90 seconds.
GoogleAnalytics.getInstance(this).setLocalDispatchPeriod(90);
Задать периодичность отправки в XML-файле конфигурации можно следующим образом:
<integer name="ga_dispatchPeriod">30</integer>
При нулевом или отрицательном значении периодическая отправка будет отключена. Это значит, что при необходимости отправлять данные в Google Analytics придется .
// Disable periodic dispatch by setting dispatch period to a value less than 1.
GoogleAnalytics.getInstance(this).setLocalDispatchPeriod(0);
Если пользователь потеряет доступ к сети или выйдет из вашего приложения, пока обращения ожидают отправки, они сохранятся локально и будут переданы, когда ваше приложение снова будет работать.
Ошибки, связанные с com.google.android.gms
На многих телефонах с OS Android то и дело возникают различные накладки, связанные с работой программки GMS. Это два основных бага — процесс остановлен или произошла ошибка в com.google.android.gms.persistent.
Причины возникновения
нестабильной работы могут быть разные:
- ошибка синхронизации учетной записи Гугл на телефоне;
- нехватка системной памяти;
- криво установленные обновления;
- влияние вирусных программ и др.
Метод исправления
таких ошибок, в принципе, стандартный:
- Для начала проверьте, что бы память телефона не была забита;
- Далее перейдите в настройки — диспетчер приложений
. Во вкладке Все или Работающие отыщите запущенную службу com.google.android.gms
— очистите кэш и перезапустите её. Также процесс может быть прописан как Службы Google или MobileSyncService. - Отключите синхронизацию
учетной записи Гугл и снова авторизуйтесь; - Примените обновления
для Андроид приложений, в первую очередь: Сервисы Google Play, Плей Маркет. - Перезагрузите телефон и примените системную очистку от мусора на Андроиде.
Данные методы должны исправить проблему и настроить стабильную работу на Андроид телефоне.
Девайс…Многие из нас слышали это слово по телевизору, от друзей, знакомых, но не каждый понимает, что означает это слово. В интернете можно найти множество различных определений, но в основе всегда будет один смысл – самостоятельное устройство, не требующее дополнительных приспособлений для работы. Что к ним относится? Всем хорошо известный смартфон. Для его использования не нужны какие-то сложные механизмы, но для правильной работы требуются определенные приложения и функции. Одним из наиболее значимых приложений на Андроид смартфонах является процесс – com.google.android.gms
В алгоритме работы нашего телефона регулярно возникают баги, общесистемные ошибки приложений. Чаще всего юзеры сталкиваются с вопросом малоустойчивого функционирования именно этой службы.
Select an ad format
The Mobile Ads SDK is now imported and you’re ready to implement an ad.
AdMob offers a number of different ad formats, so
you can choose the one that best fits your app’s user experience.
Banner
Rectangular ads that appear at the top or bottom of the device screen.
Banner ads stay on screen while users are interacting with the app, and can
refresh automatically after a certain period of time. If you’re new to mobile
advertising, they’re a great place to start.
Interstitial
Full-screen ads that cover the interface of an app until closed by the user.
They’re best used at natural pauses in the flow of an app’s execution, such as
between levels of a game or just after a task is completed.
Native
Customizable ads that match the look and feel of your app. You decide how and
where they’re placed, so the layout is more consistent with your app’s design.
Rewarded
Ads that reward users for watching short videos and interacting with playable
ads and surveys. Good for monetizing free-to-play users.
|
Implement Rewarded Ads |
Implement Rewarded Ads (New APIs) |
Troubleshooting
Q: When building I get the following error message: «File
google-services.json is missing from module root folder. The Google Services
Plugin cannot function without it».
A: The Firebase console will help you
download the .
In addition, the Quickstart guides for most APIs have instructions for
generating this file.
Once you have downloaded the file, copy it
into the folder of your Android Studio project, or into the
folder if you are using multiple build types.
Q: I can’t find the symbol «R.string.gcm_defaultSenderId»,
«R.xml.global_tracker», etc.
A: Make sure the package name in your file matches the
package name you entered when creating the
file. If you are not sure, run through the getting started flow again and get
a new json file.
Adding the JSON File
The file is generally placed in the
directory (at the root of the Android Studio app module). As
of version the plugin supports build type and product flavor
specific JSON files. All of the following directory structures are valid:
// dogfood and release are build types.
app/
    google-services.json
    src/dogfood/google-services.json
    src/release/google-services.json
    ...
Note: Providing a google-services.json file in the release directory allows
you to maintain a separate Firebase project for your production APKs.
When product flavors are in use these more complicated directory structures are
also valid.
// free and paid are product flavors.
app/
    google-services.json
    src/dogfood/paid/google-services.json
    src/release/free/google-services.json
    ...
Edit your app’s manifest
The FCM SDK automatically adds all required permissions as well as the required
receiver funtionality. Make sure to remove the following obsolete (and
potentially harmful, as they may cause message duplication) elements from your
app’s manifest:
Remove from
<uses-permission android:name="android.permission.WAKE_LOCK" />
<permission android:name="<your-package-name>.permission.C2D_MESSAGE"
            android:protectionLevel="signature" />
<uses-permission android:name="<your-package-name>.permission.C2D_MESSAGE" />

...

<receiver
    android:name="com.google.android.gms.gcm.GcmReceiver"
    android:exported="true"
    android:permission="com.google.android.c2dm.permission.SEND" >
    <intent-filter>
        <action android:name="com.google.android.c2dm.intent.RECEIVE" />
        <category android:name="com.example.gcm" />
    </intent-filter>
</receiver>
Что я пробовал
Из настройки Google Play Services мне кажется, что мне просто нужно добавить зависимость от моего файла (и файлы проекта resync с помощью gradle), чтобы сделать SDK доступным К моему проекту. Я получаю «взорванный пакет» в , но это не похоже на трюк.
У меня теперь есть службы Google Play, репозиторий поддержки Android и Google Repository, установленные из диспетчера SDK. Я также удалил и переустановил их несколько раз
Редактировать:
Могу ли я вручную добавить google_play_services в качестве Project / Global Library? Я попытался добиться успеха.
Я пытаюсь проверить, что я разрабатываю API платформы с помощью служб Google (если это вообще возможно), но я не уверен, что это так. Ничто из меня ничего не меняет.
Внешние библиотеки моего проекта показывают:
- <Платформа Android API 19>
- <1.7>
- Joda время-2,3
- опорно-v4-13.0.0
Next steps and optional migration tasks
Depending on which GCM features your app uses, you may have additional
migration tasks to perform. Most apps are likely to need to migrate an
to work with FCM.
Usually required: migrate your
Perform this step if you need to access the device registration token
because:
- You send messages to specific devices
- You send messages to device groups
- You subscribe devices to topics with the .
Optional: migrate your
Perform this step if you need to handle incoming messages, such as when:
- Your app receives data-only messages
- your app receives while the application is in foreground
- Your app receives errors in case of upstream message failures.
Optional: update your usage of
Perform this step if:
If you need to subscribe new devices to topics. Devices already subscribed
to a topic prior to migration will continue to receive messages. For example,
a device subscribed to /topics/news in GCM will continue to receive messages
sent to /news after migration to FCM (note that the prefix «topics» is not
required in FCM).
Special case: Migrate GCM to an existing Firebase project
Perform this step if:
You already have an existing Firebase project into which you would like to
migrate a GCM app and its users. This situation requires additional tasks.
Import your GCM project as a Firebase project
The instructions in this section assume that you are adding Firebase to an
existing Google Cloud project for GCM.
If you already have an existing Firebase project into which you would like to
migrate a GCM app and its users, see
Migrate GCM to an existing Firebase project
for important alternative instructions.
-
In the Firebase console, select Add Project.
-
Select your GCM project from the list of existing Google Cloud projects, and select Add Firebase.
-
In the Firebase welcome screen, select Add Firebase to your Android App.
-
Provide your package name and SHA-1, and select Add App. A new file for your Firebase app is downloaded. Copy this into your project’s module folder, typically .
-
Select Continue and follow the detailed instructions for adding the Google Services plugin in Android Studio.
Произошла ошибка com.google.android.gms, как исправить?
Com.google.android.gms – это фоновый процесс, парирующий за работу Google Mobile Services (GMS). Платформа GMS – это приложение от Гугл, которое реализует дополнительные возможности на агрегатах Android, отвечает за фоновую эксплуатацию последующих сфер – Google Play, Play Market, Gmail, Chrome, Гугл Bookmarks, Гугл Cloud Print и др. Они выполняют очень ценную миссию. Две основные погрешности, связанные с работой программы GMS – процесс приостановлен или возникновение ошибка в приложении com.google.android.gms.
Поводом может служить: вирусы, неправильно установленные приложения, мало памяти, сбой синхронизации учетной записи в Гугл. Исправить их достаточно просто и не требуют особых знаний в области программирования. Независимо от того используют ли последнюю модель Самсунг или поддержанный старый телефон, проблема может произойти с любым оборудованием.
Решение стандартно. Во-первых, нужно проверить память на мобильном телефоне и ее количество, ее должно быть достаточно, во-вторых, зайти в диспетчер задач, во вкладке работающие приложения найти службу com google андроид gms и нажать очистить кэш. Если это не поможет, в этом же меню удалить данные. Их удаление может повлиять на работу приложения. Следующим действием должно быть отключение Гугл синхронизации и повторная авторизация в учетной записи. Затем запустить обновления для сервисов: Google Play в Play Маркете. Завершающий этап – перезапустить телефон и очистить его от мусора при помощи специальной программы.
Эта статья предназначена для тех, кто получил одну из следующих ошибок: «К сожалению, процесс com.google.process.gapps остановлен» и «com.google.process.gapps неожиданно остановился». Они относятся к одной и той же проблеме, и на самом деле ее легко разрешить, поэтому не паникуйте. Ниже мы покажем вам, как это исправить.
Некоторые устройства предыдущих поколений, такие как Samsung Galaxy S6 или HTC One M8, могут быть особенно подвержены этой ошибке, но, тем не менее, проблема может случиться с кем угодно, и решения одинаковы. Итак, сделайте глубокий вдох и внимательно следуйте нашим инструкциям, чтобы снова начать работать.
Processing the JSON File
The file has the following basic structure:
{
  "project_info": {...},
  "client": ,
}
The object contains general information about your
project, while each member of the array contains information
about the clients (Android apps) that you have added to the project.
When processing the JSON file for your Android app, the plugin only uses the
object that matches your package name (for the current build
type) based on the following logic:
- For each member of the array:
- Check the value of
- If the package name matches this value, return the member object.
- If none of the members of match the package name, an exception is thrown.
For the rest of this document we will use to refer to
the member of the array determined by the procedure above.
The main result of the JSON processing is to produce two XML files which you
can reference as Android resources in your Java code. Below is an example of
each file:
app/build/generated/res/google-services/{build_type}/values/values.xml
<?xml version="1.0" encoding="utf-8"?>
<resources>

    <! -- Present in all applications -->
    <string name="google_app_id" translatable="false">1:1035469437089:android:73a4fb8297b2cd4f</string>

    <! -- Present in applications with the appropriate services configured -->
    <string name="gcm_defaultSenderId" translatable="false">1035469437089</string>
    <string name="default_web_client_id" translatable="false">337894902146-e4uksm38sne0bqrj6uvkbo4oiu4hvigl.apps.googleusercontent.com</string>
    <string name="ga_trackingId" translatable="false">UA-65557217-3</string>
    <string name="firebase_database_url" translatable="false">https://example-url.firebaseio.com</string>
    <string name="google_api_key" translatable="false">AIzbSyCILMsOuUKwN3qhtxrPq7FFemDJUAXTyZ8</string>
    <string name="google_crash_reporting_api_key" translatable="false">AIzbSyCILMsOuUKwN3qhtxrPq7FFemDJUAXTyZ8</string>
    <string name="project_id" translatable="false">mydemoapp</string>

</resources>
app/build/generated/res/google-services/{flavor}/{build_type}/xml/global_tracker.xml
<?xml version="1.0" encoding="utf-8"?>
<resources>
    <string name="ga_trackingId" translatable="false">UA-65557218-3</string>
</resources>
Every value in the XML files is present in the
file at the locations below. If your Android project has some configuration
that prevents you from using the plugin, you can
safely recreate the XML files manually using these values:
google_app_id:
{YOUR_CLIENT}/client_info/mobilesdk_app_id
gcm_defaultSenderId:
project_info/project_number
default_web_client_id:
{YOUR_CLIENT}/oauth_client/client_id (client_type == 3)
ga_trackingId:
{YOUR_CLIENT}/services/analytics-service/analytics_property/tracking_id
firebase_database_url:
project_info/firebase_url
google_api_key:
{YOUR_CLIENT}/api_key/current_key
google_crash_reporting_api_key:
{YOUR_CLIENT}/api_key/current_key
project_id:
project_info/project_id
Observe following message from Android:
In project ‘app’ a resolved Google Play services library dependency depends on another at an exact version (e.g. «», but isn’t being resolved to that version. Behavior exhibited by the library will be unknown.
Dependency failing: com.google.android.gms:play-services-flags:15.0.1 -> com.google.android.gms:play-services-basement@, but play-services-basement version was 17.0.0.
The following dependencies are project dependencies that are direct or have transitive dependencies that lead to the art
ifact with the issue.
— Project ‘app’ depends on project ‘firebase_auth’ which depends onto com.google.firebase:firebase-auth@16.0.2
— Project ‘app’ depends onto com.google.firebase:firebase-auth-interop@{strictly 16.0.0}
— Project ‘app’ depends onto com.google.firebase:firebase-auth@{strictly 16.0.2}
— Project ‘app’ depends on project ‘cloud_firestore’ which depends onto com.google.firebase:firebase-firestore@[11.6.0,
12.0[
— Project ‘app’ depends on project ‘cloud_firestore’ which depends onto com.google.firebase:firebase-core@[11.6.0,12.0[
— Project ‘app’ depends onto com.google.android.gms:play-services-measurement-sdk@{strictly 17.0.0}
— Project ‘app’ depends onto com.google.firebase:firebase-database-collection@{strictly 16.0.0}
— Project ‘app’ depends onto com.google.android.gms:play-services-measurement@{strictly 17.0.0}
— Project ‘app’ depends on project ‘firebase_core’ which depends onto com.google.firebase:firebase-core@16.0.4
— Project ‘app’ depends on project ‘firebase_database’ which depends onto com.google.firebase:firebase-database@16.0.3
— Project ‘app’ depends onto com.google.firebase:firebase-core@17.0.0
— Project ‘app’ depends onto com.google.firebase:firebase-firestore@{strictly 11.8.0}
— Project ‘app’ depends onto com.google.android.gms:play-services-base@{strictly 17.0.0}
— Project ‘app’ depends onto com.google.firebase:firebase-common@{strictly 18.0.0}
— Project ‘app’ depends onto com.google.firebase:firebase-storage-common@{strictly 15.0.2}
— Project ‘app’ depends onto com.google.firebase:firebase-analytics@{strictly 17.0.0}
— Project ‘app’ depends onto com.google.android.gms:play-services-ads-identifier@{strictly 17.0.0}
— Project ‘app’ depends onto com.google.android.gms:play-services-measurement-base@{strictly 17.0.0}
— Project ‘app’ depends onto com.google.firebase:firebase-core@{strictly 17.0.0}
— Project ‘app’ depends onto com.google.android.gms:play-services-measurement-sdk-api@{strictly 17.0.0}
— Project ‘app’ depends onto com.google.android.gms:play-services-measurement-api@{strictly 17.0.0}
— Project ‘app’ depends onto com.google.android.gms:play-services-tasks@{strictly 17.0.0}
— Project ‘app’ depends onto com.google.firebase:firebase-iid-interop@{strictly 17.0.0}
— Project ‘app’ depends onto com.google.firebase:firebase-iid@{strictly 19.0.0}
— Project ‘app’ depends onto com.google.firebase:firebase-database@{strictly 16.0.3}
— Project ‘app’ depends onto com.google.android.gms:play-services-basement@{strictly 17.0.0}
— Project ‘app’ depends onto com.google.firebase:firebase-storage@{strictly 15.0.2}
— Project ‘app’ depends onto com.google.android.gms:play-services-stats@{strictly 17.0.0}
— Project ‘app’ depends on project ‘firebase_storage’ which depends onto com.google.firebase:firebase-storage@15.+
— Project ‘app’ depends on project ‘firebase_analytics’ which depends onto com.google.firebase:firebase-analytics@16.0.
4
— Project ‘app’ depends onto com.google.android.gms:play-services-measurement-impl@{strictly 17.0.0}
— Project ‘app’ depends onto com.google.firebase:firebase-measurement-connector@{strictly 18.0.0}
— Project ‘app’ depends onto com.google.android.gms:play-services-flags@{strictly 15.0.1}
For extended debugging info execute Gradle from the command line with ./gradlew —info :app:assembleDebug to see the dep
endency paths to the artifact. This error message came from the google-services Gradle plugin, report issues at https://
github.com/google/play-services-plugins and disable by adding «googleServices { disableVersionCheck = false }» to your b
uild.gradle file.
##########################
- Stack Overflow answers do not solve the issue
- Observe gradle failures after creating a new flutter project that uses Firebase
- Have the json file installed and followed steps to use firebase
############################
Отправка в фоновом режиме
Чтобы включить отправку данных в фоновом режиме в приложениях для устройств без поддержки Google Play, выполните следующие действия в файле конфигурации :
- Получите разрешение .
- Зарегистрируйте класс .
- Зарегистрируйте класс .
Пример:
<manifest>
  <!-- ... -->

  <!-- Get permission for reliable local dispatching on non-Google Play devices. -->
  <uses-permission android:name="android.permission.WAKE_LOCK" />

  <application name="com.example.MyApp">
    <!-- Register AnalyticsReceiver and AnalyticsService to support background
         dispatching on non-Google Play devices. -->
    <receiver android:name="com.google.android.gms.analytics.AnalyticsReceiver"
      android:enabled="true">
      <intent-filter>
        <action android:name="com.google.android.gms.analytics.ANALYTICS_DISPATCH" />
      </intent-filter>
    </receiver>
    <service android:name="com.google.android.gms.analytics.AnalyticsService"
      android:enabled="true"
      android:exported="false"/>

    <!-- ... -->
  </application>
</manifest>
Import the Mobile Ads SDK
Apps can import the Google Mobile Ads SDK with a Gradle
dependency that points to
Google’s Maven repository. First, make sure
that is referenced in the section of your
project-level file.
Example project-level build.gradle (excerpt)
allprojects {
    repositories {
        google()
    }
}
Next, open the app-level file for your app, and look for
a «dependencies» section.
Example app-level build.gradle (excerpt)
dependencies {
    implementation fileTree(dir: 'libs', include: )
    implementation 'androidx.appcompat:appcompat:1.0.2'
    implementation 'com.google.android.gms:play-services-ads:19.3.0'
}
Add the line in bold above, which instruct Gradle to pull in the latest
version of the Mobile Ads SDK and additional related dependencies. Once that’s
done, save the file and perform a Gradle sync.
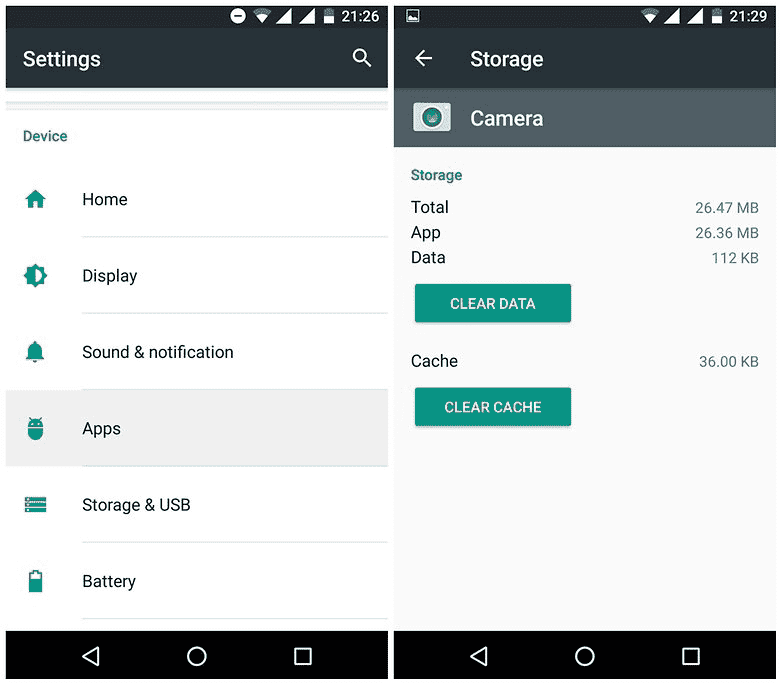
Очистите кеш для рассматриваемого приложения.
Если вы заметили, что сообщение об ошибке появляется при попытке запустить конкретное приложение, то, скорее всего, это приложение является причиной проблемы.
Откройте « Настройки» > «Приложения»
и найдите соответствующее приложение.
Нажмите на приложение, а затем нажмите «Храненилище»
и на следующей странице нажмите «Очистить кеш»
.
Если это все равно не поможет, вы также можете очистить данные приложения. Это означает, что вы потеряете прогресс игры или историю чата и т. д., поэтому сначала вы можете создать .
Вы увидите кнопку Стереть данные
над Очистить кеш
(см. Рисунок ниже, справа).
Если ни одно из решений не окажется полезным, следующий шаг — попробовать удалить приложение (что можно сделать с той же страницы, где очистка кеша и данных), и переустановить его.