User documentation
Содержание:
- Notes
- Неверно указаны пути к компонентам
- Linux
- Build Code::Blocks
- Description
- Возможные ошибки
- Как писать программы не для консоли?
- Антивирус блокирует запись программы на диск
- 11. Windows блокирует работу CodeBlocks
- 12. Отладчик не останавливается на точке останова
- 13. Неверное указание пути к компилятору
- 14. Программа на GTK+ работает только в среде CodeBlocks
- Core Plugins
- Почему CodeBlocks самая скачиваемая IDE в мире?
- Build wxWidgets Support Library
- Editor
- Modifying build options
- General
- The project wizard
- Changing file composition
- Дополнительные настройки Code::Blocks
- Introduction and other things
- Mac OS X
- Выберите стиль отступов
Notes
As the Tools+ plugin is not yet complete, some functionality — specifically Menu Priority and Environment Variables — are not available.
If the Tools Output window is open when Code::Blocks is closed, it may trigger Code::Blocks to crash.
Open file browser to selected file
Windows Explorer
- (Tools Menu)
- (Context Menu)
Dolphin
- (Tools Menu)
- (Context Menu)
Note: the following three commands Context Menu only support folders (but not files). If you know how to script a conversion to cause or to return the parent directory, please add it here.
Nautilus
- (Tools Menu)
- (Context Menu)
Thunar
- (Tools Menu)
- (Context Menu)
PCMan File Manager
- (Tools Menu)
- (Context Menu)
Windows
- (Tools Menu)
- (Context Menu and Tools Menu)
Linux
- (Tools Menu)
- (Context Menu and Tools Menu)
Windows
- (Tools Menu)
Linux
- (Tools Menu)
Неверно указаны пути к компонентам
Эта ошибка может возникать, когда вы все скачали и установили, но неверно прописали пути. Поэтому CodeBlocks не может эти компоненты найти.
В случае с компилятором вопрос решается просто. Удалите настройки и запустите CodeBlocks. При первом запуске CodeBlocks просканирует ваш диск на наличие компилятора и выдает список всех найденных компиляторов.
Вам остается только сделать выбор и можно работать.
Но для других компонентов это не так, поэтому нужно проверить, что все они прописаны. Для этого зайдите в меню «Настройки — Compiler… — Программы»
Убедитесь, что все компоненты присутствуют на вашем компьютере.
Решение: Нужные программы должны быть или в папке «bin» каталога установки компилятора, или укажите дополнительные пути для их вызова.
Linux
At the time of this writing, Code::Blocks supports the following compilers in Linux:
Digital Mars D Compiler for Linux
Now Digital Mars D Compiler (DMD) supports 32bit and 64bit Linux, and ‘support Linux library’ is under construction. If you want to build D program in CodeBlocks on 32bit and 64bit Linux, please following the instructions as bellow.
1). Install DMD(2.0) into your Linux system.
2). Settings in CodeBlocks.
A). 32bit Linux & 32bit DMD2.
On 32bit Linux, you should combine 32bit DMD2 from DMD2 source and install it into your system.
You should add correct DMD pathes into CodeBlocks Global compiler settings.
   A.1). "Settings -> Compiler and debugger settings" and choose compiler to "Digital Mars D Compiler";
   A.2). click "Compiler settings -> Other options", add  -m32  into the field.
   A.3). click "Linker settings", and add "/opt/dmd2/linux/lib32/libphobos2.a" into the "Link libraries".
   A.4). click "Search directories -> Compiler", and add "/opt/dmd2/src/phobos" into the field.
   A.5). click "Search directories -> Linker", and add "/opt/dmd2/linux/lib32" into the field.
   A.6). click "Toolchain executables", add "/opt/dmd2/linux" into the "Compiler's installation directory" filed.
   A.7). change the value of "Program Files -> Linker for dynamic libs" to "gcc -m32 -lrt" or "gcc -lrt".
If you installed DMD2 to a different path, please modify «/opt/dmd2» to your own DMD2 path.
B1). 64bit Linux & 64bit DMD2.
On 64bit Linux, you can combine 64bit DMD2 from DMD2 source and install it into your system.
You should add correct DMD paths into CodeBlocks Global compiler settings.
   B1.1). "Settings -> Compiler and debugger settings" and choose compiler to "Digital Mars D Compiler";
   B1.2). click "Compiler settings -> Other options", add  -m64  into the field.
   B1.3). click "Linker settings", and add "/opt/dmd2/linux/lib64/libphobos2.a" into the "Link libraries".
   B1.4). click "Search directories -> Compiler", and add "/opt/dmd2/src/phobos" into the field.
   B1.5). click "Search directories -> Linker", and add "/opt/dmd2/linux/lib64" into the field.
   B1.6). click "Toolchain executables", add "/opt/dmd2/linux" into the "Compiler's installation directory" filed.
   B1.7). change the value of "Program Files -> Linker for dynamic libs" to "gcc -m64 -lrt" or "gcc -lrt".
If you installed DMD2 to a different path, please modify «/opt/dmd2» to your own DMD2 path.
B2). 64bit Linux with 32bit DMD2.
On 64bit Linux, you can combine 32bit DMD2 with 64bit together from DMD2 source and install them into your system.
You should add correct DMD paths into CodeBlocks Global compiler settings.
   B2.1). "Settings -> Compiler and debugger settings" and choose compiler to "Digital Mars D Compiler";
   B2.2). click "Compiler settings -> Other options", add -m32 into the field.
   B2.3). click "Linker settings", and add "/opt/dmd2/linux/lib32/libphobos2.a" into the "Link libraries".
   B2.4). click "Search directories -> Compiler", and add "/opt/dmd2/src/phobos" into the field.
   B2.5). click "Search directories -> Linker", and add "/opt/dmd2/linux/lib32" into the field.
   B2.6). click "Toolchain executables", add "/opt/dmd2/linux" into the "Compiler's installation directory" filed.
   B2.7). change the value of "Program Files -> Linker for dynamic libs" to "gcc -m32 -lrt".
If you installed DMD2 to a different path, please modify «/opt/dmd2» to your own DMD2 path.
3). Testing D program in CodeBlocks.
In CodeBlocks, produce a D Application project, and input your own D code into the .d file in the project, then build/run.
Downloading the GNU GCC compiler & GDB debugger
Under Linux you’ll, most probably, already have everything that is needed in order to compile. All major Linux distributions (RedHat, Debian, SuSE, Mandriva, Gentoo, ArchLinux, etc) come with GCC & GDB preinstalled. To make sure you have have gcc installed, go to your terminal and type ‘gcc -v’. In case you have GCC installed, you will get GCC’s compile options and version number.
Build Code::Blocks
Self-Hosting
All the preparation work is now complete and we can actually perform a self-hosting compile of the next Code::Blocks with our current one. If you do not make any changes to your non-Code::Blocks prepared items, like your MinGW compiler version, and the wxWidgets library, then when building subsequent SVN versions of Code::Blocks you can keep all the preparation from a previous build and start with this section. When restarting from this point you can refresh your current Code::Blocks local source with TortoiseSVN. Right-click on your local source directory, go to «TortoiseSVN» in the context-menu, then choose «update to revision.» The «head» is always the latest version. If you are using a command-line SVN, just run svn update in the root of your local source directory.
Open project
Open the project file CodeBlocks.cbp.
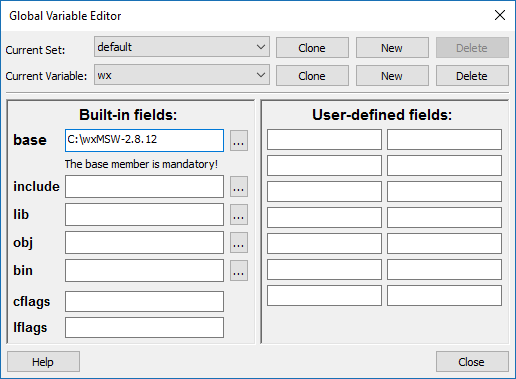
You will be prompted to define the global variable $(#wx). In the base field, enter the root of the location where you unpacked wxWidgets.
You will also be prompted to enter the global variable cb_release_type. Here you can add compiler optimization or debug-flags. Enter -g in the base field as a default or any other options you require for your specific needs.
Prevent unnecessary warnings
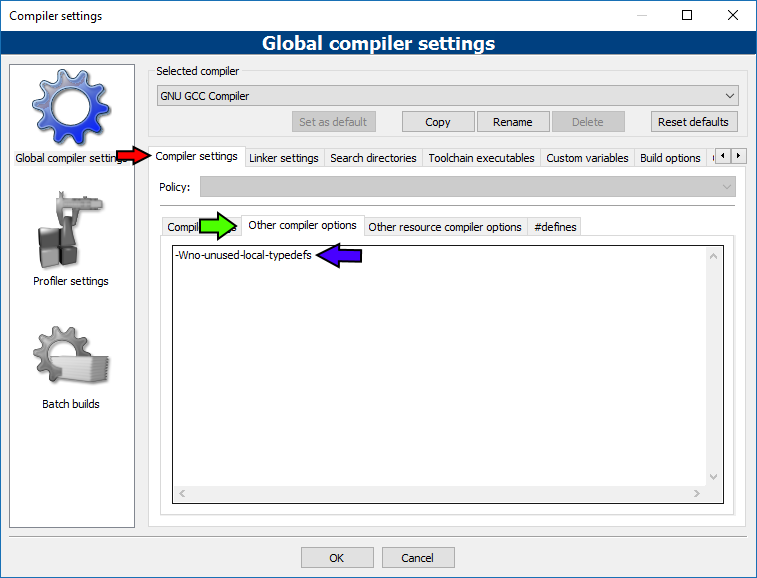
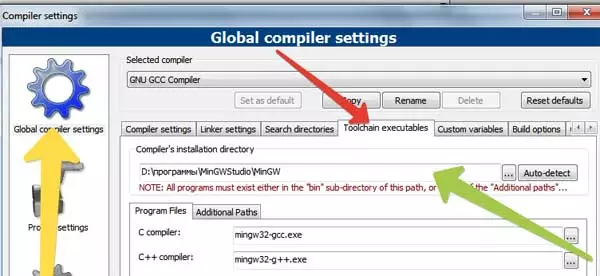
Building Code::Blocks against the wxWidgets library will generate an excessive amount of warnings during the compilation. This can significantly impact the time it takes to compile both the main project and the contributors workspace as each warning has to be printed to the build log. To silence these warnings, go to Compiler Settings:
And under the «Compiler settings» tab (red arrow), «Other compiler options» sub-tab (green arrow), enter «-Wno-unused-local-typedefs» (blue arrow), and you may also add «-Wno-deprecated-declarations» on its own line here too.
Compile project
Make sure that «All» is selected as the target (blue arrow), and then click the Build icon (red arrow).
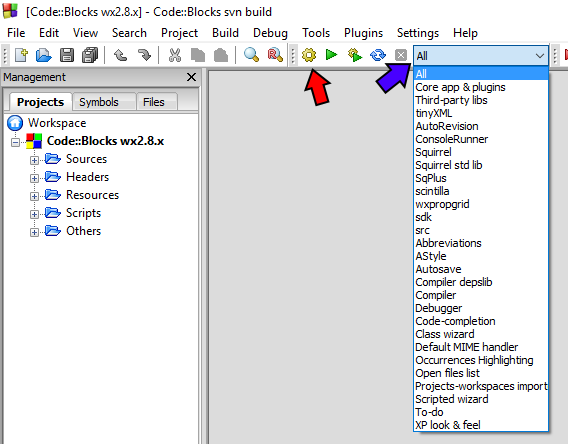
If everything builds correctly your build messages should end with no errors.

Copy wxWidgets support DLL
After the compilation has finished, copy lib\gcc_dll\wxmsw28u_gcc_custom.dll from the wxWidgets directory to the devel directory in the Code::Blocks src directory.
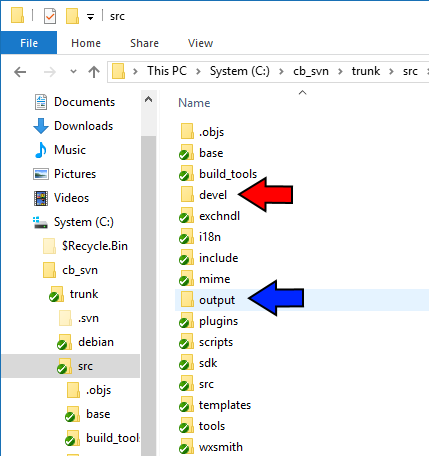
The devel directory is created by compiling the Code::Blocks project in Code::Blocks.
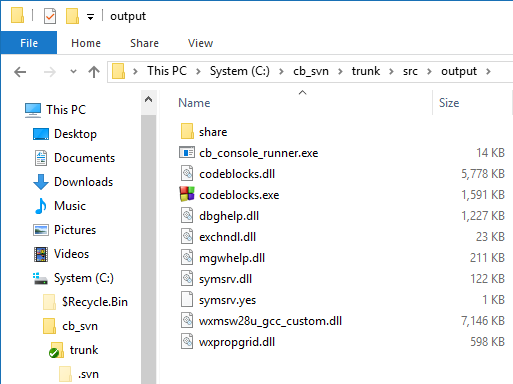
Generate Production Output
Run update.bat (located in the src directory). This will pack the resource files and copy the executables, libraries, and plugins to the output directory. It will also create the output directory if it does not exist.
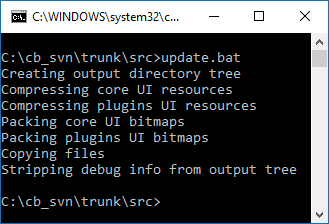
The stripped («production») executable is found in output directory together with all libraries and data files. If you want a version with debug symbols instead (caution: huge size!), use the one found in the devel directory.
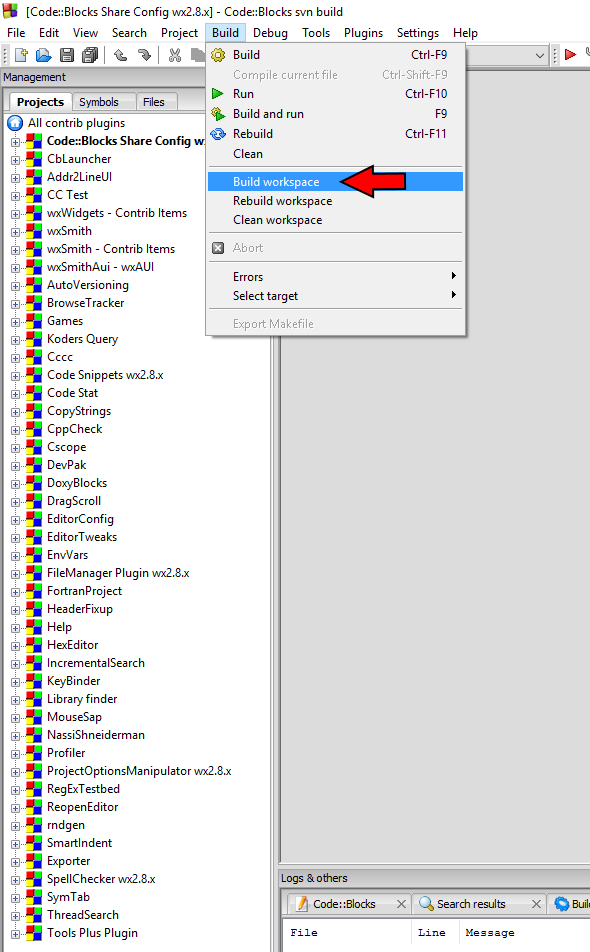
Compile contributed (or your own) plugins
The workspace file ContribPlugins.workspace contains the project files for all contributed plugins. Open that workspace and compile the plugins which you would like to use (or select «Build workspace» from the Build menu if you want them all).
Don’t forget to run update.bat again after building the contributed plugins.
Description
Code Blocks is an open source, free, C, C++ and Fortran IDE cross-platform that provides a ton of options. It is a no-cost C++IDE created with for users who have high demands.
Those behind this free software program designed it for extensive user customization and maximum flexibility. Centered on a plug-in style framework, the software is capable of being extended in the user’s preferred manner. There is even a built-in plug-in wizard that empowers users to build their unique plug-ins.
IMPORTANT: We currently do not list Code::Blocks Linux versions, but you can find all of them on projects homepage here.
Возможные ошибки
Довольно распространенной проблемой является отсутствия компилятора по указанному пути в настройках Code::Blocks. У этой проблемы есть две причины:
- Либо вы установили пакет без MinGW. Соответственно вернитесь вверх и проверьте правильность выполненных шагов.
- Возможно, автоматические прописанный путь к компилятору является неверным. Тогда укажите путь к компилятору самостоятельно (он должен быт в директории установленного Code::Blocks, которую вы указывали при установке): Settings -> Compiler -> Global compiler settings -> Toolchain executables:
Если это не решило проблему, то пишите в комментарии свою проблему (также дополняйте сообщения скриншотами ошибок) и мы обязательно поможем ее решить.
Ну а на этом все! Удачи!
7 апреля 2015
Софт, Софт
Как писать программы не для консоли?
По умолчанию весь вывод программы на Си идет в консоль. Консоль — это специальное окно для вывода системных сообщений.

Если вы хотите создавать оконный интерфейс, то нужно использовать некоторую оконную библиотеку.
Самое простое — это использовать Win32API. Или использовать кросс-платформенную библиотеку GTK+.
В этом случае оконо консоли вам будет не нужно и надо его отключить. Для этого щелкните правой кнопкой мыши на проекте и в меню выберите свойства:
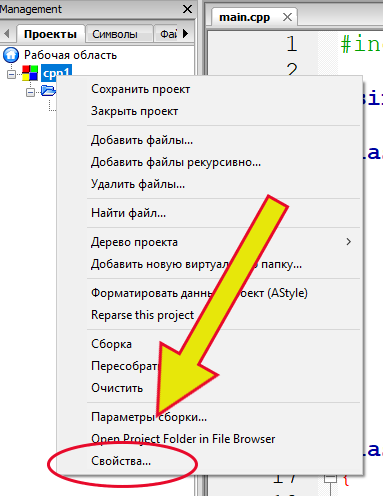
Затем выберите вкладку «Цели сборки» и в списке «тип» вместо «Консольное приложение» выберите «Приложение с графическим интерфейсом».
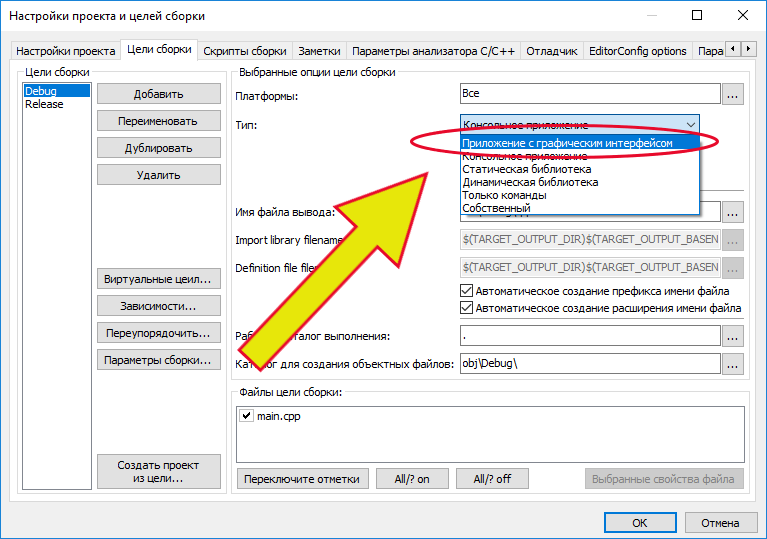
Нажмите «ok» для сохранения. После этого внесите любое исправление в программе (вставьте пустую строку) и нажмите F9. Консоль исчезнет.
Антивирус блокирует запись программы на диск
Вы получаете следующее сообщение: «Permission denied».
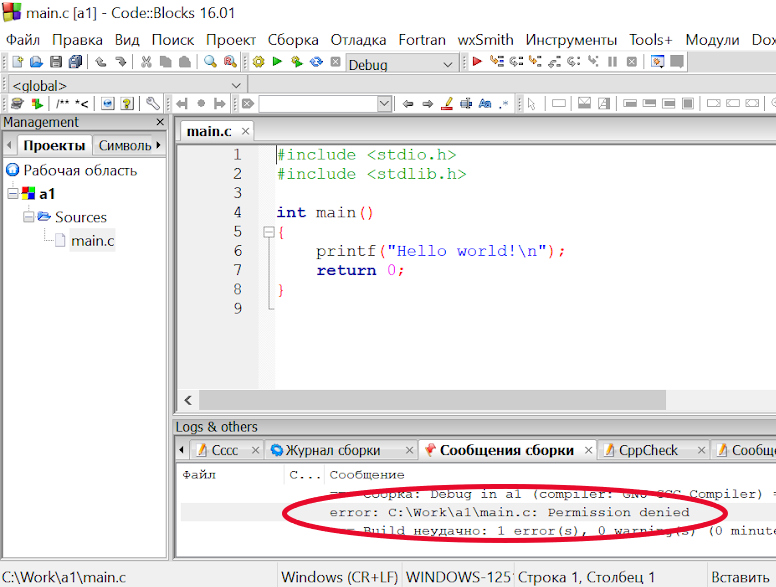
Решение: Отключите антивирус.
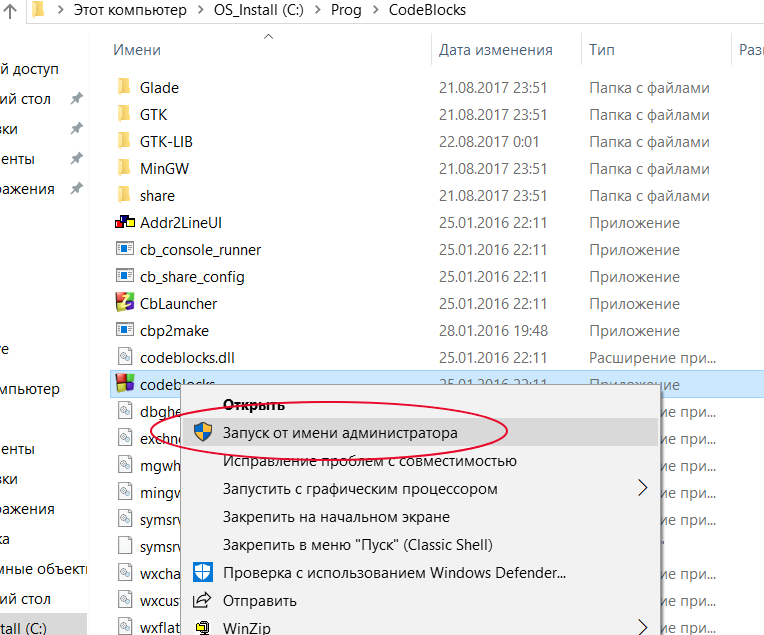
11. Windows блокирует работу CodeBlocks
Бывает так, что на одном компьютере CodeBlocks прекрасно работает, а при копировании на другой компьютер возникают ошибки. Это может быть следствием того, что Windows блокирует некоторые возможности программы.
Решение. Запустите CodeBlocks от имени администратора
Для этого нажмите правую кнопку мыши на файле codeblocks.exe
12. Отладчик не останавливается на точке останова
Вы поставили точку останова, но отладчик ее игнорирует. Это следствие ошибки №4. У вас символы кириллицы или пробелы в пути к программе.
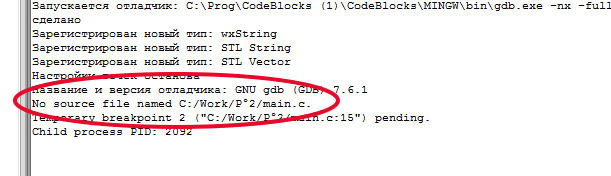
Решение: Создавайте проекты в папке «c:\Work» или в любой другой папке, в пути к которой нет пробелов или кириллицы.
13. Неверное указание пути к компилятору
При запуске CodeBlocks появляется ошибка: «Can’t find compiler executable in your in your configured search path’s for GNU GCC COMPILER»

Это означает, что в настройках неверное указание пути к компилятору. Для исправления зайдите в меню «Настройки — Compiler… — Программы» и нажмите кнопку «Автоопределение».

Если CodeBlocks обнаружит компилятор, то можно работать. Если нет, то переустановите «Си-экспресс».
14. Программа на GTK+ работает только в среде CodeBlocks
Если запускать GTK-программу в среде Code::Blocks, то все работает, а если запустить exe-файл отдельно, то окна не появляются. Это означает, что программа не может найти GTK-библиотеки.
Они есть в сборке «Си-экспресс» в папке GTK-LIB. Их нужно скопировать в папку с программой. Для разработки в папку Debug, а для релиза в папку Release.

Core Plugins
The core plugins are installed by default and offer the basic functions of Code::Blocks. The core plugins are maintained / developed by the official development team.
- Code::Blocks AutoComplete plugin.
- Saves project files between intervals.
- Provides wizard for creating new classes.
- Provides code completion functionality and class browser.
- Provides support for various compilers in one interface.
- Provides support for various debuggers in one interface.
- Adds extra file extension handlers.
Header Guard (Disabled by default.)
- Create header guards (if needed) on file save.
LogHacker (Disabled by default.)
- Manipulate loggers.
ModPoller (Disabled by default.)
- Frequently check for external modification.
- Manages a list of all opened files (editors).
- Imports projects from other IDE’s, e.g. MS Visual Studio and DevC++.
- Provides scripted wizard functionality.
Source Code Formatter (AStyle)
- Formats source code files with specific style.
Tidycmt (Disabled by default.)
- Formats comments on file save.
- Adds to-do items to source code.
- Creates manifest file which enables the version 6.0 of the Common Controls on Windows XP.
Почему CodeBlocks самая скачиваемая IDE в мире?
Один из самых больших в мире веб-сайтов для разработчиков открытого ПО — это сайт SourceForge.net. На этом сервисе размещено более 430 000 проектов. В день загружается более 4,5 миллионов программ.
Если посмотреть статистику по скачиванию IDE, то на первом месте стоит Code::Blocks.

Почему же IDE CodeBlocks такая популярная? Ответ прост — это среда, которая делается программистами для программистов. Она содержит такое количество настроек, что каждый может с легкостью настроить ее под себя. А количество возможностей просто зашкаливает:
В результате CodeBlocks имеет высокий рейтинг.

Build wxWidgets Support Library
Configure Build Options
Unpack the wxWidgets zip file to a directory of your choice, open a command-line prompt, and navigate to the directory build/msw inside the wxWidgets directory. In this directory there is a text file named config.gcc which you can edit with notepad to control the build options. There are two lines to note, CFLAGS ?= and CXXFLAGS ?=. The options given here will go in either or both of those lines.
If your linker runs out of memory while building use:
-fno-keep-inline-dllexport
-D_WIN32_IE=0x0603
To silence warnings that can significantly slow down the compilation process:
-Wno-unused-local-typedefs
and
-Wno-deprecated-declarations
All of these options apply to both CFLAGS and CXXFLAGS so the two lines containing all the options would look like this:
CFLAGS ?= -fno-keep-inline-dllexport -D_WIN32_IE=0x0603 -Wno-unused-local-typedefs -Wno-deprecated-declarations
CXXFLAGS ?= -fno-keep-inline-dllexport -D_WIN32_IE=0x0603 -Wno-unused-local-typedefs -Wno-deprecated-declarations
wxWidgets 2.8.12 will not compile by default with a 64-bit compiler. To make it compile with one add CFG=64 to the build line that is given next. This would be useful for your own 64-bit programs but the Code::Blocks project files do not have a 64-bit project that targets wxWidgets 2.8.12. To attempt to modify them so they do is beyond the scope of this guide.
Build wxWidgets Library
At a command-line, inside the build/msw directory, use the following commands to build wxWidgets:
mingw32-make -f makefile.gcc SHARED=1 MONOLITHIC=1 BUILD=release UNICODE=1  clean
mingw32-make -f makefile.gcc SHARED=1 MONOLITHIC=1 BUILD=release UNICODE=1
If your compiler toolchain is not in your PATH, it should be on a development machine, then put it in your path first:
set PATH=X:\path\to\toolchain\bin;%PATH%
Where «X» is the drive letter, and «\path\to\toolchain\bin» is where your toolchain is located.
If your compilation fails for any reason then make sure to run the clean line before trying again.
Editor
| Function | Shortcut Key |
|---|---|
| Undo last action | Ctrl + Z |
| Redo last action | Ctrl + Shift + Z |
| Cut selected text | Ctrl + X |
| Copy selected text | Ctrl + C |
| Paste text from clipboard | Ctrl + V |
| Select all text | Ctrl + A |
| Swap header / source | F11 |
| Comment highlighted code | Ctrl + Shift + C |
| Uncomment highlighted code | Ctrl + Shift + X |
| Duplicate line caret is on | Ctrl + D |
| Auto-complete / Abbreviations | Ctrl + Space / Ctrl + J |
| Show call tip | Ctrl + Shift + Space |
| Swap line caret is on with line above it | Ctrl + T |
| Toggle bookmark | Ctrl + B |
| Goto previous bookmark | Alt + PgUp |
| Goto next bookmark | Alt + PgDown |
| Toggle current block folding | F12 |
| Toggle all folds | Shift + F12 |
This is a list of shortcuts provided by the Code::Blocks’ editor component. These shortcuts cannot be rebound.
| Function | Shortcut Key |
|---|---|
| Magnify text size. | Ctrl + Keypad «+» |
| Reduce text size. | Ctrl + Keypad «-» |
| Restore text size to normal. | Ctrl + Keypad «/» |
| Cycle through recent files. | Ctrl + Tab |
| Indent block. | Tab |
| Dedent block. | Shift + Tab |
| Delete to start of word. | Ctrl + BackSpace |
| Delete to end of word. | Ctrl + Delete |
| Delete to start of line. | Ctrl + Shift + BackSpace |
| Delete to end of line. | Ctrl + Shift + Delete |
| Go to start of document. | Ctrl + Home |
| Extend selection to start of document. | Ctrl + Shift + Home |
| Go to start of display line. | Alt + Home |
| Extend selection to start of display line. | Alt + Shift + Home |
| Go to end of document. | Ctrl + End |
| Extend selection to end of document. | Ctrl + Shift + End |
| Go to end of display line. | Alt + End |
| Extend selection to end of display line. | Alt + Shift + End |
| Expand or contract a fold point. | Ctrl + Keypad «*» |
| Create or delete a bookmark. | Ctrl + F2 |
| Go to next bookmark. | F2 |
| Select to next bookmark. | Alt + F2 |
| Find selection. | Ctrl + F3 |
| Find selection backwards. | Ctrl + Shift + F3 |
| Scroll up. | Ctrl + Up |
| Scroll down. | Ctrl + Down |
| Line cut. | Ctrl + L |
| Line copy. | Ctrl + Shift + T |
| Line delete. | Ctrl + Shift + L |
| Line transpose with previous. | Ctrl + T |
| Line duplicate. | Ctrl + D |
| Find matching preprocessor conditional, skipping nested ones. | Ctrl + K |
| Select to matching preprocessor conditional. | Ctrl + Shift + K |
| Find matching preprocessor conditional backwards, skipping nested ones. | Ctrl + J |
| Select to matching preprocessor conditional backwards. | Ctrl + Shift + J |
| Previous paragraph. Shift extends selection. | Ctrl + [ |
| Next paragraph. Shift extends selection. | Ctrl + ] |
| Previous word. Shift extends selection. | Ctrl + Left |
| Next word. Shift extends selection. | Ctrl + Right |
| Previous word part. Shift extends selection. | Ctrl + / |
| Next word part. Shift extends selection. | Ctrl + \ |
Modifying build options
Build targets have come up several times so far. Changing between the two default generated ones — Debug and Release — can simply be done through the drop-down list on the Compiler Toolbar. Each of these targets has the ability to be a different type (for example: static library; console application), contain a different set of source files, custom variables, different build flags (for example: debug symbols -p; size optimization -Os; link time optimization -flto), and several other options.

Open Project->Properties… to access the main properties of the active project, HelloWorld. Most of the settings on the first tab, Project settings, are rarely changed. Title: allows the name of the project to be changed. If Platforms: is changed to something other than its default All, Code:Blocks will only allow the project to build on the selected targets. This is useful if, for example, the source code contains Windows API, and would therefore be invalid anywhere but Windows (or any other operating system specific situations). The Makefile: options are used only if the project should use a makefile instead of Code::Blocks’ internal build system (see Code::Blocks and Makefiles for further details).
Adding a new build target
Switch to the Build targets tab. Click Add to create a new build target and name it Release Small. The highlight in the left hand column should automatically switch to the new target (if not, click on it to change the focus). As the default setting for Type: — «GUI application» — is incorrect for the HelloWorld program, change it to «Console application» via the drop-down list. The output filename HelloWorld.exe is fine except in that it will cause the executable to be output in the main directory. Add the path «bin\ReleaseSmall\» (Windows) or «bin/ReleaseSmall/» (Linux) in front of it to change the directory (it is a relative path from the root of the project). The Execution working dir: refers to where the program will be executed when Run or Build and run are selected. The default setting «.» is fine (it refers to the project’s directory). The Objects output dir: needs to be changed to «obj\ReleaseSmall\» (Windows) or «obj/ReleaseSmall/» (Linux) in order to be consistent with the remainder of the project. The Build target files: currently has nothing selected. This is a problem, as nothing will be compiled if this target is built. Check all the boxes.
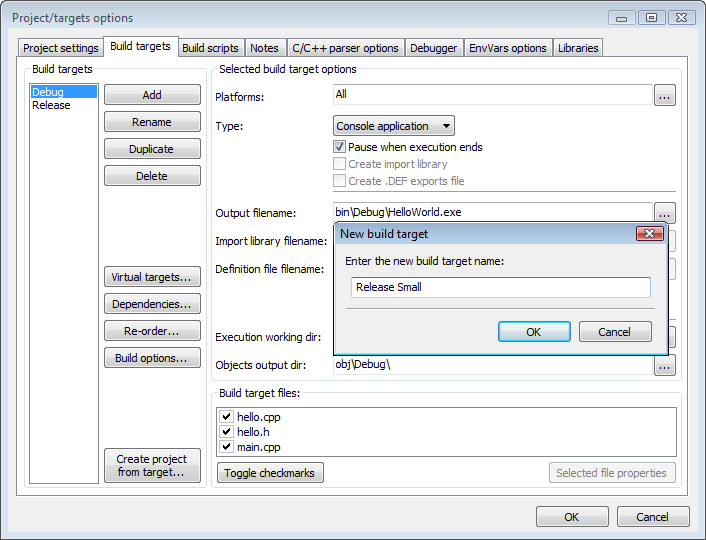
The next step is to change the target’s settings. Click Build options… to access the settings. The first tab the comes up has a series of compiler flags accessible through check boxes. Select «Strip all symbols from binary» and «Optimize generated code for size». The flags here contain many of the more common options, however, custom arguments may be passed. Switch to the Other options sub-tab and add the following switches.
-fno-rtti
-fno-exceptions
-ffunction-sections
-fdata-sections
-flto
Now switch to the Linker settings tab. The Link libraries: box provides a spot to add various libraries (for example, wxmsw28u for the Windows Unicode version of the wxWidgets monolithic dll). This program does not require any such libraries. The custom switches from the previous step require their link-time counterparts. Add
-flto
-Os
-Wl,--gc-sections
-shared-libgcc
-shared-libstdc++
Virtual Targets
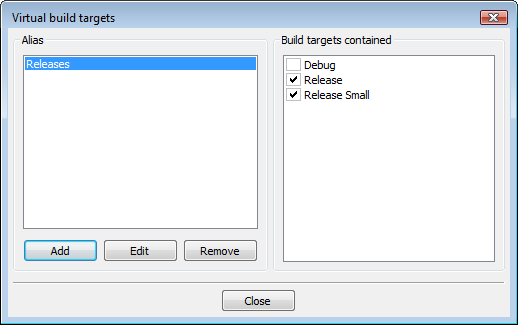
Click OK to accept these changes and return to the previous dialog. Now that there are two release builds, it will take two separate runs of Build or Build and run to compile both. Fortunately, Code::Blocks provides the option to chain multiple builds together. Click Virtual targets…, then Add. Name the virtual target Releases and click OK. In the right-hand Build targets contained box, select both Release and Release small. Close out of this box and hit OK on the main window.
The virtual target Releases will now be available from the Compiler Toolbar; building this should result in the following output.
General
Code::Blocks’ features can be extend by using plugins, most of them listed on this page. There are generally three types of plugins:
- Core plugins — developed and maintained by the core C::B team.
- Contrib plugins — developed and maintained by the community and proven to be very valuable. So they are integrated into the C::B SVN.
- 3rd party plugins — developed and maintained by the community but not (yet?) in the C::B repository. Theses plugins often have their own repository or are being posted (including the source code) in the forums.
If you are looking for plugins:
- Look in the official release. Notice that the installer / package manager might require you to enable some of the plugins specifically. So READ carefully.
- There might be information on the WiKi concerning other plugins on this page and here.
For Windows users, the default behavior of the current installer (10.05) does not install contrib plugins. You need to manually check the «contrib plugin» checkbox when asked for selected components to install. There is no way to install them manually afterwards.
If you are developing plugins:
Surely you can work with plugin as you like, but here are some suggestions:
Announce them in the plugin development board in the forums — including the (initial) source code at .
OR
Setup your own webpage (or use a file sharing platform) and post the link to the sources/binaries/svn access in the plugin development board in the forums at .
OR
Setup a repository, probably at BerliOS or SourceForge, post the link to the sources/binaries/svn access in the plugin development board in the forums at . Notice: This is very convenient as attachments in our forum might be deleted from time to time. So it is not safe to post source code in the forums.
THEN
- Enter the plugins description on this page.
- Announce the plugin here using this template.
The project wizard
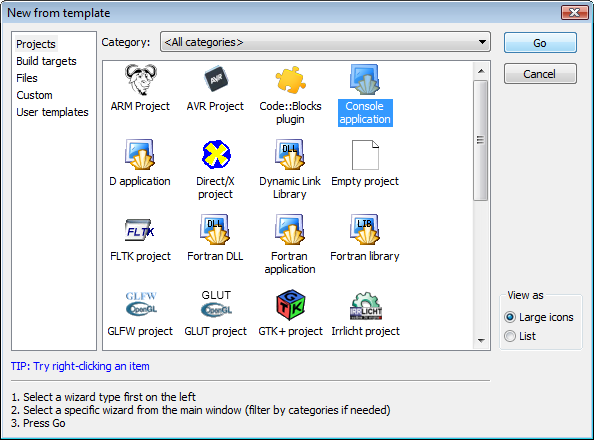
Launch the Project Wizard through File->New->Project… to start a new project. Here there are many pre-configured templates for various types of projects, including the option to create custom templates. Select Console application, as this is the most common for general purposes, an click Go.
Note: red text instead of black text below any of the icons signifies it is using a customized wizard script.
The console application wizard will appear next. Continue through the menus, selecting C++ when prompted for a language. In the next screen, give the project a name and type or select a destination folder. As seen below, Code::Blocks will generate the remaining entries from these two.
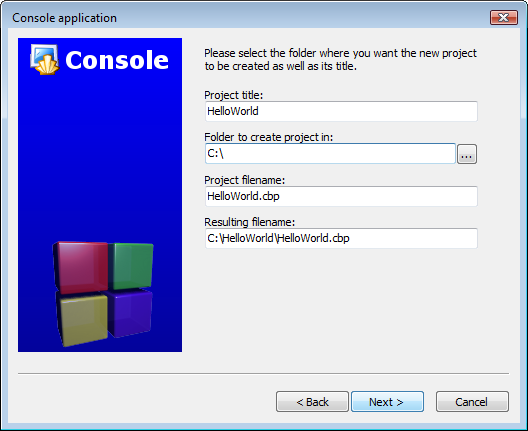
Finally, the wizard will ask if this project should use the default compiler (normally GCC) and the two default builds: Debug and Release. All of these settings are fine. Press finish and the project will be generated. The main window will turn gray, but that is not a problem, the source file needs only to be opened. In the Projects tab of the Management pane on the left expand the folders and double click on the source file main.cpp to open it in the editor.
This file contains the following standard code.
main.cpp
-
#include <iostream>
-
using namespace std;
-
int main()
-
{ -
cout << "Hello world!" << endl;
-
return ;
-
}
Changing file composition
A single source file is of little uses in programs of any useful complexity. In order to handle this, Code::Blocks has several very simple methods of adding additional files to the project.
Adding a blank file
In this example, we will be splitting the function
main.cpp
-
cout << "Hello world!" << endl;
into a separate file.
Note: it is generally improper programming style to create a function this small; it is done here to give a simple example.
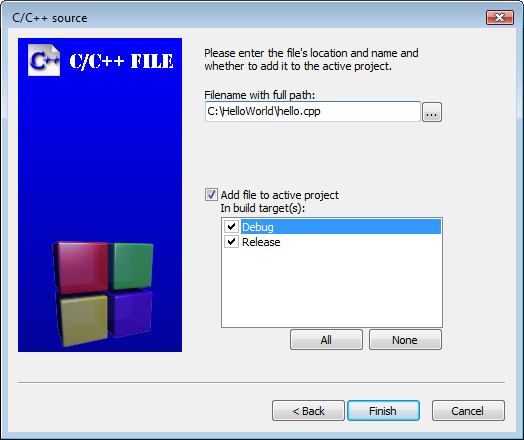
To add the new file to the project, bring up the file template wizard through either File->New->File… or Main Toolbar->New file (button)->File…

Select C/C++ source and click Go. Continue through the following dialogs very much like the original project creation, selecting C++ when prompted for a language. On the final page, you will be presented with several options. The first box will determine the new filename and location (as noted, the full path is required). You may optionally use the … button to bring up a file browser window to save the file’s location. Checking Add file to active project will store the filename in the Sources folder of the Projects tab of the Management panel. Checking any of the build targets will alert Code::Blocks that the file should be compiled and linked into the selected target(s). This can be useful if, for example, the file contains debug specific code, as it will allow the inclusion to (or exclusion from) the appropriate build target(s). In this example, however, the hello function is of key importance, and is required in each target, so select all the boxes and click Finish to generate the file.
The newly created file should open automatically; if it does not, open it by double clicking on its file in the Projects tab of the Management panel. Now add in code for the function main.cpp will call.
hello.cpp
-
#include <iostream>
-
using namespace std;
-
void hello()
-
{ -
cout << "Hello world!" << endl;
-
}
Adding a pre-existing file
Now that the function is in a separate file, the function must be declared for main.cpp to use it. Launch a plain text editor (for example Notepad or Gedit), and add the following code.
hello.h
-
#ifndef HELLO_H_INCLUDED
-
#define HELLO_H_INCLUDED
-
void hello();
-
#endif // HELLO_H_INCLUDED
Save this file as a header (hello.h) in the same directory as the other source files in this project. Back in Code::Blocks, click Project->Add files… to open a file browser. Here you may select one or multiple files (using combinations of Ctrl and Shift). (The option Project->Add files recursively… will search through all the subdirectories in the given folder, selecting the relevant files for inclusion.) Select hello.h, and click Open to bring up a dialog requesting to which build targets the file(s) should belong. For this example, select both targets.
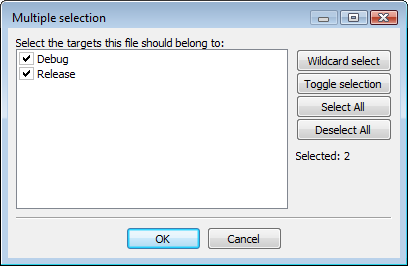
Note: if the current project has only one build target, this dialog will be skipped.
Returning to the main source (main.cpp) include the header file and replace the function to match the new setup of the project.
main.cpp
-
#include "hello.h"
-
int main()
-
{ -
hello();
-
return ;
-
}
Press Ctrl-F9, Build->Build, or Compiler Toolbar->Build (button — the gear) to compile the project. If the following output is generated in the build log (in the bottom panel) then all steps were followed correctly.
-------------- Build: Debug in HelloWorld ---------------
Compiling: main.cpp
Compiling: hello.cpp
Linking console executable: bin\Debug\HelloWorld.exe
Output size is 923.25 KBProcess terminated with status 0 (0 minutes, 0 seconds)0 errors, 0 warnings (0 minutes, 0 seconds)
The executable may now be run by either clicking the Run button or hitting Ctrl-F10.
Note: the option F9 (for build and run) combines these commands, and may be more useful in some situations.
See the build process of Code::Blocks for what occurs behind the scenes during a compile.
Removing a file
Using the above steps, add a new C++ source file, useless.cpp, to the project. Removing this unneeded file from the project is straightforward. Simply right-click on useless.cpp in the Projects tab of the Management pane and select Remove file from project.
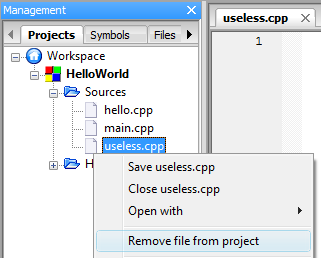
Note: removing a file from a project does not physically delete it; Code::Blocks only removes it from the project management.
Дополнительные настройки Code::Blocks
- По умолчанию при установке Code::Blocks на панели инструментов доступно большое количество тулбаров, которые зачастую не используются, но при этом загромождают интерфейс среды программирования. Поэтому желательно перейти в меню View -> Toolbars и оставить галочки только напротив пунктов Compiler и Main.
- Для того, чтобы консольное приложение не закрывалось сразу после вывода результатов работы, необходимо перейти в свойства проекта (нажать правой кнопкой на названии проекта и выбрать пункт Properties). Далее на вкладке Build targets установить галочку Pause when execution ends.
- Для включения поддержки стандартов 2011 и более поздних годов необходимо пройти в меню Settings -> Compiler… в раздел Global compiler settings и на вкладке Compiler settings выбрать первую вкладку compiler Flags и уже в ней отметить соответствующую галочку. Ниже показан пример для включения поддержки стандарта 2011 года.
- Для изменения размера шрифта в редакторе кода достаточно зажать кнопку Ctrl и вращением колеса прокрутки (скролла) установить комфортный размер шрифта. Точно также можно изменить размер шрифта в окне Log & others (окно с выводом логов и сообщений). Только следует учесть, что при следующей сборке настройки этого окна сбросятся. Для того, чтобы настройки окна логов и сообщений сохранялась необходимо перейти в меню Settings -> Environment… перейти в раздел View и там в окошке Message log’s font size установить комфортный размер шрифта.
Introduction and other things
And last, but not least, it’s not a tutorial about programming.
If you need something like that, please consider searching on the web. As a good hint, I will say www.cplusplus.com, which is my favorite site for searching C++’s easy to read
documentation. It has some tutorials too.
Be warned: I am using a nightly build of Code::Blocks, because they are not so hard to install, include many improvements, and are stable enough for use on a daily basis. At
least, stable enough for me.
So by using the official but old version of Code::Blocks (10.05: more than a year at the moment I am writing those lines).
It implies that some menus may have changed and you could have to search for something near my words, not exactly my words.
Remember: if you want to write programs, you will need to be able to learn by yourself. It’s more important than being able to use a technology, because all technologies can
evolve! (But I will try to be as accurate as I can).
At last, don’t hesitate to try something that is not specified here, I think doing is better than reading. We learn more with a fail, than with a success. If you mess up your Code::Blocks’ install, it’s not a problem, just remove configuration files and reinstall it. (configuration files are in you user directory. It means in «%UserProfile%» under windows and in «~/» for unix likes. Remember that they can be hidden, so it is possible you need to disable the hiding feature of your file manager.)
Mac OS X
The Mac OS X port efforts has began recently, but it should be a matter of time until these compilers will be supported:
Setting up compiler switches
Usually you need to tweak the compiler options to be able to compile C++ applications — that’s the stuff Xcode hides from your eyes, but you better should know. You need to point to the GNU compiler’s C/C++ include folders, to the GNU linkers libraries folder and a adjust the compiler options to setup the GNU compiler root path. Those path’s differ depending on what hardware (processor architecture) and what version of MacOS is used. For an Intel based Mac with MacOS 10.6.2 and Xcode v3.2.2 the following should work:
Compiler search directories («include» folders):
Linker search directories («library» folders):
Additional compiler flags:
Выберите стиль отступов
Так как язык Си — это язык свободной формы, то программист волен располагать текст программы как угодно. Компилятор всё равно ориентируется на точки с запятой в конце команды. Это породило целый ряд возможных стилей отступа. И CodeBlocks позволяет выбрать любой из самых популярных стилей.
Для этого войдите в меню «Настройки — Редактор — Средства форматирования»
Я рекомендую использовать Allman (ANSI), который наиболее удобен по целому ряду причин:
- Хорошо видно структуру программы.
- Легко искать парную фигурную скобку.
- Легко комментировать и убирать комментарии
Но, конечно же, если вы привыкли к другому стилю, то выбирайте его.


