Acunetix web vulnerability scanner 12.0.181218140 retail
Содержание:
- Activating your Acunetix Installation
- Acunetix Web Vulnerability Scanner review – Firewall.cx
- New web-based user interface
- Authorise Scanning Engine from Main Installation
- Installation on Linux
- The new features of Version 7 are:
- Partner Levels
- Scan Types
- In-depth analysis of JavaScript-rich sites and Single Page Applications
- Enabling Additional Scanning Technologies
- Acunetix AcuSensor Technology
- Installation on MacOS Mojave and MacOS Catalina
- Version 13 (build 13.0.200508159 – Windows and Linux) 11th May 2020
- The DeepScan Engine
- Notes:
- Issues With Vulnerability Monitoring
- Version 13 (Windows / Linux: 13.0.200807155, macOS: 13.0.200807156) 7th August 2020
- Closing Vulnerabilities
- Set excluded paths for your targets
- Install the Scanning Engines using /engineonly switch
- Filtering Vulnerabilities
- Acunetix VWS Version 7 documentation
Activating your Acunetix Installation
After the installation, Acunetix needs to be activated using your license key. This can be done by logging into Acunetix using the web UI, which by default is running on https://localhost:3443. You will immediately be directed to the User Profile page, where you will need to update your contact details. Insert your License key and proceed with product activation.
Enable the AcuMonitor Service
At this stage, you can also choose to register your installation with the AcuMonitor service. AcuMonitor is used to detect certain types of vulnerabilities, such Blind XSS, SSRF, XXE and other out of band vulnerabilities which can only be detected using an intermediary service. More information on AcuMonitor can be found at http://www.acunetix.com/vulnerability-scanner/acumonitor-blind-xss-detection/.
Note: Product activation requires a connection to the internet.

Acunetix Web Vulnerability Scanner review – Firewall.cx
Acunetix scored 90% in a review conducted by Sahir Hidayatullah at Firewall.cx. The reviewer states, “I truly enjoyed using this product. Web application auditing can be a tedious and time consuming nightmare, and the best praise I can give Acunetix is that they’ve made a product that makes me feel a part of the test. The interactivity and levels of detail available to you give you the ability to be laid back or tinker with everything you want, while the test is still going on. With its features and reasonable pricing for a consultant’s license, this product is unmatched and will quickly become one of the premier tools in your arsenal.”
New web-based user interface
The user interface has been re-designed with a fresh new look, bringing it inline with Acunetix On-Premises. The Acunetix Online UI is designed to make it easier for customers to use, by focusing on the core functionality of the product, introducing filtering options, and improving manageability of Targets.
- All lists can be filtered (Targets, Scans, Vulnerabilities and Reports).
- Increased configuration options (Excluded Hours, Excluded Paths, custom User Agent strings, client certificates and more).
- Pre-seed crawls using a list of URLs, Acunetix Sniffer Log, Fiddler SAZ files, Burp Suite saved and state files, and HTTP Archive (HAR) files.

Authorise Scanning Engine from Main Installation
All the Scanning Engine registration requests need to be authorised from the Main Installation. This ensures that the Main Installation administrator remains in control of all the Scan Engine registrations.
- From the Main Installation, change to Settings > Engines
- Here you will see all the Engines configured, including the ones which are pending Authorization.
- Select the Scan Engines which are pending Authorization, and click Authorize to confirm their Registration.
- The Status of the Scan Engine request will change to Online, and the version of the Scan Engine is updated.
- Back on the Scan Engine machine, the Scan Engine is now shown as Registered
Once this is done, any scans configured on the Main Installation will be distributed between the Scanning Engines configured.
Notes:
- The License on the Main Installation will be propagated to the Scanning Engine installations when the Scanning Engines are Authorized.
- The Scanning Engine on the Main Installation cannot be disabled.
- You can configure a Target to always be scanned using the same Scanning Engine. This can be done from the Target Settings > Advanced > Scanning Engine. Enable the setting, and choose the Scanning Engine to be used for this Target.
- The Acunetix Main Installation and the Acunetix Engines communicate over port 3443. Firewalls should be configured to allow these connections both ways.
Get the latest content on web security in your inbox each week.
THE AUTHOR
Installation on Linux
- Download the latest Linux version of Acunetix from the download location provided when you purchased the license.
- Open a Terminal Window
- Use chmod to add executable permissions on the installation fileE.g. chmod +x acunetix_13.0.200205121_x64.sh
- Run the installation
- E.g. sudo ./acunetix_13.0.200205121_x64.sh
- In case there are dependencies missing see the Notes section
- Review and accept the License Agreement.
- Configure the hostname which will be used to access the Acunetix UI
- Provide credentials for the Administrative user account. These will be used to access and configure Acunetix.
- Proceed with the installation.
The new features of Version 7 are:
- A new revolutionary and intelligent scanning engine
- Detection of a wide range of new web vulnerability types
- No more ‘brute force style’ vulnerability checks
- Consumes less bandwidth
- Less False Positives and False Negatives reported
- Website parameters are thoroughly analyzed to understand their purpose
- A Number of thorough checks are launched before vulnerabilities are reported
- Human like vulnerability verifying techniques
- Scriptable Vulnerabilities
- More flexible and advanced web security checks
- Easier to script own vulnerabilities
- Faster processing
- Consolidation of reported vulnerabilities
- Different variants of the same vulnerability are consolidated under one detailed report
- Presenting the problem to developers in a more precise and understandable way
- Facilitates prioritization and coordination of vulnerability remediation
- Advanced analysis of website presentation layer
- Less chances of breaking down a website because of a security scan
- Ability to automatically submit the correct data in web forms
- A whole variety of new vulnerability checks
- Stored SQL injection
- Stored File Inclusion
- Stored Directory Traversal
- Stored Code Execution
- Stored File Tampering
- More advanced WebDav auditing checks
- Automated form based authentication auditing (e.g. tests to check if credentials can be brute forced, for common username and passwords etc)
- Test for SQL Injection In URI
- New Scan Status Interface
- Graphical presentation of scan status
- Granular explanation of current running tasks
- Ability to capture more information at a glance
- Re-Scan capabilities
- Right click a reported vulnerability and relaunch the test
- No need to rerun a whole crawl and scan to verify fixes
- Saves time in verifying corrections
- Ability to specify label or tag instead of actual parameter name in input fields settings node
- Option to automatically randomize input for parameters specified in Input Fields settings node
- New well known web applications (e.g. WordPress) finger printing module
Partner Levels
The Acunetix Partner Program consists of the following levels based on cooperation type, commitment and achievements:
- Acunetix Advisor – This level applies to Technical and Sales Advisors who may be supporting customers in their purchasing decisions and who wish to be fully informed of ongoing developments at Acunetix. Acunetix Advisors that make a very reasonable minimum of one sale every 6 months are promoted to Acunetix Partner level with higher margins.
- Acunetix Partner – This is the starting level for new added-value partners in which they would familiarize themselves with Acunetix Vulnerability Scanner and the web security industry. As an Acunetix Partner you may request to be listed on our website upon your first sale(s) and will be granted access to cooperative marketing. Acunetix Partners that make regular sales and list the Acunetix logo and product information on their website may then be promoted to Acunetix Professional Partners, after discussing an Action and Sales Plan with their Partner Program account manager, the Sales Executive responsible for their region.
- Acunetix Professional Partner – Acunetix Professional Partners would have made regular sales and demonstrated a higher commitment to Acunetix. They would have agreed to an Action and Sales Plan with their Partner Program account manager. The Action Plan would include human resource development goals, and sales and marketing objectives. Benefits include website listing, higher margin, access to special training, events and cooperative marketing.
Scan Types
Acunetix installs with a default set of Scanning Profiles, which allow you to scan for specific types of vulnerabilities. If you need to be more granular in your scans, you can create your own custom scanning profiles which check for specific vulnerabilities. Proceed as follows:
- Click the «Add New Profile» button
- Provide a name for the profile.
- Select the vulnerabilities as needed.You can search for vulnerabilities using the search field. You can also click on the folder icons to expand the folders.
- Click Save when done.

Screenshot — Custom Scanning Profile
When starting a new scan, you can choose your custom scanning profiles in the Scan Type selection.
In-depth analysis of JavaScript-rich sites and Single Page Applications
London, UK – May 2018 – Acunetix, the pioneer in automated web application security software, has announced the release of version 12. This new version provides support for JavaScript ES7 to better analyse sites which rely heavily on JavaScript such as SPAs. This coupled with a new AcuSensor for Java web applications, sets Acunetix ahead of the curve in its ability to comprehensively and accurately scan all types of websites. With v12 also comes a brand new scanning engine, re-engineered and re-written from the ground up, making Acunetix the fastest scanning engine in the industry.
Support for latest JavaScript
Acunetix DeepScan and the Acunetix Login Sequence Recorder have been updated to support ECMAScript version 6 (ES6) and ECMAScript version 7 (ES7). This allows Acunetix to better analyse JavaScript-rich sites which make use of the latest JavaScript features. The modularity of the new Acunetix architecture also makes it much easier now for the technology to stay ahead of the industry curve.
AcuSensor for Java
Acunetix version 12 includes a new AcuSensor for Java web applications. This improves the coverage of the web site and the detection of web vulnerabilities, decreases false positives and provides more information on the vulnerabilities identified. While already supporting PHP and ASP .NET, the introduction of Java support in AcuSensor means that Acunetix coverage for interactive gray box scanning of web applications is now possibly the widest in the industry.

Speed and efficiency with Multi-Engine
Combining the fastest scanning engine with the ability to scan multiple sites at a time, in a multi-engine environment, allows users to scan thousands of sites in the least time possible. The Acunetix Multi-engine setup is suitable for Enterprise customers who need to scan more than 10 websites or web applications at the same time. This can be achieved by installing one Main Installation and multiple Scanning Engines, all managed from a central console.
Pause / Resume Feature
Acunetix Version 12 allows the user to pause a Scan and Resume the scan at a later stage. Acunetix will proceed with the scan from where it had left off. There is no need to save any scan state files or similiar – the information about the paused scan is automatically retained in Acunetix.

About Acunetix
User-friendly and competitively priced, Acunetix leads the market in automatic web security testing technology. Its industry leading crawler fully supports HTML5 and JavaScript and AJAX-heavy websites, allowing auditing of complex, authenticated applications. Acunetix provides the only technology on the market that can automatically detect out-of-band vulnerabilities and is available both as an online and on-premises solution. Acunetix also includes integrated vulnerability management features to extend the enterprise’s ability to comprehensively manage, prioritise and control vulnerability threats – ordered by business criticality.
Acunetix, the company
Founded in 2004 to combat the alarming rise in web application attacks, Acunetix is the market leader, and a pioneer in automated web application security technology. Acunetix products and technologies are depended on globally by individual pen-testers and consultants all the way to large organizations. It is the tool of choice for many customers in the Government, Military, Educational, Telecommunications, Banking, Finance, and E-Commerce sectors, including many Fortune 500 companies, such as the Pentagon, Harper Collins, Disney, Adobe and many more.
Get the latest content on web security in your inbox each week.
THE AUTHOR
Tamara NaudiMarketing Manager
Tamara started off her career with Acunetix in 2005. Since then she has witnessed the company grow into a leader in the web security sphere.
Enabling Additional Scanning Technologies
You can enable additional scanning tools to achieve a more thorough evaluation of your Targets.
Installing AcuSensor in your web application
If you need to scan a .NET, JAVA or PHP web application, you should install Acunetix AcuSensor on your web application in order to improve the detection of vulnerabilities, get the line in the source code where vulnerabilities are located and decrease false positives.
Installing Malware Scanning
Acunetix can work in conjunction with AntiVirus engines to check for malware on your site. The default engine used is the Windows Defender AntiVirus service, with ClamAV being a viable alternative.
Acunetix AcuSensor Technology
Acunetix’ unique AcuSensor Technology allows you to identify more vulnerabilities than other Web Application Scanners, whilst generating less false positives. Acunetix AcuSensor indicates exactly where in your code the vulnerability is and reports additional debug information.
The increased accuracy, available for PHP, .NET and JAVA web applications, is achieved by combining black box scanning techniques with feedback from sensors placed inside the source code. Black box scanning does not know how the application reacts and source code analyzers do not understand how the application will behave while it is being attacked. AcuSensor technology combines both techniques to achieve significantly better results than using source code analyzers and black box scanning independently.
AcuSensor can be installed in .NET, PHP and JAVA code transparently.
AcuSensor can be installed into pre-compiled .NET and JAVA assemblies, even if they are signed (strong-named), therefore, neither .NET or JAVA source code, nor a compiler (or any other dependencies) are required. In case of PHP web applications, the source is readily available. To date, Acunetix is the only web vulnerability security solution to implement this technology.
Advantages of using AcuSensor Technology
- Allows you to locate and fix the vulnerability faster because of the ability to provide more information about the vulnerability, such as source code line number, stack trace, affected SQL query, etc.
- Significantly reduces false positives when scanning a website because it understands the behavior of the web application better.
- Alerts you to web application configuration problems which can result in a security misconfiguration, or expose sensitive information. E.g. If ‘custom errors’ are enabled in .NET, this could expose sensitive application details to a malicious user.
- Advises you how to better secure your web server settings, e.g. if write access is enabled on the web server.
- Detects more SQL injection vulnerabilities. Previously SQL injection vulnerabilities could only be found if database errors were reported, whereas now the source code can be analyzed for improved detection.
- Ability to detect SQL injection vulnerabilities in all SQL statements, including in SQL INSERT statements. Using a black box scanner such SQL injection vulnerabilities cannot be found. This significantly increases the ability for Acunetix to find vulnerabilities.
- Scans run using AcuSensor run a back-end crawl, presenting all files accessible through the web server to the scanner; even if these files are not linked through the front-end application. This ensures 100% coverage of the application, and alerts users of any backdoor files that might have been maliciously uploaded by an attacker.
- AcuSensor Technology is able to intercept all web application inputs and build a comprehensive list with all possible inputs in the website and test them.
- Ability to test for arbitrary file creation and deletion vulnerabilities. E.g. Through a vulnerable script a malicious user can create a file in the web application directory and execute it to have privileged access, or delete sensitive web application files.
Installation on MacOS Mojave and MacOS Catalina
- Download the latest MacOS version of Acunetix from the download location provided when you purchased the license.
- Double click the installation PKG file to launch the Acunetix installation wizard, and click «Continue» when prompted.
- Review and accept the License Agreement.
- You may be prompted for your MacOS password to complete parts of the installation.
- Provide credentials for the Acunetix Administrative user account. These will be used to access and configure Acunetix.
- Configure how the Acunetix Web UI is accessed, and click «Continue» to start the installation.
- Setup will now copy all files and install the Acunetix services; when the installation is completed, the default browser will be launched to allow access to the Acunetix UI, and the «Continue» button will become enabled in the installer.
- Click «Close» to exit the installer.
Version 13 (build 13.0.200508159 – Windows and Linux) 11th May 2020
New Features
- Business Logic Recorder – used to record logic used in multi-step forms
- Export to Citrix WAF
- Support for Azure DevOps Services issue tracker
- CVSS3.1 score for most Acunetix vulnerabilities
- Targets can now be exported to CSV
- New Graph in Dashboard showing Average vulnerabilities per Target
New Vulnerability Checks
- New check for Server-Side Template Injection (SSTI) in ASP.NET Razor
- New check for Oracle BI AMF Deserialization RCE (CVE-2020-2950)
- New check for Possible Cross Site Scripting via jquery.htmlPrefilter() (CVE-2020-11023)
- New check for Stored XSS in WP theme Onetone (CVE-2019-17230 and CVE-2019-17231)
- Updated detection of phpinfo pages
- New checks in WordPress Core and WordPress plugins
- New checks for default credentials in over 65 web applications
Updates
- Manual Intervention (used for CAPTCHAs, OTP etc) is now using the integrated (web-based) LSR
- As a result of the previous update, Manual Intervention is now available on Linux
- Improved error reporting for network scans aborted due to network errors
- Vulnerability alerts updated to show important information at the top
- Updated Github issue tracker to support Personal Access Token (PAT) authentication
- Improved reporting of Paused scans in the UI
- Improved UI message user triggers a scan which is not allowed due to Manual Intervention
- API documentation can now be downloaded from within the Acunetix UI
- Added support for popup windows in the Login Sequence Recorder
- Improved handling of large import files
- Improved handling large requests / responses generated from import files
- Decreased false positives reported for Possible username or password disclosure
- Truncated large vulnerability alerts when sending to Jira issue tracker
Fixes
- Fixed incorrect from email address used for monthly update emails
- Fixed AcuMonitor UI notification to link to corresponding vulnerability
- Fixed issue causing vulnerability checks to not be able to send empty values
- Fixed a number of crashes
- Fixed issue causing ASP.NET sites to be processed as ASP sites
- Fixed 2 issues caused when using Swagger import files
- Improved handling of txt import files using incorrect import format
- Fixed Session Fixation false positive
- Fixed UI issue when configuring Custom Cookies
- Trend charts where not being updated for user accounts
- Fixed issue in excluded hours
- Fixed “Client Certificate Not Set” message incorrectly being reported
The DeepScan Engine
Web applications are evolving to put more functionality on the client side, as evidenced by the rise of single-page applications (SPAs) that rely heavily on HTML5 and JavaScript. Most scanners fall short in properly interacting with and crawling SPAs. If a web application vulnerability scanner cannot perform comprehensive crawling and vulnerability assessment, that means you miss out on vulnerabilities that a sophisticated and patient attacker will take the time to find.
Acunetix security researchers have developed a way to crawl the full range of tags, attributes and events in modern SPAs, and this research has been put into action with the DeepScan engine.
Notes:
SeLinux on Centos 8 or RedHat 8
SeLinux needs to be disabled if you are installing Acunetix on Centos 8 or RedHat 8.
To disable SeLinux temporarily, open a Terminal window and run the following:
sudo setenforce 0
To disable SeLinux permanently:
- open a Terminal window
- run the command «sudo nano /etc/selinux/config»
- find the line that sets the «SELINUX» parameter and change the line to read «SELINUX=disabled»
- save the amended «/etc/selinux/config» file
- reboot the machine
Installing on Linux without GUI
The following need to be installed if you are installing Acunetix on Linux where the Linux GUI is not installed.
- On Ubuntu Server:sudo apt-get install libxdamage1 libgtk-3-0 libasound2 libnss3 libxss1 libx11-xcb1
- On Suse Linux Enterprise Server or OpenSUSE Leap:sudo zypper install libXdamage1 libgtk-3-0 libasound2 mozilla-nss libX11-xcb1 libXss1
- On Red Hat Enterprise Linux 8 or Centos 8:
sudo dnf update
sudo dnf install libX11 libX11-devel gtk3 nss libXScrnSaver alsa-lib bzip2
Issues With Vulnerability Monitoring
Vulnerability scanning tools are helpful, but it’s important to know running these programs has the potential to cause issues on your network. For instance, scanners intrude on the running code of target devices, which can lead to errors or reboots. On some networks, scanners take up bandwidth and can cause general performance issues. For this reason, admins may prefer to run scans during off-hours to minimize employee impact. In fact, some scanners are built to minimize this impact. For example, some programs incorporate endpoint agents to push information to the platform, rather than allowing the platform to pull information during the scheduled scan.
Another option is to use adaptive scanning, which detects changes to the network, like an added device and scans that new system immediately. This allows for piecemeal scanning rather than a slower, complete scan.
While there are many types of security software tools on the market, using vulnerability scanning software is a critical first step toward protecting your network while relieving some of the manual VM burdens. Check out a tool like Network Configuration Manager as an all-in-one solution to save time and better manage your vulnerability detection strategy.
Version 13 (Windows / Linux: 13.0.200807155, macOS: 13.0.200807156) 7th August 2020
New Vulnerability Checks
- New check for Insecure Inline Frames
- New check for Remote code execution of user-provided local names in Rails
- New check for SAP NetWeaver RECON auth bypass vulnerability
- New check for H2 console publicly accessible
- New check for PHP version disclosure
- New check for Atlassian JIRA ServiceDesk misconfiguration
- New test for Jolokia XML External Entity (XXE) vulnerability
- New checks for WordPress core, WordPress themes, WordPress plugins, Joomla and Drupal
Updates
- Created and Last Updated dates are available for vulnerabilities
- Order of section in Comparison report updated to be more intuitive
- Target Address is shown in full in the UI
- /users/ endpoint is now available in the API
Fixes
- Fixed issue when exporting vulnerabilities to WAF which contained CVSS3.1
- Fixed issue causing custom user-agent to not be used in all requests during a scan
- Fixed issues causing some vulnerabilities not to be well formatted when sent to JIRA issue tracker
- Fixed issue when adding JIRA Issue Tracker in Acunetix Online
- Fixed issue caused when adding Targets to an existing Target Group
- Minor fix in Comprehensive report text
- Fixed UI issue showing blank list (Scans, Targets etc) when using the browser’s back button
- Fixed issue caused by scanning Targets with complex GraphQL schemas
Closing Vulnerabilities
Vulnerabilities detected by Acunetix remain in the vulnerabilities list until they are marked as not open. You can remove vulnerabilities from the list of open vulnerabilities by marking them as:
Fixed — This status is given to vulnerabilities that are fixed by the developers. If the vulnerability is found again by Acunetix, the vulnerability will be reopened, and marked as Rediscovered.
False Positive — There are situations where a vulnerability is incorrectly detected by Acunetix. The vulnerability will not be reported again in future scans.
Ignored — This status can be used for vulnerabilities which are not False Positives, but which for some reason should be ignored in future scans.
Vulnerabilities marked as False Positives or Ignored can be re-opened manually at any time.
Set excluded paths for your targets
If there are any paths or files that you do not wish to scan, you can set exclusions by following these steps:
- Navigate to ‘Targets’ from the navigation menu
- Click on your target to edit it
- Navigate to the ‘Crawl’ tab
- From the ‘Excluded Paths’ field, enter exclusions for any paths or files and click ‘Add’. The exclusions can be set using regular expressions, wildcards, and also normal strings
- Click the ‘Save’ button when done

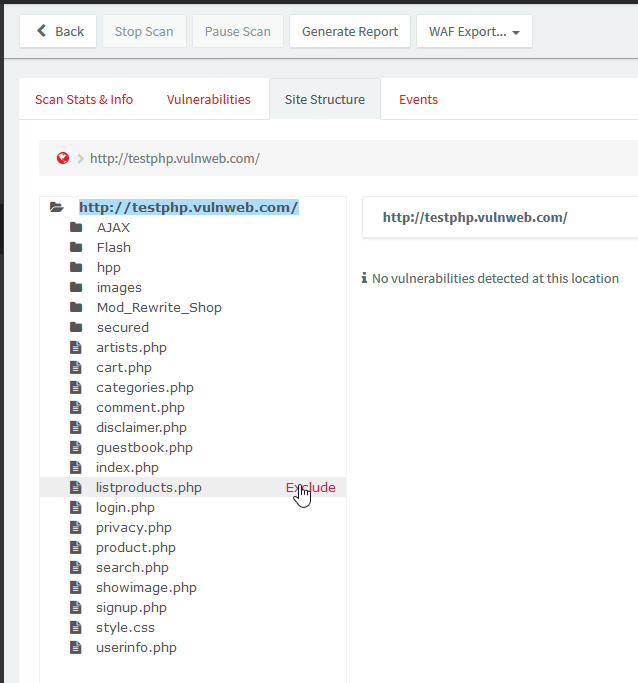
Paths can also be excluded from the Site Structure identified during a previous scan. This can be done as follows:
- Navigate to ‘Scans’ from the navigation menu
- Click on a scan for the Target for which you want to configure exclusions
- Navigate to the ‘Site Structure’ tab
- Hover the mouse over the Site Strcutre, and click on the ‘Exclude’ option to automatically configure exclusion for the specific path.
- The exclusions will be configured in the Target’s settings
Install the Scanning Engines using /engineonly switch
The only function of the Acunetix Scanning Engine installations is to perform scans when requested from the Main Installation. The Acunetix Engine configuration is only used to register the engine with the Main installation. Proceed as follows to install an Acunetix Scanning Engine:
- Copy the Acunetix installation to the machine. The same installation file will be used to install the Scanning Engine.
- From command prompt, run the installation with the switch. (If installing the engine on Linux, use )
- This will start the installation of the Acunetix Scanning Engine
- Proceed with the installation. Once again, you will need to enable “Allow remote access to Acunetix”, and specify a Server Name that is accessible from the Acunetix Main Installation.
- Proceed and finish the installation.
Filtering Vulnerabilities
As the amount of vulnerabilities detected increases, the list of vulnerabilities can become cumbersome to manage. For this reason, the vulnerabilities can be filtered.
Vulnerabilities can be filtered by Confidence, Business Criticality, Target Group, Severity, Status, and Target. The list allows for multiple flexible filters, e.g. show all the high severity Vulnerabilities, identified on a specific Target, which are still open.

Screenshot — Filtered vulnerabilities
Import vulnerabilities into your Web Application Firewall (WAF)
Ideally, vulnerabilities are fixed as soon as possible. Unfortunately, it often takes months to fix a vulnerability. If you make use of a Web Application Firewall (WAF) supported by Acunetix, you can export vulnerabilities from Acunetix and import them into your WAF. Your WAF will be able to provide virtual patching for the vulnerability.
Acunetix supports exporting vulnerabilities for F5 BIG-IP ASM, Fortinet FortiWeb, Imperva SecureSphere WAF, and to a Generic XML file.

Acunetix VWS Version 7 documentation
The Acunetix WVS Version 7 user manual is available in PDF Format.
With the introduction of scripting, a Getting Started guide / SDK is available to help you understand how the new vulnerability checks are implemented in Acunetix WVS, and to help you write your own scripts / security checks. We also developed a new tool, ‘WVS Scripting’, to help you writing your own scripts and testing them. You can download the documentation and tool from the following location; https://www.acunetix.com/download/tools/WVSSDK.zip.
At a later stage, a more detailed SDK and ‘WVS Scripting’ tool documentation will also be released.
Get the latest content on web security in your inbox each week.
THE AUTHOR
Acunetix
Acunetix developers and tech agents regularly contribute to the blog. All the Acunetix developers come with years of experience in the web security sphere.


